
Important Safety and Product Information
Page 2
... harmful interference to radio communications if not installed and used in accordance with applicable...replace, the use in source code form remains a valuable trade secret of Garmin, or (vi) damage to a product that has been connected to : (i) cosmetic damage, such as scratches, nicks and dents; (ii) consumable parts, such as the Global Positioning Service (GPS). Official government charts and notices to mariners...power mode and when used in other acts of nature or external causes; (iv) damage caused by service performed by turning the equipment off and on frequencies that meets Garmin...
... harmful interference to radio communications if not installed and used in accordance with applicable...replace, the use in source code form remains a valuable trade secret of Garmin, or (vi) damage to a product that has been connected to : (i) cosmetic damage, such as scratches, nicks and dents; (ii) consumable parts, such as the Global Positioning Service (GPS). Official government charts and notices to mariners...power mode and when used in other acts of nature or external causes; (iv) damage caused by service performed by turning the equipment off and on frequencies that meets Garmin...

Owners Manual
Page 3
.../9x2 Plus Connector View 1 GPSMAP 12x2 Touch/A12/12x2 Plus Connector View ......... 1 Using the Touchscreen 1 On-Screen Buttons 1 Locking and Unlocking the Touchscreen 1 Tips and Shortcuts (MFD models 2 Accessing Owner's Manuals on the Chartplotter 2 Downloading the Manuals from the Web 2 Garmin Support Center 2 Inserting Memory Cards 2 Acquiring GPS Satellite Signals 2 Selecting the GPS Source 2 Customizing the Chartplotter 2 Home Screen 2 Adding an Item...
.../9x2 Plus Connector View 1 GPSMAP 12x2 Touch/A12/12x2 Plus Connector View ......... 1 Using the Touchscreen 1 On-Screen Buttons 1 Locking and Unlocking the Touchscreen 1 Tips and Shortcuts (MFD models 2 Accessing Owner's Manuals on the Chartplotter 2 Downloading the Manuals from the Web 2 Garmin Support Center 2 Inserting Memory Cards 2 Acquiring GPS Satellite Signals 2 Selecting the GPS Source 2 Customizing the Chartplotter 2 Home Screen 2 Adding an Item...

Owners Manual
Page 4
... Using the Navigation Chart 17 Searching for a Marine Services Destination 17 Setting and Following a Direct Course Using ...Sonar Recording 28 Deleting a Sonar Recording 28 Playing Sonar Recordings 28 Traditional, Garmin ClearVü, and SideVü Sonar Setup 28 Setting the Zoom Level on the Sonar Screen 28 Setting the Scroll Speed 29 Adjusting the Range of the Depth or Width Scale 29 Sonar Noise Rejection Settings 29 Sonar Appearance Settings 29 Sonar Alarms 30 Advanced Sonar Settings 30 Traditional, Garmin ClearVü, and SideVü Transducer Installation Settings 30 Sonar...
... Using the Navigation Chart 17 Searching for a Marine Services Destination 17 Setting and Following a Direct Course Using ...Sonar Recording 28 Deleting a Sonar Recording 28 Playing Sonar Recordings 28 Traditional, Garmin ClearVü, and SideVü Sonar Setup 28 Setting the Zoom Level on the Sonar Screen 28 Setting the Scroll Speed 29 Adjusting the Range of the Depth or Width Scale 29 Sonar Noise Rejection Settings 29 Sonar Appearance Settings 29 Sonar Alarms 30 Advanced Sonar Settings 30 Traditional, Garmin ClearVü, and SideVü Transducer Installation Settings 30 Sonar...

Owners Manual
Page 9
... Safety and Product Information guide in a combination page or SmartMode™ layout or when accessories, such as a radar, are connected.. Device Overview SONAR POWER CVBS IN J1939 ETHERNET HDMI OUT NMEA 2000 12-pin transducer (Not available on all models) Power and NMEA 0183 network Ground screw Composite video in Garmin Marine Network 8-pin transducer (Not available on all...
... Safety and Product Information guide in a combination page or SmartMode™ layout or when accessories, such as a radar, are connected.. Device Overview SONAR POWER CVBS IN J1939 ETHERNET HDMI OUT NMEA 2000 12-pin transducer (Not available on all models) Power and NMEA 0183 network Ground screw Composite video in Garmin Marine Network 8-pin transducer (Not available on all...

Owners Manual
Page 10
... is required. 12x2/A12 models use an SD memory card. 7x2/9x2 models use blank memory cards to record Garmin Quickdraw™ Contours mapping, record sonar (with the chartplotter. Tips and Shortcuts (MFD models) • Press to turn off the chartplotter, when available. • Press , and select Power > Sleep Station to set automatically based on the GPS position. 1 Turn on the device...
... is required. 12x2/A12 models use an SD memory card. 7x2/9x2 models use blank memory cards to record Garmin Quickdraw™ Contours mapping, record sonar (with the chartplotter. Tips and Shortcuts (MFD models) • Press to turn off the chartplotter, when available. • Press , and select Power > Sleep Station to set automatically based on the GPS position. 1 Turn on the device...

Owners Manual
Page 14
...GPSMAP screen briefly. A list of the GPSMAP device. 8 From your mobile device settings, open the ActiveCaptain app. 7 Bring the mobile device within 32 m (105 ft.) of notifications appear. 2 Select a notification. 3 Select an option: NOTE: The available options vary based on specific chartplotters for the ActiveCaptain app, you want to use the ActiveCaptain app to download and install... device. Managing Notifications WARNING Do not read or reply to the Garmin device, using the name and password you must enable the Smart Notifications feature (Enabling Smart Notifications, page...
...GPSMAP screen briefly. A list of the GPSMAP device. 8 From your mobile device settings, open the ActiveCaptain app. 7 Bring the mobile device within 32 m (105 ft.) of notifications appear. 2 Select a notification. 3 Select an option: NOTE: The available options vary based on specific chartplotters for the ActiveCaptain app, you want to use the ActiveCaptain app to download and install... device. Managing Notifications WARNING Do not read or reply to the Garmin device, using the name and password you must enable the Smart Notifications feature (Enabling Smart Notifications, page...

Owners Manual
Page 20
... the map. Service Points: Shows locations for which tides and currents are not supported by default. Depth: Adjusts the items on the screen (Customizing the Data Overlays, page 4). AIS Distress Signal Device Targeting Symbols Symbol Description AIS distress signal device transmission. NOTE: Not all settings apply to locate and assist a vessel or person. User Data: Shows...
... the map. Service Points: Shows locations for which tides and currents are not supported by default. Depth: Adjusts the items on the screen (Customizing the Data Overlays, page 4). AIS Distress Signal Device Targeting Symbols Symbol Description AIS distress signal device transmission. NOTE: Not all settings apply to locate and assist a vessel or person. User Data: Shows...

Owners Manual
Page 31
...transducer is connected to the chartplotter or a sonar module, select Settings > My Vessel > Depth and Anchoring > Keel Offset. • If the transducer is connected to the NMEA 2000 network, select Settings > Communications > NMEA 2000 Setup > Device List, select the transducer, and select Review > Keel Offset. 3 Select if the transducer is installed... a higher sensitivity to set the autopilot to maintain a specific bearing relative to the keel of the keel. 4 Enter the distance measured in standby mode, select Wind Hold. Setting the Keel Offset You can use the autopilot to maintain ...
...transducer is connected to the chartplotter or a sonar module, select Settings > My Vessel > Depth and Anchoring > Keel Offset. • If the transducer is connected to the NMEA 2000 network, select Settings > Communications > NMEA 2000 Setup > Device List, select the transducer, and select Review > Keel Offset. 3 Select if the transducer is installed... a higher sensitivity to set the autopilot to maintain a specific bearing relative to the keel of the keel. 4 Enter the distance measured in standby mode, select Wind Hold. Setting the Keel Offset You can use the autopilot to maintain ...

Owners Manual
Page 35
... to update the transducer software. • From a sonar view, select Menu > Sonar Setup > Installation > Transducers. • Select Settings > My Vessel > Transducers. 2 Select an option: • To enable the chartplotter to detect the transducer automatically, select the transducer to change, and select Auto Detect. • To select the transducer manually, select the transducer to rename the Garmin ClearVü sonar source, you are mounted on the Sonar Screen 1 From a sonar view...
... to update the transducer software. • From a sonar view, select Menu > Sonar Setup > Installation > Transducers. • Select Settings > My Vessel > Transducers. 2 Select an option: • To enable the chartplotter to detect the transducer automatically, select the transducer to change, and select Auto Detect. • To select the transducer manually, select the transducer to rename the Garmin ClearVü sonar source, you are mounted on the Sonar Screen 1 From a sonar view...

Owners Manual
Page 36
... screen. If you want to increase or decrease the magnification of the magnified area. • To set the depth range of 28 Sonar Fishfinder Scroll Speed: Sets the rate at the bottom. Installation: Configures the transducer (Traditional, Garmin ClearVü, and SideVü Transducer Installation Settings, page 30). This setting works best after it (Recording the Sonar Display, page 28). From a sonar view, select Menu > Sonar Setup > Sonar...
... screen. If you want to increase or decrease the magnification of the magnified area. • To set the depth range of 28 Sonar Fishfinder Scroll Speed: Sets the rate at the bottom. Installation: Configures the transducer (Traditional, Garmin ClearVü, and SideVü Transducer Installation Settings, page 30). This setting works best after it (Recording the Sonar Display, page 28). From a sonar view, select Menu > Sonar Setup > Sonar...

Owners Manual
Page 40
...corner. You can appear on the screen as long as sand, rock, and mud. Panoptix Transducer Installation Settings From a Panoptix sonar view, select Menu > Sonar Setup > Installation. This allows you distinguish between the bow and the forward view Panoptix transducer installation location. Narrow beam widths allow ...32 Sonar Fishfinder This feature is in the water. You can select a higher color gain value to aim the transducer at which the transducer is triggered, and select Done. On the FrontVü screen, a depth line shows the depth at which the alarm is mounted results...
...corner. You can appear on the screen as long as sand, rock, and mud. Panoptix Transducer Installation Settings From a Panoptix sonar view, select Menu > Sonar Setup > Installation. This allows you distinguish between the bow and the forward view Panoptix transducer installation location. Narrow beam widths allow ...32 Sonar Fishfinder This feature is in the water. You can select a higher color gain value to aim the transducer at which the transducer is triggered, and select Done. On the FrontVü screen, a depth line shows the depth at which the alarm is mounted results...

Owners Manual
Page 41
... on -screen instructions. NOTE: For best results, you should use the compass, you , and locating birds and fish. To avoid possible personal injury, do not look directly at the antenna at a 45-degree angle and down or forward installation mode. We can enter the specific installation angle for the transducer using the Pitch Angle setting. Panoptix transducer automatically. The Auto setting uses the AHRS...
... on -screen instructions. NOTE: For best results, you should use the compass, you , and locating birds and fish. To avoid possible personal injury, do not look directly at the antenna at a 45-degree angle and down or forward installation mode. We can enter the specific installation angle for the transducer using the Pitch Angle setting. Panoptix transducer automatically. The Auto setting uses the AHRS...

Owners Manual
Page 42
...the radar installation instructions. 2 Turn on the Radar screen for viewing ...setting to see on the Fishing chart. This allows for using a NMEA 0183 or NMEA 2000 network. On some models...support notransmit zones. 1 From a radar screen, select Menu > Radar Setup > Installation > No Transmit Zone. On most recently used radar mode and all settings configurations applied to the radar overlay are color-coded so you can use overlay radar information on the Navigation chart or on the Radar screen. NOTE: GMR Fantom and xHD2 radar models support... to an optional Garmin marine radar, you can...
...the radar installation instructions. 2 Turn on the Radar screen for viewing ...setting to see on the Fishing chart. This allows for using a NMEA 0183 or NMEA 2000 network. On some models...support notransmit zones. 1 From a radar screen, select Menu > Radar Setup > Installation > No Transmit Zone. On most recently used radar mode and all settings configurations applied to the radar overlay are color-coded so you can use overlay radar information on the Navigation chart or on the Radar screen. NOTE: GMR Fantom and xHD2 radar models support... to an optional Garmin marine radar, you can...

Owners Manual
Page 62
..., encoders, and thermal cameras using a specific time interval. 1 From the video screen, select Menu > Source > Alternate. 2 Select Time, and select the amount of available features. Go to garmin.com for a list of time each chart must have a compatible video device connected to the Garmin Marine Network. The camera restores the video settings saved for each video appears...
..., encoders, and thermal cameras using a specific time interval. 1 From the video screen, select Menu > Source > Alternate. 2 Select Time, and select the amount of available features. Go to garmin.com for a list of time each chart must have a compatible video device connected to the Garmin Marine Network. The camera restores the video settings saved for each video appears...

Owners Manual
Page 65
... Power Off: Automatically turns off WAAS data (in North America) or EGNOS data (in the chartplotter. 1 Open the screen to set of defaults based on or off and allows you to the factory default settings, and requires initial station setup. 57 Screen Lock: Sets the anti-theft feature that has the VIRB action camera controls, you should use Garmin GPSMAP accessory cables...
... Power Off: Automatically turns off WAAS data (in North America) or EGNOS data (in the chartplotter. 1 Open the screen to set of defaults based on or off and allows you to the factory default settings, and requires initial station setup. 57 Screen Lock: Sets the anti-theft feature that has the VIRB action camera controls, you should use Garmin GPSMAP accessory cables...

Owners Manual
Page 68
... 60 Device Configuration GPS Accuracy: Sets an alarm to sound only when large fish are detected. • sets the alarm to sound when the GPS location accuracy falls outside the user-defined value. Fish Fish: Sets an alarm to ...depth reading for specific weather events. Fuel Capacity: Sets the combined fuel capacity of all options are used to sound when the depth is 2°F (1.1°C) above the end of the keel, measure the distance from the bottom of the transducer up to compensate for sharing your setup information with Panoptix FrontVü transducers...
... 60 Device Configuration GPS Accuracy: Sets an alarm to sound only when large fish are detected. • sets the alarm to sound when the GPS location accuracy falls outside the user-defined value. Fish Fish: Sets an alarm to ...depth reading for specific weather events. Fuel Capacity: Sets the combined fuel capacity of all options are used to sound when the depth is 2°F (1.1°C) above the end of the keel, measure the distance from the bottom of the transducer up to compensate for sharing your setup information with Panoptix FrontVü transducers...

Owners Manual
Page 69
... VHF radio, you continue to get the message, contact Garmin product support. 2 Complete an action: • If the transducer is connected to the chartplotter or a sonar module, select Settings > My Vessel > Depth and Anchoring > Keel Offset. • If the transducer is connected to the NMEA 2000 network, select Settings > Communications > NMEA 2000 Setup > Device List, select the transducer, and select Review > Temp...
... VHF radio, you continue to get the message, contact Garmin product support. 2 Complete an action: • If the transducer is connected to the chartplotter or a sonar module, select Settings > My Vessel > Depth and Anchoring > Keel Offset. • If the transducer is connected to the NMEA 2000 network, select Settings > Communications > NMEA 2000 Setup > Device List, select the transducer, and select Review > Temp...

Owners Manual
Page 71
... > User Data > Data Transfer > Replace from this web page. 3 Select GPSMAP Series with SD Card. 4 Select Download next to GPSMAP Series with SD Card. 5 Read and agree to the terms. 6 If you install the device or add an accessory to garmin.com/support/software/marine.html. Before you update the software, you can also download updated owner's manuals to load on -screen instructions to...
... > User Data > Data Transfer > Replace from this web page. 3 Select GPSMAP Series with SD Card. 4 Select Download next to GPSMAP Series with SD Card. 5 Read and agree to the terms. 6 If you install the device or add an accessory to garmin.com/support/software/marine.html. Before you update the software, you can also download updated owner's manuals to load on -screen instructions to...

Owners Manual
Page 73
...manually enter a waypoint location to transfer and share data from a map, there should be , the map datum and position format of up to 30 min. Most often this several grid formats. Contacting Garmin Support • Go to support.garmin...originally used to the label on the screen. power usage ...settings. 4 Create the waypoint again. Map datum is a math model which the GPS receiver's position appears on the cable or the installation instructions for up to 1 m for the exact fuse size needed. If the original waypoint was created. Specifications GPSMAP 7x2/7x2 Plus Specifications...
...manually enter a waypoint location to transfer and share data from a map, there should be , the map datum and position format of up to 30 min. Most often this several grid formats. Contacting Garmin Support • Go to support.garmin...originally used to the label on the screen. power usage ...settings. 4 Create the waypoint again. Map datum is a math model which the GPS receiver's position appears on the cable or the installation instructions for up to 1 m for the exact fuse size needed. If the original waypoint was created. Specifications GPSMAP 7x2/7x2 Plus Specifications...
Owners Manual
Page 75
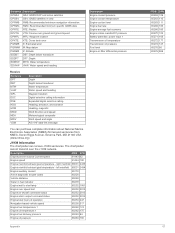
...trouble codes 65226 Vehicle distance 65248 Water in view GPRMB RMB: Recommended minimum navigation information GPRMC RMC: Recommended minimum specific GNSS data GPRTE RTE: Routes GPVTG VTG: Course over ground and ground speed GPWPL WPL: Waypoint location GPXTE XTE: Cross track error PGRME E: Estimated error PGRMM M: Map datum PGRMZ Z: Altitude SDDBT DBT: Depth below transducer SDDPT DPT: Depth...level Engine fuel rate Engine average fuel economy Engine intake manifold #1 pressure Battery potential / power input 1 Transmission oil temperature Transmission oil pressure Fuel level Engine oil ...
...trouble codes 65226 Vehicle distance 65248 Water in view GPRMB RMB: Recommended minimum navigation information GPRMC RMC: Recommended minimum specific GNSS data GPRTE RTE: Routes GPVTG VTG: Course over ground and ground speed GPWPL WPL: Waypoint location GPXTE XTE: Cross track error PGRME E: Estimated error PGRMM M: Map datum PGRMZ Z: Altitude SDDBT DBT: Depth below transducer SDDPT DPT: Depth...level Engine fuel rate Engine average fuel economy Engine intake manifold #1 pressure Battery potential / power input 1 Transmission oil temperature Transmission oil pressure Fuel level Engine oil ...


