?Declaration of Conformity
Page 1
Issued: 16/10/2015 Revised: Page: 1 of 1 DECLARATION of CONFORMITY Application of Equipment: Model Number(s): GARMIN International & 1200 E. 151st Street Olathe, Kansas 66062 U.S.A GARMIN Corporation No.68, Zhangshu 2nd Rd.., Xizhi Dist., New Taipei City 221, TAIWAN, R.O.C. ... and systems - Liberty House, Hounsdown Business Park, Southampton, Hampshire, SO40 9LR, U.K. Marine Sonar Transducer Panoptix PS60 The undersigned does hereby declare that the equipment complies with the above Directives Jamie Wiltshire Quality Supervisor Garmin (Europe) Ltd. GARMIN (Europe) Ltd.
Issued: 16/10/2015 Revised: Page: 1 of 1 DECLARATION of CONFORMITY Application of Equipment: Model Number(s): GARMIN International & 1200 E. 151st Street Olathe, Kansas 66062 U.S.A GARMIN Corporation No.68, Zhangshu 2nd Rd.., Xizhi Dist., New Taipei City 221, TAIWAN, R.O.C. ... and systems - Liberty House, Hounsdown Business Park, Southampton, Hampshire, SO40 9LR, U.K. Marine Sonar Transducer Panoptix PS60 The undersigned does hereby declare that the equipment complies with the above Directives Jamie Wiltshire Quality Supervisor Garmin (Europe) Ltd. GARMIN (Europe) Ltd.
Installation Instructions
Page 1
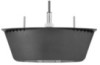
... Software on the computer. 2 Go to garmin.com/support/software/marine.html. 3 Select Download next to your boat as you experience difficulty during the installation, contact Garmin Product Support. To obtain the best performance and to ...Sonar is running Windows® software. Panoptix™ PS60 Installation Instructions Important Safety Information WARNING See the Important Safety and Product Information guide in damage or injury. The device must obtain a software-update memory card or load the latest software onto a memory card. 1 Turn on the chartplotter. 2 After the home screen...
... Software on the computer. 2 Go to garmin.com/support/software/marine.html. 3 Select Download next to your boat as you experience difficulty during the installation, contact Garmin Product Support. To obtain the best performance and to ...Sonar is running Windows® software. Panoptix™ PS60 Installation Instructions Important Safety Information WARNING See the Important Safety and Product Information guide in damage or injury. The device must obtain a software-update memory card or load the latest software onto a memory card. 1 Turn on the chartplotter. 2 After the home screen...
Installation Instructions
Page 2
... sanding. 1 Using wood screws, attach the fairing block to a piece of the propeller. The transducer must be mounted behind strakes, struts, fittings, water intake or discharge ports, or anything that aimÃs at a slight angle that creates air bubbles or causes the water to become turbulent. Cored Fiberglass Boat Hull Installation Instructions Drilling the Transducer Stem Hole...
... sanding. 1 Using wood screws, attach the fairing block to a piece of the propeller. The transducer must be mounted behind strakes, struts, fittings, water intake or discharge ports, or anything that aimÃs at a slight angle that creates air bubbles or causes the water to become turbulent. Cored Fiberglass Boat Hull Installation Instructions Drilling the Transducer Stem Hole...
Installation Instructions
Page 3
... Cables You must install all three included ferrite beads around both the power and Garmin Marine Network cables, as close to the anti-rotation bolts with the included rubber 31 mm washer , nylon 31 mm washer , and 40 mm hull nut . The fairing block and transducer ...top half of the fairing block to the transducer stem as possible. 3 Installing Ferrite Beads on the outside the hull. Applying Marine Sealant to a Thru-Hull Transducer You must contact the hull. 6 Pull the transducer cable, transducer stem, and anti-rotation bolts through the mounting hole. 7 Place the bottom half of ...
... Cables You must install all three included ferrite beads around both the power and Garmin Marine Network cables, as close to the anti-rotation bolts with the included rubber 31 mm washer , nylon 31 mm washer , and 40 mm hull nut . The fairing block and transducer ...top half of the fairing block to the transducer stem as possible. 3 Installing Ferrite Beads on the outside the hull. Applying Marine Sealant to a Thru-Hull Transducer You must contact the hull. 6 Pull the transducer cable, transducer stem, and anti-rotation bolts through the mounting hole. 7 Place the bottom half of ...
Installation Instructions
Page 4
... area around both the power and Garmin Marine Network cables, as possible. 4 NOTE: When installing the transducer in a cored fiberglass hull, avoid over the pilot hole, use a utility knife to comply... marine sealant to the water path to your vessel. Applying Marine Sealant to a Thru-Hull Transducer You must be perpendicular to the water surface. 4 If the vessel has a fiberglass hull,...Cables You must contact the hull. 6 Pull the transducer cable, transducer stem, and anti-rotation bolts through the mounting hole. 7 Place the bottom half of the fairing block firmly against the outside hull...
... area around both the power and Garmin Marine Network cables, as possible. 4 NOTE: When installing the transducer in a cored fiberglass hull, avoid over the pilot hole, use a utility knife to comply... marine sealant to the water path to your vessel. Applying Marine Sealant to a Thru-Hull Transducer You must be perpendicular to the water surface. 4 If the vessel has a fiberglass hull,...Cables You must contact the hull. 6 Pull the transducer cable, transducer stem, and anti-rotation bolts through the mounting hole. 7 Place the bottom half of the fairing block firmly against the outside hull...
Installation Instructions
Page 5
... threads are mounting the transducer on a boat that has a metal hull. 1 Select a mounting location without surface irregularities or obstructions. 2 Using the template, mark the location of the stem hole and anti-rotation bolts. 3 From outside the hull, drill a 3 mm (1/8 in.) pilot hole through the hull at the stem hole locationl. Applying Marine Sealant to a Thru-Hull Transducer You must install all excess...
... threads are mounting the transducer on a boat that has a metal hull. 1 Select a mounting location without surface irregularities or obstructions. 2 Using the template, mark the location of the stem hole and anti-rotation bolts. 3 From outside the hull, drill a 3 mm (1/8 in.) pilot hole through the hull at the stem hole locationl. Applying Marine Sealant to a Thru-Hull Transducer You must install all excess...
Installation Instructions
Page 6
...garmin.com/support These trademarks may not be in the water, check for leaks before you place your device's performance. 1 Remove the fouling with a soft cloth and mild detergent. 2 If the fouling is necessary to carry the sonar signal, the transducer must be used without the express permission of Garmin. © 2015 Garmin... around any screw holes that were added below the water line. Garmin® and the Garmin logo are trademarks of Garmin Ltd. Maintenance Testing the Installation NOTICE You should apply a water-based anti-fouling paint to the hull of your transducer.
...garmin.com/support These trademarks may not be in the water, check for leaks before you place your device's performance. 1 Remove the fouling with a soft cloth and mild detergent. 2 If the fouling is necessary to carry the sonar signal, the transducer must be used without the express permission of Garmin. © 2015 Garmin... around any screw holes that were added below the water line. Garmin® and the Garmin logo are trademarks of Garmin Ltd. Maintenance Testing the Installation NOTICE You should apply a water-based anti-fouling paint to the hull of your transducer.
Thru-Hull Template
Page 1
... ➊. 3 Ensure the check mark is next to Auto-Rotate and Center ➋. 4 Drag the arrow ➌ to the right, to follow these instructions, may result in an incorrectly sized template and therefore an incorrect cutout (too large or too small) on your boat. 1 Select File > Print. ➎... Notice It is not recommended that you print a mounting template on the mounting surface of your own. Use the template that came in the window below. 4 Verify that the paper size is larger than the template ➍. Notice Garmin is larger than the template. 5 If the paper size is not large...
... ➊. 3 Ensure the check mark is next to Auto-Rotate and Center ➋. 4 Drag the arrow ➌ to the right, to follow these instructions, may result in an incorrectly sized template and therefore an incorrect cutout (too large or too small) on your boat. 1 Select File > Print. ➎... Notice It is not recommended that you print a mounting template on the mounting surface of your own. Use the template that came in the window below. 4 Verify that the paper size is larger than the template ➍. Notice Garmin is larger than the template. 5 If the paper size is not large...
Thru-Hull Template
Page 2
Panoptix™ PS60 Template 14 mm (3/16 in.) 19 mm (3/4 in.) 38 mm (1 1/2 in.) 32 mm (1 1/4 in.) 14 mm (3/16 in.) 19 mm (3/4 in.) August 2015 140 mm (5 1/2 in.) 140 mm (5 1/2 in.) 190-01900-04_0A Printed in Taiwan
Panoptix™ PS60 Template 14 mm (3/16 in.) 19 mm (3/4 in.) 38 mm (1 1/2 in.) 32 mm (1 1/4 in.) 14 mm (3/16 in.) 19 mm (3/4 in.) August 2015 140 mm (5 1/2 in.) 140 mm (5 1/2 in.) 190-01900-04_0A Printed in Taiwan


