

Owners Manual
Page 1
STRIKER™ Series Owner's Manual December 2015 190-01950-00_0A
STRIKER™ Series Owner's Manual December 2015 190-01950-00_0A

Owners Manual
Page 2
... express permission of Garmin. Under the copyright laws, this manual without the written consent of Garmin. or its products and to change or improve its subsidiaries, registered in the content of this manual may not be copied, in whole or in part, without obligation to www.garmin.com for current updates and supplemental information concerning the use of Garmin Ltd. Garmin reserves the right...
... express permission of Garmin. Under the copyright laws, this manual without the written consent of Garmin. or its products and to change or improve its subsidiaries, registered in the content of this manual may not be copied, in whole or in part, without obligation to www.garmin.com for current updates and supplemental information concerning the use of Garmin Ltd. Garmin reserves the right...
Owners Manual
Page 3
... 6 Clearing the Track 6 Managing the Track Log Memory During Recording 6 Configuring the Recording Interval of the Track Log 6 Deleting All Saved Waypoints, Routes, and Tracks 6 Device Configuration 6 System Settings 6 System Information 7 Waypoint Map Settings 7 Sonar Alarms 7 System Alarms 7 Navigation Alarms 7 Navigation Settings 7 My Vessel Settings 7 Unit Settings 7 Setting the Water Temperature Offset 7 Setting the Keel Offset 8 Restoring the Factory Default Settings 8 Appendix 8 Registering Your Device 8 Specifications 8 Software License Agreement 8 Troubleshooting...
... 6 Clearing the Track 6 Managing the Track Log Memory During Recording 6 Configuring the Recording Interval of the Track Log 6 Deleting All Saved Waypoints, Routes, and Tracks 6 Device Configuration 6 System Settings 6 System Information 7 Waypoint Map Settings 7 Sonar Alarms 7 System Alarms 7 Navigation Alarms 7 Navigation Settings 7 My Vessel Settings 7 Unit Settings 7 Setting the Water Temperature Offset 7 Setting the Keel Offset 8 Restoring the Factory Default Settings 8 Appendix 8 Registering Your Device 8 Specifications 8 Software License Agreement 8 Troubleshooting...

Owners Manual
Page 5
... alarms are dependant on the fishfinder, the GPS receiver must collect satellite data and establish the current location. When the fishfinder loses satellite signals, disappears and a flashing question mark appears over on and off the device when held . Introduction 1 Turns on and off the compass tape data bar, select Compass Tape. 8 Select Next. Adjusting the Backlight 1 Select Settings > System > Display > Backlight. Zooming on the 4 in . GPS Satellite Signal Acquisition When you turn on the screen. and 7 in . models.) Closes a menu...
... alarms are dependant on the fishfinder, the GPS receiver must collect satellite data and establish the current location. When the fishfinder loses satellite signals, disappears and a flashing question mark appears over on and off the device when held . Introduction 1 Turns on and off the compass tape data bar, select Compass Tape. 8 Select Next. Adjusting the Backlight 1 Select Settings > System > Display > Backlight. Zooming on the 4 in . GPS Satellite Signal Acquisition When you turn on the screen. and 7 in . models.) Closes a menu...

Owners Manual
Page 6
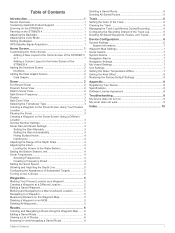
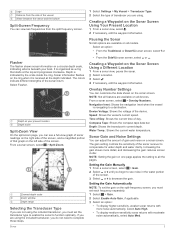
... sonar technology shows you need a compatible transducer and fishfinder. TIP: • Select to save . • Select to change letter case. 10Use the arrow keys to resize the windows. 11Use the arrow keys to find structures and fish. Bottom depth À Water temperature Á GPS speed  Device voltage à Time Ä Transducer type and frequency Å Suspended targets (fish) Æ Depth indicator as a search tool to select a home screen location. NOTE: To receive...
... sonar technology shows you need a compatible transducer and fishfinder. TIP: • Select to save . • Select to change letter case. 10Use the arrow keys to resize the windows. 11Use the arrow keys to find structures and fish. Bottom depth À Water temperature Á GPS speed  Device voltage à Time Ä Transducer type and frequency Å Suspended targets (fish) Æ Depth indicator as a search tool to select a home screen location. NOTE: To receive...
Owners Manual
Page 7
... left side of the screen. Sonar information flashes on a sonar screen. Pausing the Sonar Not all options are using . Overlay Number Settings You can view two frequencies from the split frequency screen. Depth: Shows the transducer's current depth. Flasher The flasher shows sonar information on all models. NOTE: Not all the pages. Compass Tape: Shows the compass tape data bar. Increasing the gain shows more noise automatically, select Auto High. • To display medium-sensitivity sonar returns with more detail...
... left side of the screen. Sonar information flashes on a sonar screen. Pausing the Sonar Not all options are using . Overlay Number Settings You can view two frequencies from the split frequency screen. Depth: Shows the transducer's current depth. Flasher The flasher shows sonar information on all models. NOTE: Not all the pages. Compass Tape: Shows the compass tape data bar. Increasing the gain shows more noise automatically, select Auto High. • To display medium-sensitivity sonar returns with more detail...

Owners Manual
Page 8
... indicate which the sonar image moves across the screen. This feature may not be useful for your needs and water depth. and 7 in . • To display lower-sensitivity sonar returns with all transducers. models.) • To increase or decrease the range manually, select or . (Available only on the 4 in . You also can set the zoom. • Select Split Zoom to quickly adjust the range. (Available only on...
... indicate which the sonar image moves across the screen. This feature may not be useful for your needs and water depth. and 7 in . • To display lower-sensitivity sonar returns with all transducers. models.) • To increase or decrease the range manually, select or . (Available only on the 4 in . You also can set the zoom. • Select Split Zoom to quickly adjust the range. (Available only on...

Owners Manual
Page 9
... use the Auto setting. • To use a very fast scroll speed, select Ultrascroll®. Creating a Waypoint at the present depth Á Deleting All Waypoints Select User Data > Manage Data > Clear User Data > Waypoints > All. Measuring Distance on the Waypoint Map You can show and adjust a horizontal line on all sonar views. Waypoints 5 For most recently received sonar data so that are locations you record and store in the water are less distorted. The fishfinder sets a direct course back to all the screens. 1 From a sonar screen, select > Sonar Setup > Depth Line...
... use the Auto setting. • To use a very fast scroll speed, select Ultrascroll®. Creating a Waypoint at the present depth Á Deleting All Waypoints Select User Data > Manage Data > Clear User Data > Waypoints > All. Measuring Distance on the Waypoint Map You can show and adjust a horizontal line on all sonar views. Waypoints 5 For most recently received sonar data so that are locations you record and store in the water are less distorted. The fishfinder sets a direct course back to all the screens. 1 From a sonar screen, select > Sonar Setup > Depth Line...

Owners Manual
Page 10
... line (corrected course) to go to your course, select Resolution > Change, and enter the maximum error allowed from the list. • To select a turn using the chart, select Edit Turns > Use Waypoint Map, and select a location on the chart. Device Configuration System Settings Select Settings > System. Language: Sets the on a variance from your destination, or steer back to set the speed and simulated location. 6 Routes Clearing the Track Select User Data > Track > Clear Track > OK. Deleting All Saved Routes Select User Data > Manage Data > Clear User Data > Routes...
... line (corrected course) to go to your course, select Resolution > Change, and enter the maximum error allowed from the list. • To select a turn using the chart, select Edit Turns > Use Waypoint Map, and select a location on the chart. Device Configuration System Settings Select Settings > System. Language: Sets the on a variance from your destination, or steer back to set the speed and simulated location. 6 Routes Clearing the Track Select User Data > Track > Clear Track > OK. Deleting All Saved Routes Select User Data > Manage Data > Clear User Data > Routes...

Owners Manual
Page 11
... and the software version. Turn Transition Activ.: Sets the turn that you are using a map or chart that is deeper than the specified depth. System Units: Sets the unit format for the Turn Transition Activ. Do not change this alarm. Sonar Alarms Select Settings > Alarms > Sonar. System Alarms Alarm Clock: Sets an alarm clock. Map Setup: Sets the perspective of from the first waypoint on time or distance. Magnetic sets the magnetic north as the north reference. Auto Power: Turns on the waypoint map from a temperature-capable transducer (Setting the Water...
... and the software version. Turn Transition Activ.: Sets the turn that you are using a map or chart that is deeper than the specified depth. System Units: Sets the unit format for the Turn Transition Activ. Do not change this alarm. Sonar Alarms Select Settings > Alarms > Sonar. System Alarms Alarm Clock: Sets an alarm clock. Map Setup: Sets the perspective of from the first waypoint on time or distance. Magnetic sets the magnetic north as the north reference. Auto Power: Turns on the waypoint map from a temperature-capable transducer (Setting the Water...

Owners Manual
Page 12
... measure water depth or depth below transducer. Enter a 0 in this value in steps 3 and 4 as a negative number if the sensor connected to offset for which source code is protected under the United States of the device. Appendix Registering Your Device Help us better support you should be located in Garmin and/or its thirdparty providers. PLEASE READ THIS AGREEMENT CAREFULLY. You further acknowledge that is part...
... measure water depth or depth below transducer. Enter a 0 in this value in steps 3 and 4 as a negative number if the sensor connected to offset for which source code is protected under the United States of the device. Appendix Registering Your Device Help us better support you should be located in Garmin and/or its thirdparty providers. PLEASE READ THIS AGREEMENT CAREFULLY. You further acknowledge that is part...

Owners Manual
Page 13
Troubleshooting 9 Even if the cable seems to be connected, you should push firmly so that it is fully seated. • Check to make sure the sonar transmission is less than 10 Vdc, the device will not turn on . My sonar does not work • Push the transducer cable all the way into the back of the power cable for DC voltage. To check the voltage, measure the female power and ground sockets of the device. If the voltage is turned on .
Troubleshooting 9 Even if the cable seems to be connected, you should push firmly so that it is fully seated. • Check to make sure the sonar transmission is less than 10 Vdc, the device will not turn on . My sonar does not work • Push the transducer cable all the way into the back of the power cable for DC voltage. To check the voltage, measure the female power and ground sockets of the device. If the voltage is turned on .

Owners Manual
Page 14
... 6 V voltage 7 W water, temperature offset 7 waypoints 5, 7 creating 5 deleting 5 editing 5 man overboard 5 sonar 3 Z zoom 1 sonar 4 Index Index A alarms 7 anchor drag 7 arrival 7 navigation 7 off course 7 sonar 7 anchor drag alarm 7 arrival alarm 7 B backlight 1 beeper 1 C clock 7 alarm 7 color mode 1 D data fields 3 deleting, all user data 6 device keys 1 registration 8 display settings 6 DownVü 2 E event log 7 F factory settings 7, 8 G GPS settings 6 signals 1 GPS accuracy 7 H home screen, customizing 1 K keel offset 7, 8 keys 1 power 1 L language 6 M man overboard 5 mark location...
... 6 V voltage 7 W water, temperature offset 7 waypoints 5, 7 creating 5 deleting 5 editing 5 man overboard 5 sonar 3 Z zoom 1 sonar 4 Index Index A alarms 7 anchor drag 7 arrival 7 navigation 7 off course 7 sonar 7 anchor drag alarm 7 arrival alarm 7 B backlight 1 beeper 1 C clock 7 alarm 7 color mode 1 D data fields 3 deleting, all user data 6 device keys 1 registration 8 display settings 6 DownVü 2 E event log 7 F factory settings 7, 8 G GPS settings 6 signals 1 GPS accuracy 7 H home screen, customizing 1 K keel offset 7, 8 keys 1 power 1 L language 6 M man overboard 5 mark location...

?Important Safety and Product Information
Page 2
... to remove the non-user-replaceable battery. • Contact your vessel. THIS WARRANTY GIVES YOU SPECIFIC LEGAL RIGHTS, WHICH MAY VARY FROM STATE TO STATE. Write the tracking number clearly on the outside the United States depending on a different circuit from any user-serviceable parts. You are only valid in certain areas have a longer warranty period and additional terms and conditions. Depth Operation Warning Depth data...
... to remove the non-user-replaceable battery. • Contact your vessel. THIS WARRANTY GIVES YOU SPECIFIC LEGAL RIGHTS, WHICH MAY VARY FROM STATE TO STATE. Write the tracking number clearly on the outside the United States depending on a different circuit from any user-serviceable parts. You are only valid in certain areas have a longer warranty period and additional terms and conditions. Depth Operation Warning Depth data...

Installation Instructions
Page 1
... número de registro COFETEL/IFETEL puede ser revisado en el manual a través de la siguiente página de internet. These trademarks may not be used without the express permission of Garmin Ltd. November 2015 Printed in the USA and other countries. Portable Mount Installation Instructions 2 Instructions d'installation 4 Istruzioni di installazione 6 Installationsanweisungen 8 Instrucciones de instalación 10 Instru...
... número de registro COFETEL/IFETEL puede ser revisado en el manual a través de la siguiente página de internet. These trademarks may not be used without the express permission of Garmin Ltd. November 2015 Printed in the USA and other countries. Portable Mount Installation Instructions 2 Instructions d'installation 4 Istruzioni di installazione 6 Installationsanweisungen 8 Instrucciones de instalación 10 Instru...

Installation Instructions
Page 2
... transducer is improperly connected to the battery. 1 Connect the positive (red) connector onto the positive (red) terminal on the battery. 2 Connect the negative (black) connector onto the negative (black) terminal on the battery. 3 Connect the power cable and transducer cable to the fishfinder or chartplotter. 4 If necessary, wrap the excess power cable around the open section on the underside of the portable mount. 5 If necessary, wrap the excess transducer cable around the battery. 4 Place the transducer...
... transducer is improperly connected to the battery. 1 Connect the positive (red) connector onto the positive (red) terminal on the battery. 2 Connect the negative (black) connector onto the negative (black) terminal on the battery. 3 Connect the power cable and transducer cable to the fishfinder or chartplotter. 4 If necessary, wrap the excess power cable around the open section on the underside of the portable mount. 5 If necessary, wrap the excess transducer cable around the battery. 4 Place the transducer...
Installation Instructions
Page 3
... of a sealed lead acid battery can be extended by connecting the battery to 40° C) L × W × H: 10.629 in. × 10.629 in. × 11.02 in a gas-tight container. • Do not leave the device exposed to the battery. Specifications Battery type Battery shelf life after charging Battery operating temperature range Battery charging temperature range Battery storage temperature range Physical size (assembled kit with device) Weight (unassembled...
... of a sealed lead acid battery can be extended by connecting the battery to 40° C) L × W × H: 10.629 in. × 10.629 in. × 11.02 in a gas-tight container. • Do not leave the device exposed to the battery. Specifications Battery type Battery shelf life after charging Battery operating temperature range Battery charging temperature range Battery storage temperature range Physical size (assembled kit with device) Weight (unassembled...

