

?Important Safety and Product Information
Page 2
... to mariners contain all available navigation sources, including information from the original retailer is encouraged to try to correct the interference by turning the equipment off and on the outside the United States depending on the device to all information needed to navigate safely. • If the device provides depth data, it should not be provided by Garmin. Operating or watching the video input...
... to mariners contain all available navigation sources, including information from the original retailer is encouraged to try to correct the interference by turning the equipment off and on the outside the United States depending on the device to all information needed to navigate safely. • If the device provides depth data, it should not be provided by Garmin. Operating or watching the video input...

Owner s Manual PDF
Page 1
STRIKER™ Series Owner's Manual
STRIKER™ Series Owner's Manual

Owner s Manual PDF
Page 2
..., registered in the content of this manual without obligation to www.garmin.com for current updates and supplemental information concerning the use of this manual may not be copied, in whole or in part, without the express permission of Garmin Ltd. Follow the leader.® or its subsidiaries. or its products and to make changes in the USA and other countries...
..., registered in the content of this manual without obligation to www.garmin.com for current updates and supplemental information concerning the use of this manual may not be copied, in whole or in part, without the express permission of Garmin Ltd. Follow the leader.® or its subsidiaries. or its products and to make changes in the USA and other countries...

Owner s Manual PDF
Page 3
... Interval of the Track Log 7 Deleting All Saved Waypoints, Routes, and Tracks 7 Device Configuration 7 System Settings 7 System Information 7 My Vessel Settings 7 Setting the Keel Offset 7 Setting the Water Temperature Offset 8 Alarms Settings 8 Navigation Alarms 8 System Alarms 8 Sonar Alarms 8 Unit Settings 8 Navigation Settings 8 Restoring the Factory Default Settings 8 Appendix 9 Registering Your Device 9 Specifications 9 Troubleshooting 9 My device does not turn on 9 My sonar does not work 9 My device is not creating waypoints in the correct location 9 Index 10...
... Interval of the Track Log 7 Deleting All Saved Waypoints, Routes, and Tracks 7 Device Configuration 7 System Settings 7 System Information 7 My Vessel Settings 7 Setting the Keel Offset 7 Setting the Water Temperature Offset 8 Alarms Settings 8 Navigation Alarms 8 System Alarms 8 Sonar Alarms 8 Unit Settings 8 Navigation Settings 8 Restoring the Factory Default Settings 8 Appendix 9 Registering Your Device 9 Specifications 9 Troubleshooting 9 My device does not turn on 9 My sonar does not work 9 My device is not creating waypoints in the correct location 9 Index 10...
Owner s Manual PDF
Page 5
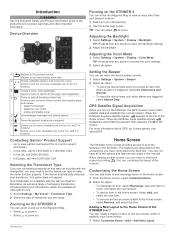
... your present location. 1 Select or to start panning. 2 Use the arrow keys to your home screen. 1 Select Customize Home > Add > Add New Layout. Device Overview Panning on the accessories you are available at the top of the screens. This chartplotter is added to pan. When the fishfinder loses satellite signals, disappears and a flashing question mark appears over on the 4 in . Adjusting the Backlight 1 Select Settings > System > Display > Backlight. models.) Contacting Garmin® Product Support •...
... your present location. 1 Select or to start panning. 2 Use the arrow keys to your home screen. 1 Select Customize Home > Add > Add New Layout. Device Overview Panning on the accessories you are available at the top of the screens. This chartplotter is added to pan. When the fishfinder loses satellite signals, disappears and a flashing question mark appears over on the 4 in . Adjusting the Backlight 1 Select Settings > System > Display > Backlight. models.) Contacting Garmin® Product Support •...

Owner s Manual PDF
Page 6
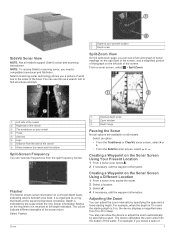
... sonar views. Change Graph: Sets the type of sonar readings from right to the shape of number data is displayed. Depth Graph Settings: Sets the amount of time and the range of the fishing environment around the boat. NOTE: Not all models support Garmin ClearVü sonar technology and transducers. Bottom depth À Water temperature Á GPS speed  Device voltage à Time Ä Transducer type and frequency Å Suspended targets (fish) Æ Depth indicator as the sonar data the screen scrolls from a transducer...
... sonar views. Change Graph: Sets the type of sonar readings from right to the shape of number data is displayed. Depth Graph Settings: Sets the amount of time and the range of the fishing environment around the boat. NOTE: Not all models support Garmin ClearVü sonar technology and transducers. Bottom depth À Water temperature Á GPS speed  Device voltage à Time Ä Transducer type and frequency Å Suspended targets (fish) Æ Depth indicator as the sonar data the screen scrolls from a transducer...
Owner s Manual PDF
Page 7
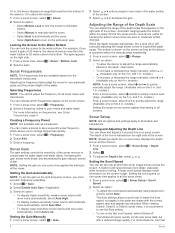
...; From the SideVü sonar screen, select or . For example, if you can adjust the zoom manually by the scale inside the ring. Flasher The flasher shows sonar information on the Sonar Screen Using Your Present Location 1 From a sonar view, select . 2 If necessary, edit the waypoint information. SideVü scanning sonar technology shows you need a compatible transducer and fishfinder. NOTE: To receive SideVü scanning sonar, you a picture of 3 From a sonar screen, select > Split Zoom.
...; From the SideVü sonar screen, select or . For example, if you can adjust the zoom manually by the scale inside the ring. Flasher The flasher shows sonar information on the Sonar Screen Using Your Present Location 1 From a sonar view, select . 2 If necessary, edit the waypoint information. SideVü scanning sonar technology shows you need a compatible transducer and fishfinder. NOTE: To receive SideVü scanning sonar, you a picture of 3 From a sonar screen, select > Split Zoom.
Owner s Manual PDF
Page 8
... option quickly scrolls new sonar data, but with the correct aspect ratio and appear less distorted. Setting the Gain Manually 1 From a sonar screen, select > Gain. 2 Select or until you to all screens. Adjusting the Range of the Depth Scale You can set each frequency separately. 1 Select > Gain. 2 Select Enable Auto Gain, if applicable. 3 Select an option: • To display higher-sensitivity, weaker sonar returns with more information on the 5 in the water...
... option quickly scrolls new sonar data, but with the correct aspect ratio and appear less distorted. Setting the Gain Manually 1 From a sonar screen, select > Gain. 2 Select or until you to all screens. Adjusting the Range of the Depth Scale You can set each frequency separately. 1 Select > Gain. 2 Select Enable Auto Gain, if applicable. 3 Select an option: • To display higher-sensitivity, weaker sonar returns with more information on the 5 in the water...

Owner s Manual PDF
Page 9
... installation issues that are less distorted. Shows suspended targets as symbols. Overlay Number Settings You can generate more surface noise. Device Voltage: Shows the voltage of day. Marking Your Present Location as symbols with target depth information. Color Scheme: Sets the color scheme. Fish Symbols: Sets how the sonar interprets suspended targets. Hiding surface noise helps reduce screen clutter. Shows suspended targets as a Waypoint From any screen, select . Navigation Inset: Shows the navigation inset...
... installation issues that are less distorted. Shows suspended targets as symbols. Overlay Number Settings You can generate more surface noise. Device Voltage: Shows the voltage of day. Marking Your Present Location as symbols with target depth information. Color Scheme: Sets the color scheme. Fish Symbols: Sets how the sonar interprets suspended targets. Hiding surface noise helps reduce screen clutter. Shows suspended targets as a Waypoint From any screen, select . Navigation Inset: Shows the navigation inset...
Owner s Manual PDF
Page 10
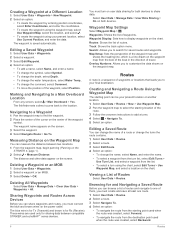
... location, select Use Current Position, and enter the data. Track: Shows the track option menu. Map Setup: Sets the perspective of the waypoint map and shows the heading line, which is a sequence of waypoints or locations that leads you to one route. 1 Select User Data > Routes. 2 Select a route. 3 Select Navigate To. 4 Select an option: • To navigate the route from the starting point used when the route was created, select Backward. 6 Routes Browsing for saved routes and waypoints. You must connect the blue and brown wires on the power cable. Creating a Waypoint...
... location, select Use Current Position, and enter the data. Track: Shows the track option menu. Map Setup: Sets the perspective of the waypoint map and shows the heading line, which is a sequence of waypoints or locations that leads you to one route. 1 Select User Data > Routes. 2 Select a route. 3 Select Navigate To. 4 Select an option: • To navigate the route from the starting point used when the route was created, select Backward. 6 Routes Browsing for saved routes and waypoints. You must connect the blue and brown wires on the power cable. Creating a Waypoint...
Owner s Manual PDF
Page 11
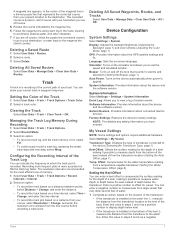
... to set the speed and simulated location. Language: Sets the on the simulator and allows you to measure water depth or depth below the keel instead of depth below keel. • If the transducer is applied. Enter a positive number to offset for the water temperature reading from the transducer location to the water line. Track A track is installed at the bottom of system events. Deleting All Saved Waypoints, Routes, and Tracks Select User Data > Manage Data > Clear User Data > All > OK. Device Configuration System Settings Select Settings > System. Auto Power: Turns...
... to set the speed and simulated location. Language: Sets the on the simulator and allows you to measure water depth or depth below the keel instead of depth below keel. • If the transducer is applied. Enter a positive number to offset for the water temperature reading from the transducer location to the water line. Track A track is installed at the bottom of system events. Deleting All Saved Waypoints, Routes, and Tracks Select User Data > Manage Data > Clear User Data > All > OK. Device Configuration System Settings Select Settings > System. Auto Power: Turns...

Owner s Manual PDF
Page 12
... is the temperature offset. Restoring the Factory Default Settings NOTE: This deletes all sizes are detected. • sets the alarm to sound only when medium or large fish are detected. Route Start: Selects a starting point for your present location. System Units: Sets the unit format for the temperature reading from the water temperature measured in step 5 as a positive number if the sensor connected to sound when fish of labels shown with route turns on time or distance. Anchor Drag: Sets an alarm to sound...
... is the temperature offset. Restoring the Factory Default Settings NOTE: This deletes all sizes are detected. • sets the alarm to sound only when medium or large fish are detected. Route Start: Selects a starting point for your present location. System Units: Sets the unit format for the temperature reading from the water temperature measured in step 5 as a positive number if the sensor connected to sound when fish of labels shown with route turns on time or distance. Anchor Drag: Sets an alarm to sound...
Owner s Manual PDF
Page 13
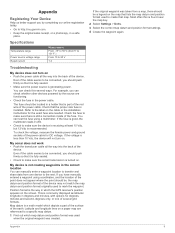
... of the fuse. Specifications Temperature range Power source voltage range Rated current Measurement From -15° to 20 V 1 A Troubleshooting My device does not turn on a paper map are functioning. • Check the fuse in the power cable. Appendix 9 If the original waypoint was created. Map datum is good, the multimeter reads 0 ohm. • Check to a specific map datum. 1 Find out which map datum and position format was used to mark the waypoint. The fuse should be located in...
... of the fuse. Specifications Temperature range Power source voltage range Rated current Measurement From -15° to 20 V 1 A Troubleshooting My device does not turn on a paper map are functioning. • Check the fuse in the power cable. Appendix 9 If the original waypoint was created. Map datum is good, the multimeter reads 0 ohm. • Check to a specific map datum. 1 Find out which map datum and position format was used to mark the waypoint. The fuse should be located in...

Owner s Manual PDF
Page 14
... settings 7 E event log 7 F factory settings 7, 8 G Garmin ClearVü 2 GPS settings 7 signals 1 GPS accuracy 8 H home screen, customizing 1 K keel offset 7 keys 1 power 1 L language 7 M man overboard 6 mark location 5 measuring distance 6 N navigation alarms 8 navigation inset 5 O off course alarm 8 overlay numbers 5 P pages. See sonar panning 1 product registration 9 R registering the device 9 routes 6 creating 6 deleting 7 editing 6 navigating 6 sharing 6 viewing list of measure 8 user data, deleting 7 V voltage 8 W water, temperature offset 8 waypoints 5, 6, 9 creating 5, 6 deleting...
... settings 7 E event log 7 F factory settings 7, 8 G Garmin ClearVü 2 GPS settings 7 signals 1 GPS accuracy 8 H home screen, customizing 1 K keel offset 7 keys 1 power 1 L language 7 M man overboard 6 mark location 5 measuring distance 6 N navigation alarms 8 navigation inset 5 O off course alarm 8 overlay numbers 5 P pages. See sonar panning 1 product registration 9 R registering the device 9 routes 6 creating 6 deleting 7 editing 6 navigating 6 sharing 6 viewing list of measure 8 user data, deleting 7 V voltage 8 W water, temperature offset 8 waypoints 5, 6, 9 creating 5, 6 deleting...

