
Important Safety and Product Information
Page 2
... under our Limited Warranty are intended to human readable form the Software or any part thereof or create any purpose requiring precise measurement of direction, distance, location or topography. Changes in environmental conditions, like wind gusts or downrange winds, may result in the original country of purchase or follow the instructions on support.garmin.com to remove the removable batteries. • KEEP BATTERIES AWAY FROM...
... under our Limited Warranty are intended to human readable form the Software or any part thereof or create any purpose requiring precise measurement of direction, distance, location or topography. Changes in environmental conditions, like wind gusts or downrange winds, may result in the original country of purchase or follow the instructions on support.garmin.com to remove the removable batteries. • KEEP BATTERIES AWAY FROM...

Owners Manual
Page 2
... trademarks and trade names are trademarks of such changes or improvements. Go to notify any person or organization of Garmin Ltd. or its products and to make changes in the content of this manual without obligation to www.garmin.com for current updates and supplemental information concerning the use of this manual may not be copied, in whole or...
... trademarks and trade names are trademarks of such changes or improvements. Go to notify any person or organization of Garmin Ltd. or its products and to make changes in the content of this manual without obligation to www.garmin.com for current updates and supplemental information concerning the use of this manual may not be copied, in whole or...

Owners Manual
Page 3
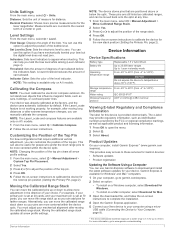
... Settings 6 Pin Settings 6 Laser Location Settings 6 Shot Dynamics Settings 6 Units Settings 7 Level Settings 7 Calibrating the Compass 7 Customizing the Position of the Top Pin 7 Moving the Calibrated Range Stack 7 Device Information 7 Device Specifications 7 Viewing E-label Regulatory and Compliance Information .......... 7 Product Updates 7 Updating the Software Using a Computer 7 Connecting the Device to Your Computer 8 Device Care 8 Cleaning the Device 8 Getting More Information 8 Troubleshooting 8 The point of impact moves between shots 8 My device only displays fixed...
... Settings 6 Pin Settings 6 Laser Location Settings 6 Shot Dynamics Settings 6 Units Settings 7 Level Settings 7 Calibrating the Compass 7 Customizing the Position of the Top Pin 7 Moving the Calibrated Range Stack 7 Device Information 7 Device Specifications 7 Viewing E-label Regulatory and Compliance Information .......... 7 Product Updates 7 Updating the Software Using a Computer 7 Connecting the Device to Your Computer 8 Device Care 8 Cleaning the Device 8 Getting More Information 8 Troubleshooting 8 The point of impact moves between shots 8 My device only displays fixed...

Owners Manual
Page 5
... Buttons • Press OK to open the main menu and select menu options. • Press or to move through menus. • Press or to adjust the pin brightness. • Hold or to set a pin manually. • Press to return to a previous menu. • Press to turn the device on two AAA lithium batteries (not included). Alkaline and NiMH batteries do not meet the power requirements for installing and setting...
... Buttons • Press OK to open the main menu and select menu options. • Press or to move through menus. • Press or to adjust the pin brightness. • Hold or to set a pin manually. • Press to return to a previous menu. • Press to turn the device on two AAA lithium batteries (not included). Alkaline and NiMH batteries do not meet the power requirements for installing and setting...
Owners Manual
Page 6
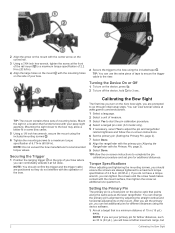
... bow. 2 Secure the trigger to a maximum torque specification of 6.7 N-m (60 lbf-in). After you set pins for 3 sec. TIP: You can use the extra piece of tape to secure the trigger cable to complete the pin calibration procedure and set the primary pin, you can view tutorial videos at www.garmin.com/xerotutorials. 1 Select a language. 2 Select a unit of measure. 3 Select Yes to start...
... bow. 2 Secure the trigger to a maximum torque specification of 6.7 N-m (60 lbf-in). After you set pins for 3 sec. TIP: You can use the extra piece of tape to secure the trigger cable to complete the pin calibration procedure and set the primary pin, you can view tutorial videos at www.garmin.com/xerotutorials. 1 Select a language. 2 Select a unit of measure. 3 Select Yes to start...
Owners Manual
Page 7
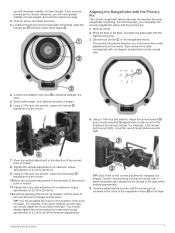
...of impact. The arrows indicate the direction you will decrease visibility of adjustment on the curved adjustments indicates one degree of closer targets. Garmin® recommends moving the curved rails in small increments as needed, until the primary pin is centered in the level is pointing... and right, move the curved adjustments on the mount in the optic corresponds with the Primary Pin The circular rangefinder reticle indicates the direction the laser rangefinder is centered between adjustments. you should adjust the mount down and right. If you set your bow's peep sight ...
...of impact. The arrows indicate the direction you will decrease visibility of adjustment on the curved adjustments indicates one degree of closer targets. Garmin® recommends moving the curved rails in small increments as needed, until the primary pin is centered in the level is pointing... and right, move the curved adjustments on the mount in the optic corresponds with the Primary Pin The circular rangefinder reticle indicates the direction the laser rangefinder is centered between adjustments. you should adjust the mount down and right. If you set your bow's peep sight ...

Owners Manual
Page 8
... session. You can use the bow sight, you track game when using fixed pins. Main Menu Press OK to the target. Enables hunt mode Enables practice mode Opens the statistics mode menu Opens the brightness settings menu Opens the arrow profile menu (A1i models only) Opens the pin settings menu Opens the Laser Locate™ menu (A1i models only) Opens the shot dynamics menu Opens the device settings menu Hunt Mode Hunt mode enables features to...
... session. You can use the bow sight, you track game when using fixed pins. Main Menu Press OK to the target. Enables hunt mode Enables practice mode Opens the statistics mode menu Opens the brightness settings menu Opens the arrow profile menu (A1i models only) Opens the pin settings menu Opens the Laser Locate™ menu (A1i models only) Opens the shot dynamics menu Opens the device settings menu Hunt Mode Hunt mode enables features to...

Owners Manual
Page 9
... groups. The bow sight will be using for each arrow type you use with different arrows, draw lengths, or draw weights. Group Direction: The average direction of each time you must record shots using statistics mode. Avg. You can press or to work like a conventional fixed pin sight. TIP: You can also adjust the pin brightness quickly by connecting the device to display fixed pins at your target...
... groups. The bow sight will be using for each arrow type you use with different arrows, draw lengths, or draw weights. Group Direction: The average direction of each time you must record shots using statistics mode. Avg. You can press or to work like a conventional fixed pin sight. TIP: You can also adjust the pin brightness quickly by connecting the device to display fixed pins at your target...
Owners Manual
Page 10
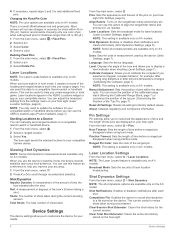
.... Manual Adjustment: Sets the position of the bow and allows you create waypoints or track game. Laser Location Settings From the main menu, select > Laser Locations. NOTE: The Laser Locate feature is available only on A1i models. Changing the Fixed Pin Color NOTE: Pin color options are available only on A1i models. You can use the device in practice mode, the device records statistics about your bow sight (Pin Settings...
.... Manual Adjustment: Sets the position of the bow and allows you create waypoints or track game. Laser Location Settings From the main menu, select > Laser Locations. NOTE: The Laser Locate feature is available only on A1i models. Changing the Fixed Pin Color NOTE: Pin color options are available only on A1i models. You can use the device in practice mode, the device records statistics about your bow sight (Pin Settings...
Owners Manual
Page 11
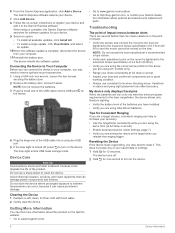
... licensing information. 1 Press OK to 1 year in the direction of the bow. If the Laser Locate feature is available only on -screen instructions to complete the installation. 4 Open the Garmin Express application. 5 Connect your Xero device to adjust the position of the top pin. Customizing the Position of the Top Pin For bow configurations that are available only on A1i models. 1 From the main menu, select > Calibrate...
... licensing information. 1 Press OK to 1 year in the direction of the bow. If the Laser Locate feature is available only on -screen instructions to complete the installation. 4 Open the Garmin Express application. 5 Connect your Xero device to adjust the position of the top pin. Customizing the Position of the Top Pin For bow configurations that are available only on A1i models. 1 From the main menu, select > Calibrate...
Owners Manual
Page 12
... adjustment point on -screen instructions to register your saved data or settings. 1 Hold for your accuracy. • Use the rangefinder consistently while you are using AAA lithium batteries. Getting More Information You can damage plastic components and finishes. 6 From the Garmin Express application, click Add a Device. The device installs the software update. The bow sight enters USB mass storage mode. Variations in good working...
... adjustment point on -screen instructions to register your saved data or settings. 1 Hold for your accuracy. • Use the rangefinder consistently while you are using AAA lithium batteries. Getting More Information You can damage plastic components and finishes. 6 From the Garmin Express application, click Add a Device. The device installs the software update. The bow sight enters USB mass storage mode. Variations in good working...

Owners Manual
Page 13
... 5 B backlight 5 battery 7 installing 1 bow sight, using 4 brightness 5 buttons 1 C calibrating the sight 2 cleaning the device 8 compass, calibrating 7 computer, connecting 8 D data, transferring 8 deleting, history 5 device, cleaning 8 F fixed pins 4-6 G Garmin Express, updating software 7 H hunt mode 4 L laser locations 6 laser rangefinder 4 level 4 settings 7 locations, sending 6 M main menu 4 mounting the device 1, 2 P power key 2 practice mode 4 R resetting the device 8 S settings 6, 7 shot dynamics 6 sighting in the device 2-5 software, updating 7 specifications 7 torque 2 statistics...
... 5 B backlight 5 battery 7 installing 1 bow sight, using 4 brightness 5 buttons 1 C calibrating the sight 2 cleaning the device 8 compass, calibrating 7 computer, connecting 8 D data, transferring 8 deleting, history 5 device, cleaning 8 F fixed pins 4-6 G Garmin Express, updating software 7 H hunt mode 4 L laser locations 6 laser rangefinder 4 level 4 settings 7 locations, sending 6 M main menu 4 mounting the device 1, 2 P power key 2 practice mode 4 R resetting the device 8 S settings 6, 7 shot dynamics 6 sighting in the device 2-5 software, updating 7 specifications 7 torque 2 statistics...


