User Manual
Page 1
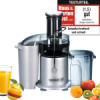
Model and attachments are subject to change! For household use ! GASTROBACK® Instructions for Use and Recipes DESIGN JUICER Pro Art.-Nr. 40126 Design Juicer Pro Read all provided instructions before first use only!
Model and attachments are subject to change! For household use ! GASTROBACK® Instructions for Use and Recipes DESIGN JUICER Pro Art.-Nr. 40126 Design Juicer Pro Read all provided instructions before first use only!

User Manual
Page 2
risk of Contents Knowing your juicer 46 Care and cleaning 48 Trouble shooting guide 49 To clear blockage 50 Tips on juicing...51 Storage...55 Notes for all provided instructions before ... in these instructions. Table of injury 39 Technical details 40 Operating...41 Assembling the appliance 41 Operating your Design Juicer Pro 44 Emptying the pulp container during juicing 45 Disassembling your Design Juicer Pro 35 Important safeguards 36 Safeguards for daily operation 37 Important safeguards for disposal 55 Information and service 55...
risk of Contents Knowing your juicer 46 Care and cleaning 48 Trouble shooting guide 49 To clear blockage 50 Tips on juicing...51 Storage...55 Notes for all provided instructions before ... in these instructions. Table of injury 39 Technical details 40 Operating...41 Assembling the appliance 41 Operating your Design Juicer Pro 44 Emptying the pulp container during juicing 45 Disassembling your Design Juicer Pro 35 Important safeguards 36 Safeguards for daily operation 37 Important safeguards for disposal 55 Information and service 55...

User Manual
Page 3
... container (dishwasher safe) 7. Filter bowl surround with inter locking safety arm: stops the juicing without the juicer cover locked in whole fruit such as apples, carrots, tomatoes and peeled oranges. Safety arm 8. Knowing Your Design juicer PRO 1. Juicer cover (dishwasher safe) with juice spout 6. 6. Food pusher with 2 speed settings 10. On-/Off-switch...
... container (dishwasher safe) 7. Filter bowl surround with inter locking safety arm: stops the juicing without the juicer cover locked in whole fruit such as apples, carrots, tomatoes and peeled oranges. Safety arm 8. Knowing Your Design juicer PRO 1. Juicer cover (dishwasher safe) with juice spout 6. 6. Food pusher with 2 speed settings 10. On-/Off-switch...

User Manual
Page 4
... taking off , wait for further reference. Never put fingers, wooden spoons or other than the intended use the food pusher provided. The Design Juicer Pro has a special designed large feed chute, a 3 litre pulp container, a big juice jug and a stainless steel titanium reinforced micro mesh...authorised service centre. Any other than described in operational mode. • Always make sure the appliance is an essential part of the juicer. • Do not push products into the power point. Important Instructions • Never leave the appliance unattended when in these instructions...
... taking off , wait for further reference. Never put fingers, wooden spoons or other than the intended use the food pusher provided. The Design Juicer Pro has a special designed large feed chute, a 3 litre pulp container, a big juice jug and a stainless steel titanium reinforced micro mesh...authorised service centre. Any other than described in operational mode. • Always make sure the appliance is an essential part of the juicer. • Do not push products into the power point. Important Instructions • Never leave the appliance unattended when in these instructions...

User Manual
Page 5
... appliance. Do not use the appliance in use the appliance if the rotating filter basket is also likely damaged if the drive wheel of the juicer. • Note: The juice jug lid can cause damages and heavy personal injuries through voltage, fire and moving or cleaning the appliance. Do not place...
... appliance. Do not use the appliance in use the appliance if the rotating filter basket is also likely damaged if the drive wheel of the juicer. • Note: The juice jug lid can cause damages and heavy personal injuries through voltage, fire and moving or cleaning the appliance. Do not place...
User Manual
Page 8
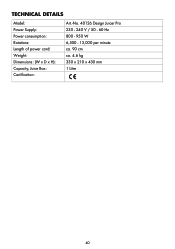
Technical details Model: Power Supply: Power consumption: Rotations: Length of power cord: Weight: Dimensions: (W x D x H): Capacity, Juice Box: Certification: Art.-No. 40126 Design Juicer Pro 230 - 240 V / 50 - 60 Hz 800 - 950 W 6,500 - 13,000 per minute ca. 90 cm ca. 4.6 kg 330 x 210 x 430 mm 1 Litre 40
Technical details Model: Power Supply: Power consumption: Rotations: Length of power cord: Weight: Dimensions: (W x D x H): Capacity, Juice Box: Certification: Art.-No. 40126 Design Juicer Pro 230 - 240 V / 50 - 60 Hz 800 - 950 W 6,500 - 13,000 per minute ca. 90 cm ca. 4.6 kg 330 x 210 x 430 mm 1 Litre 40
User Manual
Page 9
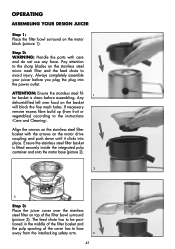
...1). ATTENTION: Ensure the stainless steel fil- 1 ter basket is fitted securely inside the integrated pulp container and onto the motor base (picture 2). 2 2 Step 3: Place the juicer cover over food on the motor drive coupling and push down until it clicks into the power outlet. operating Assembling your... juicer before assembling. Step 2: WARNING: Handle the parts with the arrows on the basket will block the fine mesh holes. Pay attention to the sharp ...
...1). ATTENTION: Ensure the stainless steel fil- 1 ter basket is fitted securely inside the integrated pulp container and onto the motor base (picture 2). 2 2 Step 3: Place the juicer cover over food on the motor drive coupling and push down until it clicks into the power outlet. operating Assembling your... juicer before assembling. Step 2: WARNING: Handle the parts with the arrows on the basket will block the fine mesh holes. Pay attention to the sharp ...

User Manual
Page 10
... feed chute (picture 5a). 5a 42 Step 4: Raise the safety locking arm straight up and lock into the two grooves on both sides of the juicer cover (picture 4). IMPORTANT: If the safety locking arm is not in a vertical position and locked into place on top of the...
... feed chute (picture 5a). 5a 42 Step 4: Raise the safety locking arm straight up and lock into the two grooves on both sides of the juicer cover (picture 4). IMPORTANT: If the safety locking arm is not in a vertical position and locked into place on top of the...

User Manual
Page 11
Slide the food pusher all the way down the feed chute (picture 5b). 5b Step 6: Place the pulp container into position by the container support extending from under the juicer cover on the left-hand side ensuring it is supported by tilting the motor base slightly to collect the pulp. NOTE: To minimise cleaning, line the pulp container with a plastic bag to the right. Pulp can then be used in other dishes, or as compost for the garden or discarded. 6 Step 7: Place the juice jug underneith the spout (picture 7). 7 43 Insert the container under the motor base (picture 6).
Slide the food pusher all the way down the feed chute (picture 5b). 5b Step 6: Place the pulp container into position by the container support extending from under the juicer cover on the left-hand side ensuring it is supported by tilting the motor base slightly to collect the pulp. NOTE: To minimise cleaning, line the pulp container with a plastic bag to the right. Pulp can then be used in other dishes, or as compost for the garden or discarded. 6 Step 7: Place the juice jug underneith the spout (picture 7). 7 43 Insert the container under the motor base (picture 6).

User Manual
Page 12
...water run into the power outlet. Do not put fingers, wooden spoons or other liquids ran into the feed chute. Step 2: Ensure the juicer is completely assembled and that there are nor foreign objects in the feed chute before putting the plug into the motor block. Insert the ... appliance immediately, pull the plug and dry the appliance with the lid. Operate according to overfill the juice jug when operating the juicer. Step1: Wash your Design Juicer pro WARNING: Make sure the appliance is correctly assembled. Push the ›ON/OFF‹ button to avoid endangering by fire ...
...water run into the power outlet. Do not put fingers, wooden spoons or other liquids ran into the feed chute. Step 2: Ensure the juicer is completely assembled and that there are nor foreign objects in the feed chute before putting the plug into the motor block. Insert the ... appliance immediately, pull the plug and dry the appliance with the lid. Operate according to overfill the juice jug when operating the juicer. Step1: Wash your Design Juicer pro WARNING: Make sure the appliance is correctly assembled. Push the ›ON/OFF‹ button to avoid endangering by fire ...

User Manual
Page 13
... WARNING: Never use fingers to the instructions in use the food pusher provided. Replace the empty pulp container into position before continuing to the juicer cover. To extract the maximum amount of the appliance or the filter basket. 45 Clean the appliance in accordance to push food down the ...feed chute. To minimise cleaning, line the pulp container with a plastic freezer bag to the right and unlatch it from under the juicer cover and the container support extending from under the motor base. Always use and you finished operating turn off and pull the plug when the...
... WARNING: Never use fingers to the instructions in use the food pusher provided. Replace the empty pulp container into position before continuing to the juicer cover. To extract the maximum amount of the appliance or the filter basket. 45 Clean the appliance in accordance to push food down the ...feed chute. To minimise cleaning, line the pulp container with a plastic freezer bag to the right and unlatch it from under the juicer cover and the container support extending from under the motor base. Always use and you finished operating turn off and pull the plug when the...

User Manual
Page 14
... 4). 4 46 Move the locking arm down. 3 Step 3: Lift the juicer cover off and pull the plug when the appliance is not in use or when... the pulp container slightly to the right and unlatch it in the dishwasher, pour liquids over the grooves on the juicer to ›OFF‹ and then switch off at the power outlet and unplug. Step 2: Pull the locking... arm back over the appliance or douse or dip it from under the juicer cover and the container support extending from 2 under the motor base (picture 1). Never clean the power cord or ...
... 4). 4 46 Move the locking arm down. 3 Step 3: Lift the juicer cover off and pull the plug when the appliance is not in use or when... the pulp container slightly to the right and unlatch it in the dishwasher, pour liquids over the grooves on the juicer to ›OFF‹ and then switch off at the power outlet and unplug. Step 2: Pull the locking... arm back over the appliance or douse or dip it from under the juicer cover and the container support extending from 2 under the motor base (picture 1). Never clean the power cord or ...
User Manual
Page 16
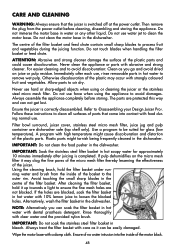
...immerse the motor base in the dishwasher. Always assemble the appliance completely before cleaning, dissembling and storing the appliance. Filter bowl surround, juicer cover, stainless steel micro mesh filter, juice jug and pulp container are protected this way and can soak the filter basket in hot ...all surfaces of the motor block. 48 Do not use water jet to ›Disassembling your Design Juicer Pro‹. The parts are dishwasher safe (top shelf only). Ensure the juicer is switched off at the power outlet. Follow these instructions to air dry. A program with ...
...immerse the motor base in the dishwasher. Always assemble the appliance completely before cleaning, dissembling and storing the appliance. Filter bowl surround, juicer cover, stainless steel micro mesh filter, juice jug and pulp container are protected this way and can soak the filter basket in hot ...all surfaces of the motor block. 48 Do not use water jet to ›Disassembling your Design Juicer Pro‹. The parts are dishwasher safe (top shelf only). Ensure the juicer is switched off at the power outlet. Follow these instructions to air dry. A program with ...

User Manual
Page 17
...power off pulp. ATTENTION: Occasionally clean the drive coupling (see picture) with a clean cloth. Assemble and begin juicing again. Disassemble the Design Juicer Pro (refer to unblock the holes or wash in the vertical oper- Never lay heavy or hard objects on juice or pulp residue. Motor ...appears to air dry or thoroughly dry them with a damp cloth. Try alternating (soft and hard) vegetable and fruit varieties. Remove the juicer cover, scrape off . Allow parts to stall when juicing Wet pulp can not get lost. Turn the ›ON/OFF‹ button to...
...power off pulp. ATTENTION: Occasionally clean the drive coupling (see picture) with a clean cloth. Assemble and begin juicing again. Disassemble the Design Juicer Pro (refer to unblock the holes or wash in the vertical oper- Never lay heavy or hard objects on juice or pulp residue. Motor ...appears to air dry or thoroughly dry them with a damp cloth. Try alternating (soft and hard) vegetable and fruit varieties. Remove the juicer cover, scrape off . Allow parts to stall when juicing Wet pulp can not get lost. Turn the ›ON/OFF‹ button to...

User Manual
Page 18
...of food on the filter basket with too much pressure or the juicing is too vigorous, wet pulp can build up under the juicer cover or the motor appears to the instruction ›Care and Cleaning‹. Follow Disassembling and Cleaning instructions and clean the filter ...bowl surround, the stainless steel filter basket and the juicer cover. 1. Disassemble the appliance according to fall easily and unhindered into the pulp container. • Try other fruit and vegetables. 50 ...
...of food on the filter basket with too much pressure or the juicing is too vigorous, wet pulp can build up under the juicer cover or the motor appears to the instruction ›Care and Cleaning‹. Follow Disassembling and Cleaning instructions and clean the filter ...bowl surround, the stainless steel filter basket and the juicer cover. 1. Disassemble the appliance according to fall easily and unhindered into the pulp container. • Try other fruit and vegetables. 50 ...
User Manual
Page 19
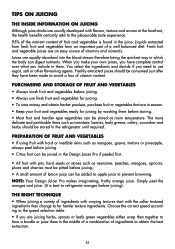
... to the pleasurable taste experience. 95% of the nutrient content of vitamin content. Simply peel the oranges and juice. (It is found in the Design Juicer Pro if peeled first. • All fruit with the softer textured ingredients then change to for juicing. • To save money and obtain fresher produce...; Keep your own juices, you have been made to avoid a loss of fruit and vegetables is best to refrigerate oranges before juicing). NOTE: Your Design Juicer Pro makes invigorating, frothy orange juice.
... to the pleasurable taste experience. 95% of the nutrient content of vitamin content. Simply peel the oranges and juice. (It is found in the Design Juicer Pro if peeled first. • All fruit with the softer textured ingredients then change to for juicing. • To save money and obtain fresher produce...; Keep your own juices, you have been made to avoid a loss of fruit and vegetables is best to refrigerate oranges before juicing). NOTE: Your Design Juicer Pro makes invigorating, frothy orange juice.
User Manual
Page 22
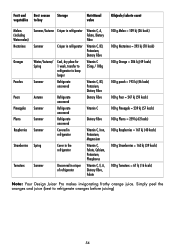
... = 259 kj 62 kcals) 100 g Raspberries = 167 kj (40 kcals) 100 g Strawberries = 163 kj (39 kcals) 100 g Tomatoes = 67 kj (16 kcals) Note: Your Design Juicer Pro makes invigorating frothy orange juice.
... = 259 kj 62 kcals) 100 g Raspberries = 167 kj (40 kcals) 100 g Strawberries = 163 kj (39 kcals) 100 g Tomatoes = 67 kj (16 kcals) Note: Your Design Juicer Pro makes invigorating frothy orange juice.

User Manual
Page 23
... as unsorted municipal waste, use separate collection facilities. Notes for electrical appliances and packaging. For technical support, please contact Gastroback Customer Care Center by inappropriate treatment, over loading or installation mistakes. Operate according to the exclusion of any technical interference of... be to the instructions ›Care and cleaning‹. Contact your local government for further information. Please store the juicer in landfills or dumps, hazardous substances can leak into the groundwater and get into the food chain, damaging your health...
... as unsorted municipal waste, use separate collection facilities. Notes for electrical appliances and packaging. For technical support, please contact Gastroback Customer Care Center by inappropriate treatment, over loading or installation mistakes. Operate according to the exclusion of any technical interference of... be to the instructions ›Care and cleaning‹. Contact your local government for further information. Please store the juicer in landfills or dumps, hazardous substances can leak into the groundwater and get into the food chain, damaging your health...
User Manual
Page 25
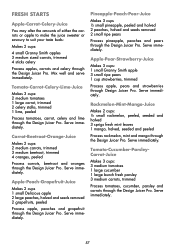
...3 cups: 1 small Granny Smith apple 3 small ripe pears 1 cup strawberries, trimmed Process apple, pears and strawberries through the Design Juicer Pro. Tomato-Carrot-Celery-Lime-Juice Makes 3 cups: 2 medium tomatoes 1 large carrot, trimmed 2 celery stalks, trimmed 1 lime, ...peeled, seeded and halved 3 sprigs fresh mint leaves 1 mango, halved, seeded and peeled Process rockmelon, mint and mango through the Design Juicer Pro. Mix well and serve immediately. Serve immediately. Serve immediately. Serve immediately. Serve immediately. Tomato-Cucumber-ParsleyCarrot-Juice Makes 3 cups:...
...3 cups: 1 small Granny Smith apple 3 small ripe pears 1 cup strawberries, trimmed Process apple, pears and strawberries through the Design Juicer Pro. Tomato-Carrot-Celery-Lime-Juice Makes 3 cups: 2 medium tomatoes 1 large carrot, trimmed 2 celery stalks, trimmed 1 lime, ...peeled, seeded and halved 3 sprigs fresh mint leaves 1 mango, halved, seeded and peeled Process rockmelon, mint and mango through the Design Juicer Pro. Mix well and serve immediately. Serve immediately. Serve immediately. Serve immediately. Serve immediately. Tomato-Cucumber-ParsleyCarrot-Juice Makes 3 cups:...

User Manual
Page 26
...cups: 4 medium sized beetroot, trimmed 2 medium Granny Smith apples 4 sticks celery Process beetroot, apples and celery through the Design Juicer Pro. Serve immediately. Serve immediately. (Best to refrigerate oranges before juicing) Liquid lunches Mango, rockmelon and orange yogurt drink Serves 4:...Makes 3 Cups: 2 parsnips, trimmed 4 sticks celery, trimmed 4 medium pears, stalks removed Process parsnips, celery and pears through the Design Juicer Pro. Serve immediately. Vitamin replacer Tomato-Carrot-Red CapsicumJuice Makes 3 cups: 2 small red capsicum 3 medium tomatoes 3 carrots, trimmed 4...
...cups: 4 medium sized beetroot, trimmed 2 medium Granny Smith apples 4 sticks celery Process beetroot, apples and celery through the Design Juicer Pro. Serve immediately. Serve immediately. (Best to refrigerate oranges before juicing) Liquid lunches Mango, rockmelon and orange yogurt drink Serves 4:...Makes 3 Cups: 2 parsnips, trimmed 4 sticks celery, trimmed 4 medium pears, stalks removed Process parsnips, celery and pears through the Design Juicer Pro. Serve immediately. Vitamin replacer Tomato-Carrot-Red CapsicumJuice Makes 3 cups: 2 small red capsicum 3 medium tomatoes 3 carrots, trimmed 4...
