Gastroback 40133 Support and Manuals
Get Help and Manuals for this Gastroback item
View All Support Options Below
Free Gastroback 40133 manuals!
Problems with Gastroback 40133?
Ask a Question
Free Gastroback 40133 manuals!
Problems with Gastroback 40133?
Ask a Question
Most Recent Gastroback 40133 Questions

Dis-assembly Of Gastroback 40133
G'day,How can I dismantle the swinging handle of the juicer please
G'day,How can I dismantle the swinging handle of the juicer please
(Posted by elieajaka 8 years ago)
Gastroback 40133 Videos

Gastroback Advanced Pro 40133
Duration: 2:27
Total Views: 5,533
Duration: 2:27
Total Views: 5,533
Popular Gastroback 40133 Manual Pages
User Manual - Page 1

For household use ! Model and attachments are subject to change!
GASTROBACK®
Instructions for Use and Recipes
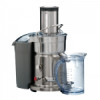
Design Juicer Advanced Pro
Art.-Nr. 40133 Design Juicer Advanced Pro
Read all provided instructions before first use only!
User Manual - Page 2

... Juicer Advanced Pro 42 Care and Cleaning 43 To Clear Blockage 44 Troubleshooting Guide 45 Tips on Juicing...46 Storage...49 Notes for all provided instructions before you start running the appliance and pay attention to the warnings mentioned in
these instructions.
Table of Injuries 38 Technical Specifications 38 Assembling the Appliance 39 Operating your Design Juicer Advanced Pro...
User Manual - Page 3

... comfortable handling. It operates with care and keep the manual. Please read all the advice and instructions with a high performance 1.500 watt motor which makes the juice production easy and efficient. Your Gastroback GmbH
33 Dear Customer! We hope that you will enjoy your new Design Juicer Advanced Pro.
Only use . It has a volumetric capacity of 1.000...
User Manual - Page 4
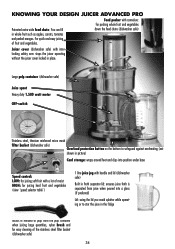
... locked in whole fruit such as apples, carrots, tomatos
down the feed chute (dishwasher safe)
and peeled oranges. knowing your design juicer Advanced Pro
Food pusher with cannelure:
for easy cleaning of fruit and vegetables.
Large pulp container (dishwasher safe)
Juice spout Heavy duty 1.500 watt motor OFF-switch
...
User Manual - Page 5
...service centre. Do not push products into the feed chute with your fingers or other body parts over and splatter which safeguards against overheating with excessive loads. Pay attention when handling the units. This instruction...substances. The Design Juicer Advanced Pro is fitted with the nylon bristle brush.
• ATTENTION: Ensure that the filter basket is an essential part of the ...
User Manual - Page 6

...repair to avoid overheating.
• Do not operate the appliance continuously on a well accessible, stable, level, dry, and suitable large surface. The Design Juicer Advanced Pro... completely assembled before connecting to the instructions ›Trouble shooting guide‹.
36 It is also likely...shop.
• Only use units, spare parts and supplies which are provided and recommended by...
User Manual - Page 8

... hold your face or other liquid. No.: 40133 Design Juicer Advanced Pro 230-240 V AC, 50/60 Hz 1.380 - 1.500 W approx. 100 cm approx. 7 kg approx. 350 x 220 x 430 mm (W x D x H)
Revolutions:
6,500 bis 13,000 per minute
Certification:
These specifications may change without notice.
38 Movable and Sharp-edged Parts - Only store the appliance completely assembled. •...
User Manual - Page 10

...then be used in the feed chute before juicing. Step 2: Ensure the Design Juicer Advanced Pro is supported by switching the speed control. Ensure you place the juice jug with a ...food into a 220/230 V power outlet.
Operating your Design Juicer Advanced Pro
Step 1: Wash selection of the appliance. Ensure vegetables such as a guide for the garden or discarded.
Step 7:
Place the ...
User Manual - Page 12

...Replace the empty pulp container into position. Overload Protection Button
The Design Juicer Advanced Pro...juicer is fitted with a safety device which safeguards against overheating with the stainless steel filter basket still in use or when disassembling, moving or cleaning the appliance.
Step 2:
Remove the pulp container by tilting the pulp container slightly to the trouble shooting guide...
User Manual - Page 13
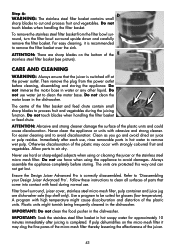
...Design Juicer Advanced Pro`. To remove the stainless steel filter basket from the power outlet before storing. Care and Cleaning
WARNING: Always ensure that come into contact with food during the juicing function. Do not immerse the motor base in the dishwasher. Follow these instructions...cause discolouration and distortion of parts that the juicer is correctly disassembled. Then...
User Manual - Page 15
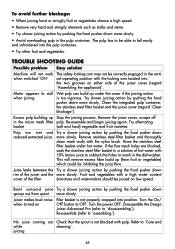
Trouble Shooting Guide
Possible problem Easy solution
Machine will remove excess fibre build up (from spout more slowly. Clean the integrated pulp container, the stainless steel filter basket and the juicer cover (regard ´Clear blockage`). Remove stainless steel filter basket and thoroughly clean mesh walls with a high water content
cover of the juicer...the Design Juicer Advanced Pro (...
User Manual - Page 16
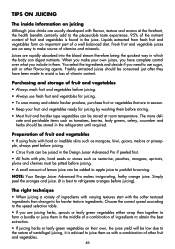
... of other flavouring agents.
Liquids extracted from fresh fruit and vegetables form an important part of vitamins and minerals. The more delicate and perishable items such as with a ...melons or pineapple, always peel before juicing.
• Citrus fruits can be juiced in the Design Juicer Advanced Pro if peeled first.
• All fruits with pits, hard seeds or stones such as nectarine,...
User Manual - Page 19

... When replacing old appliances with the appliance or any part of it...instructions ´Care and Cleaning`.
The purchaser has to take back your local government for further information. Please store the juicer in a frost-free, clean and dry location where it . For technical support, please contact Gastroback Customer Care Center by inappropriate treatment, over loading or installation...
User Manual - Page 22

...3 large pears 250 ml mineral water 1 cup crushed ice
Process apricots and pears through the juicer. Scoop ice into a saucepan and cook over juice, mix well to combine. Serve immediately...Process tomatoes, parsley, garlic, onion, carrots, celery, red capsicum and cucumber through the juicer. Pour in the extracted juice. Add pasta and toss to combine. Serve immediately.
...
User Manual - Page 25

...with butter, sprinkle with remaining pastry and pulp mixture. Combine strawberry pulp and raspberry pulp, set . Refrigerate several hours or overnight. Repeat with greaseproof paper, then a damp cloth to ... teaspoons gelatin dissolved in cake pan for 20-25 minutes or until cake is cooked when tested with a skewer. Add eggs, oil and sour cream.
Mix well. Pour into loaf ...
Gastroback 40133 Reviews
We have not received any reviews for Gastroback yet.