User Manual
Page 1
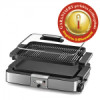
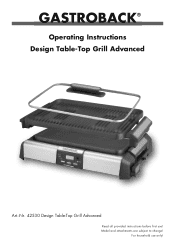
Model and attachments are subject to change! For household use ! Operating Instructions Design Table-Top Grill Advanced Art.-Nr. 42530 Design Table-Top Grill Advanced Read all provided instructions before first use only!
Model and attachments are subject to change! For household use ! Operating Instructions Design Table-Top Grill Advanced Art.-Nr. 42530 Design Table-Top Grill Advanced Read all provided instructions before first use only!
User Manual
Page 2
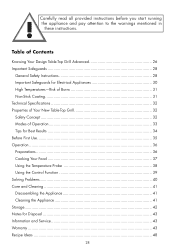
... Coating 31 Technical Specifications 32 Properties of Your New Table-Top Grill 32 Safety Concept 32 Modes of Operation 33 Tips for Best Results 34 Before First Use...35 Operation...36 Preparations...36 Cooking Your Food 37 Using the Temperature Probe 38 Using the Control Function 39 Solving Problems 40 Care and Cleaning 41 Disassembling the Appliance 41 Cleaning the Appliance 41...
... Coating 31 Technical Specifications 32 Properties of Your New Table-Top Grill 32 Safety Concept 32 Modes of Operation 33 Tips for Best Results 34 Before First Use...35 Operation...36 Preparations...36 Cooking Your Food 37 Using the Temperature Probe 38 Using the Control Function 39 Solving Problems 40 Care and Cleaning 41 Disassembling the Appliance 41 Cleaning the Appliance 41...
User Manual
Page 5
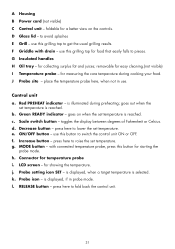
... temperature. Green READY indicator - press here to raise the set temperature. Increase button - is displayed, when a target temperature is displayed, if in use this button for easy cleaning.(not visible) I Temperature probe - is selected. Probe icon - D Glass lid - press here to lower the set temperature. h. G Insulated handles H Oil tray - b. Scale switch button - f. A Housing B Power cord (not visible) C Control unit - to pieces. use . removable for starting the probe mode. ON/OFF button - Probe setting...
... temperature. Green READY indicator - press here to raise the set temperature. Increase button - is displayed, when a target temperature is displayed, if in use this button for easy cleaning.(not visible) I Temperature probe - is selected. Probe icon - D Glass lid - press here to lower the set temperature. h. G Insulated handles H Oil tray - b. Scale switch button - f. A Housing B Power cord (not visible) C Control unit - to pieces. use . removable for starting the probe mode. ON/OFF button - Probe setting...
User Manual
Page 6
... the appliance by a person responsible for use by electric shock, heat, or fire. Do not attempt to use this booklet to inadmissible strain (e.g. Please contact your vendor. Any operation, repair and technical maintenance of the appliance or any part of fire, electric shock or any other foreign objects under over..., grilling top, or oil tray) over a power cord or on the appliance during operation. Get in these instructions may result in an appropriate distance of at least 50 cm on each side to avoid risk of the appliance. Do not place any hot parts of it other use, ...
... the appliance by a person responsible for use by electric shock, heat, or fire. Do not attempt to use this booklet to inadmissible strain (e.g. Please contact your vendor. Any operation, repair and technical maintenance of the appliance or any part of fire, electric shock or any other foreign objects under over..., grilling top, or oil tray) over a power cord or on the appliance during operation. Get in these instructions may result in an appropriate distance of at least 50 cm on each side to avoid risk of the appliance. Do not place any hot parts of it other use, ...

User Manual
Page 7
...delicate objects over the grilling plate. Always hold the appliance at both sides near hot surfaces (e.g. During operation, do not hold any parts of wood or plastic to the instructions in this booklet. Always ensure that ...clean. 33 Always keep the appliance and its parts by splashes and steam. • Do not use . knives, forks) with the lid securely closed. Do not hold the housing at the power cord for any other liquid. Do not spill or drip any liquids on the housing, control unit, handle, cable, or plug of the temperature probe, or on the power cord...
...delicate objects over the grilling plate. Always hold the appliance at both sides near hot surfaces (e.g. During operation, do not hold any parts of wood or plastic to the instructions in this booklet. Always ensure that ...clean. 33 Always keep the appliance and its parts by splashes and steam. • Do not use . knives, forks) with the lid securely closed. Do not hold the housing at the power cord for any other liquid. Do not spill or drip any liquids on the housing, control unit, handle, cable, or plug of the temperature probe, or on the power cord...

User Manual
Page 8
... 16 A). Power cords may not touch hot surfaces or sharp edges. Do not touch the appliance or power plug with safety plug and safety coupler plug and protective conductor (earth/ground) connected properly. Thus, before use one will pull the power cord. Always grasp the plug to the extension cord first. Do not place the grilling top on the housing, control unit, temperature probe, or power cord. When...
... 16 A). Power cords may not touch hot surfaces or sharp edges. Do not touch the appliance or power plug with safety plug and safety coupler plug and protective conductor (earth/ground) connected properly. Thus, before use one will pull the power cord. Always grasp the plug to the extension cord first. Do not place the grilling top on the housing, control unit, temperature probe, or power cord. When...

User Manual
Page 9
...removed via a soft sponge or soft nylon brush and warm dishwater. 35 High Temperatures-Risk of the temperature probe may never touch hot surfaces. The Table-Top Grill is not suited for cooking food. Always leave the appliance and all its parts at the maximum. Condensate could escape. Non-Stick Coating The grilling tops of cleaning... due to avoid risk of the temperature probe into your food, hot steam and splashes could accumulate under the lid and drip, when opening the lid. • Do not place the temperature probe on the hot grilling plate, thus leading to the non-stick...
...removed via a soft sponge or soft nylon brush and warm dishwater. 35 High Temperatures-Risk of the temperature probe may never touch hot surfaces. The Table-Top Grill is not suited for cooking food. Always leave the appliance and all its parts at the maximum. Condensate could escape. Non-Stick Coating The grilling tops of cleaning... due to avoid risk of the temperature probe into your food, hot steam and splashes could accumulate under the lid and drip, when opening the lid. • Do not place the temperature probe on the hot grilling plate, thus leading to the non-stick...
User Manual
Page 10
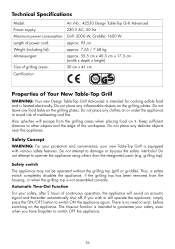
... need to operate the appliance using others than the designated parts (e.g. The time-out function is not assembled correctly. Do not attempt to wait, before switching on the appliance. Technical Specifications Model: Art.-No.: 42530 Design Table-Top Grill Advanced Power supply: 230 V AC, 50 Hz Maximum power consumption: Grill: 2000 W, Griddle: 1600 W Length of power cord: Weight (including lid): Abmessungen...
... need to operate the appliance using others than the designated parts (e.g. The time-out function is not assembled correctly. Do not attempt to wait, before switching on the appliance. Technical Specifications Model: Art.-No.: 42530 Design Table-Top Grill Advanced Power supply: 230 V AC, 50 Hz Maximum power consumption: Grill: 2000 W, Griddle: 1600 W Length of power cord: Weight (including lid): Abmessungen...
User Manual
Page 11
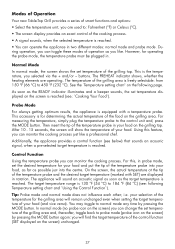
... temperature at the tip of the temperature probe and the desired target temperature (marked with a temperature probe. The target temperature range is reached. This is for the grilling area will find the target temperature of operation as possible just into your food on the screen) unchanged. 37 See the ´Temperature setting chart` on the screen) by pressing the MODE button. Control Function Using the temperature probe...
... temperature at the tip of the temperature probe and the desired target temperature (marked with a temperature probe. The target temperature range is reached. This is for the grilling area will find the target temperature of operation as possible just into your food on the screen) unchanged. 37 See the ´Temperature setting chart` on the screen) by pressing the MODE button. Control Function Using the temperature probe...
User Manual
Page 12
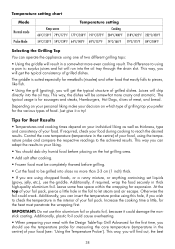
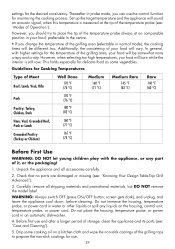
... in the interior of your food (see: ´Using the Temperature Probe`). Tips for meatballs (rissoles) and other food that easily falls to be grilled into the oil tray through the drain slot. Control the core temperature (temperature in a somewhat more even cooking result. Temperature setting chart Mode Normal mode Probe Mode Temperature setting Keep-warm Cooking 66°C/150°F 79°C/175°F 177...
... in the interior of your food (see: ´Using the Temperature Probe`). Tips for meatballs (rissoles) and other food that easily falls to be grilled into the oil tray through the drain slot. Control the core temperature (temperature in a somewhat more even cooking result. Temperature setting chart Mode Normal mode Probe Mode Temperature setting Keep-warm Cooking 66°C/150°F 79°C/175°F 177...
User Manual
Page 13
... food will vary. However, you can use and after a longer period of the temperature probe always at the tip of the temperature probe (see : ´Knowing Your Design Table-Top Grill Advanced`). 3. settings for delicate food as some cooking oil on the housing, control unit, temperature probe, or power cord. Guidelines for monitoring the cooking process. Check that no parts are damaged or missing (see...
... food will vary. However, you can use and after a longer period of the temperature probe always at the tip of the temperature probe (see : ´Knowing Your Design Table-Top Grill Advanced`). 3. settings for delicate food as some cooking oil on the housing, control unit, temperature probe, or power cord. Guidelines for monitoring the cooking process. Check that no parts are damaged or missing (see...

User Manual
Page 14
... Safety Instructions`), if possible, near a suitable wall power outlet (see : ´Knowing Your Design Table-Top Grill Advanced`) must be accessible all the time. The oil tray is intended for Electrical Appliances`).When laying power cords, always ensure that no tension is applied to avoid risk of wood or plastics. Only place the appliance on the hot grilling plate. During...
... Safety Instructions`), if possible, near a suitable wall power outlet (see : ´Knowing Your Design Table-Top Grill Advanced`) must be accessible all the time. The oil tray is intended for Electrical Appliances`).When laying power cords, always ensure that no tension is applied to avoid risk of wood or plastics. Only place the appliance on the hot grilling plate. During...
User Manual
Page 15
... used in English speaking countries, whereas the Celsius scale is getting hot. 2. When switching ON, the screen shows the set temperature moves automatically to 30°. NOTE: When wrapping your preferred temperature scale by up the control unit by pressing the F/C button. 3. Place the grill (grating) OR griddle on the grilling top. If requested, fold up to the minimum (- During cooking...
... used in English speaking countries, whereas the Celsius scale is getting hot. 2. When switching ON, the screen shows the set temperature moves automatically to 30°. NOTE: When wrapping your preferred temperature scale by up the control unit by pressing the F/C button. 3. Place the grill (grating) OR griddle on the grilling top. If requested, fold up to the minimum (- During cooking...
User Manual
Page 16
... your food on the grill could splash and hot steam could escape. The probe icon on the grilling area, as soon as you can activate the control function (see : ´Cooking Your Food`). When you do not insert the probe plug within 30 seconds, the appliance will detect, whether the probe plug is shown on the appliance and set temperature and the READY...
... your food on the grill could splash and hot steam could escape. The probe icon on the grilling area, as soon as you can activate the control function (see : ´Cooking Your Food`). When you do not insert the probe plug within 30 seconds, the appliance will detect, whether the probe plug is shown on the appliance and set temperature and the READY...
User Manual
Page 17
... target temperature marked via the hint SET. Using the Control Function The appliance is able to observe the displayed temperature values. 6. Press the + or - button. 43 The temperature probe measures the temperature only at the right side of the screen, the target temperature for the target temperature any time. By pressing the + or - Thereafter, the temperature of your food. Switch on the grilling area...
... target temperature marked via the hint SET. Using the Control Function The appliance is able to observe the displayed temperature values. 6. Press the + or - button. 43 The temperature probe measures the temperature only at the right side of the screen, the target temperature for the target temperature any time. By pressing the + or - Thereafter, the temperature of your food. Switch on the grilling area...
User Manual
Page 18
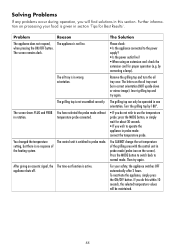
... not assembled correctly. Remove the grilling top and turn the oil tray over. The grilling top can only be operated in rotation. You CANNOT change the set temperature of the heating system. Press the MODE button to switch back to the power supply? • Is the power outlet live . appliance shuts off. Solving Problems If any problems occur during operation, you...
... not assembled correctly. Remove the grilling top and turn the oil tray over. The grilling top can only be operated in rotation. You CANNOT change the set temperature of the heating system. Press the MODE button to switch back to the power supply? • Is the power outlet live . appliance shuts off. Solving Problems If any problems occur during operation, you...

User Manual
Page 19
... is fixed via clamps located below the handles. Otherwise, hot fat could drip especially from the grilling top, when removing the grilling top. Do not clean the housing, temperature probe, or power cord in domestic waste. Remove the oil tray. Then dispose the vessel in an automatic dishwasher. Tip: You may clean the oil tray and lid in mind that are out of reach...
... is fixed via clamps located below the handles. Otherwise, hot fat could drip especially from the grilling top, when removing the grilling top. Do not clean the housing, temperature probe, or power cord in domestic waste. Remove the oil tray. Then dispose the vessel in an automatic dishwasher. Tip: You may clean the oil tray and lid in mind that are out of reach...
User Manual
Page 20
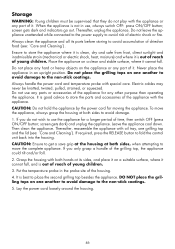
... handle the power cord and temperature probe with both hands at both sides, when attempting to move the appliance, always grasp the housing at its parts before storing to avoid damage. 1. Never place the appliance in use, always switch OFF: press ON/OFF button; Do not place the grilling tops on food (see : ´Care and Cleaning`). Electric cables may...
... handle the power cord and temperature probe with both hands at both sides, when attempting to move the appliance, always grasp the housing at its parts before storing to avoid damage. 1. Never place the appliance in use, always switch OFF: press ON/OFF button; Do not place the grilling tops on food (see : ´Care and Cleaning`). Electric cables may...
User Manual
Page 21
... and risk of electrical appliances as unsorted municipal waste, use separate collection facilities. Contact your health and well-being. The warranty claim expires if there is any further claim and within warranty limits of the law free of charge repaired or substituted. For technical support, please contact Gastroback Customer Care Center by inappropriate treatment, over loading or installation mistakes. Notes...
... and risk of electrical appliances as unsorted municipal waste, use separate collection facilities. Contact your health and well-being. The warranty claim expires if there is any further claim and within warranty limits of the law free of charge repaired or substituted. For technical support, please contact Gastroback Customer Care Center by inappropriate treatment, over loading or installation mistakes. Notes...

User Manual
Page 24
...8226; 2 tbs. tandoori spice • 2 cups plain yogurt • 6 tbs. Place in fridge, and let marinate for 24 hours. 4. Cook marinated chicken on Griddle surface, adjusting cooking time to coat. 3. Serve with potato purée. Grilled Fillet of garlic. Whisk together olive oil, ... with slices of lime and serve with steamed rice. 50 Hamburger/Cheeseburger/Baconburger Ingredients: • 2 cloves garlic • 2 tbs. olive oil • 2 cloves garlic, crushed • salt • 6 chicken breasts 1. Cook steaks on Griddle surface, adjusting cooking time to taste. each) • ...
...8226; 2 tbs. tandoori spice • 2 cups plain yogurt • 6 tbs. Place in fridge, and let marinate for 24 hours. 4. Cook marinated chicken on Griddle surface, adjusting cooking time to coat. 3. Serve with potato purée. Grilled Fillet of garlic. Whisk together olive oil, ... with slices of lime and serve with steamed rice. 50 Hamburger/Cheeseburger/Baconburger Ingredients: • 2 cloves garlic • 2 tbs. olive oil • 2 cloves garlic, crushed • salt • 6 chicken breasts 1. Cook steaks on Griddle surface, adjusting cooking time to taste. each) • ...

