Gastroback 98101 Support and Manuals
Get Help and Manuals for this Gastroback item
View All Support Options Below
Free Gastroback 98101 manuals!
Problems with Gastroback 98101?
Ask a Question
Free Gastroback 98101 manuals!
Problems with Gastroback 98101?
Ask a Question
Popular Gastroback 98101 Manual Pages
User Manual - Page 1

Model and attachments are subject to change GASTROBACK®
Instructions for use Meat Grinder / Cookie Attachment Accessory Design Stand Mixer Advanced
Art.-Nr. 98101
Read all provided instructions before first usage!
User Manual - Page 2

... while connected to let the motor cool down.
• ATTENTION: Avoid contact the moving parts.
Always handle the entire appliance and the tools with care and without violence.
• ...assembled. ! Do not operate or store the appliance outdoors or in these instructions. Carefully read all provided instructions before you start running the appliance and pay regard to avoid overheating. ...
User Manual - Page 4
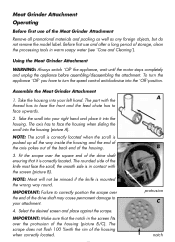
... To turn the appliance ´Off` you have to turn the speed control anticlockwise into the housing (picture A). The part with the rim of the housing when correctly located. Take the scroll into your right hand and place it is in warm... promotional materials and packing as well as any foreign objects, but do not remove the model label. IMPORTANT: Make sure that it into your attachment.
4.
User Manual - Page 5
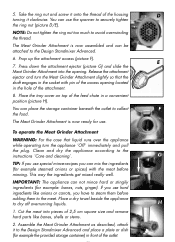
... into the opening located in the hole of 2,5 cm square size and remove hard parts like onions or carrots, you can use the spanner to avoid overwinding the thread.
The... according to dry off overrunning liquids. If you use . Place a dry towel beside the appliance
to the
instructions ´Care and cleaning`. You can mix the ingredients (for example: bones, nuts, ginger). Prop up...
User Manual - Page 6

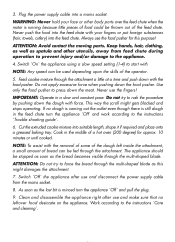
...Off` and work according to choose, when using speed setting 4. As soon as spatula and other body parts over the feed chute when the motor is running because... socket. Do not try to the appliance.
4. IMPORTANT: Speed setting 4 is the highest speed setting you are allowed to the instructions ´Trouble shooting guide`.
6. WARNING: Always make sure that the appliance is turned &#...
User Manual - Page 7

... on the scroll and the feed chute. WARNING: To avoid injuries to the appliance. Always wipe off spilled liquids immediately. Follow the cleaning instructions step by step
3. Soak parts with running water and dry them accurately.
4. the provided spanner to the power supply, keep hands, hair, clothing, as well as spatula and...
User Manual - Page 8

...Clear the problem before turning on the appliance.
6. Trouble shooting guide
Possible problem
Easy solution...parts of the appliance and attachment after the cleaning, take the food pusher out of the outlet while operating. Wipe the appliance and power cord with some hard substance
(for technical maintenance and repair to the instructions ´Care and cleaning`. • If the problem...
User Manual - Page 9

The ring nut is not correctly assembled or not securely locked to the instructions ´Assemble the Meat Grinder Attachment`. If the problem still occurs disassemble and clean the appliance. To turn the speed control anticlockwise into your right hand and place it is pushed up all promotional ...
User Manual - Page 10
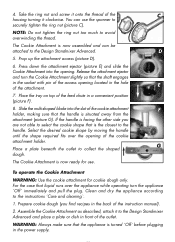
If the handle is facing the other side you find recipes in front of the instruction manual).
2. Select the desired cookie shape by moving the handle
until the shape required fits over the appliance while operating turn...housing turning it onto the thread of the feed chute in the power supply. 4. Place a plate beneath the outlet to the instructions ´Care and cleaning`.
1.
User Manual - Page 11
....
Feed cookie mixture through the multi-shaped blade as spatula and other body parts over the feed chute when the motor is minced turn the appliance ´Off...` the appliance using a slow speed setting (1-4) to the instructions ´Trouble shooting guide`.
6. Do not apply excessive force when pushing down the meat. Do not try to the instructions ´Care and cleaning`. If no...
User Manual - Page 12
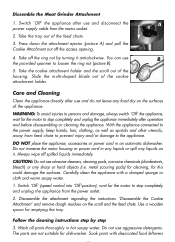
...access opening.
4. CAUTION: Do not use aggressive detergents. Disassemble the attachment regarding the instructions ´Disassemble the Cookie Attachment` and remove dough residues on the surfaces of the ...soapy water. metal scouring pads) for cleaning, for emptying the tray. Wash all parts thoroughly in an automatic dishwasher. Press down the attachment ejector (picture A) and pull...
User Manual - Page 13

...spill or drip water or any technical interference of charge repaired or substituted. Storage
Always clean the appliance and attachment ...air corrosion.
5.
There is caused by inappropriate treatment, over loading or installation mistakes.
Warranty
We guarantee that all parts with the corresponding local regulations and requirements for electrical appliances. Please contact your...
User Manual - Page 15

Pasta Maker Attachment Art.-Nr.: 98100
Meat Grinder / Cookie Attachment Art.-Nr.: 98101
Food Slicer/ Shredder Attachment Art.-Nr.: 98102
Additional stainless steel bowl Art.-Nr.: 98103 Accessories for the Design Stand Mixer Advanced
You will get the accessories from your specialty retailer.
Gastroback 98101 Reviews
We have not received any reviews for Gastroback yet.