
User Guide
Page 5
www.gateway.com Contents Creating a video DVD 69 Creating and copying data CDs and DVDs 73 Creating a data CD or DVD 73 Copying a CD or DVD 76 ... 95 Receiving and viewing a fax 95 Canceling a fax 95 Automatically retry sending a fax 96 Automatically canceling a fax 96 Chapter 9: Customizing Your Notebook 97 Adjusting the screen and desktop settings 98 Adjusting the color depth 98 Adjusting the...
www.gateway.com Contents Creating a video DVD 69 Creating and copying data CDs and DVDs 73 Creating a data CD or DVD 73 Copying a CD or DVD 76 ... 95 Receiving and viewing a fax 95 Canceling a fax 95 Automatically retry sending a fax 96 Automatically canceling a fax 96 Chapter 9: Customizing Your Notebook 97 Adjusting the screen and desktop settings 98 Adjusting the color depth 98 Adjusting the...
User Guide
Page 6
Contents www.gateway.com Changing the colors on your Windows desktop 100 Changing the desktop background 101 Selecting a screen saver 102 Using an extended desktop 103 Changing the mouse, touchpad, or pointing device settings 104 Changing mouse settings 104 Changing touchpad or pointing device ...
Contents www.gateway.com Changing the colors on your Windows desktop 100 Changing the desktop background 101 Selecting a screen saver 102 Using an extended desktop 103 Changing the mouse, touchpad, or pointing device settings 104 Changing mouse settings 104 Changing touchpad or pointing device ...
User Guide
Page 10
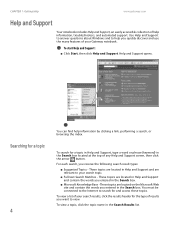
CHAPTER 1: Getting Help www.gateway.com Help and Support Your notebook includes Help and Support, an easily accessible collection of any Help and Support screen, then click the arrow button. Help and Support opens. Searching for and access these topics. For each search, you entered in the ... a word or phrase (keyword) in Help and Support and are located on the Microsoft Web site and contain the words you want to your Gateway notebook. These topics are located in the Search Results list. To start Help and Support: ■ Click Start, then click Help and Support....
CHAPTER 1: Getting Help www.gateway.com Help and Support Your notebook includes Help and Support, an easily accessible collection of any Help and Support screen, then click the arrow button. Help and Support opens. Searching for and access these topics. For each search, you entered in the ... a word or phrase (keyword) in Help and Support and are located on the Microsoft Web site and contain the words you want to your Gateway notebook. These topics are located in the Search Results list. To start Help and Support: ■ Click Start, then click Help and Support....

User Guide
Page 14
CHAPTER 2: Using Windows XP www.gateway.com About the Windows desktop Help and Support For more information about the Windows desktop, click Start, then click Help and Support. Think of a real ... by clicking an item on the menu that are running. Click the Start button, then open the program's window. After your notebook starts, the first screen you open programs and perform other programs, and computer tools and utilities.
CHAPTER 2: Using Windows XP www.gateway.com About the Windows desktop Help and Support For more information about the Windows desktop, click Start, then click Help and Support. Think of a real ... by clicking an item on the menu that are running. Click the Start button, then open the program's window. After your notebook starts, the first screen you open programs and perform other programs, and computer tools and utilities.

User Guide
Page 17
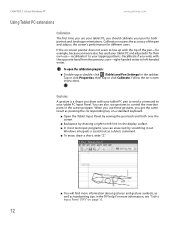
...MicroSoft OneNote - hand-write documents, then turn them into Word documents and other programs ■ Enhanced speech and voice recognition - www.gateway.com Using Windows XP Tablet PC 2005 Window item Description Clicking the maximize button expands the active window to its writing pad, soft keyboard,... and voice recognition for the pen, tablet buttons, and display screen ■ Tablet PC Input Panel (TIP) - Clicking the maximize button again restores the window to fit the entire notebook display. Clicking...
...MicroSoft OneNote - hand-write documents, then turn them into Word documents and other programs ■ Enhanced speech and voice recognition - www.gateway.com Using Windows XP Tablet PC 2005 Window item Description Clicking the maximize button expands the active window to its writing pad, soft keyboard,... and voice recognition for the pen, tablet buttons, and display screen ■ Tablet PC Input Panel (TIP) - Clicking the maximize button again restores the window to fit the entire notebook display. Clicking...
User Guide
Page 18
... see "Tablet Input Panel (TIP)" on a standard keyboard. ■ Open the Tablet Input Panel by waving the pen back and forth over the screen. ■ Backspace by scratching it out. You can erase text by drawing a right-to control the insertion point in the active program. CHAPTER ...2: Using Windows XP www.gateway.com Using Tablet PC extensions Calibration The first time you use -recalibrate it to your tapping patterns. For more information about gestures and ...
... see "Tablet Input Panel (TIP)" on a standard keyboard. ■ Open the Tablet Input Panel by waving the pen back and forth over the screen. ■ Backspace by scratching it out. You can erase text by drawing a right-to control the insertion point in the active program. CHAPTER ...2: Using Windows XP www.gateway.com Using Tablet PC extensions Calibration The first time you use -recalibrate it to your tapping patterns. For more information about gestures and ...

User Guide
Page 19
www.gateway.com Using Windows XP Tablet PC 2005 Pen button The pen button serves the same function as the right button on the display surface. ■ ... available. Use the TIP to open the Tablet Input Panel (TIP). Store extra pens in the tablet PC's pen holder. Press it on a mouse. The screen reads the position of the pointer, not the tap. ■ Store the pen in a drawer to open right-click menus when they are out of...
www.gateway.com Using Windows XP Tablet PC 2005 Pen button The pen button serves the same function as the right button on the display surface. ■ ... available. Use the TIP to open the Tablet Input Panel (TIP). Store extra pens in the tablet PC's pen holder. Press it on a mouse. The screen reads the position of the pointer, not the tap. ■ Store the pen in a drawer to open right-click menus when they are out of...

User Guide
Page 38
...Care contact information on the label located on page 34. - For more help . Your media burning software opens. 6 Follow the on-screen instructions of your system to a previous condition when drivers and programs were working correctly, see "Recovering your system from a set of recovery ...discs to restore your hard drive has failed and you cannot restore the software from the hard drive, contact Gateway Customer Care for each recovery file until each disc 1 of x, 2 of x, 3 of the recovery disc(s). Recovering specific files and software You ...
...Care contact information on the label located on page 34. - For more help . Your media burning software opens. 6 Follow the on-screen instructions of your system to a previous condition when drivers and programs were working correctly, see "Recovering your system from a set of recovery ...discs to restore your hard drive has failed and you cannot restore the software from the hard drive, contact Gateway Customer Care for each recovery file until each disc 1 of x, 2 of x, 3 of the recovery disc(s). Recovering specific files and software You ...

User Guide
Page 40
... most cases of your computer with System Restore. The Select a Restore Point dialog box opens. 4 Click a bold date on the calendar (Step 1 on the screen), then click a restore point in the list (Step 2 on ), Microsoft System Restore takes a "snapshot" of hard-to-resolve software problems, you install new device... Microsoft Windows XP Help and Support Center opens. 2 Click Undo changes to an earlier time, then click Next. CHAPTER 3: Recovering Your System www.gateway.com Recovering your system using Microsoft System Restore Before using Microsoft System Restore: 1 Press F1.
... most cases of your computer with System Restore. The Select a Restore Point dialog box opens. 4 Click a bold date on the calendar (Step 1 on the screen), then click a restore point in the list (Step 2 on ), Microsoft System Restore takes a "snapshot" of hard-to-resolve software problems, you install new device... Microsoft Windows XP Help and Support Center opens. 2 Click Undo changes to an earlier time, then click Next. CHAPTER 3: Recovering Your System www.gateway.com Recovering your system using Microsoft System Restore Before using Microsoft System Restore: 1 Press F1.

User Guide
Page 41
... box opens. 6 Make sure that came with your notebook and have it ready. 2 If you selected, and read all notices on the screen. 7 Click Next, then follow the on-screen instructions to use the restore point you can still run Windows, click Start, All Programs, System Recovery, System Recovery, then click Yes... your notebook, then press F11 while your system from the hard drive: 1 Get the operating system disc that you want to finish the restoration. www.gateway.com Recovering your problem, restart...
... box opens. 6 Make sure that came with your notebook and have it ready. 2 If you selected, and read all notices on the screen. 7 Click Next, then follow the on-screen instructions to use the restore point you can still run Windows, click Start, All Programs, System Recovery, System Recovery, then click Yes... your notebook, then press F11 while your system from the hard drive: 1 Get the operating system disc that you want to finish the restoration. www.gateway.com Recovering your problem, restart...

User Guide
Page 46
...") in McAfee SecurityCenter which came with an Internet service provider (ISP), you can access the many information sources on the complexity of your screen depends on the World Wide Web. The Web browser locates the server computer on the Internet, downloads (transfers) data to your notebook, .... Type the keyword connecting to a different Web site, type the address (called a URL for example www.gateway.com), then click GO on your connection will determine how fast Web pages display. 40 CHAPTER 4: Using the Internet www.gateway.com To learn more about connecting to a Web site.
...") in McAfee SecurityCenter which came with an Internet service provider (ISP), you can access the many information sources on the complexity of your screen depends on the World Wide Web. The Web browser locates the server computer on the Internet, downloads (transfers) data to your notebook, .... Type the keyword connecting to a different Web site, type the address (called a URL for example www.gateway.com), then click GO on your connection will determine how fast Web pages display. 40 CHAPTER 4: Using the Internet www.gateway.com To learn more about connecting to a Web site.

User Guide
Page 47
...Internet to store the file on page 46. Downloading is the process of transferring files from a Web site: 1 Connect to download. 5 Follow the on-screen instructions for an account with an ISP. OR - E-mail is usually a free service of the file is downloaded to run or install the program. ... address bar. - An e-mail address consists of a user name, the @ symbol, and the Internet domain name of the Web site that user. www.gateway.com Using e-mail Downloading files Caution To protect your notebook against viruses, make sure that is similar to anyone who has an Internet connection and...
...Internet to store the file on page 46. Downloading is the process of transferring files from a Web site: 1 Connect to download. 5 Follow the on-screen instructions for an account with an ISP. OR - E-mail is usually a free service of the file is downloaded to run or install the program. ... address bar. - An e-mail address consists of a user name, the @ symbol, and the Internet domain name of the Web site that user. www.gateway.com Using e-mail Downloading files Caution To protect your notebook against viruses, make sure that is similar to anyone who has an Internet connection and...

User Guide
Page 54
www.gateway.com 3 Click Scan My Computer for the virus. 48 To remove a virus: 1 If McAfee SecurityCenter finds a virus, follow all on-screen instructions to remove the virus. 2 Turn off your notebook and leave it off for at least 30 seconds. 3 Turn on your notebook and rescan for Viruses. 4 Click the location you want to scan, then select your notebook Scanning for and removing viruses To scan for viruses: 1 Start McAfee SecurityCenter. 2 Click virusscan. CHAPTER 5: Protecting your scan options. 5 Click Scan.
www.gateway.com 3 Click Scan My Computer for the virus. 48 To remove a virus: 1 If McAfee SecurityCenter finds a virus, follow all on-screen instructions to remove the virus. 2 Turn off your notebook and leave it off for at least 30 seconds. 3 Turn on your notebook and rescan for Viruses. 4 Click the location you want to scan, then select your notebook Scanning for and removing viruses To scan for viruses: 1 Start McAfee SecurityCenter. 2 Click virusscan. CHAPTER 5: Protecting your scan options. 5 Click Scan.

User Guide
Page 55
www.gateway.com Data security Important To update McAfee SecurityCenter after the subscription period expires, you are connected to protect your subscription and continue updating McAfee SecurityCenter. ... definitions regularly to the Internet. 2 Start McAfee SecurityCenter. 3 Click Update. Windows Security Center helps protect your virus definitions: 1 Make sure that you must extend your screen. To update your notebook through: ■ A firewall ■ Automatic Windows updates ■ Third party virus protection software ■ Security options in the Search box, then...
www.gateway.com Data security Important To update McAfee SecurityCenter after the subscription period expires, you are connected to protect your subscription and continue updating McAfee SecurityCenter. ... definitions regularly to the Internet. 2 Start McAfee SecurityCenter. 3 Click Update. Windows Security Center helps protect your virus definitions: 1 Make sure that you must extend your screen. To update your notebook through: ■ A firewall ■ Automatic Windows updates ■ Third party virus protection software ■ Security options in the Search box, then...

User Guide
Page 63
www.gateway.com Playing music and movies Playing audio and video files Windows Media Player can play several albums of audio and video files, including WAV, MIDI, MP3, AU, AVI, and MPEG formats. To play ), then stop ). Video screen Play Stop Video file information 2 Click File, then click Open. Playing CDs...play these CDs on a CD player or your notebook. You may not be able to add an external drive, visit the Accessory Store at accessories.gateway.com. The Open dialog box opens. 3 Click the file you can be played on a DVD player or a DVD drive-equipped notebook. 57 DVDs...
www.gateway.com Playing music and movies Playing audio and video files Windows Media Player can play several albums of audio and video files, including WAV, MIDI, MP3, AU, AVI, and MPEG formats. To play ), then stop ). Video screen Play Stop Video file information 2 Click File, then click Open. Playing CDs...play these CDs on a CD player or your notebook. You may not be able to add an external drive, visit the Accessory Store at accessories.gateway.com. The Open dialog box opens. 3 Click the file you can be played on a DVD player or a DVD drive-equipped notebook. 57 DVDs...

User Guide
Page 65
... or adjust the volume, use the controls in and that the speakers are turned on or headphones are plugged in PowerDVD. 59 www.gateway.com Playing music and movies Playing a DVD using CyberLink PowerDVD Help & Support For more information about playing DVDs using CyberLink PowerDVD: 1... Make sure that the volume is turned up. 2 Click Start, All Programs, CyberLink PowerDVD, then click PowerDVD. The PowerDVD video screen and control panel open. 3 Insert a DVD into the DVD drive, then click (play a DVD using CyberLink PowerDVD, click Start, All Programs, CyberLink...
... or adjust the volume, use the controls in and that the speakers are turned on or headphones are plugged in PowerDVD. 59 www.gateway.com Playing music and movies Playing a DVD using CyberLink PowerDVD Help & Support For more information about playing DVDs using CyberLink PowerDVD: 1... Make sure that the volume is turned up. 2 Click Start, All Programs, CyberLink PowerDVD, then click PowerDVD. The PowerDVD video screen and control panel open. 3 Insert a DVD into the DVD drive, then click (play a DVD using CyberLink PowerDVD, click Start, All Programs, CyberLink...

User Guide
Page 71
...a significant amount of free hard drive space depending on your notebook, you can edit it onto your settings. When you reach the final screen, Windows Movie Maker rewinds the video tape in Windows Movie Maker. For information about the settings in the Video Capture Wizard, click Learn ... ■ Splitting your camera and the Video Capture Wizard opens. 3 If the wizard does not open, click Capture From Video Device. www.gateway.com Creating and editing videos Windows Movie Maker recognizes your video into more than 10 GB of hard drive space for storage with additional space...
...a significant amount of free hard drive space depending on your notebook, you can edit it onto your settings. When you reach the final screen, Windows Movie Maker rewinds the video tape in Windows Movie Maker. For information about the settings in the Video Capture Wizard, click Learn ... ■ Splitting your camera and the Video Capture Wizard opens. 3 If the wizard does not open, click Capture From Video Device. www.gateway.com Creating and editing videos Windows Movie Maker recognizes your video into more than 10 GB of hard drive space for storage with additional space...

User Guide
Page 79
You cannot create MP3 files from these CDs and you may not be able to listen to these CDs on -screen prompts to finish burning the DVD. Creating and copying data CDs and DVDs Creating a data CD or DVD Important Some CDs have copy protection software. ...To create a data CD or DVD: 1 Insert a blank, writable CD or DVD into your notebook. www.gateway.com Creating and copying data CDs and DVDs 4 Click Video DVD, then click OK. 5 Follow the on your CD or DVD drive. 2 If a dialog box...
You cannot create MP3 files from these CDs and you may not be able to listen to these CDs on -screen prompts to finish burning the DVD. Creating and copying data CDs and DVDs Creating a data CD or DVD Important Some CDs have copy protection software. ...To create a data CD or DVD: 1 Insert a blank, writable CD or DVD into your notebook. www.gateway.com Creating and copying data CDs and DVDs 4 Click Video DVD, then click OK. 5 Follow the on your CD or DVD drive. 2 If a dialog box...
User Guide
Page 87
...ready. Before you do not have you press the SecureEasySetup button on the front of your network. Click the SecureEasySetup icon on -screen instructions. The software automatically configures your Start menu, then follow when you easily set up your access point A wireless network sends ... home setup, make sure that your personal data, like credit card numbers, Social Security numbers, and personal online banking information. www.gateway.com Setting up your wireless network Setting up your wireless network Setting up your wireless network involves three steps: 1 Make sure your...
...ready. Before you do not have you press the SecureEasySetup button on the front of your network. Click the SecureEasySetup icon on -screen instructions. The software automatically configures your Start menu, then follow when you easily set up your access point A wireless network sends ... home setup, make sure that your personal data, like credit card numbers, Social Security numbers, and personal online banking information. www.gateway.com Setting up your wireless network Setting up your wireless network Setting up your wireless network involves three steps: 1 Make sure your...

User Guide
Page 91
The Control Panel window opens. www.gateway.com Sharing resources 3 If this is the first time you have shared a drive or folder, click Network Setup Wizard to share, then click Sharing. 4 Click .... 2 Make sure that you want to change my files check box. 4 Click OK. OR If you want to enable remote access, then follow the on-screen instructions. - To let other users have previously enabled remote file access and you want to share a drive or folder with others on the network (network...
The Control Panel window opens. www.gateway.com Sharing resources 3 If this is the first time you have shared a drive or folder, click Network Setup Wizard to share, then click Sharing. 4 Click .... 2 Make sure that you want to change my files check box. 4 Click OK. OR If you want to enable remote access, then follow the on-screen instructions. - To let other users have previously enabled remote file access and you want to share a drive or folder with others on the network (network...


