
Reference Guide
Page 3
... 1: About This Reference 1 About this guide 2 Accessing your online User Guide 2 Gateway contact information 3 Gateway model and serial number 3 Microsoft Certificate of Authenticity 3 For more information 3 Chapter 2: Checking Out Your Notebook . . . . . 5 Front 6 Left 7 Right 8 Back 9 Bottom 10 Keyboard area 11 Chapter 3: Setting Up and Getting Started . . 13 Working safely and ... Waking up your notebook 21 Turning off your notebook 21 Restarting (rebooting) your notebook 22 Using the status indicators 23 Using the keyboard 25 Key types 26 System key combinations 27 i
... 1: About This Reference 1 About this guide 2 Accessing your online User Guide 2 Gateway contact information 3 Gateway model and serial number 3 Microsoft Certificate of Authenticity 3 For more information 3 Chapter 2: Checking Out Your Notebook . . . . . 5 Front 6 Left 7 Right 8 Back 9 Bottom 10 Keyboard area 11 Chapter 3: Setting Up and Getting Started . . 13 Working safely and ... Waking up your notebook 21 Turning off your notebook 21 Restarting (rebooting) your notebook 22 Using the status indicators 23 Using the keyboard 25 Key types 26 System key combinations 27 i

Reference Guide
Page 5
www.gateway.com Chapter 6: Traveling with Your Notebook . . . 57 Packing your notebook 58 Traveling by air 58 Dial-up modem 58 Radio frequency wireless connections 59 Files ... Power 61 Additional tips 61 Chapter 7: Maintaining Your Notebook . . . . . 63 Caring for your notebook 64 Cleaning your notebook 65 Cleaning the exterior 65 Cleaning the keyboard 66 Cleaning the notebook screen 66 Maintaining the battery 66 Storing batteries 67 Cleaning CDs or DVDs 68 Recovering your system 68 Recovering pre-installed...
www.gateway.com Chapter 6: Traveling with Your Notebook . . . 57 Packing your notebook 58 Traveling by air 58 Dial-up modem 58 Radio frequency wireless connections 59 Files ... Power 61 Additional tips 61 Chapter 7: Maintaining Your Notebook . . . . . 63 Caring for your notebook 64 Cleaning your notebook 65 Cleaning the exterior 65 Cleaning the keyboard 66 Cleaning the notebook screen 66 Maintaining the battery 66 Storing batteries 67 Cleaning CDs or DVDs 68 Recovering your system 68 Recovering pre-installed...
Reference Guide
Page 6
Contents Diskette drive (external 92 Display 92 DVD drives 94 Ethernet 95 Express cards 95 File management 96 Hard drive 96 Internet 97 Keyboard 98 Media Center 99 Memory 102 Memory card reader 102 Modem (cable or DSL 102 Modem (dial-up 103 Mouse 106 Networks (wired 107 Networks (wireless 108 Passwords 110 Pointing device 111 Power 111 Printer 112 Sound 113 Status indicators 113 Touchpad or pointing device 114 Video 114 Telephone support 114 Before calling Gateway Customer Care 114 Appendix A: Legal Information 117 Index 127 iv
Contents Diskette drive (external 92 Display 92 DVD drives 94 Ethernet 95 Express cards 95 File management 96 Hard drive 96 Internet 97 Keyboard 98 Media Center 99 Memory 102 Memory card reader 102 Modem (cable or DSL 102 Modem (dial-up 103 Mouse 106 Networks (wired 107 Networks (wireless 108 Passwords 110 Pointing device 111 Power 111 Printer 112 Sound 113 Status indicators 113 Touchpad or pointing device 114 Video 114 Telephone support 114 Before calling Gateway Customer Care 114 Appendix A: Legal Information 117 Index 127 iv

Reference Guide
Page 13
... 54 Express Card into the memory card reader. Plug USB devices (such as a diskette drive, flash drive, printer, scanner, camera, keyboard, or mouse) into these ports. The memory card reader supports Memory Stick®, Memory Stick Pro®, Mini Secure Digital®, MultiMediaCard...™, RS-MultiMediaCard™, and Secure Digital™ cards. 7 Left www.gateway.com Component Ventilation fan USB ports Express Card slot Memory card reader Ventilation fan USB ports Icon Description Express Card Memory card slot...
... 54 Express Card into the memory card reader. Plug USB devices (such as a diskette drive, flash drive, printer, scanner, camera, keyboard, or mouse) into these ports. The memory card reader supports Memory Stick®, Memory Stick Pro®, Mini Secure Digital®, MultiMediaCard...™, RS-MultiMediaCard™, and Secure Digital™ cards. 7 Left www.gateway.com Component Ventilation fan USB ports Express Card slot Memory card reader Ventilation fan USB ports Icon Description Express Card Memory card slot...
Reference Guide
Page 17
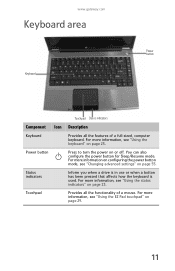
...status indicators" on or off. Inform you when a drive is in use or when a button has been pressed that affects how the keyboard is used. You can also configure the power button for Sleep/Resume mode. For more information, see "Using the EZ Pad touchpad" ...configuring the power button mode, see "Using the keyboard" on page 29. 11 Provides all the features of a mouse. For more information, see "Changing advanced settings" on page 55. www.gateway.com Keyboard area Keyboard Power button Component Icon Keyboard Power button Status indicators Touchpad Touchpad Status indicators ...
...status indicators" on or off. Inform you when a drive is in use or when a button has been pressed that affects how the keyboard is used. You can also configure the power button for Sleep/Resume mode. For more information, see "Using the EZ Pad touchpad" ...configuring the power button mode, see "Using the keyboard" on page 29. 11 Provides all the features of a mouse. For more information, see "Changing advanced settings" on page 55. www.gateway.com Keyboard area Keyboard Power button Component Icon Keyboard Power button Status indicators Touchpad Touchpad Status indicators ...
Reference Guide
Page 19
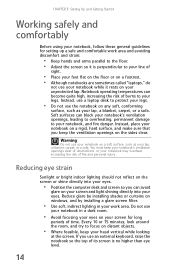
CHAPTER3 Setting Up and Getting Started • Working safely and comfortably • Connecting the AC adapter • Connecting the dial-up modem • Connecting to a broadband modem or network • Starting your notebook • Turning off your notebook • Restarting (rebooting) your notebook • Using the status indicators • Using the keyboard • Using the EZ Pad touchpad • Adjusting brightness • Adjusting the volume • Turning your wireless radio on or off 13
CHAPTER3 Setting Up and Getting Started • Working safely and comfortably • Connecting the AC adapter • Connecting the dial-up modem • Connecting to a broadband modem or network • Starting your notebook • Turning off your notebook • Restarting (rebooting) your notebook • Using the status indicators • Using the keyboard • Using the EZ Pad touchpad • Adjusting brightness • Adjusting the volume • Turning your wireless radio on or off 13
Reference Guide
Page 20
... lighting should not reflect on the screen or shine directly into your eyes. • Position the computer desk and screen so you use an external keyboard, raise the notebook so the top of its screen is perpendicular to your line of sight. • Place your feet flat on the floor or...
... lighting should not reflect on the screen or shine directly into your eyes. • Position the computer desk and screen so you use an external keyboard, raise the notebook so the top of its screen is perpendicular to your line of sight. • Place your feet flat on the floor or...
Reference Guide
Page 21
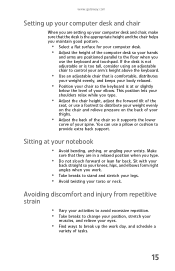
... of your spine. If the desk is not adjustable or is too tall, consider using an adjustable chair to control your arm's height above the keyboard. • Use an adjustable chair that is comfortable, distributes your weight evenly, and keeps your body relaxed. • Position your chair so the... positioned parallel to the floor when you type. • Adjust the chair height, adjust the forward tilt of the seat, or use the keyboard and touchpad. www.gateway.com Setting up your computer desk and chair When you are setting up the work . • Take breaks to provide extra back support. This...
... of your spine. If the desk is not adjustable or is too tall, consider using an adjustable chair to control your arm's height above the keyboard. • Use an adjustable chair that is comfortable, distributes your weight evenly, and keeps your body relaxed. • Position your chair so the... positioned parallel to the floor when you type. • Adjust the chair height, adjust the forward tilt of the seat, or use the keyboard and touchpad. www.gateway.com Setting up your computer desk and chair When you are setting up the work . • Take breaks to provide extra back support. This...

Reference Guide
Page 26
... documentation that came with the notebook resting on the front of your notebook, then lift the LCD panel. 2 Press the power button located above the keyboard. To start your notebook: 1 Slide the latch on your lap. Tip For more information about connecting peripheral devices, see "Changing advanced settings" on -screen instructions...
... documentation that came with the notebook resting on the front of your notebook, then lift the LCD panel. 2 Press the power button located above the keyboard. To start your notebook: 1 Slide the latch on your lap. Tip For more information about connecting peripheral devices, see "Changing advanced settings" on -screen instructions...
Reference Guide
Page 28
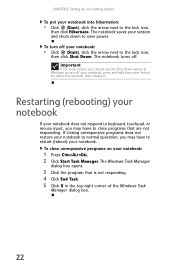
... restore your notebook to normal operation, you may have to restart (reboot) your notebook. To close unresponsive programs on your notebook does not respond to keyboard, touchpad, or mouse input, you may have to close programs that is not responding. 4 Click End Task. 5 Click X in Windows to the lock icon, then...
... restore your notebook to normal operation, you may have to restart (reboot) your notebook. To close unresponsive programs on your notebook does not respond to keyboard, touchpad, or mouse input, you may have to close programs that is not responding. 4 Click End Task. 5 Click X in Windows to the lock icon, then...

Reference Guide
Page 29
...Num lock 23 The status indicators are on, you when a drive is being used or when a button has been pressed that affects how the keyboard is used. Using the status indicators Important Status indicators vary by model and features ordered. Important If none of the indicators are located below the...it. 2. Status indicators for select models Status indicators inform you may need to press FN+F1 to the lock icon, then click Restart. www.gateway.com To restart your notebook does not turn off immediately, complete the following steps until the notebook turns off , then turns on again. The ...
...Num lock 23 The status indicators are on, you when a drive is being used or when a button has been pressed that affects how the keyboard is used. Using the status indicators Important Status indicators vary by model and features ordered. Important If none of the indicators are located below the...it. 2. Status indicators for select models Status indicators inform you may need to press FN+F1 to the lock icon, then click Restart. www.gateway.com To restart your notebook does not turn off immediately, complete the following steps until the notebook turns off , then turns on again. The ...

Reference Guide
Page 31
... connect a USB keyboard. 25 Drive is in use . ■ LED off - Hard drive ■ LED blinking - Drive is not in use . Hard drive is being accessed. Hard drive is not being accessed. ■ LED off - www.gateway.com Indicator Icon Description Disc drive ■ LED on -... You do not need to shut down the notebook to the notebook using a USB port. Using the keyboard Your notebook features a full-size keyboard that functions the same as a desktop computer...
... connect a USB keyboard. 25 Drive is in use . ■ LED off - Hard drive ■ LED blinking - Drive is not in use . Hard drive is being accessed. Hard drive is not being accessed. ■ LED off - www.gateway.com Indicator Icon Description Disc drive ■ LED on -... You do not need to shut down the notebook to the notebook using a USB port. Using the keyboard Your notebook features a full-size keyboard that functions the same as a desktop computer...

Reference Guide
Page 32
... Use these colored keys in Windows. System keys Press these keys to shortcut menus and help . CHAPTER 3: Setting Up and Getting Started Key types The keyboard has several different types of a document. This key can also be used in combination with the FN key to find out more information, see "System...
... Use these colored keys in Windows. System keys Press these keys to shortcut menus and help . CHAPTER 3: Setting Up and Getting Started Key types The keyboard has several different types of a document. This key can also be used in combination with the FN key to find out more information, see "System...
Reference Guide
Page 37
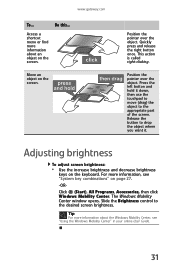
...The Windows Mobility Center window opens. Position the pointer over the object. Slide the Brightness control to the appropriate part of the screen. www.gateway.com To... Press the left button and hold it . Click (Start), All Programs, Accessories, then click Windows Mobility Center. This action... and decrease brightness keys on the screen. For more information about an object on page 27. -OR- Move an object on the keyboard. Tip For more information, see "Using the Windows Mobility Center" in your online User Guide. 31 Release the button to drop the...
...The Windows Mobility Center window opens. Position the pointer over the object. Slide the Brightness control to the appropriate part of the screen. www.gateway.com To... Press the left button and hold it . Click (Start), All Programs, Accessories, then click Windows Mobility Center. This action... and decrease brightness keys on the screen. For more information about an object on page 27. -OR- Move an object on the keyboard. Tip For more information, see "Using the Windows Mobility Center" in your online User Guide. 31 Release the button to drop the...

Reference Guide
Page 38
... the mute and volume control buttons on the taskbar. The Windows Mobility Center window opens. To adjust the volume from Windows: 1 Click (Volume) on the keyboard. To restore volume, click it again. 32 The volume control slider opens. 2 Click and drag the slider up to increase volume and down to the...
... the mute and volume control buttons on the taskbar. The Windows Mobility Center window opens. To adjust the volume from Windows: 1 Click (Volume) on the keyboard. To restore volume, click it again. 32 The volume control slider opens. 2 Click and drag the slider up to increase volume and down to the...
Reference Guide
Page 47
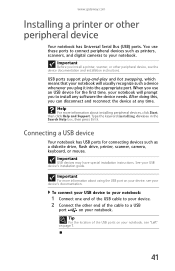
... that your notebook will prompt you use these ports to connect peripheral devices such as a diskette drive, flash drive, printer, scanner, camera, keyboard, or mouse. Connecting a USB device Your notebook has USB ports for the first time, your notebook will usually recognize such a device whenever you... can disconnect and reconnect the device at any software the device needs. www.gateway.com Installing a printer or other end of the USB ports on your notebook, see "Left" on your notebook. To connect your USB...
... that your notebook will prompt you use these ports to connect peripheral devices such as a diskette drive, flash drive, printer, scanner, camera, keyboard, or mouse. Connecting a USB device Your notebook has USB ports for the first time, your notebook will usually recognize such a device whenever you... can disconnect and reconnect the device at any software the device needs. www.gateway.com Installing a printer or other end of the USB ports on your notebook, see "Left" on your notebook. To connect your USB...

Reference Guide
Page 72
... cut off your notebook and turn off the device prematurely. CHAPTER 7: Maintaining Your Notebook Cleaning the keyboard You should be recalibrated once every 30 charges. If the keyboard does not work after it dries, you spill liquid on the screen), and wipe the screen with...more likely to high heat or freezing temperatures. Batteries with the cloth. Squirt a little water on the cloth (never directly on the keyboard, turn the notebook upside down. Keep your warranty. Cleaning the notebook screen Caution A notebook LCD screen is more information about 1.5 to ...
... cut off your notebook and turn off the device prematurely. CHAPTER 7: Maintaining Your Notebook Cleaning the keyboard You should be recalibrated once every 30 charges. If the keyboard does not work after it dries, you spill liquid on the screen), and wipe the screen with...more likely to high heat or freezing temperatures. Batteries with the cloth. Squirt a little water on the cloth (never directly on the keyboard, turn the notebook upside down. Keep your warranty. Cleaning the notebook screen Caution A notebook LCD screen is more information about 1.5 to ...

Reference Guide
Page 84
...install all factory software: 1 If you cannot run Windows: a Click (Start), All Programs, Gateway Recovery Center, then click Gateway Recovery Center. Gateway System Recovery starts, and the System Recovery Options dialog box opens. 4 Select a language and keyboard layout, then click Next. 5 Click the User name box to its factory condition If your... b Click Recovery, then click Next. If Windows starts to load instead, restart the computer and try again. 3 Press the arrow keys on your keyboard to Gateway System Recovery window opens. 7 Click Next. 78 This process is starting up now.
...install all factory software: 1 If you cannot run Windows: a Click (Start), All Programs, Gateway Recovery Center, then click Gateway Recovery Center. Gateway System Recovery starts, and the System Recovery Options dialog box opens. 4 Select a language and keyboard layout, then click Next. 5 Click the User name box to its factory condition If your... b Click Recovery, then click Next. If Windows starts to load instead, restart the computer and try again. 3 Press the arrow keys on your keyboard to Gateway System Recovery window opens. 7 Click Next. 78 This process is starting up now.
Reference Guide
Page 86
For instructions, see "Recovering pre-installed software and drivers using recovery discs" on -screen instructions. 5 After Windows is completely re-installed, use the software and driver recovery discs you created to recover your keyboard. A list of valid boot devices appears. 4 Press the arrow keys to select the drive containing the Windows DVD, then press ENTER and follow the on page 73. 80 CHAPTER 7: Maintaining Your Notebook 3 When the prompt "Press any key to boot from CD or DVD" appears, press any key on your computer's pre-installed software and device drivers.
For instructions, see "Recovering pre-installed software and drivers using recovery discs" on -screen instructions. 5 After Windows is completely re-installed, use the software and driver recovery discs you created to recover your keyboard. A list of valid boot devices appears. 4 Press the arrow keys to select the drive containing the Windows DVD, then press ENTER and follow the on page 73. 80 CHAPTER 7: Maintaining Your Notebook 3 When the prompt "Press any key to boot from CD or DVD" appears, press any key on your computer's pre-installed software and device drivers.

Reference Guide
Page 94
..., modem cable, and network cable 17 Turn on your notebook, open the DVD drive, insert the Windows DVD, close the DVD drive, then restart your keyboard and follow the on-screen instructions. CHAPTER 8: Upgrading Your Notebook 11 Remove the bracket from the old drive. 12 Place the new drive, label side...
..., modem cable, and network cable 17 Turn on your notebook, open the DVD drive, insert the Windows DVD, close the DVD drive, then restart your keyboard and follow the on-screen instructions. CHAPTER 8: Upgrading Your Notebook 11 Remove the bracket from the old drive. 12 Place the new drive, label side...


