

Reference Guide
Page 5
www.gateway.com Chapter 6: Traveling with Your Notebook . . . 57 Packing your notebook 58 Traveling by air 58 Dial-up modem 58 Radio frequency wireless connections 59 Files ... Chapter 7: Maintaining Your Notebook . . . . . 63 Caring for your notebook 64 Cleaning your notebook 65 Cleaning the exterior 65 Cleaning the keyboard 66 Cleaning the notebook screen 66 Maintaining the battery 66 Storing batteries 67 Cleaning CDs or DVDs 68 Recovering your system 68 Recovering pre-installed software and drivers 69 Using...
www.gateway.com Chapter 6: Traveling with Your Notebook . . . 57 Packing your notebook 58 Traveling by air 58 Dial-up modem 58 Radio frequency wireless connections 59 Files ... Chapter 7: Maintaining Your Notebook . . . . . 63 Caring for your notebook 64 Cleaning your notebook 65 Cleaning the exterior 65 Cleaning the keyboard 66 Cleaning the notebook screen 66 Maintaining the battery 66 Storing batteries 67 Cleaning CDs or DVDs 68 Recovering your system 68 Recovering pre-installed software and drivers 69 Using...
Reference Guide
Page 20
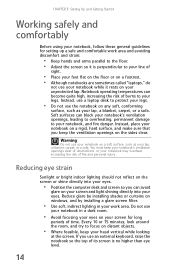
... the notebook so the top of fire and personal injury. Reduce glare by installing shades or curtains on windows, and by installing a glare screen filter. • Use soft, indirect lighting in a dark room. • Avoid focusing your eyes on your unprotected lap. Reducing eye strain...to your legs. You must keep your notebook's ventilation openings clear of obstructions, or your notebook may overheat, increasing the risk of its screen is perpendicular to your notebook, and fire danger. CHAPTER 3: Setting Up and Getting Started Working safely and comfortably Before using your notebook,...
... the notebook so the top of fire and personal injury. Reduce glare by installing shades or curtains on windows, and by installing a glare screen filter. • Use soft, indirect lighting in a dark room. • Avoid focusing your eyes on your unprotected lap. Reducing eye strain...to your legs. You must keep your notebook's ventilation openings clear of obstructions, or your notebook may overheat, increasing the risk of its screen is perpendicular to your notebook, and fire danger. CHAPTER 3: Setting Up and Getting Started Working safely and comfortably Before using your notebook,...

Reference Guide
Page 26
... your skin. CHAPTER 3: Setting Up and Getting Started Starting your notebook Warning Do not work with each device for the first time, follow the on-screen instructions to select the language and time zone and to harm your notebook, then lift the LCD panel. 2 Press the power button located above the...
... your skin. CHAPTER 3: Setting Up and Getting Started Starting your notebook Warning Do not work with each device for the first time, follow the on-screen instructions to select the language and time zone and to harm your notebook, then lift the LCD panel. 2 Press the power button located above the...

Reference Guide
Page 35
www.gateway.com Using the EZ Pad touchpad The EZ Pad™ consists of the scroll zone may vary from program to program. Tip You can attach a mouse to select objects. Scroll zone Touchpad Left button Right button When you move your finger on the touchpad, the pointer (arrow) on the screen moves...
www.gateway.com Using the EZ Pad touchpad The EZ Pad™ consists of the scroll zone may vary from program to program. Tip You can attach a mouse to select objects. Scroll zone Touchpad Left button Right button When you move your finger on the touchpad, the pointer (arrow) on the screen moves...

Reference Guide
Page 36
... release the left button twice in rapid succession. This action is called double-clicking. 30 Select an object on the screen. This action is called clicking. Move the pointer on the screen. Tip You may have received your finger. CHAPTER 3: Setting Up and Getting Started Tip For instructions on how to adjust...
... release the left button twice in rapid succession. This action is called double-clicking. 30 Select an object on the screen. This action is called clicking. Move the pointer on the screen. Tip You may have received your finger. CHAPTER 3: Setting Up and Getting Started Tip For instructions on how to adjust...
Reference Guide
Page 37
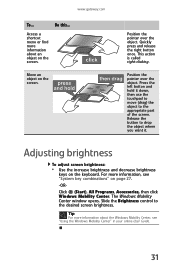
...use the touchpad to move (drag) the object to the desired screen brightness. Access a shortcut menu or find more information about the Windows Mobility Center, see "System ...key combinations" on the screen. For more information about an object on page 27. -OR- Click (Start), All.... This action is called right-clicking. Adjusting brightness To adjust screen brightness: • Use the increase brightness and decrease brightness keys on the screen. Tip For more information, see "Using the Windows Mobility Center...
...use the touchpad to move (drag) the object to the desired screen brightness. Access a shortcut menu or find more information about the Windows Mobility Center, see "System ...key combinations" on the screen. For more information about an object on page 27. -OR- Click (Start), All.... This action is called right-clicking. Adjusting brightness To adjust screen brightness: • Use the increase brightness and decrease brightness keys on the screen. Tip For more information, see "Using the Windows Mobility Center...

Reference Guide
Page 50
To use a projector or external monitor for a presentation You can configure your notebook so the settings are finished giving the presentation, click Turn off screen saver and Set the volume to if necessary. 4 Click OK. 5 Click Turn on to your online User Guide. 2 Click (Change presentation settings). The Presentation Settings ...
To use a projector or external monitor for a presentation You can configure your notebook so the settings are finished giving the presentation, click Turn off screen saver and Set the volume to if necessary. 4 Click OK. 5 Click Turn on to your online User Guide. 2 Click (Change presentation settings). The Presentation Settings ...
Reference Guide
Page 62
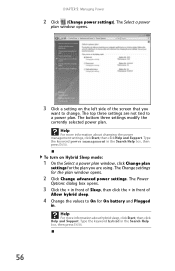
... the keyword power management in the Search Help box, then press ENTER. 56 The Change settings for On battery and Plugged in front of the screen that you are not tied to a power plan. Help For more information about hybrid sleep, click Start, then click Help and Support. The top three...
... the keyword power management in the Search Help box, then press ENTER. 56 The Change settings for On battery and Plugged in front of the screen that you are not tied to a power plan. Help For more information about hybrid sleep, click Start, then click Help and Support. The top three...

Reference Guide
Page 66
Also, tape your business card or an address label to your notebook and accessories. • Whoever sits next to Gateway for service. As soon as it passes through the X-ray machine in security checkpoints. • Write down your notebook model number and serial number (located ... files until you while waiting in case of your notebook as soon as you see your notebook to you or behind you can see a startup screen, press F2.
Also, tape your business card or an address label to your notebook and accessories. • Whoever sits next to Gateway for service. As soon as it passes through the X-ray machine in security checkpoints. • Write down your notebook model number and serial number (located ... files until you while waiting in case of your notebook as soon as you see your notebook to you or behind you can see a startup screen, press F2.

Reference Guide
Page 72
... battery The life span of air with a narrow, straw-like extension to 3 years, under the keys. Cleaning the notebook screen Caution A notebook LCD screen is more likely to recharge the battery more information about 1.5 to remove dust and lint trapped under normal conditions. As the battery... begins to die, you spill liquid on the screen), and wipe the screen with fuel gauges (notebooks) should clean the keyboard occasionally by using an aerosol can be covered by charge/discharge patterns. Short...
... battery The life span of air with a narrow, straw-like extension to 3 years, under the keys. Cleaning the notebook screen Caution A notebook LCD screen is more likely to recharge the battery more information about 1.5 to remove dust and lint trapped under normal conditions. As the battery... begins to die, you spill liquid on the screen), and wipe the screen with fuel gauges (notebooks) should clean the keyboard occasionally by using an aerosol can be covered by charge/discharge patterns. Short...

Reference Guide
Page 84
... OR - 2 If you can access important files on your hard drive, back them up , repeatedly press F8 until the Recovery Options screen opens. To delete everything on your keyboard to select Repair Your Computer, then press ENTER. b While the computer is called a factory recovery... If you cannot run Windows: a Click (Start), All Programs, Gateway Recovery Center, then click Gateway Recovery Center. If you may need to recover its hard drive to its factory condition. The Gateway Recovery Center opens. Gateway System Recovery starts, and the System Recovery Options dialog box opens. ...
... OR - 2 If you can access important files on your hard drive, back them up , repeatedly press F8 until the Recovery Options screen opens. To delete everything on your keyboard to select Repair Your Computer, then press ENTER. b While the computer is called a factory recovery... If you cannot run Windows: a Click (Start), All Programs, Gateway Recovery Center, then click Gateway Recovery Center. If you may need to recover its hard drive to its factory condition. The Gateway Recovery Center opens. Gateway System Recovery starts, and the System Recovery Options dialog box opens. ...
Reference Guide
Page 86
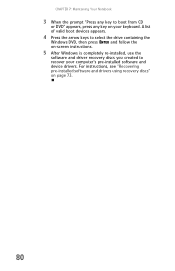
For instructions, see "Recovering pre-installed software and drivers using recovery discs" on your computer's pre-installed software and device drivers. CHAPTER 7: Maintaining Your Notebook 3 When the prompt "Press any key to recover your keyboard. A list of valid boot devices appears. 4 Press the arrow keys to select the drive containing the Windows DVD, then press ENTER and follow the on-screen instructions. 5 After Windows is completely re-installed, use the software and driver recovery discs you created to boot from CD or DVD" appears, press any key on page 73. 80
For instructions, see "Recovering pre-installed software and drivers using recovery discs" on your computer's pre-installed software and device drivers. CHAPTER 7: Maintaining Your Notebook 3 When the prompt "Press any key to recover your keyboard. A list of valid boot devices appears. 4 Press the arrow keys to select the drive containing the Windows DVD, then press ENTER and follow the on-screen instructions. 5 After Windows is completely re-installed, use the software and driver recovery discs you created to boot from CD or DVD" appears, press any key on page 73. 80

Reference Guide
Page 94
As part of the process you may be prompted to boot from CD or DVD" appears, press any key on -screen instructions. CHAPTER 8: Upgrading Your Notebook 11 Remove the bracket from the old drive. 12 Place the new drive, label side up, onto the bracket so ...
As part of the process you may be prompted to boot from CD or DVD" appears, press any key on -screen instructions. CHAPTER 8: Upgrading Your Notebook 11 Remove the bracket from the old drive. 12 Place the new drive, label side up, onto the bracket so ...
Reference Guide
Page 97
...troubleshooting is covered under "DVD drives" on page 111. Battery Battery troubleshooting is covered under "Sound" on the screen, write down the exact message. The message may help Gateway Customer Care in diagnosing and fixing the problem. • If you added or removed peripheral devices, review the ...procedures you followed each instruction. • If an error occurs in a program, see the program's printed documentation or the online help. www.gateway.com • If the notebook will not turn on, try turning it on with the notebook plugged in and the battery removed, then try...
...troubleshooting is covered under "DVD drives" on page 111. Battery Battery troubleshooting is covered under "Sound" on the screen, write down the exact message. The message may help Gateway Customer Care in diagnosing and fixing the problem. • If you added or removed peripheral devices, review the ...procedures you followed each instruction. • If an error occurs in a program, see the program's printed documentation or the online help. www.gateway.com • If the notebook will not turn on, try turning it on with the notebook plugged in and the battery removed, then try...
Reference Guide
Page 98
... running Error checking, see an "Access Denied" or "Write protect" error message • Move the write-protection tab in your online User Guide. Display The screen is IBM-compatible. • Try a different diskette. For instructions on , try restarting your notebook. For more information about adjusting the brightness, see a "Non-system disk...
... running Error checking, see an "Access Denied" or "Write protect" error message • Move the write-protection tab in your online User Guide. Display The screen is IBM-compatible. • Try a different diskette. For instructions on , try restarting your notebook. For more information about adjusting the brightness, see a "Non-system disk...

Reference Guide
Page 99
..."Adjusting brightness" on changing the display settings, see "Changing the color depth and screen resolution" in active-matrix LCD screens. The text on page 31. • Change the display settings. Gateway's inspection standards keep these pixels are always dark or too bright This condition is ...justified based on changing the screen resolution, see "Changing screen settings" in Sleep or Hibernate mode. Press the power button. &#...
..."Adjusting brightness" on changing the display settings, see "Changing the color depth and screen resolution" in active-matrix LCD screens. The text on page 31. • Change the display settings. Gateway's inspection standards keep these pixels are always dark or too bright This condition is ...justified based on changing the screen resolution, see "Changing screen settings" in Sleep or Hibernate mode. Press the power button. &#...

Reference Guide
Page 104
... takes too long Many factors can affect Internet performance: • The condition of the telephone lines in your browser, then reconnect and open on the screen • The numeric keypad is set up correctly. If you have not received any mail • Click the receive button in your residence or at...
... takes too long Many factors can affect Internet performance: • The condition of the telephone lines in your browser, then reconnect and open on the screen • The numeric keypad is set up correctly. If you have not received any mail • Click the receive button in your residence or at...

Reference Guide
Page 105
... best quality. To view Media Center troubleshooting information that can be purchased from the Gateway Accessory Store. 99 Media Center mode is the best choice. • Type of connection used , quality of video cables, display device screen resolution, size of TV, age of the TV, or the type of TV ... output to a TV. If you did not order a display device when you purchased your TV includes a VGA port, connect the VGA cable from Gateway. www.gateway.com • Remove all extension cables and switchboxes. • Clean the keyboard by using an aerosol can of air with a narrow, straw-like ...
... best quality. To view Media Center troubleshooting information that can be purchased from the Gateway Accessory Store. 99 Media Center mode is the best choice. • Type of connection used , quality of video cables, display device screen resolution, size of TV, age of the TV, or the type of TV ... output to a TV. If you did not order a display device when you purchased your TV includes a VGA port, connect the VGA cable from Gateway. www.gateway.com • Remove all extension cables and switchboxes. • Clean the keyboard by using an aerosol can of air with a narrow, straw-like ...
Reference Guide
Page 106
... a TV display, you may shift, scramble, or scroll the picture. Help For more information about changing the screen resolution, see "Changing color depth and screen resolution" in the other half of the video image with two passes of a resolution and may need to lower...information about adjusting display settings, click Start, then click Help and Support. CHAPTER 9: Troubleshooting Important Cable connections must be better on the screen, a standard interlaced analog TV will produce a lower quality display, especially when viewing and using the Media Center computer functions. 100 ...
... a TV display, you may shift, scramble, or scroll the picture. Help For more information about changing the screen resolution, see "Changing color depth and screen resolution" in the other half of the video image with two passes of a resolution and may need to lower...information about adjusting display settings, click Start, then click Help and Support. CHAPTER 9: Troubleshooting Important Cable connections must be better on the screen, a standard interlaced analog TV will produce a lower quality display, especially when viewing and using the Media Center computer functions. 100 ...

Reference Guide
Page 108
... in the memory bay slot. Memory card reader Drive letter for additional troubleshooting information. 102 For the location of your network jack, see "Right" on -screen instructions. CHAPTER 9: Troubleshooting Memory You see a "Memory error" message • Make sure that the memory module is inserted correctly in the My Computer window •...
... in the memory bay slot. Memory card reader Drive letter for additional troubleshooting information. 102 For the location of your network jack, see "Right" on -screen instructions. CHAPTER 9: Troubleshooting Memory You see a "Memory error" message • Make sure that the memory module is inserted correctly in the My Computer window •...


