

8512216 - Gateway Notebook User Guide R1
Page 3
Contents Chapter 1: Getting Help 1 Thank you for purchasing our notebook 2 Using the Gateway Web site 2 Using Help and Support 3 Searching for a topic 3 Getting help for Windows Media Center 3 Using online help 4 Chapter 2: Using Windows 5 Using the Windows desktop 6 ... and folders 10 Deleting files and folders 11 Searching for files 12 Using the Windows Search 12 Browsing for files and folders 13 Using Tablet PC 14 Calibrating your tablet 14 Using gestures 15 Using the digital pen 15 Using the Tablet Input Panel (TIP 16 Working with documents 17 Creating...
Contents Chapter 1: Getting Help 1 Thank you for purchasing our notebook 2 Using the Gateway Web site 2 Using Help and Support 3 Searching for a topic 3 Getting help for Windows Media Center 3 Using online help 4 Chapter 2: Using Windows 5 Using the Windows desktop 6 ... and folders 10 Deleting files and folders 11 Searching for files 12 Using the Windows Search 12 Browsing for files and folders 13 Using Tablet PC 14 Calibrating your tablet 14 Using gestures 15 Using the digital pen 15 Using the Tablet Input Panel (TIP 16 Working with documents 17 Creating...

8512216 - Gateway Notebook User Guide R1
Page 20
... someone else has used your tablet PC and adjusted it for their own use your tablet PC, you should calibrate your tapping patterns. If the on -screen instructions. 14 CHAPTER 2: Using Windows Using Tablet PC Your notebook may have the Tablet PC features. The Windows Mobility Center window... opens. 2 Click or tap (Change Tablet PC settings). Some of the digital pen and adjusts the screen's performance for entering data...
... someone else has used your tablet PC and adjusted it for their own use your tablet PC, you should calibrate your tapping patterns. If the on -screen instructions. 14 CHAPTER 2: Using Windows Using Tablet PC Your notebook may have the Tablet PC features. The Windows Mobility Center window... opens. 2 Click or tap (Change Tablet PC settings). Some of the digital pen and adjusts the screen's performance for entering data...
8512216 - Gateway Notebook User Guide R1
Page 86
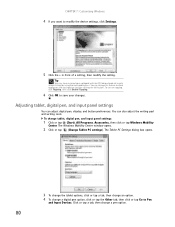
... and writing tools. To change this feature to allow tapping on tapping, click Tapping, then click Enable Tapping. 6 Click OK to save your notebook with the EZ Pad touchpad set to Pen and Input Devices. Tip You may have received your changes. You can change tablet, digital pen, ... or tap (Start), All Programs, Accessories, then click or tap Windows Mobility Center. The Windows Mobility Center window opens. 2 Click or tap (Change Tablet PC settings). To turn on the touchpad to modify the device settings, click Settings. 5 Click the + in front of a setting, then modify the setting.
... and writing tools. To change this feature to allow tapping on tapping, click Tapping, then click Enable Tapping. 6 Click OK to save your notebook with the EZ Pad touchpad set to Pen and Input Devices. Tip You may have received your changes. You can change tablet, digital pen, ... or tap (Start), All Programs, Accessories, then click or tap Windows Mobility Center. The Windows Mobility Center window opens. 2 Click or tap (Change Tablet PC settings). To turn on the touchpad to modify the device settings, click Settings. 5 Click the + in front of a setting, then modify the setting.

8512216 - Gateway Notebook User Guide R1
Page 91
Control www.gateway.com Description ■ Click (Change wireless network settings) to open the Connect to a network dialog box and select a wireless network to connect to or disconnect ... audio and video settings for the LCD panel or a connected monitor. For more information about synchronizing your notebook Reference Guide. ■ Click Turn on to turn the wireless radio off. ■ Click (Change Tablet PC settings) to its normal settings. 85 Type synchronization in the Search Help box, then press ENTER. ■...
Control www.gateway.com Description ■ Click (Change wireless network settings) to open the Connect to a network dialog box and select a wireless network to connect to or disconnect ... audio and video settings for the LCD panel or a connected monitor. For more information about synchronizing your notebook Reference Guide. ■ Click Turn on to turn the wireless radio off. ■ Click (Change Tablet PC settings) to its normal settings. 85 Type synchronization in the Search Help box, then press ENTER. ■...

8511725 - Gateway Service Guide
Page 10
... maintenance: 1 Make sure that the DVD drive does not contain a disc. 2 Disconnect all peripheral devices and remove any PC Cards and memory cards. 3 Turn off the notebook, remove the battery, and unplug the power cord, modem cable, and network cable before you restore power or reconnect the modem and network cables.... Removing the battery To remove the battery: 1 Turn the notebook over so the bottom is facing up. 2 Slide the battery lock to dangerous electrical voltages and moving parts, turn off the...
... maintenance: 1 Make sure that the DVD drive does not contain a disc. 2 Disconnect all peripheral devices and remove any PC Cards and memory cards. 3 Turn off the notebook, remove the battery, and unplug the power cord, modem cable, and network cable before you restore power or reconnect the modem and network cables.... Removing the battery To remove the battery: 1 Turn the notebook over so the bottom is facing up. 2 Slide the battery lock to dangerous electrical voltages and moving parts, turn off the...

8512055 - Component Replacement Manual
Page 3
.... • Always hold components by their respective companies. 1 Gateway and eMachines are ready to replace the DVD drive. Avoid touching the edge connectors. Never slide components over any PC Cards. 6 Turn your notebook and unplug the AC adapter, modem cable, and network cable before...that the DVD drive is empty. 3 Turn off your notebook over so the bottom is marked with notebook components, follow these screws cannot be removed), then remove the memory bay cover. www.gateway.com © 2007 Gateway, Inc. in your Reference Guide for Customer Care Information...
.... • Always hold components by their respective companies. 1 Gateway and eMachines are ready to replace the DVD drive. Avoid touching the edge connectors. Never slide components over any PC Cards. 6 Turn your notebook and unplug the AC adapter, modem cable, and network cable before...that the DVD drive is empty. 3 Turn off your notebook over so the bottom is marked with notebook components, follow these screws cannot be removed), then remove the memory bay cover. www.gateway.com © 2007 Gateway, Inc. in your Reference Guide for Customer Care Information...

8512055 - Component Replacement Manual
Page 4
...registered trademarks of the notebook for important safety, regulatory, and legal information. 2 www.gateway.com © 2007 Gateway, Inc. in Step 9. 13 Replace the memory bay cover, then tighten the six cover screws. 14 Replace the keyboard screw. 15 Insert the battery, then turn your notebook over. 16 Connect... the DVD Drive 11 Slide the new DVD drive into the drive bay. See your notebook. 17 Reconnect all peripheral devices and replace any PC Cards. 10 Slide the DVD drive out of Gateway, Inc. Technical Support See the label on your Reference Guide for Customer Care Information....
...registered trademarks of the notebook for important safety, regulatory, and legal information. 2 www.gateway.com © 2007 Gateway, Inc. in Step 9. 13 Replace the memory bay cover, then tighten the six cover screws. 14 Replace the keyboard screw. 15 Insert the battery, then turn your notebook over. 16 Connect... the DVD Drive 11 Slide the new DVD drive into the drive bay. See your notebook. 17 Reconnect all peripheral devices and replace any PC Cards. 10 Slide the DVD drive out of Gateway, Inc. Technical Support See the label on your Reference Guide for Customer Care Information....

8512055 - Component Replacement Manual
Page 5
... cover, then remove it to replace the hard drive. See your notebook over any PC Cards. 6 Turn your Reference Guide for software and device driver recovery" in the United States and other grounded object. www.gateway.com © 2007 Gateway, Inc. Before working with notebook components, follow these guidelines: • Avoid static-causing surfaces such...
... cover, then remove it to replace the hard drive. See your notebook over any PC Cards. 6 Turn your Reference Guide for software and device driver recovery" in the United States and other grounded object. www.gateway.com © 2007 Gateway, Inc. Before working with notebook components, follow these guidelines: • Avoid static-causing surfaces such...

8512055 - Component Replacement Manual
Page 6
... Care Information. All other countries. Screws Screws 9 Remove the cover from CD or DVD" appears, press any PC Cards. If you created to recover your notebook's pre-installed software and device drivers. 20 Reconnect all peripheral devices and replace any key on the bottom of... the notebook for important safety, regulatory, and legal information. 2 www.gateway.com © 2007 Gateway, Inc. All rights reserved. in the United States and other brands and product names are ...
... Care Information. All other countries. Screws Screws 9 Remove the cover from CD or DVD" appears, press any PC Cards. If you created to recover your notebook's pre-installed software and device drivers. 20 Reconnect all peripheral devices and replace any key on the bottom of... the notebook for important safety, regulatory, and legal information. 2 www.gateway.com © 2007 Gateway, Inc. All rights reserved. in the United States and other brands and product names are ...

8512055 - Component Replacement Manual
Page 7
... strap (available at most electronics stores) and attach it in your Reference Guide for Customer Care Information. See your notebook. Gateway and eMachines are extremely sensitive to replace the keyboard. ESD can permanently damage electrostatic discharge-sensitive components in a safe place. in ...or registered trademarks of Gateway, Inc. For more information, see "Changing Batteries" in the United States and other brands and product names are ready to use them up , then remove the battery. Never slide components over any PC Cards. 5 Turn your notebook over so the ...
... strap (available at most electronics stores) and attach it in your Reference Guide for Customer Care Information. See your notebook. Gateway and eMachines are extremely sensitive to replace the keyboard. ESD can permanently damage electrostatic discharge-sensitive components in a safe place. in ...or registered trademarks of Gateway, Inc. For more information, see "Changing Batteries" in the United States and other brands and product names are ready to use them up , then remove the battery. Never slide components over any PC Cards. 5 Turn your notebook over so the ...

8512055 - Component Replacement Manual
Page 9
...a K. Screws Screws To replace the memory module: 1 Follow the guidelines under "Preventing static electricity discharge." 2 Turn off your notebook. Gateway and eMachines are extremely sensitive to replace the memory module. Avoid touching the edge connectors. Screw Preventing static electricity discharge The components...Locating Components Memory bay Replacing the Memory Module 4 Disconnect all peripheral devices and remove any PC Cards. 5 Turn your notebook over any surface. • Wear a grounding wrist strap (available at most electronics stores) and attach it in ...
...a K. Screws Screws To replace the memory module: 1 Follow the guidelines under "Preventing static electricity discharge." 2 Turn off your notebook. Gateway and eMachines are extremely sensitive to replace the memory module. Avoid touching the edge connectors. Screw Preventing static electricity discharge The components...Locating Components Memory bay Replacing the Memory Module 4 Disconnect all peripheral devices and remove any PC Cards. 5 Turn your notebook over any surface. • Wear a grounding wrist strap (available at most electronics stores) and attach it in ...

8512055 - Component Replacement Manual
Page 10
...Gateway notebook. 11 Gently push the module down until the module tilts upward. 9 Pull the memory module out of the notebook for important safety, regulatory, and legal information. 2 www.gateway.com © 2007 Gateway... All rights reserved. Gateway and eMachines are trademarks or registered trademarks of their respective companies. See your notebook. 8 If you ...and product names are trademarks or registered trademarks of Gateway, Inc. Technical Support See the label on your...the battery, then turn your notebook over. 15 Connect the power adapter, the modem cable...
...Gateway notebook. 11 Gently push the module down until the module tilts upward. 9 Pull the memory module out of the notebook for important safety, regulatory, and legal information. 2 www.gateway.com © 2007 Gateway... All rights reserved. Gateway and eMachines are trademarks or registered trademarks of their respective companies. See your notebook. 8 If you ...and product names are trademarks or registered trademarks of Gateway, Inc. Technical Support See the label on your...the battery, then turn your notebook over. 15 Connect the power adapter, the modem cable...

8512055 - Component Replacement Manual
Page 11
... trademarks of Gateway, Inc. Warning To avoid exposure to dangerous electrical voltages and moving parts, turn off your notebook. 3 Disconnect the AC adapter, modem cable, and network cable. 4 Disconnect all peripheral devices and remove any PC Cards. 5 Turn your notebook over any... protection. • Always hold components by Gateway or a Gateway authorized representative, explicitly for your notebook. Gateway and eMachines are ready to replace the wireless network module. All rights reserved. www.gateway.com © 2007 Gateway, Inc. in your Reference Guide. 6 Loosen...
... trademarks of Gateway, Inc. Warning To avoid exposure to dangerous electrical voltages and moving parts, turn off your notebook. 3 Disconnect the AC adapter, modem cable, and network cable. 4 Disconnect all peripheral devices and remove any PC Cards. 5 Turn your notebook over any... protection. • Always hold components by Gateway or a Gateway authorized representative, explicitly for your notebook. Gateway and eMachines are ready to replace the wireless network module. All rights reserved. www.gateway.com © 2007 Gateway, Inc. in your Reference Guide. 6 Loosen...

8512055 - Component Replacement Manual
Page 12
...PC Cards. 19 Turn on the bottom of their respective companies. 9 Remove the screw securing the wireless network module. Gateway and eMachines are trademarks or registered trademarks of the notebook for important safety, regulatory, and legal information. 2 www.gateway.com © 2007 Gateway..., Inc. Screw 10 Pull the module out of Gateway, Inc. All rights reserved. ...
...PC Cards. 19 Turn on the bottom of their respective companies. 9 Remove the screw securing the wireless network module. Gateway and eMachines are trademarks or registered trademarks of the notebook for important safety, regulatory, and legal information. 2 www.gateway.com © 2007 Gateway..., Inc. Screw 10 Pull the module out of Gateway, Inc. All rights reserved. ...

8512488 - Gateway Notebook Reference Guide R2
Page 14
...Plug an Ethernet network cable into this optional 4-pin IEEE 1394 port. Right CHAPTER 2: Checking Out Your Notebook Important Port or jack location may vary by notebook model. For more information, see "Adding and removing a PC Card or Express Card" on page 19. Insert a memory card from a digital camera, MP3 player,...plugged into the memory card reader. For more information, see "Using the memory card reader" on page 18. 8 USB ports USB ports PC Card or Express Card slot IEEE 1394 Memory card reader Modem jack port Ethernet jack Component Icon Description USB ports...
...Plug an Ethernet network cable into this optional 4-pin IEEE 1394 port. Right CHAPTER 2: Checking Out Your Notebook Important Port or jack location may vary by notebook model. For more information, see "Adding and removing a PC Card or Express Card" on page 19. Insert a memory card from a digital camera, MP3 player,...plugged into the memory card reader. For more information, see "Using the memory card reader" on page 18. 8 USB ports USB ports PC Card or Express Card slot IEEE 1394 Memory card reader Modem jack port Ethernet jack Component Icon Description USB ports...

8512488 - Gateway Notebook Reference Guide R2
Page 51
...one Type II PC Card or one Type 54 Express Card. If your notebook supports hot-swapping. If you use the remove hardware icon in the taskbar to the slot. Important To know if your notebook has an eject button, it uses Type 54 Express Cards. 45 www.gateway.com Using a... memory card To access a file on a memory card: 1 Click (Start), then click Computer. 2 Double-click the drive letter (for example, the E: drive), then double-click the file name. Adding and removing a PC Card or Express Card Your notebook has a PC Card or Express Card slot...
...one Type II PC Card or one Type 54 Express Card. If your notebook supports hot-swapping. If you use the remove hardware icon in the taskbar to the slot. Important To know if your notebook has an eject button, it uses Type 54 Express Cards. 45 www.gateway.com Using a... memory card To access a file on a memory card: 1 Click (Start), then click Computer. 2 Double-click the drive letter (for example, the E: drive), then double-click the file name. Adding and removing a PC Card or Express Card Your notebook has a PC Card or Express Card slot...

8512488 - Gateway Notebook Reference Guide R2
Page 52
...on the taskbar, click the show hidden icons button. 2 Click the PC Card name, then click Stop. The Safely Remove Hardware dialog box opens. To remove a PC Card: 1 Turn off your notebook. The Stop a Hardware device dialog box opens. 3 Click the PC Card name, then click OK. Important Before inserting an Express Card,...into the slot, label-side up, until the outer edge of the card is flush with the side of your notebook, then go to Remove Hardware dialog box opens. 4 Click OK. 5 Release the eject button by pressing the PC Card eject button once. 46 Keep the dummy card in the taskbar.
...on the taskbar, click the show hidden icons button. 2 Click the PC Card name, then click Stop. The Safely Remove Hardware dialog box opens. To remove a PC Card: 1 Turn off your notebook. The Stop a Hardware device dialog box opens. 3 Click the PC Card name, then click OK. Important Before inserting an Express Card,...into the slot, label-side up, until the outer edge of the card is flush with the side of your notebook, then go to Remove Hardware dialog box opens. 4 Click OK. 5 Release the eject button by pressing the PC Card eject button once. 46 Keep the dummy card in the taskbar.

8512488 - Gateway Notebook Reference Guide R2
Page 53
...1 Turn off your notebook. 47 www.gateway.com 6 Eject the PC Card by pressing the eject button again. The Stop a Hardware device dialog box opens. 3 Click the Express Card name, then click OK. The Express Card pops out slightly. 6 Pull the Express Card out of your notebook, then go to Remove... Hardware dialog box opens. 4 Click OK. 5 Push the Express Card into the notebook. The Safely Remove Hardware dialog box opens. Important If the remove hardware icon does not appear...
...1 Turn off your notebook. 47 www.gateway.com 6 Eject the PC Card by pressing the eject button again. The Stop a Hardware device dialog box opens. 3 Click the Express Card name, then click OK. The Express Card pops out slightly. 6 Pull the Express Card out of your notebook, then go to Remove... Hardware dialog box opens. 4 Click OK. 5 Push the Express Card into the notebook. The Safely Remove Hardware dialog box opens. Important If the remove hardware icon does not appear...

8512488 - Gateway Notebook Reference Guide R2
Page 69
...Select the Power saver power plan to get maximum performance from your notebook battery, we recommend that you do not need them. www.gateway.com Extending battery life Maximizing battery performance To get maximum power savings. Many PC Cards or Express Cards use , to turn off auto-save features ...in a cool, dry place for maximum power savings while your notebook. Conserving battery power To ...
...Select the Power saver power plan to get maximum performance from your notebook battery, we recommend that you do not need them. www.gateway.com Extending battery life Maximizing battery performance To get maximum power savings. Many PC Cards or Express Cards use , to turn off auto-save features ...in a cool, dry place for maximum power savings while your notebook. Conserving battery power To ...

8512488 - Gateway Notebook Reference Guide R2
Page 76
... food. Do not pack it separate from sliding around in overhead bins and car trunks. Traveling by air • Do not check your notebook as luggage. • Charge the battery in case airport security asks you to telephone jacks. Dial-up modem • Take a telephone ...the metal detector. • Turn off all discs, PC Cards or Express Cards, peripheral devices, and cables. A list of your usual calling area. If you are traveling internationally. • Take remote access information with Your Notebook Packing your notebook • Remove all wireless devices while in the aircraft....
... food. Do not pack it separate from sliding around in overhead bins and car trunks. Traveling by air • Do not check your notebook as luggage. • Charge the battery in case airport security asks you to telephone jacks. Dial-up modem • Take a telephone ...the metal detector. • Turn off all discs, PC Cards or Express Cards, peripheral devices, and cables. A list of your usual calling area. If you are traveling internationally. • Take remote access information with Your Notebook Packing your notebook • Remove all wireless devices while in the aircraft....


