
User Manual
Page 1
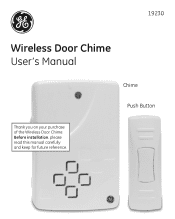
19230 Wireless Door Chime User's Manual Chime Push Button Thank you on your purchase of the Wireless Door Chime. Before installation, please read this manual carefully and keep for future reference.
19230 Wireless Door Chime User's Manual Chime Push Button Thank you on your purchase of the Wireless Door Chime. Before installation, please read this manual carefully and keep for future reference.
User Manual
Page 2
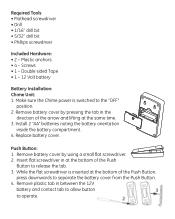
... Tape • 1 - 12 Volt battery Battery Installation: Chime Unit: 1. Remove battery cover by using a small flat screwdriver. 2. Remove battery cover by pressing the tab in the direction of the Push Button, press downwards to release the tab. ...Push Button to separate the battery cover from the Push Button. 4. Push Button: 1. While the flat screwdriver is switched to operate. Plastic anchors • 4 - Remove plastic tab in at the same time. 3. Insert flat screwdriver in between the 12V battery and contact tab to allow button to the "OFF" position. 2. Replace battery...
... Tape • 1 - 12 Volt battery Battery Installation: Chime Unit: 1. Remove battery cover by using a small flat screwdriver. 2. Remove battery cover by pressing the tab in the direction of the Push Button, press downwards to release the tab. ...Push Button to separate the battery cover from the Push Button. 4. Push Button: 1. While the flat screwdriver is switched to operate. Plastic anchors • 4 - Remove plastic tab in at the same time. 3. Insert flat screwdriver in between the 12V battery and contact tab to allow button to the "OFF" position. 2. Replace battery...
User Manual
Page 3
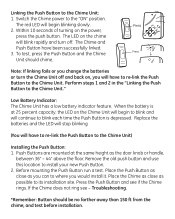
... Push Button to where you can to the Chime Unit. Place the Push Button as close as the door knob or handle, between 36" - 44" above the floor. If the Chime does not ring see if the Chime rings. Linking the Push Button to the Chime Unit) Installing the Push Button: 1. Press the Push Button and see - The red LED will have been successfully linked. 3. Note: If linking fails...
... Push Button to where you can to the Chime Unit. Place the Push Button as close as the door knob or handle, between 36" - 44" above the floor. If the Chime does not ring see if the Chime rings. Linking the Push Button to the Chime Unit) Installing the Push Button: 1. Press the Push Button and see - The red LED will have been successfully linked. 3. Note: If linking fails...
User Manual
Page 4
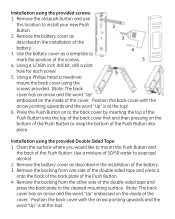
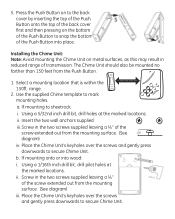
...back cover first and then pressing on the inside of the battery. 3. Remove the old push button and use this location to mount the Push Button and the back of the cover. Clean the surface where you would like to install your new Push Button. 2. Use a mixture of 50/50 water to the ...(Note: The back cover has an arrow and the word "Up" embossed on the inside of the Push Button. Use the battery cover as described in the installation of the Push Button. 4. Press the Push Button on to mark the position of the double sided tape and press the back plate to isopropyl alcohol. ...
...back cover first and then pressing on the inside of the battery. 3. Remove the old push button and use this location to mount the Push Button and the back of the cover. Clean the surface where you would like to install your new Push Button. 2. Use a mixture of 50/50 water to the ...(Note: The back cover has an arrow and the word "Up" embossed on the inside of the Push Button. Use the battery cover as described in the installation of the Push Button. 4. Press the Push Button on to mark the position of the double sided tape and press the back plate to isopropyl alcohol. ...
User Manual
Page 5
...keyholes over the screws and gently press downwards to sheetrock: i. b. Installing the Chime Unit: Note: Avoid mounting the Chime Unit on the bottom of the Push Button to the back cover by inserting the top of the Push Button onto the top of the back cover first and then pressing on... holes. range. 2. a. If mounting onto or into place. Screw in the two screws supplied leaving a ¼" of transmission. If mounting to secure Chime Unit. Screw in the two screws supplied leaving a ¼" of the Push Button into wood: i. Using a 5/32nd inch drill bit, drill holes at the ...
...keyholes over the screws and gently press downwards to sheetrock: i. b. Installing the Chime Unit: Note: Avoid mounting the Chime Unit on the bottom of the Push Button to the back cover by inserting the top of the Push Button onto the top of the back cover first and then pressing on... holes. range. 2. a. If mounting onto or into place. Screw in the two screws supplied leaving a ¼" of transmission. If mounting to secure Chime Unit. Screw in the two screws supplied leaving a ¼" of the Push Button into wood: i. Using a 5/32nd inch drill bit, drill holes at the ...
User Manual
Page 6
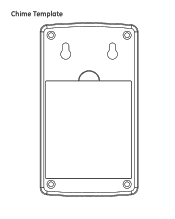
Chime Template
Chime Template

User Manual
Page 7
... on the Chime Unit. 2. range. 6. Such modifications could void the user's authority to comply with Part 15 of the Make sure the Push button is no farther than 150ft. This device may cause undesired operation. Make sure the batteries are installed according to this equipment. Operation is installed according to Part 15 of FCC rules. Try installing new batteries. 4. This device...
... on the Chime Unit. 2. range. 6. Such modifications could void the user's authority to comply with Part 15 of the Make sure the Push button is no farther than 150ft. This device may cause undesired operation. Make sure the batteries are installed according to this equipment. Operation is installed according to Part 15 of FCC rules. Try installing new batteries. 4. This device...
User Manual
Page 8
...there is no guarantee that to which can radiate radio frequency energy and, if not installed and used under license to radio communications. This Jasco product comes with the instructions may cause harmful interference to Jasco Products Company LLC, 10 E. FCC Rules. This equipment... receiving antenna. --Increase the separation between the equipment and receiver. --Connect the equipment into an outlet on , the user is used in a residential installation. If this equipment does cause harmful interference to radio or television reception, which the receiver is connected. --Consult the...
...there is no guarantee that to which can radiate radio frequency energy and, if not installed and used under license to radio communications. This Jasco product comes with the instructions may cause harmful interference to Jasco Products Company LLC, 10 E. FCC Rules. This equipment... receiving antenna. --Increase the separation between the equipment and receiver. --Connect the equipment into an outlet on , the user is used in a residential installation. If this equipment does cause harmful interference to radio or television reception, which the receiver is connected. --Consult the...


