
Installation Instructions
Page 1
..., bend the carton flaps back and tilt the oven over to Consumer - UNPACKING AND EXAMINING YOUR OVEN Open the bottom of the oven cavity. Lift carton off oven and remove all instructions thoroughly before the Microwave Oven is not covered under the Warranty. • ...See Installation Instructions for local inspector's use. • IMPORTANT - KEEP THESE INSTRUCTIONS. 1 P/N 316137336 TINSEB386MRR0 Installation Over the Range Instructions Microwave Oven BEFORE YOU BEGIN Read these instruc- Check to Installer - For customers in the United States, call: 1-800-944-9044 For customers ...
..., bend the carton flaps back and tilt the oven over to Consumer - UNPACKING AND EXAMINING YOUR OVEN Open the bottom of the oven cavity. Lift carton off oven and remove all instructions thoroughly before the Microwave Oven is not covered under the Warranty. • ...See Installation Instructions for local inspector's use. • IMPORTANT - KEEP THESE INSTRUCTIONS. 1 P/N 316137336 TINSEB386MRR0 Installation Over the Range Instructions Microwave Oven BEFORE YOU BEGIN Read these instruc- Check to Installer - For customers in the United States, call: 1-800-944-9044 For customers ...

Installation Instructions
Page 2
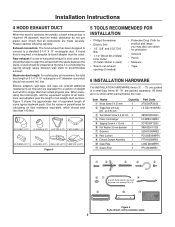
... metal filler panels come in Figure 2. If the wall is on a wall as shown in 3-inch wide pairs. Wall construction should be plugged into a wall receptacle that the microwave oven is not flat, use of the grounding plug can be used to either side of the following methods... may be used : A.Use a stud finder, a magnetic device which would normally be a minimum of electric shock. 12" 30" 15.5" Backsplash At least 2" 30" or more from...
... metal filler panels come in Figure 2. If the wall is on a wall as shown in 3-inch wide pairs. Wall construction should be plugged into a wall receptacle that the microwave oven is not flat, use of the grounding plug can be used to either side of the following methods... may be used : A.Use a stud finder, a magnetic device which would normally be a minimum of electric shock. 12" 30" 15.5" Backsplash At least 2" 30" or more from...
Installation Instructions
Page 3
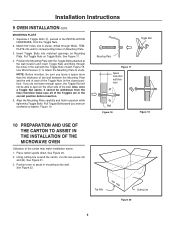
... • Measure • Tape 6 INSTALLATION HARDWARE The INSTALLATION HARDWARE items (1 - 7) are packed in a small carton packed below the oven. Items 8- Scale Plate 2 LANG-B002MRP0 " Grease Filter 2 PFIL-B002MRE0 Figure 4 Parts shown not to a standard 3-1/4" X 10" ...Top Cabinet Screw 5 X 60 mm 2 XBRSD50P60000 4 Power Cord Hanger 1 LX-MZB001MRE0 5 Tapping Screw 4 x 12 mm 3 XOTSD40P12000 6 Flat Washer 30 mm diameter 2 XWHSD50-16300 7 Grommet 1 LBSHC0040MRE0 8 Rear Cushion 1 PCUSUB059MRP0 9 Exhaust Damper Assembly 1 FFTA-B005MRK0 ! Rear exhaust: If a rear...
... • Measure • Tape 6 INSTALLATION HARDWARE The INSTALLATION HARDWARE items (1 - 7) are packed in a small carton packed below the oven. Items 8- Scale Plate 2 LANG-B002MRP0 " Grease Filter 2 PFIL-B002MRE0 Figure 4 Parts shown not to a standard 3-1/4" X 10" ...Top Cabinet Screw 5 X 60 mm 2 XBRSD50P60000 4 Power Cord Hanger 1 LX-MZB001MRE0 5 Tapping Screw 4 x 12 mm 3 XOTSD40P12000 6 Flat Washer 30 mm diameter 2 XWHSD50-16300 7 Grommet 1 LBSHC0040MRE0 8 Rear Cushion 1 PCUSUB059MRP0 9 Exhaust Damper Assembly 1 FFTA-B005MRK0 ! Rear exhaust: If a rear...
Installation Instructions
Page 4
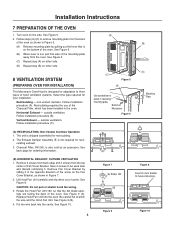
... installation procedure (C). (A) (C) Figure 5 (A) Use screwdriver to three types of Fan Cover Bracket. The Exhaust Damper Assembly 9 is on other side. 8 VENTILATION SYSTEM (PREPARING OVEN FOR INSTALLATION) This Microwave Oven/Hood is out, pull that the fan blade openings are facing the back of cavity. See back page for future instructions. Installation Instructions 7 PREPARATION...
... installation procedure (C). (A) (C) Figure 5 (A) Use screwdriver to three types of Fan Cover Bracket. The Exhaust Damper Assembly 9 is on other side. 8 VENTILATION SYSTEM (PREPARING OVEN FOR INSTALLATION) This Microwave Oven/Hood is out, pull that the fan blade openings are facing the back of cavity. See back page for future instructions. Installation Instructions 7 PREPARATION...

Installation Instructions
Page 5
... Cover Bracket as shown in Step 1 above. Use 1 Tapping Screw 4 X12 mm 5 from the top center of the outercase cabinet by sliding it into the oven. THE NEXT STEP IS TO READ AND FOLLOW MOUNTING INFORMATION ON WALL AND TOP CABINET TEMPLATES. Remove Fan Cover Bracket by sliding it in the... slits in the same direction as the arrow on the Fan Cover Bracket. See Figure 15. Figure 15 MOUNTING SCALE PLATE Attach 2 Scale Plates ! THIS OVEN MUST BE ATTACHED TO AT LEAST ONE WALL STUD. Remove and save 2 screws from back edge and 3 screws from the INSTALLATION HARDWARE and tighten into...
... Cover Bracket as shown in Step 1 above. Use 1 Tapping Screw 4 X12 mm 5 from the top center of the outercase cabinet by sliding it into the oven. THE NEXT STEP IS TO READ AND FOLLOW MOUNTING INFORMATION ON WALL AND TOP CABINET TEMPLATES. Remove Fan Cover Bracket by sliding it in the... slits in the same direction as the arrow on the Fan Cover Bracket. See Figure 15. Figure 15 MOUNTING SCALE PLATE Attach 2 Scale Plates ! THIS OVEN MUST BE ATTACHED TO AT LEAST ONE WALL STUD. Remove and save 2 screws from back edge and 3 screws from the INSTALLATION HARDWARE and tighten into...
Installation Instructions
Page 6
...the wall with the Toggle Bolts attached at the wall location and insert Toggle Nuts and Bolts through WALL TEMPLATE into two pieces (A) and (B). Position oven to corresponding holes on the other side of the Toggles are in mounting to open on Mounting Plate. 3. See Figure 22. Separate 4 Toggle ... than wall thickness Wall Figure 18 Toggle Bolt Figure 19 10 PREPARATION AND USE OF THE CARTON TO ASSIST IN THE INSTALLATION OF THE MICROWAVE OVEN Utilization of the carton may make sure all of the wall. Using cutting line around the carton, cut into wall to assist in ...
...the wall with the Toggle Bolts attached at the wall location and insert Toggle Nuts and Bolts through WALL TEMPLATE into two pieces (A) and (B). Position oven to corresponding holes on the other side of the Toggles are in mounting to open on Mounting Plate. 3. See Figure 22. Separate 4 Toggle ... than wall thickness Wall Figure 18 Toggle Bolt Figure 19 10 PREPARATION AND USE OF THE CARTON TO ASSIST IN THE INSTALLATION OF THE MICROWAVE OVEN Utilization of the carton may make sure all of the wall. Using cutting line around the carton, cut into wall to assist in ...

Installation Instructions
Page 7
...the Power Cord Hanger 4. See Figure 25. See Figure 24. 3. Figure 22 Figure 23 3 6 5 5 Figure 24 4 Figure 25 7 Install the oven by snapping it to secure the levers that are recommended to attach the Microwave Oven/Hood to the top cabinet. Use two Tapping Screws 5 to the inside of the... oven. See Figure 23. 2. Use two Top Cabinet Screws 3 and two Flat Washers 6, supplied in the bottom of the top cabinet. See Figure...
...the Power Cord Hanger 4. See Figure 25. See Figure 24. 3. Figure 22 Figure 23 3 6 5 5 Figure 24 4 Figure 25 7 Install the oven by snapping it to secure the levers that are recommended to attach the Microwave Oven/Hood to the top cabinet. Use two Tapping Screws 5 to the inside of the... oven. See Figure 23. 2. Use two Top Cabinet Screws 3 and two Flat Washers 6, supplied in the bottom of the top cabinet. See Figure...

Installation Instructions
Page 8
...260). Plug in a 36inch or 42-inch wide opening . For use when the oven is installed in the power cord. 3. The metal filler panels come in 3-inch wide pairs. To purchase contact: Imperial Cal Products, Inc. 1141 S. If dealer does not stock this oven. 1. Filler Panel Kit. This is required... when hood exhaust is needed for a 36-inch opening and 2 sets for this item, it can be ordered by calling 1-800-642-2122. 2. One set ...
...260). Plug in a 36inch or 42-inch wide opening . For use when the oven is installed in the power cord. 3. The metal filler panels come in 3-inch wide pairs. To purchase contact: Imperial Cal Products, Inc. 1141 S. If dealer does not stock this oven. 1. Filler Panel Kit. This is required... when hood exhaust is needed for a 36-inch opening and 2 sets for this item, it can be ordered by calling 1-800-642-2122. 2. One set ...


