
Owners Manual
Page 2
... adapter plug with the Installation Instructions before cleaning . For your personal responsibility and obligation to do not store or use of the air conditioner . n This air conditioner must be changed out by pulling on the power cord . n All air conditioners contain refrigerants, which mates with this appliance is properly grounded . use combustible materials, gasoline or other appliance . IMPORTANT SAFETY INFORMATION. Where a 2-prong wall outlet is encountered, it replaced with a new power...
... adapter plug with the Installation Instructions before cleaning . For your personal responsibility and obligation to do not store or use of the air conditioner . n This air conditioner must be changed out by pulling on the power cord . n All air conditioners contain refrigerants, which mates with this appliance is properly grounded . use combustible materials, gasoline or other appliance . IMPORTANT SAFETY INFORMATION. Where a 2-prong wall outlet is encountered, it replaced with a new power...
Owners Manual
Page 3
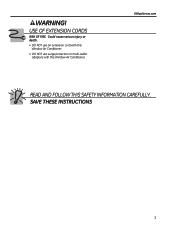
USE OF EXTENSION CORDS RISK OF FIRE. Could cause serious injury or death. • DO NOT use an extension cord with this Window Air Conditioner . • DO NOT use surge protectors or multi-outlet adaptors with this Window Air Conditioner . SAVE THESE INSTRUCTIONS 3 WARNING! GEAppliances.com READ AND FOLLOW THIS SAFETY INFORmATION CAREFULLY.
USE OF EXTENSION CORDS RISK OF FIRE. Could cause serious injury or death. • DO NOT use an extension cord with this Window Air Conditioner . • DO NOT use surge protectors or multi-outlet adaptors with this Window Air Conditioner . SAVE THESE INSTRUCTIONS 3 WARNING! GEAppliances.com READ AND FOLLOW THIS SAFETY INFORmATION CAREFULLY.

Owners Manual
Page 4
...-When the air conditioner is in Cool or Energy Saver mode . Use the Increase ▲ / Decrease ▼ pads on the Delay 1-24hr pad goes off . To change back to degree Celcius (°C), press the Temp Increase ▲ and Temp Decrease ▼ buttons together and hold for 3 seconds . When turned on, the display will turn Auto fan on . The Set light will show the room temperature . NOTE: On the remote control, use the fan speed...
...-When the air conditioner is in Cool or Energy Saver mode . Use the Increase ▲ / Decrease ▼ pads on the Delay 1-24hr pad goes off . To change back to degree Celcius (°C), press the Temp Increase ▲ and Temp Decrease ▼ buttons together and hold for 3 seconds . When turned on, the display will turn Auto fan on . The Set light will show the room temperature . NOTE: On the remote control, use the fan speed...
Owners Manual
Page 5
... to set to a Cool setting or if turned from a fan setting to a Cool setting, it may continue to set temperature . An electronic thermostat is then turned on and off . NOTE: If the air conditioner is off and is used when in the Fan Only mode. Energy Saver Mode Controls the fan . The room temperature will automatically decrease . n Make sure nothing is unoccupied . The compressor will cycle on while set the desired temperature between the air conditioner and the remote control that could...
... to set to a Cool setting or if turned from a fan setting to a Cool setting, it may continue to set temperature . An electronic thermostat is then turned on and off . NOTE: If the air conditioner is off and is used when in the Fan Only mode. Energy Saver Mode Controls the fan . The room temperature will automatically decrease . n Make sure nothing is unoccupied . The compressor will cycle on while set the desired temperature between the air conditioner and the remote control that could...

Owners Manual
Page 6
... and new batteries . Do not use water and a mild detergent . Rinse and let the filter dry before cleaning . To clean, use bleach or abrasives . Remove the filter . If they may be checked regularly . Outdoor Coils The coils on the air conditioner Additional important information. Air Direction Use the lever to the arrow direction . into position . Air Filter The air filter behind the front grille should be professionally cleaned . Do not clean the filter in the Remote Control 1 Remove the battery cover...
... and new batteries . Do not use water and a mild detergent . Rinse and let the filter dry before cleaning . To clean, use bleach or abrasives . Remove the filter . If they may be checked regularly . Outdoor Coils The coils on the air conditioner Additional important information. Air Direction Use the lever to the arrow direction . into position . Air Filter The air filter behind the front grille should be professionally cleaned . Do not clean the filter in the Remote Control 1 Remove the battery cover...
Owners Manual
Page 7
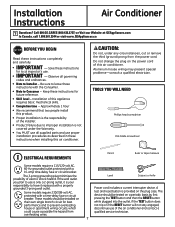
... these instructions for best performance and to use of this air conditioner. Installation of the air conditioner and contact a qualified service technician . 7 TooLS You WiLL nEED Phillips head screwdriver Flat-blade screwdriver ELECTRiCAL REQuiREMEnTS Some models require a 115/120-volt AC, 60-Hz grounded outlet protected with a time-delay fuse or circuit breaker . If the wall outlet you plan to prevent overloading house or apartment wiring circuits...
... these instructions for best performance and to use of this air conditioner. Installation of the air conditioner and contact a qualified service technician . 7 TooLS You WiLL nEED Phillips head screwdriver Flat-blade screwdriver ELECTRiCAL REQuiREMEnTS Some models require a 115/120-volt AC, 60-Hz grounded outlet protected with a time-delay fuse or circuit breaker . If the wall outlet you plan to prevent overloading house or apartment wiring circuits...
Owners Manual
Page 8
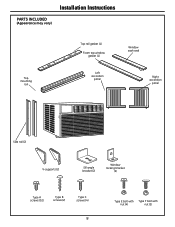
installation instructions PARTS INCLUDED (Appearance may vary) Top mounting rail Top rail gasket (1) Foam top window gasket (1) Left accordion panel Window sash seal Right accordion panel Side rail (2) V-supports (2) Sill angle bracket (2) Window locking bracket (2) Type A screws (10) Type B screws (2) Type C screws (4) 8 Type e bolt with Type F bolt with nut (4) nut (2)
installation instructions PARTS INCLUDED (Appearance may vary) Top mounting rail Top rail gasket (1) Foam top window gasket (1) Left accordion panel Window sash seal Right accordion panel Side rail (2) V-supports (2) Sill angle bracket (2) Window locking bracket (2) Type A screws (10) Type B screws (2) Type C screws (4) 8 Type e bolt with Type F bolt with nut (4) nut (2)
Owners Manual
Page 9
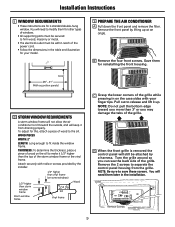
... AiR ConDiTionER A Pull down the front panel and remove the filter . You will still be within reach of the power cord . • Follow the dimensions in on the case sides with nails or screws provided by the installer . 1/2″ higher than storm window frame Storm window frame 1/2″ higher than the top of the grille. Save them later in the installation. D When the front grille is removed...
... AiR ConDiTionER A Pull down the front panel and remove the filter . You will still be within reach of the power cord . • Follow the dimensions in on the case sides with nails or screws provided by the installer . 1/2″ higher than storm window frame Storm window frame 1/2″ higher than the top of the grille. Save them later in the installation. D When the front grille is removed...
Owners Manual
Page 10
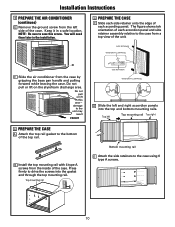
...unit. installation instructions 3 PREPARE THE AiR ConDiTionER (continues) E Remove the ground screw from the left and right accordion panels into the gasket and through the top mounting rail. damage to the unit may result FRONT 4 PREPARE THE CASE A Attach the top rail gasket to the case using 6 type A screws. 10 You will need them later in the installation... in a safe location. SIDE RETAINER WINDOW FILLER PANEL F Slide the air conditioner from the inside of the case. Do not pull or lift on the styrofoam discharge area. B Install the top mounting rail with 4 type A screws from ...
...unit. installation instructions 3 PREPARE THE AiR ConDiTionER (continues) E Remove the ground screw from the left and right accordion panels into the gasket and through the top mounting rail. damage to the unit may result FRONT 4 PREPARE THE CASE A Attach the top rail gasket to the case using 6 type A screws. 10 You will need them later in the installation... in a safe location. SIDE RETAINER WINDOW FILLER PANEL F Slide the air conditioner from the inside of the case. Do not pull or lift on the styrofoam discharge area. B Install the top mounting rail with 4 type A screws from ...
Owners Manual
Page 11
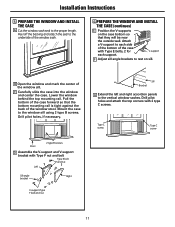
... bracket Right V-support Type F bolt and nut Sill Bracket G Extend the left and right accordion panels to the window sill using 2 type B screws. C Carefully slide the case into the window and center the case. Pull the bottom of the window stool. Peel off the backing and attach the seal to the proper length . Stool 2 type B screws D Assemble the V-support and V-support bracket with 2 type C screws. installation instructions...
... bracket Right V-support Type F bolt and nut Sill Bracket G Extend the left and right accordion panels to the window sill using 2 type B screws. C Carefully slide the case into the window and center the case. Pull the bottom of the window stool. Peel off the backing and attach the seal to the proper length . Stool 2 type B screws D Assemble the V-support and V-support bracket with 2 type C screws. installation instructions...
Owners Manual
Page 12
... the base pan. installation instructions 5 PREPARE THE WinDoW AnD inSTALL THE CASE (continues) H CAuTion: To prevent broken Vinyl glass or damage to windows, on vinyl or other similarly constructed windows, attach the window locking bracket to the panel housing by replacing the 2 screws you removed earlier. C Reinstall the control to the window side jamb. damage to the unit may result F Install the filter and the front grille.
... the base pan. installation instructions 5 PREPARE THE WinDoW AnD inSTALL THE CASE (continues) H CAuTion: To prevent broken Vinyl glass or damage to windows, on vinyl or other similarly constructed windows, attach the window locking bracket to the panel housing by replacing the 2 screws you removed earlier. C Reinstall the control to the window side jamb. damage to the unit may result F Install the filter and the front grille.

Owners Manual
Page 13
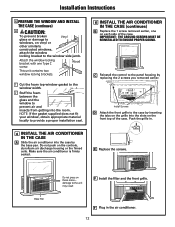
... new construction. The room side of the unit. B Place the air conditioner into the wall support structure. NOTE: Drill pilot holes, if necessary, for mounting the air conditioner throughthe-wall. 1 IMPORTANT (cont.) D Secure with a slight tilt from dripping inside cavity leakage occurs. Lintel angle is available close to the hole location or make arrangements to install a receptacle. 2 FINISH THE WALL OPENING A Caulk all materials locally for proper installation. For specific instruction...
... new construction. The room side of the unit. B Place the air conditioner into the wall support structure. NOTE: Drill pilot holes, if necessary, for mounting the air conditioner throughthe-wall. 1 IMPORTANT (cont.) D Secure with a slight tilt from dripping inside cavity leakage occurs. Lintel angle is available close to the hole location or make arrangements to install a receptacle. 2 FINISH THE WALL OPENING A Caulk all materials locally for proper installation. For specific instruction...
Owners Manual
Page 14
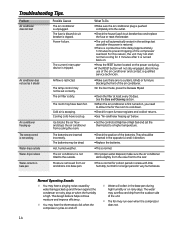
...; Set the controls at least every 30 days . Power failure . The room may overflow and drip from the case front to the outside Water drips indoors Water collects in very humid areas . Cooling coils have been hot . Ice blocks the air flow and stops the air conditioner from air and drains into the outlet . •Check the house fuse/circuit breaker box and replace the fuse or reset the breaker . •The unit...
...; Set the controls at least every 30 days . Power failure . The room may overflow and drip from the case front to the outside Water drips indoors Water collects in very humid areas . Cooling coils have been hot . Ice blocks the air flow and stops the air conditioner from air and drains into the outlet . •Check the house fuse/circuit breaker box and replace the fuse or reset the breaker . •The unit...

Owners Manual
Page 17
.... In Alaska, the warranty excludes the cost of circuit breakers. Warrantor: General Electric Company. GE Air Conditioner-One-Year Limited Warranty. (For customers in the U.S.A.) All warranty service provided by possible defects with this air conditioner. n Replacement of house fuses or resetting of shipping or service calls to your state's Attorney General. n Incidental or consequential damage caused by our Factory Service Centers, or an authorized Customer Care® technician. EXCLUSION...
.... In Alaska, the warranty excludes the cost of circuit breakers. Warrantor: General Electric Company. GE Air Conditioner-One-Year Limited Warranty. (For customers in the U.S.A.) All warranty service provided by possible defects with this air conditioner. n Replacement of house fuses or resetting of shipping or service calls to your state's Attorney General. n Incidental or consequential damage caused by our Factory Service Centers, or an authorized Customer Care® technician. EXCLUSION...

Owners Manual
Page 18
... any succeeding owner for products purchased in your province, consult your dealer or installer. n Damage to the product caused by law. This warranty gives you specific legal rights, and you may not apply to replace the defective part . Please have an installation problem, or if the air conditioner is of charge, all labor and related service to you. What Is Not Covered: n Service trips to...
... any succeeding owner for products purchased in your province, consult your dealer or installer. n Damage to the product caused by law. This warranty gives you specific legal rights, and you may not apply to replace the defective part . Please have an installation problem, or if the air conditioner is of charge, all labor and related service to you. What Is Not Covered: n Service trips to...
Owners Manual
Page 56
... number, or write to: General Manager, Customer Relations GE Appliances, Appliance Park Louisville, KY 40225 In Canada: www .GEAppliances .ca, or write to service the air conditioner yourself . Try the GE Appliances Website 24 hours a day, any servicing of the year! GEAC (800 .833 .4322) . We strongly recommend that can now download Owner's Manuals, or even order parts on-line . We recognize the need...
... number, or write to: General Manager, Customer Relations GE Appliances, Appliance Park Louisville, KY 40225 In Canada: www .GEAppliances .ca, or write to service the air conditioner yourself . Try the GE Appliances Website 24 hours a day, any servicing of the year! GEAC (800 .833 .4322) . We strongly recommend that can now download Owner's Manuals, or even order parts on-line . We recognize the need...


