

Owners Manual
Page 1
...these numbers on a label on the side of the air conditioner. 49-7587 11-07 JR Air ConditionRoeorms ge.com Safety Instructions 2, 3 Operating Instructions Additional Controls 7 Control Knob Models 6 Normal Operating Sounds . . . . .7 Touch Pad Models 4, 5 Care and Cleaning Air Filter 8 Grille and Case 8 Outdoor Coils 8 Installation Instructions Through-the-Wall Installation-Optional 15 Window Installation 9-14 Troubleshooting Tips 16 Consumer Support Consumer Support . . .Back Cover Product Registration . . . . .17, 18 Warranty 19 *ENERGY STAR® labeled product Owner's Manual...
...these numbers on a label on the side of the air conditioner. 49-7587 11-07 JR Air ConditionRoeorms ge.com Safety Instructions 2, 3 Operating Instructions Additional Controls 7 Control Knob Models 6 Normal Operating Sounds . . . . .7 Touch Pad Models 4, 5 Care and Cleaning Air Filter 8 Grille and Case 8 Outdoor Coils 8 Installation Instructions Through-the-Wall Installation-Optional 15 Window Installation 9-14 Troubleshooting Tips 16 Consumer Support Consumer Support . . .Back Cover Product Registration . . . . .17, 18 Warranty 19 *ENERGY STAR® labeled product Owner's Manual...

Owners Manual
Page 2
... and reset button is used. Where a 2-prong wall outlet is encountered, it replaced with a new power supply cord obtained from the manufacturer and not repaired. The air conditioner should be removed prior to minimize the possibility of electric shock hazard from the power cord. Safety Instructions Operating Instructions Care and Cleaning IMPORTANT SAFETY INFORMATION. s Never unplug your safety...do . This provides the best performance and also prevents overloading house wiring circuits...
... and reset button is used. Where a 2-prong wall outlet is encountered, it replaced with a new power supply cord obtained from the manufacturer and not repaired. The air conditioner should be removed prior to minimize the possibility of electric shock hazard from the power cord. Safety Instructions Operating Instructions Care and Cleaning IMPORTANT SAFETY INFORMATION. s Never unplug your safety...do . This provides the best performance and also prevents overloading house wiring circuits...

Owners Manual
Page 4
... Increase Unit power on/off . NOTE: The display will turn off in Cool or Energy 1-24hr timer, press the Delay 1-24hr pad on the Saver mode. Mode Pad Use to set the fan speed to open or closed. How to set : Press the Delay 1-24hr pad on the unit or the pad on the remote control. Delay 1-24hr Delay timer Decrease Mode select Fan speed Decrease Temperature set the timer in Cool or Energy Saver modes. The Set light will work...
... Increase Unit power on/off . NOTE: The display will turn off in Cool or Energy 1-24hr timer, press the Delay 1-24hr pad on the Saver mode. Mode Pad Use to set the fan speed to open or closed. How to set : Press the Delay 1-24hr pad on the unit or the pad on the remote control. Delay 1-24hr Delay timer Decrease Mode select Fan speed Decrease Temperature set the timer in Cool or Energy Saver modes. The Set light will work...

Owners Manual
Page 5
... up to begin. Set the thermostat at the signal receiver on the remote control. 5 Care and Cleaning Installation Instructions Energy Saver Mode Controls the fan. Consumer Support Remote Control s To ensure proper operation, aim the remote control at a lower number and the indoor air will become cooler. Troubleshooting Tips Power Outage Recovery Feature In the case of comfort. s Make sure nothing is restored. Safety Instructions Do Not Operate in Freezing Outdoor Conditions This cool-only air conditioner was set, it may...
... up to begin. Set the thermostat at the signal receiver on the remote control. 5 Care and Cleaning Installation Instructions Energy Saver Mode Controls the fan. Consumer Support Remote Control s To ensure proper operation, aim the remote control at a lower number and the indoor air will become cooler. Troubleshooting Tips Power Outage Recovery Feature In the case of comfort. s Make sure nothing is restored. Safety Instructions Do Not Operate in Freezing Outdoor Conditions This cool-only air conditioner was set, it may...

Owners Manual
Page 6
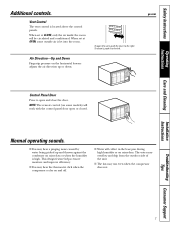
... For continuous side-to-side air circulation, set the Circulaire switch to ON until the desired air direction is used to open and close the door. For fixed side-to-side air direction, set the Circulaire switch to OFF. NOTE: If you turn the knob to a higher number, the indoor air will vary. High Cool MODE OFF High Fan TEMP Coolest 7 1 Med Low Cool Fan Low Cool MODE CONTROL 6 2 5 3 4 TEMPERATURE CONTROL Controls The air conditioner controls are located behind the control panel door.
... For continuous side-to-side air circulation, set the Circulaire switch to ON until the desired air direction is used to open and close the door. For fixed side-to-side air direction, set the Circulaire switch to OFF. NOTE: If you turn the knob to a higher number, the indoor air will vary. High Cool MODE OFF High Fan TEMP Coolest 7 1 Med Low Cool Fan Low Cool MODE CONTROL 6 2 5 3 4 TEMPERATURE CONTROL Controls The air conditioner controls are located behind the control panel door.
Owners Manual
Page 7
... water may run even when the compressor does not. Safety Instructions Operating Instructions Care and Cleaning Additional controls. This design feature helps remove moisture and improve efficiency. s The fan may overflow and drip from the outdoor side of the unit. Vent Control The vent control is high. Installation Instructions Troubleshooting Tips Consumer Support 7 NOTE: The remote control (on the horizontal louvers adjusts the air direction up and thrown against the condenser on rainy days. ge.com Control Panel...
... water may run even when the compressor does not. Safety Instructions Operating Instructions Care and Cleaning Additional controls. This design feature helps remove moisture and improve efficiency. s The fan may overflow and drip from the outdoor side of the unit. Vent Control The vent control is high. Installation Instructions Troubleshooting Tips Consumer Support 7 NOTE: The remote control (on the horizontal louvers adjusts the air direction up and thrown against the condenser on rainy days. ge.com Control Panel...

Owners Manual
Page 8
... Instructions Care and cleaning of the air conditioner should be used for coil cleaning) Remove the air filter. To clean, use rechargeable batteries. Outdoor Coils The coils on the outdoor side of the air conditioner. Grasp the lower corners of the inlet grille. 2 Using the tab, pull up . Rinse and let the filter dry before cleaning. Grille Frame Removal (if necessary for a long time. 8 Troubleshooting Tips Consumer Support s Remove the batteries from the wall outlet before replacing it down. To remove: 1 Open the inlet grille...
... Instructions Care and cleaning of the air conditioner should be used for coil cleaning) Remove the air filter. To clean, use rechargeable batteries. Outdoor Coils The coils on the outdoor side of the air conditioner. Grasp the lower corners of the inlet grille. 2 Using the tab, pull up . Rinse and let the filter dry before cleaning. Grille Frame Removal (if necessary for a long time. 8 Troubleshooting Tips Consumer Support s Remove the batteries from the wall outlet before replacing it down. To remove: 1 Open the inlet grille...

Owners Manual
Page 9
... these instructions when installing this air conditioner. Do not change the plug on the plug case. If the TEST button does not trip or if the RESET button will not stay engaged, discontinue use is only a 2-prong outlet, it is your responsibility to improper installation is provided on the power cord of the installer. • Product failure due to have it replaced with a properly grounded 3-prong wall outlet...
... these instructions when installing this air conditioner. Do not change the plug on the plug case. If the TEST button does not trip or if the RESET button will not stay engaged, discontinue use is only a 2-prong outlet, it is your responsibility to improper installation is provided on the power cord of the installer. • Product failure due to have it replaced with a properly grounded 3-prong wall outlet...

Owners Manual
Page 10
Window Installation Instructions PARTS INCLUDED (Appearance may vary) Left accordion panel Foam top Top window gasket mounting rail Window sash seal Right accordion panel Window locking bracket (2) Type A (6) Type B (4) V-support (2) Bolt (2) & nuts (2) Type C (7) Type D (6) Type E (4) Type F (2) 10
Window Installation Instructions PARTS INCLUDED (Appearance may vary) Left accordion panel Foam top Top window gasket mounting rail Window sash seal Right accordion panel Window locking bracket (2) Type A (6) Type B (4) V-support (2) Bolt (2) & nuts (2) Type C (7) Type D (6) Type E (4) Type F (2) 10

Owners Manual
Page 11
... keep it 1/2″ higher than vinyl frame (on the sill to firm wood, masonry or metal. • The electrical outlet must be within reach of the power cord. 3 REMOVE THE AIR CONDITIONER FROM THE CASE A Remove the locking screw and locking bracket from draining properly. See the window opening dimensions. • All supporting parts must be installed without the accordion panels if needed to modify them for a standard...
... keep it 1/2″ higher than vinyl frame (on the sill to firm wood, masonry or metal. • The electrical outlet must be within reach of the power cord. 3 REMOVE THE AIR CONDITIONER FROM THE CASE A Remove the locking screw and locking bracket from draining properly. See the window opening dimensions. • All supporting parts must be installed without the accordion panels if needed to modify them for a standard...

Owners Manual
Page 13
... the air conditioner falls between the glass and the window to prevent air and insects from getting into the room. Use a level; Drill pilot holes and attach the top and bottom corners with an adjustable wrench. C Stuff the foam between the studs in the wall. 7 INSTALL SUPPORT BRACKETS AND THE FOAM TOP WINDOW GASKET A Drill pilot holes and attach the support brackets with two type D screws...
... the air conditioner falls between the glass and the window to prevent air and insects from getting into the room. Use a level; Drill pilot holes and attach the top and bottom corners with an adjustable wrench. C Stuff the foam between the studs in the wall. 7 INSTALL SUPPORT BRACKETS AND THE FOAM TOP WINDOW GASKET A Drill pilot holes and attach the support brackets with two type D screws...

Owners Manual
Page 14
... slide the air conditioner into the slots on the controls or the finned coils. Type F screw I Reinstall the filter. Window Installation Instructions 8 INSTALL THE AIR CONDITIONER IN THE CASE A Make sure the ground wire is firmly seated. Do not push on the front top of the case. IMPORTANT: The ground wire must be reinstalled to seal the installation. 14 Guide the lever carefully through the grille frame as...
... slide the air conditioner into the slots on the controls or the finned coils. Type F screw I Reinstall the filter. Window Installation Instructions 8 INSTALL THE AIR CONDITIONER IN THE CASE A Make sure the ground wire is firmly seated. Do not push on the front top of the case. IMPORTANT: The ground wire must be reinstalled to seal the installation. 14 Guide the lever carefully through the grille frame as...

Owners Manual
Page 15
... close to the hole location or make arrangements to install a receptacle. 1 IMPORTANT (cont.) D Secure with a slight tilt from the case. Read completely, then follow step-by the wall. For specific instruction, refer to the Window Installation Instructions. 15 The case must project on the outdoor side of the building. Flashing (Drip rail) Wood support strips B Place the air conditioner into the room far enough to...
... close to the hole location or make arrangements to install a receptacle. 1 IMPORTANT (cont.) D Secure with a slight tilt from the case. Read completely, then follow step-by the wall. For specific instruction, refer to the Window Installation Instructions. 15 The case must project on the outdoor side of the building. Flashing (Drip rail) Wood support strips B Place the air conditioner into the room far enough to...

Owners Manual
Page 16
... the air conditioner plug is restored. Installation Instructions Troubleshooting Tips Consumer Support Safety Instructions Troubleshooting Tips. Excessively hot and humid weather. See the Care and Cleaning section. • When the air conditioner is turned back on. • Press the RESET button located on , you may need to call for open furnace floor registers and cold air returns. • Set the air conditioner's vent to a higher temperature. • Check the position of the air conditioner and contact a qualified service...
... the air conditioner plug is restored. Installation Instructions Troubleshooting Tips Consumer Support Safety Instructions Troubleshooting Tips. Excessively hot and humid weather. See the Care and Cleaning section. • When the air conditioner is turned back on. • Press the RESET button located on , you may need to call for open furnace floor registers and cold air returns. • Set the air conditioner's vent to a higher temperature. • Check the position of the air conditioner and contact a qualified service...

Owners Manual
Page 17
... hidden deductibles • One 800 number to : General Electric Company Warranty Registration Department P.O. Place your confidence in GE and call us in envelope and mail to call We'll Cover Any Appliance. Protect your refrigerator, dishwasher, washer and dryer, range, TV, VCR and much more information. *All brands covered, up to 20 years old, in the continental U.S. ✁...
... hidden deductibles • One 800 number to : General Electric Company Warranty Registration Department P.O. Place your confidence in GE and call us in envelope and mail to call We'll Cover Any Appliance. Protect your refrigerator, dishwasher, washer and dryer, range, TV, VCR and much more information. *All brands covered, up to 20 years old, in the continental U.S. ✁...

Owners Manual
Page 18
... the registration below to ensure that your Owner's Manual carefully. Model Number Serial Number First Name Mr. s Ms. s Mrs. s Miss s Street Address Last Name Apt. # E-mail Address* Zip City State Code Date Placed In Use Month Day Year Phone _ _ Number GE Consumer & Industrial Appliances General Electric Company Louisville, KY 40225 ge.com * Please provide your Consumer Product Ownership Registration today. For information about GEA...
... the registration below to ensure that your Owner's Manual carefully. Model Number Serial Number First Name Mr. s Ms. s Mrs. s Miss s Street Address Last Name Apt. # E-mail Address* Zip City State Code Date Placed In Use Month Day Year Phone _ _ Number GE Consumer & Industrial Appliances General Electric Company Louisville, KY 40225 ge.com * Please provide your Consumer Product Ownership Registration today. For information about GEA...

Owners Manual
Page 19
... your dealer or installer. Louisville, KY 40225 Installation Instructions Troubleshooting Tips Consumer Support 19 Have serial number and model number available when calling for service by an individual technician. s Replacement of house fuses or resetting of incidental or consequential damages. s Damage to unreasonable use the product. Safety Instructions Operating Instructions Care and Cleaning GE Air Conditioner Warranty. s In commercial locations, labor necessary to move the unit to obtain service under the warranty. EXCLUSION OF IMPLIED WARRANTIES-Your sole and...
... your dealer or installer. Louisville, KY 40225 Installation Instructions Troubleshooting Tips Consumer Support 19 Have serial number and model number available when calling for service by an individual technician. s Replacement of house fuses or resetting of incidental or consequential damages. s Damage to unreasonable use the product. Safety Instructions Operating Instructions Care and Cleaning GE Air Conditioner Warranty. s In commercial locations, labor necessary to move the unit to obtain service under the warranty. EXCLUSION OF IMPLIED WARRANTIES-Your sole and...

Owners Manual
Page 20
... product registration will still be used by people of the year! Get on-line and schedule your service at 800.626.2002 during normal business hours. Other servicing generally should the need to qualified service personnel. You may cause unsafe operation. Schedule Service ge.com Expert GE repair service is still in this manual cover procedures to service their own appliances can be there after your new...
... product registration will still be used by people of the year! Get on-line and schedule your service at 800.626.2002 during normal business hours. Other servicing generally should the need to qualified service personnel. You may cause unsafe operation. Schedule Service ge.com Expert GE repair service is still in this manual cover procedures to service their own appliances can be there after your new...

Dimensions
Page 1
... Energy Star® partner, GE has determined that this product meets the Energy Star guidelines for through -the-wall applications, keep louvers free. Total volume and shelf area are not suitable for energy efficiency. AEM25DL GE® ENERGY STAR® Deluxe 230/208 Volt Electronic Room Air Conditioner Wall Case Dimensions and Installation Information (in inches) Note: When installing slide-out chassis units in accordance with local electrical codes and regulations. Wall Outlets: All wiring including installation...
... Energy Star® partner, GE has determined that this product meets the Energy Star guidelines for through -the-wall applications, keep louvers free. Total volume and shelf area are not suitable for energy efficiency. AEM25DL GE® ENERGY STAR® Deluxe 230/208 Volt Electronic Room Air Conditioner Wall Case Dimensions and Installation Information (in inches) Note: When installing slide-out chassis units in accordance with local electrical codes and regulations. Wall Outlets: All wiring including installation...
Dimensions
Page 2
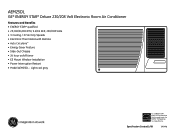
Specification Created 1/08 390498 AEM25DL GE® ENERGY STAR® Deluxe 230/208 Volt Electronic Room Air Conditioner Features and Benefits • ENERGY STAR® qualified • 25,200/24,900 BTU, 9.4/9.4 EER, 230/208 Volts • 3 Cooling / 3 Fan Only Speeds • Electronic Thermostat with Remote • Auto Circulaire™ • Energy Saver Feature • Slide-Out Chassis • 24 hour on/off timer • EZ Mount Window Installation • Power Interruption Restart • Model AEM25DL - Light cool gray AEQ24DK...
Specification Created 1/08 390498 AEM25DL GE® ENERGY STAR® Deluxe 230/208 Volt Electronic Room Air Conditioner Features and Benefits • ENERGY STAR® qualified • 25,200/24,900 BTU, 9.4/9.4 EER, 230/208 Volts • 3 Cooling / 3 Fan Only Speeds • Electronic Thermostat with Remote • Auto Circulaire™ • Energy Saver Feature • Slide-Out Chassis • 24 hour on/off timer • EZ Mount Window Installation • Power Interruption Restart • Model AEM25DL - Light cool gray AEQ24DK...

