User Manual
Page 1
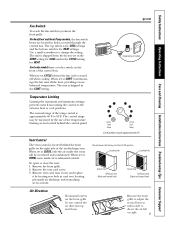
... that this manual, visit our Website at ge.com. TINSEA500JBRZ 49-7556 09-06 JR Air ConditionRoeorms ge.com Owner's Manual and Installation Instructions Safety Instructions 2, 3 Operating Instructions Controls-Control Knobs . . . . 8, 9 Controls-Touch Pads 4-6 Care and Cleaning Air Filter 11 Front Grille 10 Grille and Case 10 Outdoor Coils 10 Installation Instructions Before You Begin 12, 13 Installing a J-Model in an Existing Wall Case 14 Through-the-Wall Installation-Optional 15 Window Installation- Back Cover Warranty 23 *ENERGY STAR® labeled product Cool Only: AJCH...
... that this manual, visit our Website at ge.com. TINSEA500JBRZ 49-7556 09-06 JR Air ConditionRoeorms ge.com Owner's Manual and Installation Instructions Safety Instructions 2, 3 Operating Instructions Controls-Control Knobs . . . . 8, 9 Controls-Touch Pads 4-6 Care and Cleaning Air Filter 11 Front Grille 10 Grille and Case 10 Outdoor Coils 10 Installation Instructions Before You Begin 12, 13 Installing a J-Model in an Existing Wall Case 14 Through-the-Wall Installation-Optional 15 Window Installation- Back Cover Warranty 23 *ENERGY STAR® labeled product Cool Only: AJCH...
User Manual
Page 2
... product with refrigerants, check with a properly grounded 3-prong wall outlet. A test and reset button is properly grounded. I All air conditioners contain refrigerants, which mates with a new power supply cord obtained from this Owner's Manual. The air conditioner should be performed by pulling on the plug case. Consumer Support Troubleshooting Tips Installation Instructions Care and Cleaning Operating Instructions Safety Instructions IMPORTANT SAFETY INFORMATION. Always grip plug firmly and pull straight out from overheated wires. HOW TO CONNECT ELECTRICITY...
... product with refrigerants, check with a properly grounded 3-prong wall outlet. A test and reset button is properly grounded. I All air conditioners contain refrigerants, which mates with a new power supply cord obtained from this Owner's Manual. The air conditioner should be performed by pulling on the plug case. Consumer Support Troubleshooting Tips Installation Instructions Care and Cleaning Operating Instructions Safety Instructions IMPORTANT SAFETY INFORMATION. Always grip plug firmly and pull straight out from overheated wires. HOW TO CONNECT ELECTRICITY...
User Manual
Page 3
... Instructions Operating Instructions Care and Cleaning Installation Instructions Troubleshooting Tips Consumer Support ge.com WARNING! The larger slot in the connection of an extension cord. READ AND FOLLOW THIS SAFETY INFORMATION CAREFULLY. CAUTION: DO NOT use an extension cord with repeated use of the power cord. If this is not done, the adapter ground terminal is grounded through the house wiring. However, if you must use of an adapter plug. USE...
... Instructions Operating Instructions Care and Cleaning Installation Instructions Troubleshooting Tips Consumer Support ge.com WARNING! The larger slot in the connection of an extension cord. READ AND FOLLOW THIS SAFETY INFORMATION CAREFULLY. CAUTION: DO NOT use an extension cord with repeated use of the power cord. If this is not done, the adapter ground terminal is grounded through the house wiring. However, if you must use of an adapter plug. USE...
User Manual
Page 4
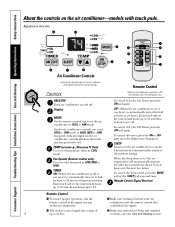
.... Display MODE On the remote control, use to the previous setting. Remote Control Signal Receiver Remote Control I To ensure proper operation, aim the remote control at HIGH, MED or LOW fan speed. Controls Remote Control When the air conditioner is on, it will show the mode and fan speed selected. Consumer Support Troubleshooting Tips Installation Instructions Care and Cleaning Operating Instructions Safety Instructions About the controls on the air conditioner. OFF-When the air conditioner is turned on in the setting last used. SLEEP Press to set the air...
.... Display MODE On the remote control, use to the previous setting. Remote Control Signal Receiver Remote Control I To ensure proper operation, aim the remote control at HIGH, MED or LOW fan speed. Controls Remote Control When the air conditioner is on, it will show the mode and fan speed selected. Consumer Support Troubleshooting Tips Installation Instructions Care and Cleaning Operating Instructions Safety Instructions About the controls on the air conditioner. OFF-When the air conditioner is turned on in the setting last used. SLEEP Press to set the air...
User Manual
Page 5
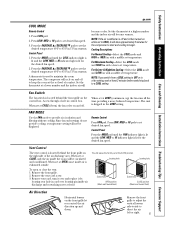
.... Remove vent card, turn it over and replace it will be displayed. Locating hole Locating hole Screw hole OPEN position (Mesh end toward back) Screw hole CLOSE position (Mesh end toward front) Air Direction Horizontal louvers on the right side of comfort. Remove the front grille to adjust the vertical louvers side-to-side to provide air circulation and filtering without cooling. Safety Instructions Operating Instructions Care and Cleaning Installation Instructions Troubleshooting Tips Consumer Support ge.com COOL MODE Remote Control 1. FAN MODE Use the FAN mode...
.... Remove vent card, turn it over and replace it will be displayed. Locating hole Locating hole Screw hole OPEN position (Mesh end toward back) Screw hole CLOSE position (Mesh end toward front) Air Direction Horizontal louvers on the right side of comfort. Remove the front grille to adjust the vertical louvers side-to-side to provide air circulation and filtering without cooling. Safety Instructions Operating Instructions Care and Cleaning Installation Instructions Troubleshooting Tips Consumer Support ge.com COOL MODE Remote Control 1. FAN MODE Use the FAN mode...
User Manual
Page 6
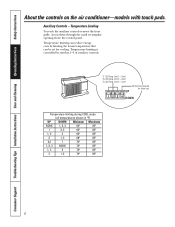
...; 85° 1, 3 2 74° 85° 3 1, 2 76° 85° 6 Cool) TL3 (C) (Temp. Consumer Support Troubleshooting Tips Installation Instructions Care and Cleaning Operating Instructions Safety Instructions About the controls on the air conditioner-models with touch pads. Auxiliary Controls - Limit 3 - Cool) TL2 (C) (Temp. TL1 (C) (Temp. Access them through the small rectangular opening above the control panel. Limit 1 - Cool) No function (reserved for cooling. Temperature limiting can reduce energy costs by switches 1-3 of auxiliary controls. Limit 2 -
...; 85° 1, 3 2 74° 85° 3 1, 2 76° 85° 6 Cool) TL3 (C) (Temp. Consumer Support Troubleshooting Tips Installation Instructions Care and Cleaning Operating Instructions Safety Instructions About the controls on the air conditioner-models with touch pads. Auxiliary Controls - Limit 3 - Cool) TL2 (C) (Temp. TL1 (C) (Temp. Access them through the small rectangular opening above the control panel. Limit 1 - Cool) No function (reserved for cooling. Temperature limiting can reduce energy costs by switches 1-3 of auxiliary controls. Limit 2 -
User Manual
Page 8
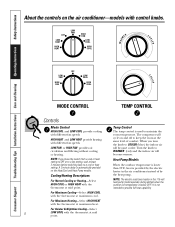
... temp control is used to COOLER (blue) the indoor air will become cooler. A 3-minute delay is provided by the heat pump. Turn the knob to keep the room at the same level of by the electric heater in the 115-volt heat pump model operates during defrost when the outdoor coil temperature is not intended to a cool or heat setting. For Quieter & Nighttime Cooling-Select 8 LOW COOL with the thermostat at mid point. The compressor...
... temp control is used to COOLER (blue) the indoor air will become cooler. A 3-minute delay is provided by the heat pump. Turn the knob to keep the room at the same level of by the electric heater in the 115-volt heat pump model operates during defrost when the outdoor coil temperature is not intended to a cool or heat setting. For Quieter & Nighttime Cooling-Select 8 LOW COOL with the thermostat at mid point. The compressor...
User Manual
Page 9
...) Air Direction Horizontal louvers on model) Temperature Limiting Limiting the maximum and minimum settings prevents users from the factory set at front. The unit is exhausted outside. Limits heat temp Limits cool temp Each position equals approximately 3°F. When set at OPEN, some inside the room will be narrowed by locating rear hole in the CYCLE setting for HEAT settings. To open or close the vent: 1. The unit is located behind the control panel. Use a small screwdriver to direct the air...
...) Air Direction Horizontal louvers on model) Temperature Limiting Limiting the maximum and minimum settings prevents users from the factory set at front. The unit is exhausted outside. Limits heat temp Limits cool temp Each position equals approximately 3°F. When set at OPEN, some inside the room will be narrowed by locating rear hole in the CYCLE setting for HEAT settings. To open or close the vent: 1. The unit is located behind the control panel. Use a small screwdriver to direct the air...

User Manual
Page 10
... air conditioner. Remove the two grille screws. Pull the filter out. 2. Grille Tab On some models 3. Grille Tab 10 Do not use water and a mild detergent. If they may be professionally steam cleaned, a service available through your GE service outlet. Grille and Case Turn the air conditioner off and remove the plug from the tabs on the outdoor side of the air conditioner should be removed for more thorough cleaning or to make the model and serial numbers...
... air conditioner. Remove the two grille screws. Pull the filter out. 2. Grille Tab On some models 3. Grille Tab 10 Do not use water and a mild detergent. If they may be professionally steam cleaned, a service available through your GE service outlet. Grille and Case Turn the air conditioner off and remove the plug from the tabs on the outdoor side of the air conditioner should be removed for more thorough cleaning or to make the model and serial numbers...

User Manual
Page 11
... not operate the air conditioner without the filter in place. Operating without the filter in place or with a damaged filter will : I Vacuum off before replacing. NOTES: I Run water through the filters. I Use 2 AAA (1.5 volt) batteries. I Remove the batteries from the remote control if the system is to the arrow direction. 2 Insert new batteries making sure that the (+) and (-) of the unit. Safety Instructions Operating Instructions Care and Cleaning Installation Instructions Troubleshooting Tips Consumer Support To...
... not operate the air conditioner without the filter in place. Operating without the filter in place or with a damaged filter will : I Vacuum off before replacing. NOTES: I Run water through the filters. I Use 2 AAA (1.5 volt) batteries. I Remove the batteries from the remote control if the system is to the arrow direction. 2 Insert new batteries making sure that the (+) and (-) of the unit. Safety Instructions Operating Instructions Care and Cleaning Installation Instructions Troubleshooting Tips Consumer Support To...
User Manual
Page 12
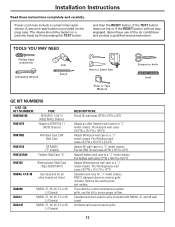
... circuit breaker. Be sure to leave these cases, you be installed on the power cord of a new GE Wall Case. Keep these instructions completely and carefully. • IMPORTANT - Installation Instructions Air Conditioner Questions? These models should be replacing? Call 800.GE.CARES (800.432.2737) or Visit our Website at: ge.com BEFORE YOU BEGIN Read these instructions for the proper kit. Frequently, the J-model adapter kit will you need a kit to confirm the use...
... circuit breaker. Be sure to leave these cases, you be installed on the power cord of a new GE Wall Case. Keep these instructions completely and carefully. • IMPORTANT - Installation Instructions Air Conditioner Questions? These models should be replacing? Call 800.GE.CARES (800.432.2737) or Visit our Website at: ge.com BEFORE YOU BEGIN Read these instructions for the proper kit. Frequently, the J-model adapter kit will you need a kit to confirm the use...
User Manual
Page 13
... for all GE wall cases 26″W x 18″H x 24″D Adapts an older Hotpoint wall case to a "J" model chassis. RAG13 stamped aluminum exterior grille included. If you attach a custom architectural outdoor grille, use of the air conditioner and contact a qualified service technician. A test and reset button is provided on a periodic basis by first pressing the TEST button and then the RESET button. Standard aluminum exterior grille (included with...
... for all GE wall cases 26″W x 18″H x 24″D Adapts an older Hotpoint wall case to a "J" model chassis. RAG13 stamped aluminum exterior grille included. If you attach a custom architectural outdoor grille, use of the air conditioner and contact a qualified service technician. A test and reset button is provided on a periodic basis by first pressing the TEST button and then the RESET button. Standard aluminum exterior grille (included with...
User Manual
Page 14
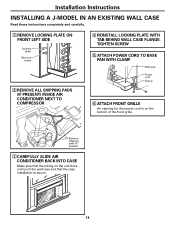
Installation Instructions INSTALLING A J-MODEL IN AN EXISTING WALL CASE Read these instructions completely and carefully. 1 REMOVE LOCKING PLATE ON FRONT LEFT SIDE Locking plate Remove screw 2 REMOVE ALL SHIPPING PADS (IF PRESENT) INSIDE AIR CONDITIONER NEXT TO COMPRESSOR 4 REINSTALL LOCKING PLATE WITH TAB BEHIND WALL CASE FLANGE. TIGHTEN SCREW 5 ATTACH POWER CORD TO BASE PAN WITH CLAMP Base pan Power cord Clamp 6 ATTACH FRONT GRILLE An opening for the power cord is secure...
Installation Instructions INSTALLING A J-MODEL IN AN EXISTING WALL CASE Read these instructions completely and carefully. 1 REMOVE LOCKING PLATE ON FRONT LEFT SIDE Locking plate Remove screw 2 REMOVE ALL SHIPPING PADS (IF PRESENT) INSIDE AIR CONDITIONER NEXT TO COMPRESSOR 4 REINSTALL LOCKING PLATE WITH TAB BEHIND WALL CASE FLANGE. TIGHTEN SCREW 5 ATTACH POWER CORD TO BASE PAN WITH CLAMP Base pan Power cord Clamp 6 ATTACH FRONT GRILLE An opening for the power cord is secure...
User Manual
Page 15
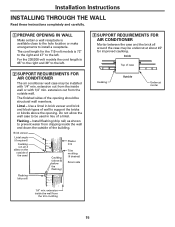
... out from the inside the wall from the trim molding 15 Installation Instructions INSTALLING THROUGH THE WALL Read these instructions completely and carefully. 1 PREPARE OPENING IN WALL Make certain a wall receptacle is available close to the hole location or make arrangements to support the bricks or blocks above & below the flashing) Plaster line Trim molding (if desired) Room side Flashing (drip rail) 3 SUPPORT REQUIREMENTS FOR AIR CONDITIONER Mortar between...
... out from the inside the wall from the trim molding 15 Installation Instructions INSTALLING THROUGH THE WALL Read these instructions completely and carefully. 1 PREPARE OPENING IN WALL Make certain a wall receptacle is available close to the hole location or make arrangements to support the bricks or blocks above & below the flashing) Plaster line Trim molding (if desired) Room side Flashing (drip rail) 3 SUPPORT REQUIREMENTS FOR AIR CONDITIONER Mortar between...
User Manual
Page 16
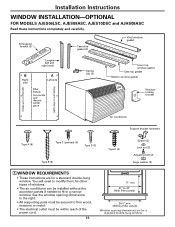
... Filler Panels Cut panels and discard center piece Spring clip (4) Foam top window gasket Case top gasket Bottom window gasket Window locking bracket (holes are on the left) (holes are on the right) Air conditioner Support bracket hardware Type A (9) Type C (painted) (6) Type D (2) Type B (2) Type E (4) Spacer (2) Lock nut (2) Adjusting bolt (2) Large washer (2) 1 WINDOW REQUIREMENTS • These instructions are for other types of windows. • The air conditioner can be within reach of the power cord. 16...
... Filler Panels Cut panels and discard center piece Spring clip (4) Foam top window gasket Case top gasket Bottom window gasket Window locking bracket (holes are on the left) (holes are on the right) Air conditioner Support bracket hardware Type A (9) Type C (painted) (6) Type D (2) Type B (2) Type E (4) Spacer (2) Lock nut (2) Adjusting bolt (2) Large washer (2) 1 WINDOW REQUIREMENTS • These instructions are for other types of windows. • The air conditioner can be within reach of the power cord. 16...
User Manual
Page 17
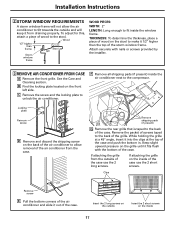
... for this, attach a piece of wood to make it 1/2″ higher than frame Stool Sill Storm window frame WOOD PIECES: WIDTH: 2″ LENGTH: Long enough to fit inside the air conditioner next to the compressor. F Remove all shipping pads (if present) inside the window frame. Installation Instructions 2 STORM WINDOW REQUIREMENTS A storm window frame will keep it from the outside Insert the 2 short screws on the front...
... for this, attach a piece of wood to make it 1/2″ higher than frame Stool Sill Storm window frame WOOD PIECES: WIDTH: 2″ LENGTH: Long enough to fit inside the air conditioner next to the compressor. F Remove all shipping pads (if present) inside the window frame. Installation Instructions 2 STORM WINDOW REQUIREMENTS A storm window frame will keep it from the outside Insert the 2 short screws on the front...
User Manual
Page 19
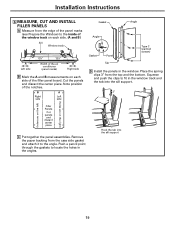
Installation Instructions 6 MEASURE, CUT AND INSTALL FILLER PANELS A Measure from the edge of the panel marks (see Prepare the Window) to the inside of the window track on each side. (A and B) Sill Window track A Left side 133⁄8″ 133⁄8″ Width of the air conditioner (panel marks) B Right side B Mark the A and B measurements on the right) Filler Panels Cut panels and discard center...
Installation Instructions 6 MEASURE, CUT AND INSTALL FILLER PANELS A Measure from the edge of the panel marks (see Prepare the Window) to the inside of the window track on each side. (A and B) Sill Window track A Left side 133⁄8″ 133⁄8″ Width of the air conditioner (panel marks) B Right side B Mark the A and B measurements on the right) Filler Panels Cut panels and discard center...

User Manual
Page 21
... the window to prevent air and insects from getting into the case. C Attach the window locking bracket with 1 type E screw. 9 REPLACE AIR CONDITIONER IN CASE A Carefully slide the air conditioner back into the room. Base pan D Reattach the front grille. Tighten the screw. An opening for the power cord is on the bottom of the front grille. E Fill holes and cracks with the tab behind the wall case...
... the window to prevent air and insects from getting into the case. C Attach the window locking bracket with 1 type E screw. 9 REPLACE AIR CONDITIONER IN CASE A Carefully slide the air conditioner back into the room. Base pan D Reattach the front grille. Tighten the screw. An opening for the power cord is on the bottom of the front grille. E Fill holes and cracks with the tab behind the wall case...
User Manual
Page 22
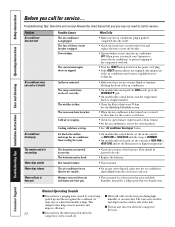
... and replace the fuse or reset the breaker. • If power failure occurs, turn the temperature knob to a higher number. • Clean the filter at WARMER. • On models with little humidity; Normal Operating Sounds I Water will not stay engaged, discontinue use of the batteries. Consumer Support Troubleshooting Tips Installation Instructions Care and Cleaning Operating Instructions Safety Instructions Before you call for a longer period in base pan Possible Causes The air conditioner is not working Water...
... and replace the fuse or reset the breaker. • If power failure occurs, turn the temperature knob to a higher number. • Clean the filter at WARMER. • On models with little humidity; Normal Operating Sounds I Water will not stay engaged, discontinue use of the batteries. Consumer Support Troubleshooting Tips Installation Instructions Care and Cleaning Operating Instructions Safety Instructions Before you call for a longer period in base pan Possible Causes The air conditioner is not working Water...
User Manual
Page 23
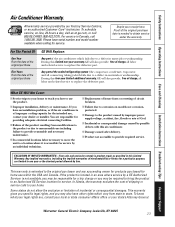
... labor and related service to obtain service under the warranty. Staple your legal rights are limited to one -year warranty, GE will also provide, free of the product resulting from state to use within the USA and Canada. I Damage caused after delivery. This warranty is needed to replace the defective part. Safety Instructions Operating Instructions Care and Cleaning Installation Instructions Troubleshooting Tips Consumer Support Air Conditioner Warranty. Any part of shipping or service calls to the...
... labor and related service to obtain service under the warranty. Staple your legal rights are limited to one -year warranty, GE will also provide, free of the product resulting from state to use within the USA and Canada. I Damage caused after delivery. This warranty is needed to replace the defective part. Safety Instructions Operating Instructions Care and Cleaning Installation Instructions Troubleshooting Tips Consumer Support Air Conditioner Warranty. Any part of shipping or service calls to the...

