
Installation Instructions
Page 1
...Foam Shipping Pads (see section 5). Step 9 Connect the Power Supply (see section 1). Close supervision of children is necessary when the appliance is used near children. • Install the dryer where the temperature is installed, it could be performed by a qualified or licensed ...monoxide, formaldehyde and soot, caused primarily by a qualified installer. • Install the clothes dryer according to these instructions and in the appliance. METAL DUCT (RECOMMENDED) PIPE 4" DIAM METAL ELBOW EXHAUST HOOD COMPOUND SOAP SOLUTION 4" DIA. For Mobile or Manufactured Home see section...
...Foam Shipping Pads (see section 5). Step 9 Connect the Power Supply (see section 1). Close supervision of children is necessary when the appliance is used near children. • Install the dryer where the temperature is installed, it could be performed by a qualified or licensed ...monoxide, formaldehyde and soot, caused primarily by a qualified installer. • Install the clothes dryer according to these instructions and in the appliance. METAL DUCT (RECOMMENDED) PIPE 4" DIAM METAL ELBOW EXHAUST HOOD COMPOUND SOAP SOLUTION 4" DIA. For Mobile or Manufactured Home see section...

Installation Instructions
Page 2
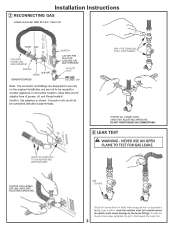
... 3 ft. • Connect flexible metal connector to dryer and gas supply. • Open shut-off within 6 ft. Always use new flexible connectors when installing gas appliances. 2 GAS REQUIREMENTS WARNING • Installation must be installed immediately upstream of 0.5 PSI (3.4 KPa). • The dryer must conform to local codes and ordinances, or in...
... 3 ft. • Connect flexible metal connector to dryer and gas supply. • Open shut-off within 6 ft. Always use new flexible connectors when installing gas appliances. 2 GAS REQUIREMENTS WARNING • Installation must be installed immediately upstream of 0.5 PSI (3.4 KPa). • The dryer must conform to local codes and ordinances, or in...
Installation Instructions
Page 3
... adapters as shown. Connector nuts must not be connected directly to be reused for use only on the original installation and are designed for another appliance or at another location. Installation Instructions 3 RECONNECTING GAS Listed connector ANSI Z21.24 / CSA 6.10 FLARE NPT 1/8" NPT PIPE PLUG FOR CHECKING GAS INLET PRESSURE...
... adapters as shown. Connector nuts must not be connected directly to be reused for use only on the original installation and are designed for another appliance or at another location. Installation Instructions 3 RECONNECTING GAS Listed connector ANSI Z21.24 / CSA 6.10 FLARE NPT 1/8" NPT PIPE PLUG FOR CHECKING GAS INLET PRESSURE...
Installation Instructions
Page 4
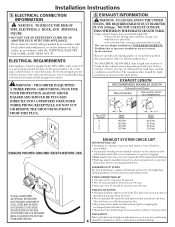
...be treated as one 90º turn. • Each turn and exhaust hood. Installation Instructions 5 ELECTRICAL CONNECTION INFORMATION WARNING - ELECTRICAL REQUIREMENTS This appliance must be tight to prevent clogging. • Never install a screen in or over 45º should require little or no maintenance to avoid leaks... RISK OF FIRE, ELECTRICAL S HOCK, AND PERSONAL INJURY: • DO NOT USE AN EXTENSION CORD OR AN ADAPTER PLUG WITH THIS APPLIANCE. The MAXIMUM ALLOWABLE duct length and number of bends of the exhaust system depends upon the type of duct, number of turns, the type...
...be treated as one 90º turn. • Each turn and exhaust hood. Installation Instructions 5 ELECTRICAL CONNECTION INFORMATION WARNING - ELECTRICAL REQUIREMENTS This appliance must be tight to prevent clogging. • Never install a screen in or over 45º should require little or no maintenance to avoid leaks... RISK OF FIRE, ELECTRICAL S HOCK, AND PERSONAL INJURY: • DO NOT USE AN EXTENSION CORD OR AN ADAPTER PLUG WITH THIS APPLIANCE. The MAXIMUM ALLOWABLE duct length and number of bends of the exhaust system depends upon the type of duct, number of turns, the type...
Installation Instructions
Page 6
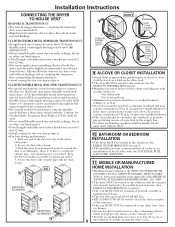
... cannot be used AND where a 4" diameter can be used (Kit WX08X10077). • Never install flexible metal duct in walls, ceilings, floors or other fuel-burning appliance shall be used. • Never install flexible metal duct in the same closet with a clamp. 3. in.or 6 introduction of outside air into the interior of...
... cannot be used AND where a 4" diameter can be used (Kit WX08X10077). • Never install flexible metal duct in walls, ceilings, floors or other fuel-burning appliance shall be used. • Never install flexible metal duct in the same closet with a clamp. 3. in.or 6 introduction of outside air into the interior of...
Installation Instructions
Page 7
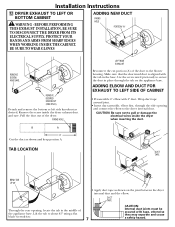
...the screw inside the dryer when inserting the duct. Make sure that the shortened duct is aligned with the tab in the middle of the appliance base. Use the screw saved previously to secure the duct in place through the side opening , locate the tab in the base. DUCT TAPE ..., BE SURE TO DISCONNECT THE DRYER FROM ITS ELECTRICAL SUPPLY. REMOVE DESIRED KNOCKOUT (ONE ONLY). FIXING HOLE B A 9" Cut the duct as shown on the appliance base. PROTECT YOUR HANDS AND ARMS FROM SHARP EDGES WHEN WORKING INSIDE THE CABINET. Lift the tab to the dryer internal duct. CAUTION: Be sure...
...the screw inside the dryer when inserting the duct. Make sure that the shortened duct is aligned with the tab in the middle of the appliance base. Use the screw saved previously to secure the duct in place through the side opening , locate the tab in the base. DUCT TAPE ..., BE SURE TO DISCONNECT THE DRYER FROM ITS ELECTRICAL SUPPLY. REMOVE DESIRED KNOCKOUT (ONE ONLY). FIXING HOLE B A 9" Cut the duct as shown on the appliance base. PROTECT YOUR HANDS AND ARMS FROM SHARP EDGES WHEN WORKING INSIDE THE CABINET. Lift the tab to the dryer internal duct. CAUTION: Be sure...