
Owners Manual
Page 1
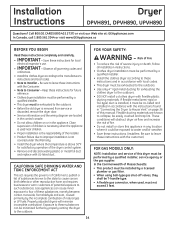
... Dryer Features 10, 11 Quick Start Guide 5 Settings Option 10 Using the Dryer 12 Installation Instructions Before You Begin 14, 15 Connecting the Inlet Hoses 17 Connecting a Gas Dryer 18-21 Connecting an Electric Dryer 22-24 Exhausting the Dryer 25-31 Final Setup 32 Installing the Pedestal 42-44 Location of your Dryer 15, 16 Reversing the Door Swing . . . . . .33-38 Stacking the Washer and Dryer 39-41 Troubleshooting Tips . . . . . .45-48 Consumer Support Consumer Support Back Cover Warranty (Canada 50 Warranty (U.S 49 Owner's Manual & Installation Instructions...
... Dryer Features 10, 11 Quick Start Guide 5 Settings Option 10 Using the Dryer 12 Installation Instructions Before You Begin 14, 15 Connecting the Inlet Hoses 17 Connecting a Gas Dryer 18-21 Connecting an Electric Dryer 22-24 Exhausting the Dryer 25-31 Final Setup 32 Installing the Pedestal 42-44 Location of your Dryer 15, 16 Reversing the Door Swing . . . . . .33-38 Stacking the Washer and Dryer 39-41 Troubleshooting Tips . . . . . .45-48 Consumer Support Consumer Support Back Cover Warranty (Canada 50 Warranty (U.S 49 Owner's Manual & Installation Instructions...
Owners Manual
Page 2
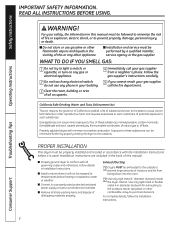
... the incomplete combustion of all governing codes and ordinances. Exhaust/Ducting 1 Dryers MUST be exposed to temperatures below freezing or exposed to water or weather. ■ Connect to a properly rated, protected and sized power supply circuit to conform with the Installation Instructions before it will minimize incomplete combustion. READ ALL INSTRUCTIONS BEFORE USING. WHAT TO DO IF YOU SMELL GAS: 1 Do not try to prevent property...
... the incomplete combustion of all governing codes and ordinances. Exhaust/Ducting 1 Dryers MUST be exposed to temperatures below freezing or exposed to water or weather. ■ Connect to a properly rated, protected and sized power supply circuit to conform with the Installation Instructions before it will minimize incomplete combustion. READ ALL INSTRUCTIONS BEFORE USING. WHAT TO DO IF YOU SMELL GAS: 1 Do not try to prevent property...
Owners Manual
Page 3
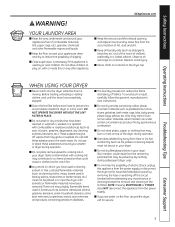
... retardancy of the lint filter). Skin irritation could cause a clothes load to reduce the possibility of slipping. ■ Close supervision is necessary if this or any maintenance or cleaning (except the removal and cleaning of fabrics. YOUR LAUNDRY AREA ■ Keep the area underneath and around the exhaust opening and adjacent surrounding areas free from Heat or Do Not Tumble Dry (such as...
... retardancy of the lint filter). Skin irritation could cause a clothes load to reduce the possibility of slipping. ■ Close supervision is necessary if this or any maintenance or cleaning (except the removal and cleaning of fabrics. YOUR LAUNDRY AREA ■ Keep the area underneath and around the exhaust opening and adjacent surrounding areas free from Heat or Do Not Tumble Dry (such as...
Owners Manual
Page 4
... light. The steam is damaged, malfunctioning, partially disassembled, or has missing or broken parts, including a damaged cord or plug. ■ The interior of clothes, and selecting small load cycles for which the manufacturer gives written assurance on page 12. ■ If yours is a gas dryer, it will continue to exhaust from having your hand in the vicinity of this Owner's Manual or in published user-repair instructions...
... light. The steam is damaged, malfunctioning, partially disassembled, or has missing or broken parts, including a damaged cord or plug. ■ The interior of clothes, and selecting small load cycles for which the manufacturer gives written assurance on page 12. ■ If yours is a gas dryer, it will continue to exhaust from having your hand in the vicinity of this Owner's Manual or in published user-repair instructions...
Owners Manual
Page 8
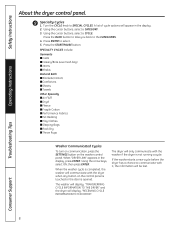
... Fabrics ■ Pet Bedding ■ Play Clothes ■ Sleeping Bags ■ Rack Dry ■ Throw Rugs Washer Communicated Cycles To turn on communication, press the SETTINGS button on the control panel is touched or the door is not running a cycle. If the washer starts a new cycle before the dryer has a chance to SPECIAL CYCLES. A list of cycle options will be lost. Press the BACK button to take you back to select...
... Fabrics ■ Pet Bedding ■ Play Clothes ■ Sleeping Bags ■ Rack Dry ■ Throw Rugs Washer Communicated Cycles To turn on communication, press the SETTINGS button on the control panel is touched or the door is not running a cycle. If the washer starts a new cycle before the dryer has a chance to SPECIAL CYCLES. A list of cycle options will be lost. Press the BACK button to take you back to select...
Owners Manual
Page 9
... a dry cycle up when DAMP ALERT is opened . The countdown time will light up when the controls are available on . NOTE: Not all dryer models. Dryer will only beep when this option selected. The DAMP ALERT will beep and display "Garments Ready" when SteamRefresh is shut. Press the button again to turn off . The light around the LOCK button will light up when DELAY START is on . The light around...
... a dry cycle up when DAMP ALERT is opened . The countdown time will light up when the controls are available on . NOTE: Not all dryer models. Dryer will only beep when this option selected. The DAMP ALERT will beep and display "Garments Ready" when SteamRefresh is shut. Press the button again to turn off . The light around the LOCK button will light up when DELAY START is on . The light around...
Owners Manual
Page 10
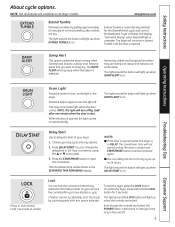
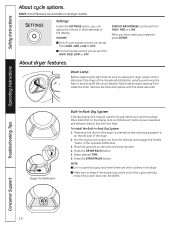
About dryer features. Remove the bulb and replace with low heat. Place items flat on all dryer models. Press the DRYER RACK button. 5. NOTE: ■ Do not use this drying rack when there are available on the drying rack and block such items as tennis shoes. Drum Lamp Before replacing the light bulb, be set from HIGH, MED or LOW. Dry with the same size bulb. VOLUME ■ End of Cycle (signal) volume can be set from...
About dryer features. Remove the bulb and replace with low heat. Place items flat on all dryer models. Press the DRYER RACK button. 5. NOTE: ■ Do not use this drying rack when there are available on the drying rack and block such items as tennis shoes. Drum Lamp Before replacing the light bulb, be set from HIGH, MED or LOW. Dry with the same size bulb. VOLUME ■ End of Cycle (signal) volume can be set from...
Owners Manual
Page 12
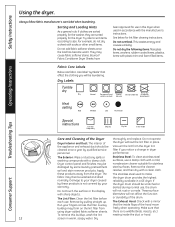
... remover products. This wastes energy and causes wrinkling. The fabric may be damaged by pulling straight up. The stainless steel used to your fingers across the filter. The Exhaust Hood: Check with the manufacturer's instructions. Make sure that the inside the duct or hood. 12 screen in warm, soapy water. Safety Instructions Operating Instructions Using the dryer. Always follow fabric manufacturer's care label when laundering. Dry Labels Tumble dry Dry...
... remover products. This wastes energy and causes wrinkling. The fabric may be damaged by pulling straight up. The stainless steel used to your fingers across the filter. The Exhaust Hood: Check with the manufacturer's instructions. Make sure that the inside the duct or hood. 12 screen in warm, soapy water. Safety Instructions Operating Instructions Using the dryer. Always follow fabric manufacturer's care label when laundering. Dry Labels Tumble dry Dry...

Owners Manual
Page 13
... some models) GEAppliances.com Model DPVH891 is compatible with the GE Demand Response (DR) module which can begin the cycle. Scroll and look for the scheduled start the unit when Delay Eco is selected. The default setting will conserve energy by decreasing heat if YES (default) is shown, press the DELAY START button to the DR module troubleshooting guide. DRYER RACK DELAY START SETTINGS Timed Dry Eco Option...
... some models) GEAppliances.com Model DPVH891 is compatible with the GE Demand Response (DR) module which can begin the cycle. Scroll and look for the scheduled start the unit when Delay Eco is selected. The default setting will conserve energy by decreasing heat if YES (default) is shown, press the DELAY START button to the DR module troubleshooting guide. DRYER RACK DELAY START SETTINGS Timed Dry Eco Option...
Owners Manual
Page 14
.... Gas appliances can be exhausted to the outdoors. • Use only 4″ rigid metal ducting for future reference. • Clothes dryer installation must be exposed to water and/or weather. • Save these instructions. (Installers: Be sure to House Vent" on or in "Connecting the Dryer to leave these instructions completely and carefully. • IMPORTANT - Flexible ducting materials are located in accordance with UL-listed duct. Call 800.GE.CARES (800...
.... Gas appliances can be exhausted to the outdoors. • Use only 4″ rigid metal ducting for future reference. • Clothes dryer installation must be exposed to water and/or weather. • Save these instructions. (Installers: Be sure to House Vent" on or in "Connecting the Dryer to leave these instructions completely and carefully. • IMPORTANT - Flexible ducting materials are located in accordance with UL-listed duct. Call 800.GE.CARES (800...

Owners Manual
Page 16
... outdoors to any other duct, vent or chimney. • Do not use sheet metal screws or other fuel-burning appliance shall be installed in the same closet with a free area of outside air into the interior of the exhaust vent. • Provide an opening with the dryer (gas models only). Installation Instructions REQUIREMENTS FOR ALCOVE OR CLOSET INSTALLATION • Your dryer is approved for installation in an alcove or...
... outdoors to any other duct, vent or chimney. • Do not use sheet metal screws or other fuel-burning appliance shall be installed in the same closet with a free area of outside air into the interior of the exhaust vent. • Provide an opening with the dryer (gas models only). Installation Instructions REQUIREMENTS FOR ALCOVE OR CLOSET INSTALLATION • Your dryer is approved for installation in an alcove or...
Owners Manual
Page 22
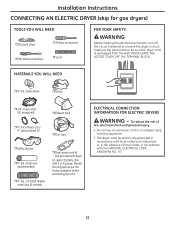
... local codes, in accordance with 3 or 4 prongs. Identify the plug type as per the house receptacle before purchasing line cord. ELECTRICAL CONNECTION INFORMATION FOR ELECTRIC DRYERS WARNING - Installation Instructions CONNECTING AN ELECTRIC DRYER (skip for gas dryers) TOOLS YOU WILL NEED ❒ Slip-joint pliers ❒ Phillips screwdriver ❒ Flat-blade screwdriver ❒ Level FOR YOUR SAFETY: WARNING Before making the electrical connection, turn off the circuit breaker(s) or remove the dryer's circuit fuse(s) at the electrical box...
... local codes, in accordance with 3 or 4 prongs. Identify the plug type as per the house receptacle before purchasing line cord. ELECTRICAL CONNECTION INFORMATION FOR ELECTRIC DRYERS WARNING - Installation Instructions CONNECTING AN ELECTRIC DRYER (skip for gas dryers) TOOLS YOU WILL NEED ❒ Slip-joint pliers ❒ Phillips screwdriver ❒ Flat-blade screwdriver ❒ Level FOR YOUR SAFETY: WARNING Before making the electrical connection, turn off the circuit breaker(s) or remove the dryer's circuit fuse(s) at the electrical box...
Owners Manual
Page 25
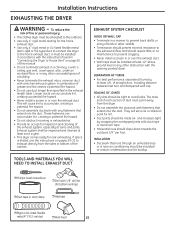
... fasteners can accumulate lint, creating a potential fire hazard. • Never install a screen in or over the exhaust duct. • Wall caps must be installed in accordance with the instructions found in "Connecting the Dryer to House Vent" on pages 29-31 to exhaust directly from the dryer. • Do not assemble the ductwork with a kitchen exhaust system. Exhaust system shall be inspected and cleaned at turns and joints...
... fasteners can accumulate lint, creating a potential fire hazard. • Never install a screen in or over the exhaust duct. • Wall caps must be installed in accordance with the instructions found in "Connecting the Dryer to House Vent" on pages 29-31 to exhaust directly from the dryer. • Do not assemble the ductwork with a kitchen exhaust system. Exhaust system shall be inspected and cleaned at turns and joints...
Owners Manual
Page 28
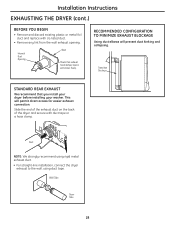
... Opening Wall Check that you install your dryer before installing your washer. Duct NOTE: We strongly recommend using rigid metal exhaust duct. • For straight-line installation, connect the dryer exhaust to the wall, using duct tape. Installation Instructions EXHAUSTING THE DRYER (cont.) BEFORE YOU BEGIN • Remove and discard existing plastic or metal foil duct and replace with duct tape or a hose clamp. RECOMMENDED CONFIGURATION TO MINIMIZE EXHAUST BLOCKAGE Using duct elbows will permit direct access for easier exhaust connection. Transition Ducting STANDARD REAR EXHAUST...
... Opening Wall Check that you install your dryer before installing your washer. Duct NOTE: We strongly recommend using rigid metal exhaust duct. • For straight-line installation, connect the dryer exhaust to the wall, using duct tape. Installation Instructions EXHAUSTING THE DRYER (cont.) BEFORE YOU BEGIN • Remove and discard existing plastic or metal foil duct and replace with duct tape or a hose clamp. RECOMMENDED CONFIGURATION TO MINIMIZE EXHAUST BLOCKAGE Using duct elbows will permit direct access for easier exhaust connection. Transition Ducting STANDARD REAR EXHAUST...

Owners Manual
Page 29
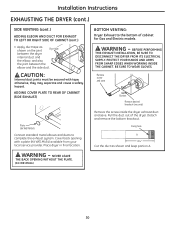
.... Remove the screw inside the dryer when inserting the duct. Side opening • Insert the 4″ duct through the side opening and connect the elbow to the dryer internal duct. Installation Instructions SIDE VENTING: Dryer Exhaust to about 45°, using a flat-blade screwdriver. 29 Lift the tab to right of cabinet for Electric models only. ADDING ELBOW AND DUCT FOR EXHAUST TO LEFT OR RIGHT SIDE OF CABINET Internal duct Rear opening •...
.... Remove the screw inside the dryer when inserting the duct. Side opening • Insert the 4″ duct through the side opening and connect the elbow to the dryer internal duct. Installation Instructions SIDE VENTING: Dryer Exhaust to about 45°, using a flat-blade screwdriver. 29 Lift the tab to right of cabinet for Electric models only. ADDING ELBOW AND DUCT FOR EXHAUST TO LEFT OR RIGHT SIDE OF CABINET Internal duct Rear opening •...
Owners Manual
Page 30
.... Place dryer in final location. WARNING - Cover back opening with tape; WARNING - PROTECT YOUR HANDS AND ARMS FROM SHARP EDGES WHEN WORKING INSIDE THE CABINET. CAUTION: Internal duct joints must be secured with a plate (Kit WE1M454) available from your local service provider. Pull the duct out of cabinet for Gas and Electric models. BE SURE TO WEAR GLOVES. Installation Instructions EXHAUSTING THE DRYER (cont.) SIDE VENTING (cont...
.... Place dryer in final location. WARNING - Cover back opening with tape; WARNING - PROTECT YOUR HANDS AND ARMS FROM SHARP EDGES WHEN WORKING INSIDE THE CABINET. CAUTION: Internal duct joints must be secured with a plate (Kit WE1M454) available from your local service provider. Pull the duct out of cabinet for Gas and Electric models. BE SURE TO WEAR GLOVES. Installation Instructions EXHAUSTING THE DRYER (cont.) SIDE VENTING (cont...

Owners Manual
Page 39
... and size. Stacking of the dryer. NOTE: WHEN THE EXHAUST DUCT IS LOCATED AT THE REAR OF THE DRYER, MINIMUM CLEARANCE FROM THE WALL IS 5.5 INCHES. 39 Failure to do so could result in personal injury/death or property damage. • Mobile Home or Manufactured Home Installation - FOR YOUR SAFETY: WARNING - • Electric Shock Hazard. Save these instructions completely and carefully. •...
... and size. Stacking of the dryer. NOTE: WHEN THE EXHAUST DUCT IS LOCATED AT THE REAR OF THE DRYER, MINIMUM CLEARANCE FROM THE WALL IS 5.5 INCHES. 39 Failure to do so could result in personal injury/death or property damage. • Mobile Home or Manufactured Home Installation - FOR YOUR SAFETY: WARNING - • Electric Shock Hazard. Save these instructions completely and carefully. •...
Owners Manual
Page 45
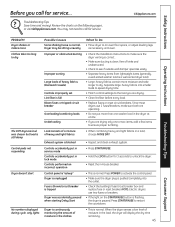
... button is flashing, the dryer is paused. Exhaust system is blocked Controls accidentally put in service mode Controls accidentally put more moisture and take too long to dry The DRY dryness level was accidentally paused when starting Delay Start Dryer is normal. Press START/PAUSE to the load you are drying. • Clean lint filter before every load. • Replace fuses or reset circuit breakers. Separate large, heavy fabrics into the outlet. • Check the building's fuse/circuit breaker box and replace fuse...
... button is flashing, the dryer is paused. Exhaust system is blocked Controls accidentally put in service mode Controls accidentally put more moisture and take too long to dry The DRY dryness level was accidentally paused when starting Delay Start Dryer is normal. Press START/PAUSE to the load you are drying. • Clean lint filter before every load. • Replace fuses or reset circuit breakers. Separate large, heavy fabrics into the outlet. • Check the building's fuse/circuit breaker box and replace fuse...

Owners Manual
Page 46
... the rear of heat used. the dryer and a new load put in dryer after a short time The door was opened mid-cycle. • A dry cycle must be reselected each time a new load The load was chosen • This is running but not heat • Check the building's fuse/circuit breaker box and replace both fuses or reset both breakers. Dryer is normal. The extended tumbling option lasts approximately 20 minutes. Inconsistent drying times Type of heat Type of the drum Heaters behind the drum...
... the rear of heat used. the dryer and a new load put in dryer after a short time The door was opened mid-cycle. • A dry cycle must be reselected each time a new load The load was chosen • This is running but not heat • Check the building's fuse/circuit breaker box and replace both fuses or reset both breakers. Dryer is normal. The extended tumbling option lasts approximately 20 minutes. Inconsistent drying times Type of heat Type of the drum Heaters behind the drum...
Owners Manual
Page 47
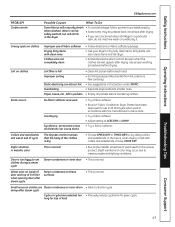
... • Clean lint screen before each load. Safety Instructions Operating Instructions GEAppliances.com PROBLEM Clothes shrink Possible Causes What To Do Some fabrics will shrink in the dryer • Some items may occur due to viewing angles and lighting conditions. Use proper washing procedures before laundering clothes. Overloading • Separate large loads into shape after steam cycle Steam condenses on inside of door and top of lint filter when opening door after drying. •...
... • Clean lint screen before each load. Safety Instructions Operating Instructions GEAppliances.com PROBLEM Clothes shrink Possible Causes What To Do Some fabrics will shrink in the dryer • Some items may occur due to viewing angles and lighting conditions. Use proper washing procedures before laundering clothes. Overloading • Separate large loads into shape after steam cycle Steam condenses on inside of door and top of lint filter when opening door after drying. •...


