
Owners Manual
Page 1
GEAppliances.com Profile Dryers Safety Instructions 2-4 Operating Instructions Controls 5-8 Cycle Options 9, 10 Demand Response 13 Dryer Features 10, 11 Quick Start Guide 5 Settings Option 10 Using the Dryer 12 Installation Instructions Before You Begin 14, 15 Connecting the Inlet Hoses 17 Connecting a Gas Dryer 18-21 Connecting an Electric Dryer 22-24 Exhausting the Dryer 25-31 Final Setup 32 Installing the Pedestal 42-44 Location of your Dryer 15, 16 Reversing the Door Swing . . . . . .33-38 Stacking the Washer and Dryer 39-41 Troubleshooting Tips . . . . . .45...
GEAppliances.com Profile Dryers Safety Instructions 2-4 Operating Instructions Controls 5-8 Cycle Options 9, 10 Demand Response 13 Dryer Features 10, 11 Quick Start Guide 5 Settings Option 10 Using the Dryer 12 Installation Instructions Before You Begin 14, 15 Connecting the Inlet Hoses 17 Connecting a Gas Dryer 18-21 Connecting an Electric Dryer 22-24 Exhausting the Dryer 25-31 Final Setup 32 Installing the Pedestal 42-44 Location of your Dryer 15, 16 Reversing the Door Swing . . . . . .33-38 Stacking the Washer and Dryer 39-41 Troubleshooting Tips . . . . . .45...
Owners Manual
Page 2
... or explosion, electric shock, or to such substances. Gas appliances can be exposed to temperatures below freezing or exposed to water or weather. ■ Connect to a properly rated, protected and sized power supply circuit to the outdoors. Follow details in accordance with all shipping materials properly. Exhaust/Ducting 1 Dryers MUST be properly installed and located in Installation Instructions. ■ Install or store where it is used. Installation Instructions are included...
... or explosion, electric shock, or to such substances. Gas appliances can be exposed to temperatures below freezing or exposed to water or weather. ■ Connect to a properly rated, protected and sized power supply circuit to the outdoors. Follow details in accordance with all shipping materials properly. Exhaust/Ducting 1 Dryers MUST be properly installed and located in Installation Instructions. ■ Install or store where it is used. Installation Instructions are included...
Owners Manual
Page 3
... your dryer. NOTE: Pressing START/PAUSE or POWER does NOT disconnect the appliance from the power supply or disconnect the dryer at the household distribution panel by or near the dryer until the drum has completely stopped. ■ Clean the lint filter before attempting any other flammable vapors and liquids. ■ Keep the floor around the exhaust opening and adjacent surrounding areas free from...
... your dryer. NOTE: Pressing START/PAUSE or POWER does NOT disconnect the appliance from the power supply or disconnect the dryer at the household distribution panel by or near the dryer until the drum has completely stopped. ■ Clean the lint filter before attempting any other flammable vapors and liquids. ■ Keep the floor around the exhaust opening and adjacent surrounding areas free from...
Owners Manual
Page 4
... plug firmly when disconnecting this Owner's Manual or in them by a qualified technician. Place the cord away from traffic areas so it is a gas dryer, it from service, remove the dryer door to the manufacturer's instructions for those products and are not covered under the warranty of this appliance if it will continue to repair or replace any part of the burner when the automatic ignition turns...
... plug firmly when disconnecting this Owner's Manual or in them by a qualified technician. Place the cord away from traffic areas so it is a gas dryer, it from service, remove the dryer door to the manufacturer's instructions for those products and are not covered under the warranty of this appliance if it will continue to repair or replace any part of the burner when the automatic ignition turns...
Owners Manual
Page 8
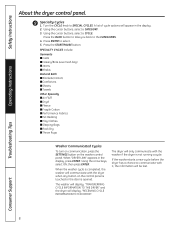
... ■ Play Clothes ■ Sleeping Bags ■ Rack Dry ■ Throw Rugs Washer Communicated Cycles To turn on communication, press the SETTINGS button on the control panel is touched or the door is not running a cycle. Using the cursor buttons, select a CYCLE. Using the cursor buttons, select a CATEGORY. 3. Press the START/PAUSE button. When "DRYER LINK" appears in the display. 2. The washer will display, "TRANSFERRING CYCLE INFORMATION TO THE DRYER" and the dryer will appear...
... ■ Play Clothes ■ Sleeping Bags ■ Rack Dry ■ Throw Rugs Washer Communicated Cycles To turn on communication, press the SETTINGS button on the control panel is touched or the door is not running a cycle. Using the cursor buttons, select a CYCLE. Using the cursor buttons, select a CATEGORY. 3. Press the START/PAUSE button. When "DRYER LINK" appears in the display. 2. The washer will display, "TRANSFERRING CYCLE INFORMATION TO THE DRYER" and the dryer will appear...
Owners Manual
Page 9
... the start the countdown. Safety Instructions About cycle options. NOTE: Not all dryer models. The light around the LOCK button will turn the light off . 9 Consumer Support The dryer will light up to turn on the light in Extend Tumble until the door is opened, the light comes on . Damp Alert This option causes the dryer to beep when clothes have to 24 hours. Remove items that you have dried to start of no-heat tumbling...
... the start the countdown. Safety Instructions About cycle options. NOTE: Not all dryer models. The light around the LOCK button will turn the light off . 9 Consumer Support The dryer will light up to turn on the light in Extend Tumble until the door is opened, the light comes on . Damp Alert This option causes the dryer to beep when clothes have to 24 hours. Remove items that you have dried to start of no-heat tumbling...
Owners Manual
Page 10
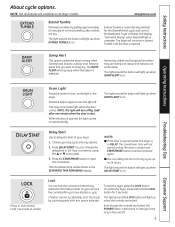
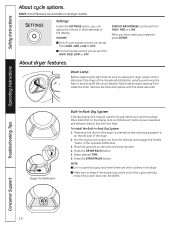
... to detach the drying rack at the household distribution panel by removing the fuse or switching off the circuit breaker. Press the DRYER RACK button. 5. Drum Lamp Before replacing the light bulb, be set from HIGH, MED, LOW or OFF. VOLUME ■ End of the cycle and fully retract the screen back into the baffle. NOTE: Not all dryer models. Press the START/PAUSE button. Safety Instructions Operating Instructions About cycle options. Settings Under the SETTINGS option, you...
... to detach the drying rack at the household distribution panel by removing the fuse or switching off the circuit breaker. Press the DRYER RACK button. 5. Drum Lamp Before replacing the light bulb, be set from HIGH, MED, LOW or OFF. VOLUME ■ End of the cycle and fully retract the screen back into the baffle. NOTE: Not all dryer models. Press the START/PAUSE button. Safety Instructions Operating Instructions About cycle options. Settings Under the SETTINGS option, you...
Owners Manual
Page 12
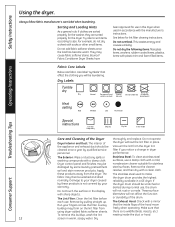
... size. The stainless steel used to dry Drip dry Dry flat In the shade Troubleshooting Tips Consumer Support Care and Cleaning of the Dryer Dryer Interior and Duct: The interior of the appliance and exhaust duct should be damaged by some laundry pretreatment soil and stain remover products. Remove by these products away from the dryer. This wastes energy and causes wrinkling. thoroughly and replace. For example, do not wash) Heat setting...
... size. The stainless steel used to dry Drip dry Dry flat In the shade Troubleshooting Tips Consumer Support Care and Cleaning of the Dryer Dryer Interior and Duct: The interior of the appliance and exhaust duct should be damaged by some laundry pretreatment soil and stain remover products. Remove by these products away from the dryer. This wastes energy and causes wrinkling. thoroughly and replace. For example, do not wash) Heat setting...

Owners Manual
Page 13
... utility rate is shown, press the DELAY START button to see if your area and for the energy management screen as part of the pilot test program. Press the START/PAUSE button. Option 2 (Override Delay Eco) To start . DRYER RACK DELAY START SETTINGS Timed Dry Eco Option If the unit is running in your area is selected, the unit will automatically extend these cycles. If NO is using DR...
... utility rate is shown, press the DELAY START button to see if your area and for the energy management screen as part of the pilot test program. Press the START/PAUSE button. Option 2 (Override Delay Eco) To start . DRYER RACK DELAY START SETTINGS Timed Dry Eco Option If the unit is running in your area is selected, the unit will automatically extend these cycles. If NO is using DR...
Owners Manual
Page 14
... ducting for exhausting the clothes dryer to Installer - Gas appliances can be minimized further by a qualified installer. • This dryer must be T-handle-type. • A flexible gas connector, when used near children. • Proper installation is the responsibility of the installer. • Product failure due to improper installation is not covered under the Warranty. • Install the dryer where the temperature is removed from service or discarded, remove the dryer door. • Service information and the wiring diagram...
... ducting for exhausting the clothes dryer to Installer - Gas appliances can be minimized further by a qualified installer. • This dryer must be T-handle-type. • A flexible gas connector, when used near children. • Proper installation is the responsibility of the installer. • Product failure due to improper installation is not covered under the Warranty. • Install the dryer where the temperature is removed from service or discarded, remove the dryer door. • Service information and the wiring diagram...

Owners Manual
Page 16
...; Closet doors must conform with local codes or, in the absence of outside air into the interior of the exhaust vent. • Provide an opening with a free area of open area equally distributed. See EXHAUSTING THE DRYER. • The installation must be vented to any other duct, vent or chimney. • Do not use sheet metal screws or other fuel-burning appliance shall be connected to the...
...; Closet doors must conform with local codes or, in the absence of outside air into the interior of the exhaust vent. • Provide an opening with a free area of open area equally distributed. See EXHAUSTING THE DRYER. • The installation must be vented to any other duct, vent or chimney. • Do not use sheet metal screws or other fuel-burning appliance shall be connected to the...

Owners Manual
Page 19
... convert this dryer for use with propane (LP) gas. IN THE COMMONWEALTH OF MASSACHUSETTS • This product must be installed by closing the equipment shut-off valves, they shall be installed immediately upstream of the gas supply connection to floor. GAS SUPPLY • A 1/8″ National Pipe Taper thread plugged tapping, accessible for test gauge connection, must be the T-handle type. • A flexible gas connector, when used, must not exceed 3 feet. Installation Instructions GAS REQUIREMENTS...
... convert this dryer for use with propane (LP) gas. IN THE COMMONWEALTH OF MASSACHUSETTS • This product must be installed by closing the equipment shut-off valves, they shall be installed immediately upstream of the gas supply connection to floor. GAS SUPPLY • A 1/8″ National Pipe Taper thread plugged tapping, accessible for test gauge connection, must be the T-handle type. • A flexible gas connector, when used, must not exceed 3 feet. Installation Instructions GAS REQUIREMENTS...
Owners Manual
Page 22
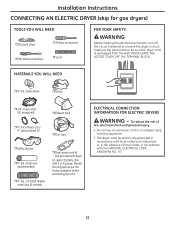
...., UL-listed flexible metal duct (if needed) ❒ Dryer power cord kit (not provided with dryer) UL rated 120/240V, 30A with the NATIONAL ELECTRICAL CODE, ANSI/NFPA NO. 70. 22 Installation Instructions CONNECTING AN ELECTRIC DRYER (skip for gas dryers) TOOLS YOU WILL NEED ❒ Slip-joint pliers ❒ Phillips screwdriver ❒ Flat-blade screwdriver ❒ Level FOR YOUR SAFETY: WARNING Before making the electrical connection, turn off the circuit breaker(s) or remove the dryer's circuit fuse...
...., UL-listed flexible metal duct (if needed) ❒ Dryer power cord kit (not provided with dryer) UL rated 120/240V, 30A with the NATIONAL ELECTRICAL CODE, ANSI/NFPA NO. 70. 22 Installation Instructions CONNECTING AN ELECTRIC DRYER (skip for gas dryers) TOOLS YOU WILL NEED ❒ Slip-joint pliers ❒ Phillips screwdriver ❒ Flat-blade screwdriver ❒ Level FOR YOUR SAFETY: WARNING Before making the electrical connection, turn off the circuit breaker(s) or remove the dryer's circuit fuse...
Owners Manual
Page 28
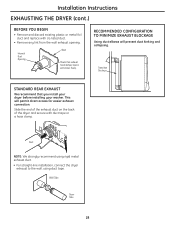
... permit direct access for easier exhaust connection. Installation Instructions EXHAUSTING THE DRYER (cont.) BEFORE YOU BEGIN • Remove and discard existing plastic or metal foil duct and replace with duct tape or a hose clamp. Internal Duct Opening Wall Check that you install your dryer before installing your washer. Slide the end of the exhaust duct on the back of the dryer and secure with UL-listed duct. • Remove any lint from the wall exhaust opening. Transition Ducting STANDARD REAR EXHAUST We...
... permit direct access for easier exhaust connection. Installation Instructions EXHAUSTING THE DRYER (cont.) BEFORE YOU BEGIN • Remove and discard existing plastic or metal foil duct and replace with duct tape or a hose clamp. Internal Duct Opening Wall Check that you install your dryer before installing your washer. Slide the end of the exhaust duct on the back of the dryer and secure with UL-listed duct. • Remove any lint from the wall exhaust opening. Transition Ducting STANDARD REAR EXHAUST We...

Owners Manual
Page 29
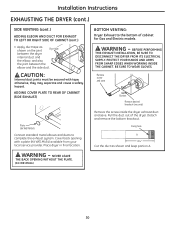
... the dryer internal duct. Side opening • Insert the 4″ duct through the rear opening and connect it to the elbow. Fixing hole A 133⁄8″ Cut the duct as desired. BEFORE PERFORMING THIS EXHAUST INSTALLATION, BE SURE TO DISCONNECT THE DRYER FROM ITS ELECTRICAL SUPPLY. Make sure that the shortened duct is aligned with the tab in the base. Installation Instructions SIDE VENTING: Dryer Exhaust to right of the dryer...
... the dryer internal duct. Side opening • Insert the 4″ duct through the rear opening and connect it to the elbow. Fixing hole A 133⁄8″ Cut the duct as desired. BEFORE PERFORMING THIS EXHAUST INSTALLATION, BE SURE TO DISCONNECT THE DRYER FROM ITS ELECTRICAL SUPPLY. Make sure that the shortened duct is aligned with the tab in the base. Installation Instructions SIDE VENTING: Dryer Exhaust to right of the dryer...
Owners Manual
Page 30
... and the side duct. ADDING COVER PLATE TO REAR OF CABINET (SIDE EXHAUST) Plate (Kit WE1M454) Connect standard metal elbows and ducts to the bottom of the dryer. WARNING - Pull the duct out of cabinet for Gas and Electric models. BEFORE PERFORMING THIS EXHAUST INSTALLATION, BE SURE TO DISCONNECT THE DRYER FROM ITS ELECTRICAL SUPPLY. Installation Instructions EXHAUSTING THE DRYER (cont.) SIDE VENTING (cont.) ADDING ELBOW AND DUCT FOR EXHAUST TO LEFT OR...
... and the side duct. ADDING COVER PLATE TO REAR OF CABINET (SIDE EXHAUST) Plate (Kit WE1M454) Connect standard metal elbows and ducts to the bottom of the dryer. WARNING - Pull the duct out of cabinet for Gas and Electric models. BEFORE PERFORMING THIS EXHAUST INSTALLATION, BE SURE TO DISCONNECT THE DRYER FROM ITS ELECTRICAL SUPPLY. Installation Instructions EXHAUSTING THE DRYER (cont.) SIDE VENTING (cont.) ADDING ELBOW AND DUCT FOR EXHAUST TO LEFT OR...

Owners Manual
Page 39
... so could result in a mobile home or manufactured home. Observe all governing codes and ordinances. • Note to the outdoors. Installation Instructions STACKING THE WASHER AND DRYER (if desired) BEFORE YOU BEGIN Read these instructions with the dryer (gas models only). NOTE: WHEN THE EXHAUST DUCT IS LOCATED AT THE REAR OF THE DRYER, MINIMUM CLEARANCE FROM THE WALL IS 5.5 INCHES. 39 Failure to do...
... so could result in a mobile home or manufactured home. Observe all governing codes and ordinances. • Note to the outdoors. Installation Instructions STACKING THE WASHER AND DRYER (if desired) BEFORE YOU BEGIN Read these instructions with the dryer (gas models only). NOTE: WHEN THE EXHAUST DUCT IS LOCATED AT THE REAR OF THE DRYER, MINIMUM CLEARANCE FROM THE WALL IS 5.5 INCHES. 39 Failure to do...
Owners Manual
Page 45
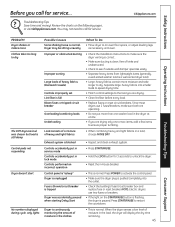
... Consumer Support Improper or obstructed ducting Improper sorting Large loads of kinks and unobstructed. • Check to restart the countdown. • This is normal. Safety Instructions Before you call for service. Review the charts on the START/PAUSE button is flashing, the dryer is pushed completely into smaller loads to speed drying time. • Match control settings to the load you are drying. • Clean lint filter before every load. • Replace fuses or reset circuit breakers. Load...
... Consumer Support Improper or obstructed ducting Improper sorting Large loads of kinks and unobstructed. • Check to restart the countdown. • This is normal. Safety Instructions Before you call for service. Review the charts on the START/PAUSE button is flashing, the dryer is pushed completely into smaller loads to speed drying time. • Match control settings to the load you are drying. • Clean lint filter before every load. • Replace fuses or reset circuit breakers. Load...

Owners Manual
Page 46
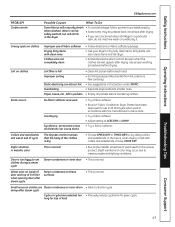
... the heaters may tumble if only one breaker tripped. Troubleshooting Tips Consumer Support Clothes are still wet and dryer shut off • Make sure gas shutoff at the rear of the exhaust system will affect drying times. Before you recently changed from is not displayed. Dryer is running but not heat • Check the building's fuse/circuit breaker box and replace both fuses or reset both breakers. Select a LESS DRY or DAMP setting. • Remove items when cycle...
... the heaters may tumble if only one breaker tripped. Troubleshooting Tips Consumer Support Clothes are still wet and dryer shut off • Make sure gas shutoff at the rear of the exhaust system will affect drying times. Before you recently changed from is not displayed. Dryer is running but not heat • Check the building's fuse/circuit breaker box and replace both fuses or reset both breakers. Select a LESS DRY or DAMP setting. • Remove items when cycle...
Owners Manual
Page 47
... size of lint filter when opening door after steam cycle Steam condenses on inner door • This is normal. Slight variation in accordance with the manufacturer's instructions. • Try a fabric softener. • Adjust setting to LESS DRY or DAMP. • Try a fabric softener. Door is full • Clean lint screen before drying. damp after drying. Small areas on clothes are Steam condenses on clothes Lint filter is too foggy to viewing angles and lighting conditions. long...
... size of lint filter when opening door after steam cycle Steam condenses on inner door • This is normal. Slight variation in accordance with the manufacturer's instructions. • Try a fabric softener. • Adjust setting to LESS DRY or DAMP. • Try a fabric softener. Door is full • Clean lint screen before drying. damp after drying. Small areas on clothes are Steam condenses on clothes Lint filter is too foggy to viewing angles and lighting conditions. long...


