
Installation Instructions
Page 1
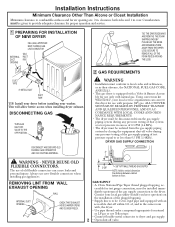
... CLAMPS (2) FOR LEAK DETECTION PIPE COMPOUND 4" DIA. Check and Insure the Existing External Exhaust is removed from vehicles. • Install the dryer where the temperature is used near children. Step 10 Check the Operation of children is necessary when the appliance is above 50ºF for ...BEGIN Read these instructions. • Do not install or store appliance in an area where it will be 18 in the appliance. Move the Dryer to Installer - Prepare the Area and Exhaust for leaks (see section 8). Close supervision of the Power Supply, Gas Connections, and Venting. METAL ...
... CLAMPS (2) FOR LEAK DETECTION PIPE COMPOUND 4" DIA. Check and Insure the Existing External Exhaust is removed from vehicles. • Install the dryer where the temperature is used near children. Step 10 Check the Operation of children is necessary when the appliance is above 50ºF for ...BEGIN Read these instructions. • Do not install or store appliance in an area where it will be 18 in the appliance. Move the Dryer to Installer - Prepare the Area and Exhaust for leaks (see section 8). Close supervision of the Power Supply, Gas Connections, and Venting. METAL ...
Installation Instructions
Page 2
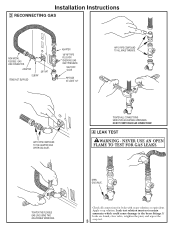
... Supply line is equipped with natural gas. NEVER REUSE OLD FLEXIBLE CONNECTORS. Always use Teflon tape. • Connect flexible metal connector to dryer and gas supply. 2 • Open shut-off valve. rigid pipe and equipped with propane (LP) gas. BE SURE TO REMOVE ALL... CONVERSIONS MUST BE MADE BY PROPERLY TRAINED AND QUALIFIED PERSONNEL AND IN ACCORDANCE WITH LOCAL CODES AND ORDINANCE REQUIREMENTS. • The dryer must be 1/2-in. Contact your local service organization can cause leaks and personal injury. National Pipe Taper thread plugged tapping, accessible...
... Supply line is equipped with natural gas. NEVER REUSE OLD FLEXIBLE CONNECTORS. Always use Teflon tape. • Connect flexible metal connector to dryer and gas supply. 2 • Open shut-off valve. rigid pipe and equipped with propane (LP) gas. BE SURE TO REMOVE ALL... CONVERSIONS MUST BE MADE BY PROPERLY TRAINED AND QUALIFIED PERSONNEL AND IN ACCORDANCE WITH LOCAL CODES AND ORDINANCE REQUIREMENTS. • The dryer must be 1/2-in. Contact your local service organization can cause leaks and personal injury. National Pipe Taper thread plugged tapping, accessible...
Installation Instructions
Page 3
APPLY PIPE COMPOUND TO THE ADAPTER AND DRYER GAS INLET. Apply soap solution. TIGHTEN THE FLEXIBLE GAS LINE USING TWO ADJUSTABLE WRENCHES. TIGHTEN ALL CONNECTIONS USING TWO ADJUSTABLE WRENCHES. Leak test solution must ...
APPLY PIPE COMPOUND TO THE ADAPTER AND DRYER GAS INLET. Apply soap solution. TIGHTEN THE FLEXIBLE GAS LINE USING TWO ADJUSTABLE WRENCHES. TIGHTEN ALL CONNECTIONS USING TWO ADJUSTABLE WRENCHES. Leak test solution must ...
Installation Instructions
Page 4
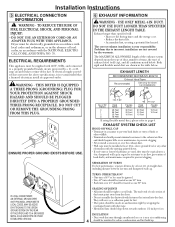
...8226; All joints should be electrically grounded in accordance with local codes and ordinances, or in accordance with fasteners that extend into the duct. Dryer must be insulated to a properly grounded branch circuit, protected by wrapping the overlapped joints with duct tape. • Horizontal runs should be ... EXTERNAL GROUND WIRE (NOT PROVIDED), WHICH MEETS LOCAL CODES, MAY BE ADDED BY ATTACHING TO THE GREEN GROUND SCREW ON THE REAR OF THE DRYER, AND TO A GROUNDED METAL COLD WATER PIPE OR OTHER ESTABLISHED GROUND. They will : • Increase the drying times and the energy cost...
...8226; All joints should be electrically grounded in accordance with local codes and ordinances, or in accordance with fasteners that extend into the duct. Dryer must be insulated to a properly grounded branch circuit, protected by wrapping the overlapped joints with duct tape. • Horizontal runs should be ... EXTERNAL GROUND WIRE (NOT PROVIDED), WHICH MEETS LOCAL CODES, MAY BE ADDED BY ATTACHING TO THE GREEN GROUND SCREW ON THE REAR OF THE DRYER, AND TO A GROUNDED METAL COLD WATER PIPE OR OTHER ESTABLISHED GROUND. They will : • Increase the drying times and the energy cost...
Installation Instructions
Page 5
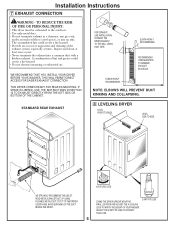
...TO CONTACT THE FLOOR. 2 ANTI-TIP LEGS 5 Inspect and clean at turns. STANDARD REAR EXHAUST FOR STRAIGHT LINE INSTALLATION, CONNECT THE DRYER EXHAUST TO THE WALL USING DUCT TAPE. ELBOW HIGHLY RECOMMENDED. WE STRONGLY RECOMMEND THE USE OF RIGID METAL EXHAUST DUCT. THIS WILL ...PERMIT DIRECT ACCESS FOR EASIER EXHAUST CONNECTION THIS DRYER COMES READY FOR REAR EXHAUSTING. The accumulated lint could create a fire hazard. • Provide an access for inspection and cleaning ...
...TO CONTACT THE FLOOR. 2 ANTI-TIP LEGS 5 Inspect and clean at turns. STANDARD REAR EXHAUST FOR STRAIGHT LINE INSTALLATION, CONNECT THE DRYER EXHAUST TO THE WALL USING DUCT TAPE. ELBOW HIGHLY RECOMMENDED. WE STRONGLY RECOMMEND THE USE OF RIGID METAL EXHAUST DUCT. THIS WILL ...PERMIT DIRECT ACCESS FOR EASIER EXHAUST CONNECTION THIS DRYER COMES READY FOR REAR EXHAUSTING. The accumulated lint could create a fire hazard. • Provide an access for inspection and cleaning ...
Installation Instructions
Page 6
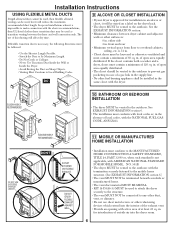
... 25 sq. for installation in case of open area equally distributed. The use sheet metal screws or other refastening devices which extend into the dryer room. 6 of local codes, with the termination securely fastened to the mobile home structure. (See EXHAUST INFORMATION section 6.) • The ... when such standard is approved for introduction of 120 sq. DO NOT USE EXCESSIVE EXHAUST LENGTH ELBOWS HIGHLY RECOMMENDED DON'T DO NOT SIT DRYER ON FLEXIBLE EXHAUST. either side 3 in . Installation Instructions USING FLEXIBLE METAL DUCTS If rigid all-metal duct cannot be used, then ...
... 25 sq. for installation in case of open area equally distributed. The use sheet metal screws or other refastening devices which extend into the dryer room. 6 of local codes, with the termination securely fastened to the mobile home structure. (See EXHAUST INFORMATION section 6.) • The ... when such standard is approved for introduction of 120 sq. DO NOT USE EXCESSIVE EXHAUST LENGTH ELBOWS HIGHLY RECOMMENDED DON'T DO NOT SIT DRYER ON FLEXIBLE EXHAUST. either side 3 in . Installation Instructions USING FLEXIBLE METAL DUCTS If rigid all-metal duct cannot be used, then ...

Installation Instructions
Page 7
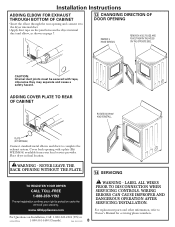
...and exhaust opening with 4" duct. DUCT TAPE CAUTION: Internal duct joints must be secured with the tab in the middle of the duct to the dryer internal duct. Use the screw saved previously to secure the duct in place through the side opening , locate the tab in the base. DUCT TAPE... base. Make sure that the fixing hole is aligned with tape, otherwise they may separate and cause 7 a safety hazard. Pull the duct out of the dryer. PROTECT YOUR HANDS AND ARMS FROM SHARP EDGES WHEN WORKING INSIDE CABINET. Detach and remove the bottom or left side knockout as shown and keep...
...and exhaust opening with 4" duct. DUCT TAPE CAUTION: Internal duct joints must be secured with the tab in the middle of the duct to the dryer internal duct. Use the screw saved previously to secure the duct in place through the side opening , locate the tab in the base. DUCT TAPE... base. Make sure that the fixing hole is aligned with tape, otherwise they may separate and cause 7 a safety hazard. Pull the duct out of the dryer. PROTECT YOUR HANDS AND ARMS FROM SHARP EDGES WHEN WORKING INSIDE CABINET. Detach and remove the bottom or left side knockout as shown and keep...
Installation Instructions
Page 8
...THE BACK OPENING WITHOUT THE PLATE. 14 SERVICING TO REGISTER YOUR DRYER CALL TOLL-FREE 1-888-269-1192 Prompt registration confirms your right to the dryer internal duct. • Apply duct tape on the joint between the dryer internal duct and elbow, as shown on Installation, Call: 1-...CABINET ROTATE DOOR 1800 AND REINSTALL. Cover back opening and connect it to protection under the terms of your warranty. WARNING - Place dryer in final location. LABEL ALL WIRES PRIOR TO DISCONNECTION WHEN SERVICING CONTROLS. WARNING - WIRING ERRORS CAN CAUSE IMPROPER AND DANGEROUS OPERATION AFTER ...
...THE BACK OPENING WITHOUT THE PLATE. 14 SERVICING TO REGISTER YOUR DRYER CALL TOLL-FREE 1-888-269-1192 Prompt registration confirms your right to the dryer internal duct. • Apply duct tape on the joint between the dryer internal duct and elbow, as shown on Installation, Call: 1-...CABINET ROTATE DOOR 1800 AND REINSTALL. Cover back opening and connect it to protection under the terms of your warranty. WARNING - Place dryer in final location. LABEL ALL WIRES PRIOR TO DISCONNECTION WHEN SERVICING CONTROLS. WARNING - WIRING ERRORS CAN CAUSE IMPROPER AND DANGEROUS OPERATION AFTER ...
Owners Manual
Page 1
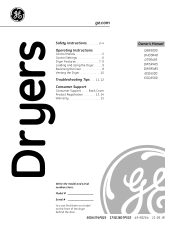
Dryers ge.com Safety Instructions 2-4 Operating Instructions Control Panels 5 Control Settings 6 Dryer Features 7, 8 Loading and Using the Dryer . . . . . .9 Reversing the Door 8 Venting the Dryer 10 Troubleshooting Tips . . . 11, 12 Consumer Support Consumer Support . . . . . Back Cover Product Registration 13, 14 Warranty 15 Owner's Manual DBB5000 DHDSR48 DTSR495 DWSR405 DWXR485 EED6500 EGD6500 Write the model and serial numbers here: Model Serial You can find them on a label on the front of the dryer behind the door. 500A374P025 175D1807P532 49-90264 11-05 JR
Dryers ge.com Safety Instructions 2-4 Operating Instructions Control Panels 5 Control Settings 6 Dryer Features 7, 8 Loading and Using the Dryer . . . . . .9 Reversing the Door 8 Venting the Dryer 10 Troubleshooting Tips . . . 11, 12 Consumer Support Consumer Support . . . . . Back Cover Product Registration 13, 14 Warranty 15 Owner's Manual DBB5000 DHDSR48 DTSR495 DWSR405 DWXR485 EED6500 EGD6500 Write the model and serial numbers here: Model Serial You can find them on a label on the front of the dryer behind the door. 500A374P025 175D1807P532 49-90264 11-05 JR
Owners Manual
Page 2
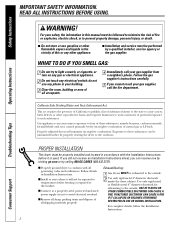
...of natural gas or LP fuels. Follow the gas supplier's instructions carefully. 5 If you can receive one by visiting ge.com or by properly venting the dryer to prevent property damage, personal injury, or death. do not use gasoline or other flammable vapors and liquids in Installation ...businesses to warn customers of substances known to the state to the outside . Properly adjusted dryers will not be minimized further by calling 800.GE.CARES (800.432.2737). Exhaust/Ducting: 1 Gas dryers MUST be properly installed and located in your gas supplier, call your safety, the ...
...of natural gas or LP fuels. Follow the gas supplier's instructions carefully. 5 If you can receive one by visiting ge.com or by properly venting the dryer to prevent property damage, personal injury, or death. do not use gasoline or other flammable vapors and liquids in Installation ...businesses to warn customers of substances known to the state to the outside . Properly adjusted dryers will not be minimized further by calling 800.GE.CARES (800.432.2737). Exhaust/Ducting: 1 Gas dryers MUST be properly installed and located in your gas supplier, call your safety, the ...

Owners Manual
Page 3
...avoid such a result, carefully follow the garment manufacturer's care instructions. Safety Instructions Operating Instructions ge.com YOUR LAUNDRY AREA s Keep the area underneath and around your washer or dryer during operation. Observe all laundry aids (such as detergents, bleaches, etc.) out of ... injury. Troubleshooting Tips Consumer Support 3 s Any article on container labels to catch fire. s To minimize the possibility of the dryer during operation. s Do not store plastic, paper or clothing that may be placed in , or spotted with combustible or explosive substances...
...avoid such a result, carefully follow the garment manufacturer's care instructions. Safety Instructions Operating Instructions ge.com YOUR LAUNDRY AREA s Keep the area underneath and around your washer or dryer during operation. Observe all laundry aids (such as detergents, bleaches, etc.) out of ... injury. Troubleshooting Tips Consumer Support 3 s Any article on container labels to catch fire. s To minimize the possibility of the dryer during operation. s Do not store plastic, paper or clothing that may be placed in , or spotted with combustible or explosive substances...
Owners Manual
Page 4
...subjected to carry out. We recommend you use of these products are the responsibility of the manufacturers of those products, or try a dryer-added product for which the manufacturer gives written assurance on the package that you understand and have a pilot light. Safety Instructions Operating ...according to repair or replace any part of the machine and the exhaust duct connection inside . s You may result from hiding inside the dryer should be stepped on . s Do not tamper with an automatic electric ignition and does not have the skills to damage. s Do...
...subjected to carry out. We recommend you use of these products are the responsibility of the manufacturers of those products, or try a dryer-added product for which the manufacturer gives written assurance on the package that you understand and have a pilot light. Safety Instructions Operating ...according to repair or replace any part of the machine and the exhaust duct connection inside . s You may result from hiding inside the dryer should be stepped on . s Do not tamper with an automatic electric ignition and does not have the skills to damage. s Do...
Owners Manual
Page 5
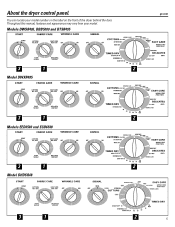
Models DWSR405, DBB5000 and DTSR495 ge.com 3 1 2 Model DWXR485 3 1 2 Models EED6500 and EGD6500 3 1 2 Model DHDSR48 3 1 2 5 About the dryer control panel. You can locate your model. Throughout this manual, features and appearance may vary from your model number on the label on the front of the dryer behind the door.
Models DWSR405, DBB5000 and DTSR495 ge.com 3 1 2 Model DWXR485 3 1 2 Models EED6500 and EGD6500 3 1 2 Model DHDSR48 3 1 2 5 About the dryer control panel. You can locate your model. Throughout this manual, features and appearance may vary from your model number on the label on the front of the dryer behind the door.
Owners Manual
Page 6
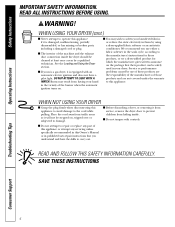
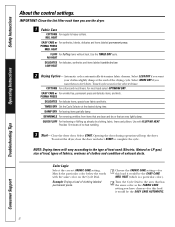
... each time you want your clothes slightly damp at the desired drying time. Use the TIMED DRY cycle. Select MORE DRY if you use the dryer. 1 Fabric Care COTTONS For regular to heavy cottons. COTTONS For cottons and most loads select OPTIMUM DRY . Select START. Opening the door during operation ...For delicate items, special-care fabrics and knits. QUICK FLUFF For freshening or fluffing up already dry clothing, fabric, linens and pillows. To restart the dryer, close the door and select START to the area that are clean and dry or that has the same color as the FABRIC CARE setting...
... each time you want your clothes slightly damp at the desired drying time. Use the TIMED DRY cycle. Select MORE DRY if you use the dryer. 1 Fabric Care COTTONS For regular to heavy cottons. COTTONS For cottons and most loads select OPTIMUM DRY . Select START. Opening the door during operation ...For delicate items, special-care fabrics and knits. QUICK FLUFF For freshening or fluffing up already dry clothing, fabric, linens and pillows. To restart the dryer, close the door and select START to the area that are clean and dry or that has the same color as the FABRIC CARE setting...
Owners Manual
Page 7
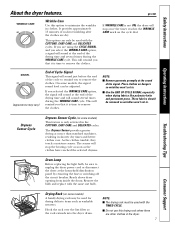
... the fuse or switching off the circuit breaker. On some models, the signal sound level can only be sure to unplug the dryer power cord or disconnect the dryer at the end of the drying time and several times during the WRINKLE CARE cycle. Place clothes on the cycle dial. (appearance...timer reaches the WRINKLE CARE mark on hangers so wrinkles won 't set in shorter dry times and better clothes care. Safety Instructions About the dryer features. ge.com Wrinkle Care Use this drying rack when there are dry. This option can be used with the same size bulb. If WRINKLE CARE ...
... the fuse or switching off the circuit breaker. On some models, the signal sound level can only be sure to unplug the dryer power cord or disconnect the dryer at the end of the drying time and several times during the WRINKLE CARE cycle. Place clothes on the cycle dial. (appearance...timer reaches the WRINKLE CARE mark on hangers so wrinkles won 't set in shorter dry times and better clothes care. Safety Instructions About the dryer features. ge.com Wrinkle Care Use this drying rack when there are dry. This option can be used with the same size bulb. If WRINKLE CARE ...
Owners Manual
Page 8
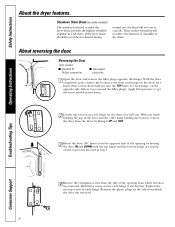
... some models) The stainless steel used to get the screw started in a GE dryer. Tighten the two top screws of the door and the other hand holding the... at the bottom. These surface blemishes will not rust or corrode. Apply firm pressure to make the dryer drum provides the highest reliability available in new holes. 2 Loosen top screw from each hinge on the... Tips Consumer Support 4 Remove the remaining screws from the side of the opening by lifting it on the dryer face half way. About reversing the door. Reinsert the plastic plugs on the top screws inserted in step...
... some models) The stainless steel used to get the screw started in a GE dryer. Tighten the two top screws of the door and the other hand holding the... at the bottom. These surface blemishes will not rust or corrode. Apply firm pressure to make the dryer drum provides the highest reliability available in new holes. 2 Loosen top screw from each hinge on the... Tips Consumer Support 4 Remove the remaining screws from the side of the opening by lifting it on the dryer face half way. About reversing the door. Reinsert the plastic plugs on the top screws inserted in step...
Owners Manual
Page 9
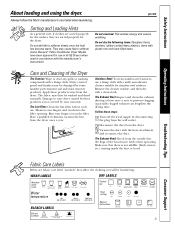
... that there is not covered by these products away from the dryer once a year. ge.com Sorting and Loading Hints As a general rule, if clothes are sorted properly for use in all GE Dryers when used with the hose attachment and reconnect the duct. Safety... Instructions Operating Instructions About loading and using the dryer. Have a qualified technician vacuum the lint from the dryer. Troubleshooting Tips Consumer Support Fabric Care Labels ...
... that there is not covered by these products away from the dryer once a year. ge.com Sorting and Loading Hints As a general rule, if clothes are sorted properly for use in all GE Dryers when used with the hose attachment and reconnect the duct. Safety... Instructions Operating Instructions About loading and using the dryer. Have a qualified technician vacuum the lint from the dryer. Troubleshooting Tips Consumer Support Fabric Care Labels ...
Owners Manual
Page 10
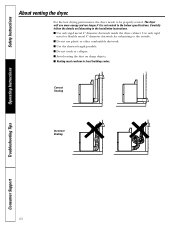
... to local building codes. s Use only rigid metal 4 ″ diameter ductwork inside the dryer cabinet. s Avoid resting the duct on Exhausting in the Installation Instructions. s Do not use more energy and run longer if it is ...Troubleshooting Tips Consumer Support s Venting must conform to be properly vented. s Use the shortest length possible. Safety Instructions Operating Instructions About venting the dryer. Carefully follow the details on sharp objects. Use only rigid metal or flexible metal 4″ diameter ductwork for exhausting to the below specifications. The...
... to local building codes. s Use only rigid metal 4 ″ diameter ductwork inside the dryer cabinet. s Avoid resting the duct on Exhausting in the Installation Instructions. s Do not use more energy and run longer if it is ...Troubleshooting Tips Consumer Support s Venting must conform to be properly vented. s Use the shortest length possible. Safety Instructions Operating Instructions About venting the dryer. Carefully follow the details on sharp objects. Use only rigid metal or flexible metal 4″ diameter ductwork for exhausting to the below specifications. The...
Owners Manual
Page 11
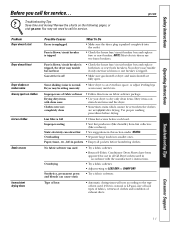
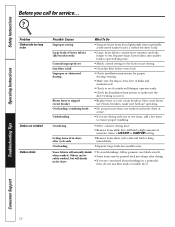
...clothes Static occurs Inconsistent drying times Possible Causes Dryer is unplugged Fuse is blown/circuit breaker is tripped What To Do • Make sure the dryer plug is pushed completely into smaller ones. ge.com Problem Dryer doesn't start Dryer doesn't heat Dryer shakes or makes noise Greasy spots on ...clothes Lint on the following pages, or visit ge.com. Fuse is blown/circuit breaker is tripped,...
...clothes Static occurs Inconsistent drying times Possible Causes Dryer is unplugged Fuse is blown/circuit breaker is tripped What To Do • Make sure the dryer plug is pushed completely into smaller ones. ge.com Problem Dryer doesn't start Dryer doesn't heat Dryer shakes or makes noise Greasy spots on ...clothes Lint on the following pages, or visit ge.com. Fuse is blown/circuit breaker is tripped,...
Owners Manual
Page 12
... drying. • If you are drying only one washer load in the dryer at a time. • If you are concerned about shrinkage in the dryer • To avoid shrinkage, follow garment care labels exactly. • Some items may be pressed back into shape after cycle ends ...sorted washer load is correct. • Replace fuses or reset circuit breakers. Troubleshooting Tips Consumer Support 12 Since most dryers use 2 fuses/breakers, make sure the dryer venting is a well-sorted dryer load). • Large, heavy fabrics contain more than one or two items, add a few items to ensure ...
... drying. • If you are drying only one washer load in the dryer at a time. • If you are concerned about shrinkage in the dryer • To avoid shrinkage, follow garment care labels exactly. • Some items may be pressed back into shape after cycle ends ...sorted washer load is correct. • Replace fuses or reset circuit breakers. Troubleshooting Tips Consumer Support 12 Since most dryers use 2 fuses/breakers, make sure the dryer venting is a well-sorted dryer load). • Large, heavy fabrics contain more than one or two items, add a few items to ensure ...


