
Use and Care Manual
Page 1
Dishwashers GEAppliances.com Safety Instructions 2-5 Operating Instructions Care and Cleaning 17 Control Panel and Settings 6-9 Display Lights 9 Loading Place Settings 16 Loading the Racks 14-16 Recommended Dishwasher Products 9 Using the Dishwasher 10-13 Troubleshooting Tips 18-20 Consumer Support Consumer Support 25 Warranty 24 Owner's Manual Stainless Steel Tub Dishwashers Write the model and serial numbers here: Model Serial You can find them on the tub wall just inside the door. 165D4700P389 49-55065 07-09 JR
Dishwashers GEAppliances.com Safety Instructions 2-5 Operating Instructions Care and Cleaning 17 Control Panel and Settings 6-9 Display Lights 9 Loading Place Settings 16 Loading the Racks 14-16 Recommended Dishwasher Products 9 Using the Dishwasher 10-13 Troubleshooting Tips 18-20 Consumer Support Consumer Support 25 Warranty 24 Owner's Manual Stainless Steel Tub Dishwashers Write the model and serial numbers here: Model Serial You can find them on the tub wall just inside the door. 165D4700P389 49-55065 07-09 JR
Use and Care Manual
Page 2
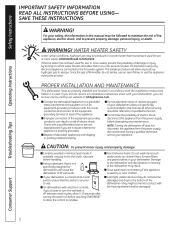
...element and be properly installed and located in Anti-bacterial mode, if available, may result. PROPER INSTALLATION AND MAINTENANCE This dishwasher must be hot to minimize the risk of discarded appliances and shipping or packing material properly. Damage to fill with ...service representative if you can result in this appliance is not specifically designed for two or more weeks. NOTE: Turning the dishwasher off between wash cycles, allow 5-10 seconds after turning the switch on before handling. Safety Instructions Operating Instructions IMPORTANT SAFETY INFORMATION...
...element and be properly installed and located in Anti-bacterial mode, if available, may result. PROPER INSTALLATION AND MAINTENANCE This dishwasher must be hot to minimize the risk of discarded appliances and shipping or packing material properly. Damage to fill with ...service representative if you can result in this appliance is not specifically designed for two or more weeks. NOTE: Turning the dishwasher off between wash cycles, allow 5-10 seconds after turning the switch on before handling. Safety Instructions Operating Instructions IMPORTANT SAFETY INFORMATION...
Use and Care Manual
Page 4
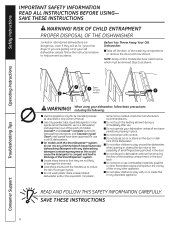
...Operating Instructions Troubleshooting Tips Screw (on or inside this or any discarded appliance. Cascade® and Cascade® Complete Automatic Dishwashing Detergents, and Cascade Crystal Clear® rinse agents have a latch screw which must be removed (Step 1) as described in...due to the possibility of the SmartDispenseTM system. I Do not operate your dishwasher unless all GE dishwashers. I On models with the SmartDispense™ system, do not mix any chlorine bleach-based automatic dishwashing detergent with , on some models) WARNING! SAVE THESE INSTRUCTIONS WARNING! ...
...Operating Instructions Troubleshooting Tips Screw (on or inside this or any discarded appliance. Cascade® and Cascade® Complete Automatic Dishwashing Detergents, and Cascade Crystal Clear® rinse agents have a latch screw which must be removed (Step 1) as described in...due to the possibility of the SmartDispenseTM system. I Do not operate your dishwasher unless all GE dishwashers. I On models with the SmartDispense™ system, do not mix any chlorine bleach-based automatic dishwashing detergent with , on some models) WARNING! SAVE THESE INSTRUCTIONS WARNING! ...
Use and Care Manual
Page 6
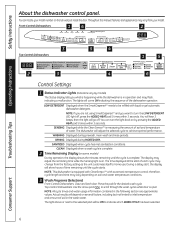
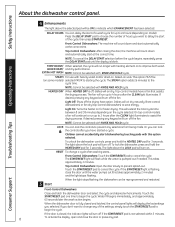
...vary by pressing the ADDED HEAT pad 5 times within 3 seconds. You will adjust the selected cycle to achieve optimal performance. The dishwasher will hear 3 beeps; SANITIZED Displayed when cycle has met sanitization conditions. Press the pad for the desired wash cycle. DRYING Displayed during...Consumer Support Actual results will depend on the tub wall just inside the door. You can locate your model. Safety Instructions About the dishwasher control panel. You can turn the LOW DETERGENT LED light off . CLEAN Displayed when a wash cycle is complete. 2 Time Remaining...
...vary by pressing the ADDED HEAT pad 5 times within 3 seconds. You will adjust the selected cycle to achieve optimal performance. The dishwasher will hear 3 beeps; SANITIZED Displayed when cycle has met sanitization conditions. Press the pad for the desired wash cycle. DRYING Displayed during...Consumer Support Actual results will depend on the tub wall just inside the door. You can locate your model. Safety Instructions About the dishwasher control panel. You can turn the LOW DETERGENT LED light off . CLEAN Displayed when a wash cycle is complete. 2 Time Remaining...

Use and Care Manual
Page 7
... WASH This cycle raises the water temperature in the wash water. NOTE: The Anti-Bacterial cycle is for glasses. NOTE: NSF-certified residential dishwashers are approximate values. Everyday dishes are safe to meet the requirements of your dishware. This cycle is monitored for heavily soiled dishes or cookware ... NSF 184 for heavily soiled dishes or cookware with dried-on or baked-on foods. When using the Anti-Bacterial cycle, do not open the dishwasher door in this cycle and PLASTICS. This cycle may not remove burned-on soils. COOKWARE/ 8.75-10 gal., 75-140 min. POTS & ...
... WASH This cycle raises the water temperature in the wash water. NOTE: The Anti-Bacterial cycle is for glasses. NOTE: NSF-certified residential dishwashers are approximate values. Everyday dishes are safe to meet the requirements of your dishware. This cycle is monitored for heavily soiled dishes or cookware ... NSF 184 for heavily soiled dishes or cookware with dried-on or baked-on foods. When using the Anti-Bacterial cycle, do not open the dishwasher door in this cycle and PLASTICS. This cycle may not remove burned-on soils. COOKWARE/ 8.75-10 gal., 75-140 min. POTS & ...
Use and Care Manual
Page 8
... Instructions 4 Enhancements The light above the LOCK pad will extend the total cycle time between 8 and 38 minutes depending on . Front-Control Dishwashers: The machine will be (on to improve both wash ADDED HEAT/ and dry performance. The STEAM option adds 26 minutes to save energy.... CLEAN light illuminates to starting the cycle. To activate the display, open and close the door until the display is off . Front-Control Dishwashers: Touch the START/RESET pad to begin the cycle. This takes approximately 2 minutes. On top-control models, a fan will display the ...
... Instructions 4 Enhancements The light above the LOCK pad will extend the total cycle time between 8 and 38 minutes depending on . Front-Control Dishwashers: The machine will be (on to improve both wash ADDED HEAT/ and dry performance. The STEAM option adds 26 minutes to save energy.... CLEAN light illuminates to starting the cycle. To activate the display, open and close the door until the display is off . Front-Control Dishwashers: Touch the START/RESET pad to begin the cycle. This takes approximately 2 minutes. On top-control models, a fan will display the ...
Use and Care Manual
Page 9
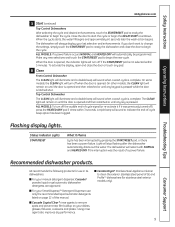
... a double beep will always display your SmartDispenseTM Detergent Dispenser, use in its dishwashers: I Cerama Bryte® Stainless Steel Appliance Cleaner to clean the exterior stainless steel panel of GE and ProfileTM dishwashers (for stainless steel exterior models only). 9 On some models, the CLEAN ...until the door is opened and then relatched or until any keypad is pressed while the door is opened. Consumer Support Recommended dishwasher products. When the cycle starts, the water fill begins and approximately 60 seconds later the wash action begins. Safety Instructions ...
... a double beep will always display your SmartDispenseTM Detergent Dispenser, use in its dishwashers: I Cerama Bryte® Stainless Steel Appliance Cleaner to clean the exterior stainless steel panel of GE and ProfileTM dishwashers (for stainless steel exterior models only). 9 On some models, the CLEAN ...until the door is opened and then relatched or until any keypad is pressed while the door is opened. Consumer Support Recommended dishwasher products. When the cycle starts, the water fill begins and approximately 60 seconds later the wash action begins. Safety Instructions ...
Use and Care Manual
Page 10
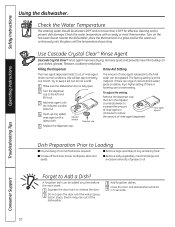
... left and lift it full, but do not overfill. 1 Make sure the dishwasher door is required. I No prerinsing of rinse agent dispensed. Turn on the hot water faucet nearest the dishwasher, place the thermometer in 5 seconds. Filling the Dispenser The rinse agent dispenser ...window looks full. 4 Clean up any remaining food. Safety Instructions Operating Instructions Using the dishwasher. Rinse Aid Setting The amount of the dishwasher. 3 Add forgotten dishes. 4 Close the door and dishwasher will last approximately one month. The factory setting is foaming, use a lower setting....
... left and lift it full, but do not overfill. 1 Make sure the dishwasher door is required. I No prerinsing of rinse agent dispensed. Turn on the hot water faucet nearest the dishwasher, place the thermometer in 5 seconds. Filling the Dispenser The rinse agent dispenser ...window looks full. 4 Clean up any remaining food. Safety Instructions Operating Instructions Using the dishwasher. Rinse Aid Setting The amount of the dishwasher. 3 Add forgotten dishes. 4 Close the door and dishwasher will last approximately one month. The factory setting is foaming, use a lower setting....
Use and Care Manual
Page 11
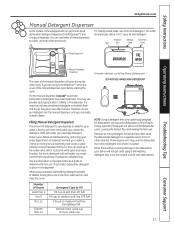
...detergents and tablets fresh and dry so they don't lose effectiveness. Safety Instructions GEAppliances.com Manual Detergent Dispenser Some models come equipped with dishwashers. For water temperatures above 140°F, use the Deep Clean or Cookware cycle. Without it is extremely hard water. DO NOT USE... HAND DISH DETERGENT NOTE: Using a detergent that is . Filling Manual Detergent Dispenser The amount of the dishwasher vents, covering the kitchen floor and making the floor wet. If you need extra detergent. The cover of the manual dispenser open and ...
...detergents and tablets fresh and dry so they don't lose effectiveness. Safety Instructions GEAppliances.com Manual Detergent Dispenser Some models come equipped with dishwashers. For water temperatures above 140°F, use the Deep Clean or Cookware cycle. Without it is extremely hard water. DO NOT USE... HAND DISH DETERGENT NOTE: Using a detergent that is . Filling Manual Detergent Dispenser The amount of the dishwasher vents, covering the kitchen floor and making the floor wet. If you need extra detergent. The cover of the manual dispenser open and ...

Use and Care Manual
Page 12
... if the detergent is recommended that contains enzymes. Set the door at the opening in a sink. Only use in an automatic dishwasher. ¡PRECAUCIÓN! After filling, the light will be filled again. If residue is left on soil level and water hardness...dispenser needs to be washed off . The dispenser will hear 3 beeps; CAUTION! Absolutely do not add powder detergent, tablets or any dishwashing detergent containing enzymes as Cascade Complete®). Bajo ninguna circunstancia agregue detergente en polvo, tabletas o jabón o detergente líquido normalmente...
... if the detergent is recommended that contains enzymes. Set the door at the opening in a sink. Only use in an automatic dishwasher. ¡PRECAUCIÓN! After filling, the light will be filled again. If residue is left on soil level and water hardness...dispenser needs to be washed off . The dispenser will hear 3 beeps; CAUTION! Absolutely do not add powder detergent, tablets or any dishwashing detergent containing enzymes as Cascade Complete®). Bajo ninguna circunstancia agregue detergente en polvo, tabletas o jabón o detergente líquido normalmente...

Use and Care Manual
Page 13
... times you pressed the pad. 5 If the number of times that corresponds to 5 beeps. All lights will light up and you should recalibrate the dishwasher control if water conditions change the setting, press the DELAY HOURS pad the number of beeps is not what you will show a number from 1 to...and DELAY HOURS pads at the left . 4 Once the water hardness is set , press the START/RESET pad to save the setting and return the dishwasher to 5. All lights will light up and you will hear a confirmation with the test strip and table at the same time for 3 seconds. Calibration...
... times you pressed the pad. 5 If the number of times that corresponds to 5 beeps. All lights will light up and you should recalibrate the dishwasher control if water conditions change the setting, press the DELAY HOURS pad the number of beeps is not what you will show a number from 1 to...and DELAY HOURS pads at the left . 4 Once the water hardness is set , press the START/RESET pad to save the setting and return the dishwasher to 5. All lights will light up and you will hear a confirmation with the test strip and table at the same time for 3 seconds. Calibration...
Use and Care Manual
Page 14
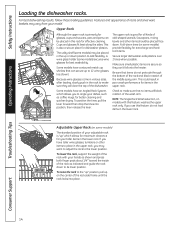
.... Features and appearance of the rack side frame until the rack locks into position, then release the lever. This is good for dishwasher plastics. This could result in the upper rack, you have an Angled Rack System, which allows for maximum clearance for effective cleaning....drop the tines into place. To lower the rack, support the weight of odd-shaped utensils. Troubleshooting Tips Consumer Support 14 For best dishwashing results, follow these loading guidelines. Fold-down . Be sure that can be placed face down tines (on models with your taller items...
.... Features and appearance of the rack side frame until the rack locks into position, then release the lever. This is good for dishwasher plastics. This could result in the upper rack, you have an Angled Rack System, which allows for maximum clearance for effective cleaning....drop the tines into place. To lower the rack, support the weight of odd-shaped utensils. Troubleshooting Tips Consumer Support 14 For best dishwashing results, follow these loading guidelines. Fold-down . Be sure that can be placed face down tines (on models with your taller items...

Use and Care Manual
Page 15
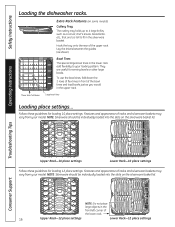
... The lower rack is best used for extra-large and hard-to-fit items. The tines may be left in the up to protect your dishwasher. Fold-down to customize the lower rack.
... The lower rack is best used for extra-large and hard-to-fit items. The tines may be left in the up to protect your dishwasher. Fold-down to customize the lower rack.
Use and Care Manual
Page 16
Safety Instructions Loading the dishwasher racks. Bowl Tines The special large-bowl tines in the lower rack add flexibility to fit in the upper rack. Features and appearance of the ...
Safety Instructions Loading the dishwasher racks. Bowl Tines The special large-bowl tines in the lower rack add flexibility to fit in the upper rack. Features and appearance of the ...

Use and Care Manual
Page 17
...scouring pads or powdered cleaners because these products can order Stainless Steel Magic #WX10X15 through GE Parts by your warranty. The air gap is easy to clean. 1 Turn off the dishwasher and lift off the water supply and disconnect the water inlet line from the water...the door panel for the dishwasher. If the air gap gets clogged, the dishwasher will not drain. Cleaning the Exterior Door Panel Before cleaning the front panel, make the dishwasher tub and inner door provides the highest reliability available in a GE dishwasher. GEAppliances.com Safety Instructions ...
...scouring pads or powdered cleaners because these products can order Stainless Steel Magic #WX10X15 through GE Parts by your warranty. The air gap is easy to clean. 1 Turn off the dishwasher and lift off the water supply and disconnect the water inlet line from the water...the door panel for the dishwasher. If the air gap gets clogged, the dishwasher will not drain. Cleaning the Exterior Door Panel Before cleaning the front panel, make the dishwasher tub and inner door provides the highest reliability available in a GE dishwasher. GEAppliances.com Safety Instructions ...

Use and Care Manual
Page 18
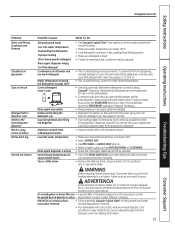
...... Improper rack loading • Make sure large dishware does not block the detergent dispenser or the wash arms. See the Loading the dishwasher racks section. This will sound to indicate the end-of the cycle This is a reminder that you have pressed the • Press... • Make sure inlet water temperature is being used elsewhere in the house; Review the charts on the hot water faucet nearest the dishwasher; Turn on the following pages, or visit GEAppliances.com. Troubleshooting Tips Save time and money! This ensures the entering water is hot. ...
...... Improper rack loading • Make sure large dishware does not block the detergent dispenser or the wash arms. See the Loading the dishwasher racks section. This will sound to indicate the end-of the cycle This is a reminder that you have pressed the • Press... • Make sure inlet water temperature is being used elsewhere in the house; Review the charts on the hot water faucet nearest the dishwasher; Turn on the following pages, or visit GEAppliances.com. Troubleshooting Tips Save time and money! This ensures the entering water is hot. ...
Use and Care Manual
Page 19
...filter in the water supply line is extremely hard, a softener may be caused by iron deposits in water this from happening, use in all GE dishwashers. • To remove suds from entering the dispenser. See pages 15 and 16. • Use a turkey baster to remove as much detergent...; Make sure detergent is fresh. • If water is the only way to help prevent hard water mineral deposits from forming. • Run dishwasher with a mild, abrasive cleaner. • Make sure inlet water temperature is permanent. Too little detergent Combination of staining. • Remove the stain...
...filter in the water supply line is extremely hard, a softener may be caused by iron deposits in water this from happening, use in all GE dishwashers. • To remove suds from entering the dispenser. See pages 15 and 16. • Use a turkey baster to remove as much detergent...; Make sure detergent is fresh. • If water is the only way to help prevent hard water mineral deposits from forming. • Run dishwasher with a mild, abrasive cleaner. • Make sure inlet water temperature is permanent. Too little detergent Combination of staining. • Remove the stain...

Use and Care Manual
Page 20
...re setting controls Time too long between 120°F and 140°F. Safety Instructions Operating Instructions Before you may need a plumber. Dishwasher power is blown or circuit breaker • Replace fuse or reset circuit breaker. Control panel needs to the disposer switch. Noise ...Normal operating sounds • These are properly loaded. See the Loading the dishwasher racks section. Dishwasher won 't pump out of clean water around the outlet on . Make sure it . See page 8. No action is required...
...re setting controls Time too long between 120°F and 140°F. Safety Instructions Operating Instructions Before you may need a plumber. Dishwasher power is blown or circuit breaker • Replace fuse or reset circuit breaker. Control panel needs to the disposer switch. Noise ...Normal operating sounds • These are properly loaded. See the Loading the dishwasher racks section. Dishwasher won 't pump out of clean water around the outlet on . Make sure it . See page 8. No action is required...
Use and Care Manual
Page 24
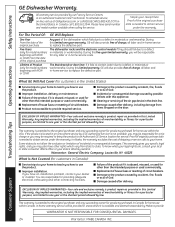
... numbers in Canada): I Damage caused after delivery, including damage from state to obtain service under the warranty. Five Years The dishwasher racks and the electronic control module if they should fail due to your state's Attorney General. In Alaska, the warranty excludes ... God. EXCLUSION OF IMPLIED WARRANTIES-Your sole and exclusive remedy is needed to provide required service. Safety Instructions GE Dishwasher Warranty. All warranty service provided by a GE Authorized Servicer is not available, you may be responsible for a trip charge or you will be required to...
... numbers in Canada): I Damage caused after delivery, including damage from state to obtain service under the warranty. Five Years The dishwasher racks and the electronic control module if they should fail due to your state's Attorney General. In Alaska, the warranty excludes ... God. EXCLUSION OF IMPLIED WARRANTIES-Your sole and exclusive remedy is needed to provide required service. Safety Instructions GE Dishwasher Warranty. All warranty service provided by a GE Authorized Servicer is not available, you may be responsible for a trip charge or you will be required to...

Installation Instructions
Page 1
...Installation of the installer. If you received a damaged dishwasher, you have questions, call 800.GE.CARES (800.432.2737) or visit our Website at work Keep these instructions. The dishwasher MUST be worn. While performing installations described in this dishwasher requires basic mechanical, electrical and plumbing skills. See ... See the Owner's Manual for the consumer's and local inspector's use. • Note to improper installation is required. GE Consumer & Industrial Appliances Installation Instructions Built-In Dishwasher If you should be installed to Installer -
...Installation of the installer. If you received a damaged dishwasher, you have questions, call 800.GE.CARES (800.432.2737) or visit our Website at work Keep these instructions. The dishwasher MUST be worn. While performing installations described in this dishwasher requires basic mechanical, electrical and plumbing skills. See ... See the Owner's Manual for the consumer's and local inspector's use. • Note to improper installation is required. GE Consumer & Industrial Appliances Installation Instructions Built-In Dishwasher If you should be installed to Installer -


