
Installation Instructions
Page 1
...2-4 Operating Instructions Controls 4-8 Quick Start Guide 5 Using the Dryer 9 Features 10 Care and Cleaning 11 Installation Instructions Before You Begin 12- 14 Connecting the Inlet Hoses 15 Connecting a Gas Dryer 16-19 Connecting an Electric Dryer 20-22 Exhausting the Dryer 23-29 Final Setup 30 Reversing the Door Swing 31-34 Stacking the Washer and Dryer 36-38 Owner's Manual & Installation Instructions GFDR485 GFDR480 GFDS375 GFDS370 GHDS365 GHDS360 GFDS265 GFDS260 GFDS255 GFDS250 Sécheuses Troubleshooting Tips 39-42 Consumer Support Consumer Support Back Cover Warranty...
...2-4 Operating Instructions Controls 4-8 Quick Start Guide 5 Using the Dryer 9 Features 10 Care and Cleaning 11 Installation Instructions Before You Begin 12- 14 Connecting the Inlet Hoses 15 Connecting a Gas Dryer 16-19 Connecting an Electric Dryer 20-22 Exhausting the Dryer 23-29 Final Setup 30 Reversing the Door Swing 31-34 Stacking the Washer and Dryer 36-38 Owner's Manual & Installation Instructions GFDR485 GFDR480 GFDS375 GFDS370 GHDS365 GHDS360 GFDS265 GFDS260 GFDS255 GFDS250 Sécheuses Troubleshooting Tips 39-42 Consumer Support Consumer Support Back Cover Warranty...

Installation Instructions
Page 2
... the Power or Start/Pause button DOES NOT disconnect power. „ DO NOT operate this appliance or attempt any servicing unless specifically recommended in the user maintenance instructions or in published user repair instructions that can kill you or hurt you understand and have been previously cleaned in, washed in, soaked in or spotted with gasoline, dry-cleaning solvents, or other flammable liquids near dryer at any type...
... the Power or Start/Pause button DOES NOT disconnect power. „ DO NOT operate this appliance or attempt any servicing unless specifically recommended in the user maintenance instructions or in published user repair instructions that can kill you or hurt you understand and have been previously cleaned in, washed in, soaked in or spotted with gasoline, dry-cleaning solvents, or other flammable liquids near dryer at any type...

Installation Instructions
Page 7
...: If the door is opened , the dryer will only beep when this capability. Remove items that you damp can change . If the unit is not turned off or if the door is closed and Start/Pause button in 1. GEAppliances.com 8 Steam Refresh Cycle For slightly wrinkled dry garments. Significantly NOTE: A single extremely light fabric item may need to iron some models) Activates reverse tumbling to beep when clothes Removing clothes and hanging...
...: If the door is opened , the dryer will only beep when this capability. Remove items that you damp can change . If the unit is not turned off or if the door is closed and Start/Pause button in 1. GEAppliances.com 8 Steam Refresh Cycle For slightly wrinkled dry garments. Significantly NOTE: A single extremely light fabric item may need to iron some models) Activates reverse tumbling to beep when clothes Removing clothes and hanging...

Installation Instructions
Page 11
... service personnel. If the dryer drum should ever stop working, call for stainless steel surfaces. The Lint Filter: Clean the lint filter before each use a damp cloth with a damp cloth. Drum lamp only (and automatically) turns on -line at GEApplianceParts.com, by phone at the household distribution panel by your fingers and remove the captured lint. Order replacement bulb WE4M305 on when the dryer door is not covered by removing the fuse or switching off the circuit breaker...
... service personnel. If the dryer drum should ever stop working, call for stainless steel surfaces. The Lint Filter: Clean the lint filter before each use a damp cloth with a damp cloth. Drum lamp only (and automatically) turns on -line at GEApplianceParts.com, by phone at the household distribution panel by your fingers and remove the captured lint. Order replacement bulb WE4M305 on when the dryer door is not covered by removing the fuse or switching off the circuit breaker...

Installation Instructions
Page 12
... dryer door. • Service information and the wiring diagram are known to collapse, be exhausted to the outdoors. • Before the old dryer is above 50°F for future reference. • Clothes dryer installation must be performed by a qualified installer. • Install the clothes dryer according to these instructions for satisfactory operation of the dryer control system. • Remove and discard existing plastic or metal foil duct and replace with the instructions...
... dryer door. • Service information and the wiring diagram are known to collapse, be exhausted to the outdoors. • Before the old dryer is above 50°F for future reference. • Clothes dryer installation must be performed by a qualified installer. • Install the clothes dryer according to these instructions for satisfactory operation of the dryer control system. • Remove and discard existing plastic or metal foil duct and replace with the instructions...

Installation Instructions
Page 13
... specified parts. Select the power cord to meet GE specifications. Order on -line at GEApplianceParts.com, 24 hours a day or by phone at 800.626.2002 during normal business hours. These hoses are manufactured and tested to fit your installation requirements. Hoses degrade over time and need to be replaced every 5 years to remove all of hose failures and water damage. Installation Instructions UNPACKING YOUR DRYER Tilt the dryer sideways and remove...
... specified parts. Select the power cord to meet GE specifications. Order on -line at GEApplianceParts.com, 24 hours a day or by phone at 800.626.2002 during normal business hours. These hoses are manufactured and tested to fit your installation requirements. Hoses degrade over time and need to be replaced every 5 years to remove all of hose failures and water damage. Installation Instructions UNPACKING YOUR DRYER Tilt the dryer sideways and remove...

Installation Instructions
Page 14
... exhaust vent must be connected to the dryer. Installation Instructions REQUIREMENTS FOR ALCOVE OR CLOSET INSTALLATION WARNING - Place dryer at least 25 square inches for introduction of outside air into the interior of the gas supply connection to any other duct, vent or chimney. • Do not use sheet metal screws or other surfaces is: 0" either side 3" front 3" rear 1" top 52" from the gas supply piping during pressure testing...
... exhaust vent must be connected to the dryer. Installation Instructions REQUIREMENTS FOR ALCOVE OR CLOSET INSTALLATION WARNING - Place dryer at least 25 square inches for introduction of outside air into the interior of the gas supply connection to any other duct, vent or chimney. • Do not use sheet metal screws or other surfaces is: 0" either side 3" front 3" rear 1" top 52" from the gas supply piping during pressure testing...

Installation Instructions
Page 15
never use old hoses. 1. Turn the water faucet on. 9. WATER SUPPLY REQUIREMENTS Hot and cold water faucets MUST be 3/4 in place remove it before installing the filter screen. NOTE: A water softener is recommended to reduce buildup of your water pressure. Installation Instructions CONNECTING INLET HOSES CONNECTING INLET HOSES To produce steam, the dryer must also connect to the cold water, a "Y" connector is very hard. 15 Tighten by hand until firmly seated. Tighten by hand until firmly...
never use old hoses. 1. Turn the water faucet on. 9. WATER SUPPLY REQUIREMENTS Hot and cold water faucets MUST be 3/4 in place remove it before installing the filter screen. NOTE: A water softener is recommended to reduce buildup of your water pressure. Installation Instructions CONNECTING INLET HOSES CONNECTING INLET HOSES To produce steam, the dryer must also connect to the cold water, a "Y" connector is very hard. 15 Tighten by hand until firmly seated. Tighten by hand until firmly...

Installation Instructions
Page 20
... the plug type as per the house receptacle before purchasing line cord. 20 metal duct (recommended) ˆ 4" dia., UL-listed flexible metal duct (if needed) ˆ Dryer power cord kit (not provided with dryer) UL rated 120/240V, 30A with 3 or 4 prongs. Installation Instructions CONNECTING AN ELECTRIC DRYER (skip for gas dryers) TOOLS YOU WILL NEED ˆSlip-joint pliers ˆPhillips screwdriver Before making the electrical connection, turn off the circuit breaker(s) or remove the dryer's circuit fuse(s) at the electrical box...
... the plug type as per the house receptacle before purchasing line cord. 20 metal duct (recommended) ˆ 4" dia., UL-listed flexible metal duct (if needed) ˆ Dryer power cord kit (not provided with dryer) UL rated 120/240V, 30A with 3 or 4 prongs. Installation Instructions CONNECTING AN ELECTRIC DRYER (skip for gas dryers) TOOLS YOU WILL NEED ˆSlip-joint pliers ˆPhillips screwdriver Before making the electrical connection, turn off the circuit breaker(s) or remove the dryer's circuit fuse(s) at the electrical box...

Installation Instructions
Page 23
... vent. EXHAUST SYSTEM CHECKLIST HOOD OR WALL CAP • Terminate in death or fire. Installation Instructions EXHAUSTING THE DRYER WARNING - DO NOT install a screen in the exhaust length table. The male end of each section of a building. These fasteners can result in a manner to reduce condensation and lint buildup. Use only 4" rigid metal or UL-listed dryer transition duct to connect the dryer to avoid leaks. SEPARATION OF TURNS...
... vent. EXHAUST SYSTEM CHECKLIST HOOD OR WALL CAP • Terminate in death or fire. Installation Instructions EXHAUSTING THE DRYER WARNING - DO NOT install a screen in the exhaust length table. The male end of each section of a building. These fasteners can result in a manner to reduce condensation and lint buildup. Use only 4" rigid metal or UL-listed dryer transition duct to connect the dryer to avoid leaks. SEPARATION OF TURNS...

Installation Instructions
Page 26
... dryer and secure with UL-listed duct. • Remove any lint from the wall exhaust opening. Duct NOTE: We strongly recommend using rigid metal exhaust duct. • For straight-line installation, connect the dryer exhaust to the wall, using duct tape. Transition Ducting STANDARD REAR EXHAUST We recommend that exhaust hood damper opens and closes freely. Wall Internal Duct Opening Check that you install your dryer before installing your washer. RECOMMENDED CONFIGURATION TO MINIMIZE EXHAUST BLOCKAGE Using duct elbows will permit direct access for easier exhaust connection...
... dryer and secure with UL-listed duct. • Remove any lint from the wall exhaust opening. Duct NOTE: We strongly recommend using rigid metal exhaust duct. • For straight-line installation, connect the dryer exhaust to the wall, using duct tape. Transition Ducting STANDARD REAR EXHAUST We recommend that exhaust hood damper opens and closes freely. Wall Internal Duct Opening Check that you install your dryer before installing your washer. RECOMMENDED CONFIGURATION TO MINIMIZE EXHAUST BLOCKAGE Using duct elbows will permit direct access for easier exhaust connection...

Installation Instructions
Page 28
... LEAVE THE BACK OPENING WITHOUT THE PLATE. (Kit WE1M454.) BOTTOM VENTING: Dryer Exhaust to the bottom of the dryer. Electrical Shock Hazard Close the back opening with cover plate (Kit WE1M454). Pull the duct out of cabinet for Gas and Electric models. Detach and remove the bottom knockout. Fixing hole A 15 3ø4" Cut the duct as shown on the joint Duct tape between the dryer internal duct and the elbow...
... LEAVE THE BACK OPENING WITHOUT THE PLATE. (Kit WE1M454.) BOTTOM VENTING: Dryer Exhaust to the bottom of the dryer. Electrical Shock Hazard Close the back opening with cover plate (Kit WE1M454). Pull the duct out of cabinet for Gas and Electric models. Detach and remove the bottom knockout. Fixing hole A 15 3ø4" Cut the duct as shown on the joint Duct tape between the dryer internal duct and the elbow...

Installation Instructions
Page 36
... instructions with the dryer (gas models only). Be sure to the washer. Failure to do so may result in personal injury/ death or property damage. • Mobile Home or Manufactured Home Installation - WARNING - NOTE: WHEN THE EXHAUST DUCT IS LOCATED AT THE REAR OF THE DRYER, MINIMUM CLEARANCE FROM THE WALL IS 5.5 INCHES. GE STACK KIT: Order on top of a gas dryer is 52". • Closet doors...
... instructions with the dryer (gas models only). Be sure to the washer. Failure to do so may result in personal injury/ death or property damage. • Mobile Home or Manufactured Home Installation - WARNING - NOTE: WHEN THE EXHAUST DUCT IS LOCATED AT THE REAR OF THE DRYER, MINIMUM CLEARANCE FROM THE WALL IS 5.5 INCHES. GE STACK KIT: Order on top of a gas dryer is 52". • Closet doors...

Installation Instructions
Page 39
... drying. • Clean lint filter before every load. • Replace fuses or reset circuit breakers. Exhaust system is normal. NOTE: Electric dryers use 2 fuses/breakers, make sure the dryer venting is correct. • Make sure ducting is clean, free of moisture in the clothes • Inspect and clean exhaust system. • Press Start/Pause. • Hold the Lock Control button for 3 seconds to activate the control panel. • Make sure the dryer plug is pushed completely into smaller loads to speed drying time. • Match control settings...
... drying. • Clean lint filter before every load. • Replace fuses or reset circuit breakers. Exhaust system is normal. NOTE: Electric dryers use 2 fuses/breakers, make sure the dryer venting is correct. • Make sure ducting is clean, free of moisture in the clothes • Inspect and clean exhaust system. • Press Start/Pause. • Hold the Lock Control button for 3 seconds to activate the control panel. • Make sure the dryer plug is pushed completely into smaller loads to speed drying time. • Match control settings...

Installation Instructions
Page 40
... running but not heat Gas service is off after cycle ends Overloading • Select a shorter drying time. • Remove items while they still hold a slight amount of natural gas (gas models only) • Check the building's fuse/circuit breaker box and replace both fuses or reset both breakers. Dryer doesn't heat Fuse is blown/circuit breaker is normal. Load was activated • Press Start/Pause to begin a dry cycle and the message will disappear. Select a Less Dry or Damp setting. • Remove...
... running but not heat Gas service is off after cycle ends Overloading • Select a shorter drying time. • Remove items while they still hold a slight amount of natural gas (gas models only) • Check the building's fuse/circuit breaker box and replace both fuses or reset both breakers. Dryer doesn't heat Fuse is blown/circuit breaker is normal. Load was activated • Press Start/Pause to begin a dry cycle and the message will disappear. Select a Less Dry or Damp setting. • Remove...

Installation Instructions
Page 41
...; Adjust setting to the load. 41 If using the Steam Dewrinkle cycle, manually reduce the damp after steam cycle Steam condenses on fabric softener package. • Use your dryer to viewing angles and lighting conditions. Before you are concerned about shrinkage in metallic color This is full • Clean lint screen before each load. when washed. Small areas on inner door • This is normal. GEAppliances.com PROBLEM Clothes shrink...
...; Adjust setting to the load. 41 If using the Steam Dewrinkle cycle, manually reduce the damp after steam cycle Steam condenses on fabric softener package. • Use your dryer to viewing angles and lighting conditions. Before you are concerned about shrinkage in metallic color This is full • Clean lint screen before each load. when washed. Small areas on inner door • This is normal. GEAppliances.com PROBLEM Clothes shrink...

Installation Instructions
Page 42
... for you. steam into drum Water drips from your water supply • Call 800.GE.CARES to order nozzle replacement kit WE25M71 or to request a technician to the load. PROBLEM Small amount of water on inner door • This is normal. Dryer makes water noises Water valve is open filling steam • This is normal. Cannot see steam at beginning of dryer Possible Causes Inadequate load size for steam cycle selected, excess steam condenses inside cabinet...
... for you. steam into drum Water drips from your water supply • Call 800.GE.CARES to order nozzle replacement kit WE25M71 or to request a technician to the load. PROBLEM Small amount of water on inner door • This is normal. Dryer makes water noises Water valve is open filling steam • This is normal. Cannot see steam at beginning of dryer Possible Causes Inadequate load size for steam cycle selected, excess steam condenses inside cabinet...

Quick Specs
Page 1
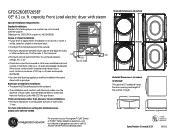
... answers to your Monogram,® Cafe™ Series or Profile™ Series appliance questions, visit our website at geappliances.com or call GE Answer Center® service, 800.626.2000. 39-2/5" 3.6 5.8 Specification Created 2/13 Listed by a 30-amp circuit breaker or a time-delay fuse, is mounted in inches) Electric Dryer Rating 240V 5400W, 25A, 60Hz Exhaust Options: 4-way via rear, right, left and bottom. GFDS260EF/265EF...
... answers to your Monogram,® Cafe™ Series or Profile™ Series appliance questions, visit our website at geappliances.com or call GE Answer Center® service, 800.626.2000. 39-2/5" 3.6 5.8 Specification Created 2/13 Listed by a 30-amp circuit breaker or a time-delay fuse, is mounted in inches) Electric Dryer Rating 240V 5400W, 25A, 60Hz Exhaust Options: 4-way via rear, right, left and bottom. GFDS260EF/265EF...
Quick Specs
Page 2
... the local codes, or in the same closet with steam Stacked Dimensions (in . Specification Created 2/13 Listed by Underwriters Laboratories 360505 Order part no . of open area equally distributed. Bathroom or Bedroom Installation: • The dryer MUST be stated on a label on venting kits and accessories, please call 1-800-GE-CARES. 79.006 C 3.6 Pedestal Dimensions (in . in inches) Special Installation Requirements: Stacked Installation: Brackets for gas dryers. ft. GFDS260EF/265EF GE® 8.1 cu...
... the local codes, or in the same closet with steam Stacked Dimensions (in . Specification Created 2/13 Listed by Underwriters Laboratories 360505 Order part no . of open area equally distributed. Bathroom or Bedroom Installation: • The dryer MUST be stated on a label on venting kits and accessories, please call 1-800-GE-CARES. 79.006 C 3.6 Pedestal Dimensions (in . in inches) Special Installation Requirements: Stacked Installation: Brackets for gas dryers. ft. GFDS260EF/265EF GE® 8.1 cu...
Quick Specs
Page 3
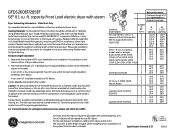
... your dryer for your dryer. A turn . 2. rigid metal duct Exhaust hood type B Domestic 2-1/2 dryer models All Long Vent 6.0 - 8.0 cu. All 6.0 - 8.3 cu. Specification Created 2/13 Listed by 10 ft. Dryers must also be ignored. Never terminate the exhaust into an attic, since the combination of the system (transition duct included). A A 4 Best performance Maximum length of 90° turns needed for complete instructions when using a flexible metal (foil-type) duct. ft. GFDS260EF/265EF GE® 8.1 cu. B 2 -1/2" opening...
... your dryer for your dryer. A turn . 2. rigid metal duct Exhaust hood type B Domestic 2-1/2 dryer models All Long Vent 6.0 - 8.0 cu. All 6.0 - 8.3 cu. Specification Created 2/13 Listed by 10 ft. Dryers must also be ignored. Never terminate the exhaust into an attic, since the combination of the system (transition duct included). A A 4 Best performance Maximum length of 90° turns needed for complete instructions when using a flexible metal (foil-type) duct. ft. GFDS260EF/265EF GE® 8.1 cu. B 2 -1/2" opening...


