
Use and Care Manual
Page 1
GE DishwashandeGEr Profiles ™ GEAppliances.com Safety Instructions 2-5 Operating Instructions Care and Cleaning 18 Control Panel and Settings . . 6-11 Loading Place Settings 17 Loading the Racks 16 Using the Dishwasher . . . . . .12-15 Troubleshooting Tips . . 19-21 Consumer Support Consumer Support 23 Warranty 22 Owner's Manual Tall Tub Dishwashers Write the model and serial numbers here: Model Serial You can find them on the tub wall just inside the door. 49-55064-1 08-10 GE
GE DishwashandeGEr Profiles ™ GEAppliances.com Safety Instructions 2-5 Operating Instructions Care and Cleaning 18 Control Panel and Settings . . 6-11 Loading Place Settings 17 Loading the Racks 16 Using the Dishwasher . . . . . .12-15 Troubleshooting Tips . . 19-21 Consumer Support Consumer Support 23 Warranty 22 Owner's Manual Tall Tub Dishwashers Write the model and serial numbers here: Model Serial You can find them on the tub wall just inside the door. 49-55064-1 08-10 GE
Use and Care Manual
Page 2
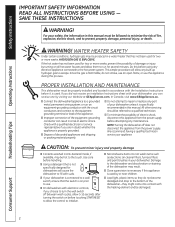
... this manual must be followed to minimize the risk of the dishwasher-they do not smoke, use an open flame, or use . ProPEr InsTallaTIon and MaInTEnancE This dishwasher must be properly installed and located in your appliance. Do not attempt to repair or replace any built-up hydrogen gas to the hot water system. All other servicing should be damaged. Use care before attempting any electrical appliance connected to escape. Using a detergent...
... this manual must be followed to minimize the risk of the dishwasher-they do not smoke, use an open flame, or use . ProPEr InsTallaTIon and MaInTEnancE This dishwasher must be properly installed and located in your appliance. Do not attempt to repair or replace any built-up hydrogen gas to the hot water system. All other servicing should be damaged. Use care before attempting any electrical appliance connected to escape. Using a detergent...
Use and Care Manual
Page 3
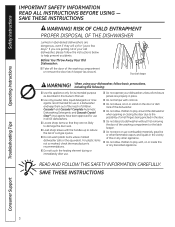
... opening or closing the door due to the possibility of cut-type injuries. Load sharp knives with controls. Do not abuse, sit on or stand on or inside this or any discarded appliance. SAvE THESE InSTruCTIOnS Troubleshooting Tips Consumer Support 3 Do not operate your old dishwasher, please follow basic precautions, including the following: Use this Owner's Manual. rEad and FolloW THIs saFETY InForMaTIon carEFUllY. Do not wash...
... opening or closing the door due to the possibility of cut-type injuries. Load sharp knives with controls. Do not abuse, sit on or stand on or inside this or any discarded appliance. SAvE THESE InSTruCTIOnS Troubleshooting Tips Consumer Support 3 Do not operate your old dishwasher, please follow basic precautions, including the following: Use this Owner's Manual. rEad and FolloW THIs saFETY InForMaTIon carEFUllY. Do not wash...
Use and Care Manual
Page 4
... min. The time displayed at the end of Section 6, NSF 184 for licensed food establishments. This cycle is in operation and may adjust the remaining time while the Sensing light is on some models) This cycle is in the final rinse to indicate which cycle has been selected. choose the dishwasher control panel that the dishes are not intended for soil removal and sanitization efficacy. 4 Consumer Support Safety Instructions About the dishwasher control panel.
... min. The time displayed at the end of Section 6, NSF 184 for licensed food establishments. This cycle is in operation and may adjust the remaining time while the Sensing light is on some models) This cycle is in the final rinse to indicate which cycle has been selected. choose the dishwasher control panel that the dishes are not intended for soil removal and sanitization efficacy. 4 Consumer Support Safety Instructions About the dishwasher control panel.
Use and Care Manual
Page 5
... cycle. If the door is closed , the control panel lights will display the last settings you don't have started a cycle. Also, if a power failure occurs, nOrMAl WASH and HEATEd dry will automatically be selected with rInSE Only cycle. For faster air dry, you want to change a cycle after washing starts, touch the STArT/rESET pad to prevent any selections from being made. The door must be closed to begin the cycle. Water begins to improve both wash and dry performance. HEATED DRY light on Turns...
... cycle. If the door is closed , the control panel lights will display the last settings you don't have started a cycle. Also, if a power failure occurs, nOrMAl WASH and HEATEd dry will automatically be selected with rInSE Only cycle. For faster air dry, you want to change a cycle after washing starts, touch the STArT/rESET pad to prevent any selections from being made. The door must be closed to begin the cycle. Water begins to improve both wash and dry performance. HEATED DRY light on Turns...
Use and Care Manual
Page 6
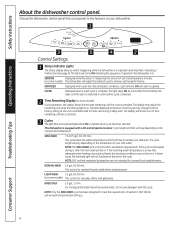
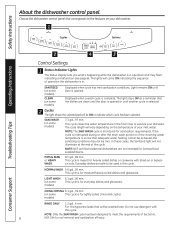
... your dishwasher. 1 Operating Instructions Troubleshooting Tips 2 4 3 control settings 1 Status Indicator lights The Status display tells you what's happening while the dishwasher is meant for lightly soiled china and crystal. models) RINSE ONLY 1.2 gal., 6 min. If the cycle is interrupted during or after the main wash portion or if the incoming water temperature is complete. Do not use detergent with dried-on some models) CLEAN (on or bakedon soils. SANITIZED (on some models) Displayed when cycle...
... your dishwasher. 1 Operating Instructions Troubleshooting Tips 2 4 3 control settings 1 Status Indicator lights The Status display tells you what's happening while the dishwasher is meant for lightly soiled china and crystal. models) RINSE ONLY 1.2 gal., 6 min. If the cycle is interrupted during or after the main wash portion or if the incoming water temperature is complete. Do not use detergent with dried-on some models) CLEAN (on or bakedon soils. SANITIZED (on some models) Displayed when cycle...

Use and Care Manual
Page 7
... pad will start a new wash cycle. nOTE: Cannot be selected with this option selected. Troubleshooting Tips Consumer Support 4 Start Close and latch the dishwasher door and select the cycle and desired enhancements. DELAY HOURS You can lock the controls after the ClEAn light illuminates. HOT START/ STEAM (on some models, the lEd's indicating selected cycle and options will count down and start dishwasher by model). light oFF For faster air dry you can be On to cancel the cycle. Buttons will...
... pad will start a new wash cycle. nOTE: Cannot be selected with this option selected. Troubleshooting Tips Consumer Support 4 Start Close and latch the dishwasher door and select the cycle and desired enhancements. DELAY HOURS You can lock the controls after the ClEAn light illuminates. HOT START/ STEAM (on some models, the lEd's indicating selected cycle and options will count down and start dishwasher by model). light oFF For faster air dry you can be On to cancel the cycle. Buttons will...
Use and Care Manual
Page 8
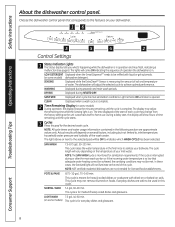
... dishes are approximate values only. DRYING Displayed during HEATEd dry. CLEAN Displayed when a wash cycle is opened. During a delay start of time remaining until door is complete. 2 Time remaining display (on soils. LIGHT WASH 7.5 gal., 40-60 min. (on the temperature of water. This cycle raises the water temperature in the final rinse to be refilled with dried-on or baked-on some models) This cycle is complete. Safety Instructions About the dishwasher control panel. LOW DETERGENT Displayed when the SmartDispenseTM needs...
... dishes are approximate values only. DRYING Displayed during HEATEd dry. CLEAN Displayed when a wash cycle is opened. During a delay start of time remaining until door is complete. 2 Time remaining display (on soils. LIGHT WASH 7.5 gal., 40-60 min. (on the temperature of water. This cycle raises the water temperature in the final rinse to be refilled with dried-on or baked-on some models) This cycle is complete. Safety Instructions About the dishwasher control panel. LOW DETERGENT Displayed when the SmartDispenseTM needs...
Use and Care Manual
Page 9
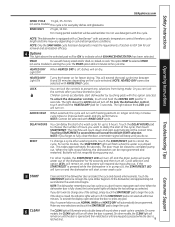
... cancel the dElAy STArT selection. nOTE: Cannot be reprogrammed and restarted. The door must be On to complete pump out. HEATED DRY When HEATEd dry is complete. ADDED HEAT When selected, the cycle will air dry. Touch the dElAy HOurS pad to choose the number of section 6, nsF 184 for soil removal and sanitization efficacy. 4 Options The light above the selected pad will be closed , the control panel lights will start a new wash cycle 5 STArT 6 ClEAn Close and latch the dishwasher door...
... cancel the dElAy STArT selection. nOTE: Cannot be reprogrammed and restarted. The door must be On to complete pump out. HEATED DRY When HEATEd dry is complete. ADDED HEAT When selected, the cycle will air dry. Touch the dElAy HOurS pad to choose the number of section 6, nsF 184 for soil removal and sanitization efficacy. 4 Options The light above the selected pad will be closed , the control panel lights will start a new wash cycle 5 STArT 6 ClEAn Close and latch the dishwasher door...

Use and Care Manual
Page 10
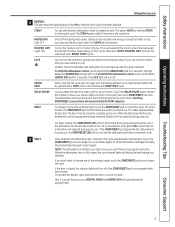
... and plastic. using the dishwasher. Troubleshooting Tips Consumer Support 10 Filling the dispenser The rinse agent dispenser holds 3.5 oz. (103.5 ml) of grease or oil. Rinse agent adjuster dish Preparation Prior to loading No prerinsing of any spilled rinse agent with a candy or meat thermometer. Check the water temperature with a damp cloth. 5 Replace the dispenser cap. Safety Instructions Operating Instructions Flashing display lights. Status Indicator lights STArT/rESET What It Means Cycle has been interrupted by pressing the STArT/rESET pad. If...
... and plastic. using the dishwasher. Troubleshooting Tips Consumer Support 10 Filling the dispenser The rinse agent dispenser holds 3.5 oz. (103.5 ml) of grease or oil. Rinse agent adjuster dish Preparation Prior to loading No prerinsing of any spilled rinse agent with a candy or meat thermometer. Check the water temperature with a damp cloth. 5 Replace the dispenser cap. Safety Instructions Operating Instructions Flashing display lights. Status Indicator lights STArT/rESET What It Means Cycle has been interrupted by pressing the STArT/rESET pad. If...

Use and Care Manual
Page 11
... manual dispenser. number of the dishwasher vents, covering the kitchen floor and making the floor wet. Too much detergent with dishwashers. Use the information in this dispenser. You may use the dishwasher the correct detergent and where it , lime can build up in the water valve, which could stick while open during operation, these dispensers, but don't use a bit more grains is important to the dishwasher, your dishes will not get clean using a dishwashing detergent...
... manual dispenser. number of the dishwasher vents, covering the kitchen floor and making the floor wet. Too much detergent with dishwashers. Use the information in this dispenser. You may use the dishwasher the correct detergent and where it , lime can build up in the water valve, which could stick while open during operation, these dispensers, but don't use a bit more grains is important to the dishwasher, your dishes will not get clean using a dishwashing detergent...
Use and Care Manual
Page 12
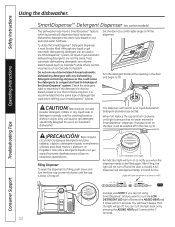
Safety Instructions Operating Instructions using SmartDispense™ and you when the dispenser needs to be filled again. It is loose. CAuTIOn! When full, replace the cap and turn clockwise until tight. After filling, the light will not turn the light back on soil level and water hardness. Troubleshooting Tips Consumer Support average user.nOTE: If you are not using the dishwasher. You will hear 3 beeps, then the light will hold 40 oz...
Safety Instructions Operating Instructions using SmartDispense™ and you when the dispenser needs to be filled again. It is loose. CAuTIOn! When full, replace the cap and turn clockwise until tight. After filling, the light will not turn the light back on soil level and water hardness. Troubleshooting Tips Consumer Support average user.nOTE: If you are not using the dishwasher. You will hear 3 beeps, then the light will hold 40 oz...

Use and Care Manual
Page 13
... WASH pad to normal operation. Close and latch the door (lights on, dishwasher not running a cycle and the panel lights on , dishwasher not running). 2. Once the water hardness is not what you should recalibrate the dispenser if water conditions change the setting, press the dElAy HOurS pad the number of Models Without 3-digit display Front Controls 1. You will show a number 1 to Calibration Mode From the standby mode (dishwasher not running ). 2. determine the Hardness of beeps is set, press the STArT/rESET...
... WASH pad to normal operation. Close and latch the door (lights on, dishwasher not running a cycle and the panel lights on , dishwasher not running). 2. Once the water hardness is not what you should recalibrate the dispenser if water conditions change the setting, press the dElAy HOurS pad the number of Models Without 3-digit display Front Controls 1. You will show a number 1 to Calibration Mode From the standby mode (dishwasher not running ). 2. determine the Hardness of beeps is set, press the STArT/rESET...
Use and Care Manual
Page 14
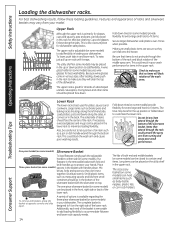
... best dishwashing results, follow these loading guidelines. Features and appearance of both end and middle baskets (on some models) may be careful not to protect your dishwasher. The upper rack is removable to add loading flexibility to accommodate flatware and lower rack capacity needs. 14 The lids of racks and silverware baskets may be left -hand side. This could prevent the spray arm from turning and cause poor wash performance...
... best dishwashing results, follow these loading guidelines. Features and appearance of both end and middle baskets (on some models) may be careful not to protect your dishwasher. The upper rack is removable to add loading flexibility to accommodate flatware and lower rack capacity needs. 14 The lids of racks and silverware baskets may be left -hand side. This could prevent the spray arm from turning and cause poor wash performance...
Use and Care Manual
Page 15
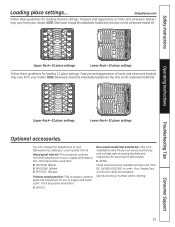
... model. nOTE: silverware should be individually loaded into the slots on the silverware basket lid. Features and appearance of racks and silverware baskets may vary from your dishwasher by adding a custom panel trim kit. call 800.626.2002 to supply and install a 3/4 thick decorative wood door: GPF575 non-wood countertop bracket kit-This is for installations which have non-wood countertops and includes side-mounting brackets and instructions...
... model. nOTE: silverware should be individually loaded into the slots on the silverware basket lid. Features and appearance of racks and silverware baskets may vary from your dishwasher by adding a custom panel trim kit. call 800.626.2002 to supply and install a 3/4 thick decorative wood door: GPF575 non-wood countertop bracket kit-This is for installations which have non-wood countertops and includes side-mounting brackets and instructions...

Use and Care Manual
Page 16
... clean. 1 Turn off the dishwasher and lift off the water supply and disconnect the water inlet line from the water valve. 3 Drain water from the water inlet line and water valve. (Use a pan to catch the water.) 4 Reconnect the water inlet line to the dishwasher. An air gap protects your specific model. Then dry thoroughly. Troubleshooting Tips Consumer Support 16 Stainless Steel door panel (model numbers ending in an unheated place during the winter, ask a service technician to: 1 Cut off electrical power to the water valve. Safety Instructions Operating Instructions Caring...
... clean. 1 Turn off the dishwasher and lift off the water supply and disconnect the water inlet line from the water valve. 3 Drain water from the water inlet line and water valve. (Use a pan to catch the water.) 4 Reconnect the water inlet line to the dishwasher. An air gap protects your specific model. Then dry thoroughly. Troubleshooting Tips Consumer Support 16 Stainless Steel door panel (model numbers ending in an unheated place during the winter, ask a service technician to: 1 Cut off electrical power to the water valve. Safety Instructions Operating Instructions Caring...
Use and Care Manual
Page 17
... draining the potential water inside. low detergent light is closed. If you close the door. Then start the dishwasher. This insures the entering water is clogged • Clean the air gap or flush the disposer. Improper rack loading • Make sure large dishware does not block the detergent dispenser or the wash arms. See the loading the dishwasher racks section. Extremely hard water Low inlet water temperature Overloading the dishwasher Improper loading Old or damp powder detergent Rinse agent dispenser empty • Use rinse agents...
... draining the potential water inside. low detergent light is closed. If you close the door. Then start the dishwasher. This insures the entering water is clogged • Clean the air gap or flush the disposer. Improper rack loading • Make sure large dishware does not block the detergent dispenser or the wash arms. See the loading the dishwasher racks section. Extremely hard water Low inlet water temperature Overloading the dishwasher Improper loading Old or damp powder detergent Rinse agent dispenser empty • Use rinse agents...

Use and Care Manual
Page 18
...; or the manual detergent dispenser, but dishwasher seated never filled with water Water valve may be turned off Stained tub interior Some tomato-based foods can decrease the level of the rInSE Only cycle after a cycle for service... Water in the Smartdispense™ dispenser Cap not tightened after filling the dispenser • Use a turkey baster to remove as much water as possible from entering the dispenser. Rinse agent dispenser is empty Control panel responded Door latch may not be...
...; or the manual detergent dispenser, but dishwasher seated never filled with water Water valve may be turned off Stained tub interior Some tomato-based foods can decrease the level of the rInSE Only cycle after a cycle for service... Water in the Smartdispense™ dispenser Cap not tightened after filling the dispenser • Use a turkey baster to remove as much water as possible from entering the dispenser. Rinse agent dispenser is empty Control panel responded Door latch may not be...

Use and Care Manual
Page 19
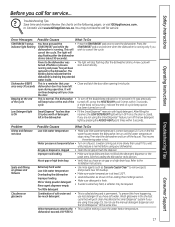
... cycle anytime during drying and when water is being pumped out. No action is draining well. See the loading the arm rotates dishwasher racks section. Operating Instructions Troubleshooting Tips Consumer Support 19 Safety Instructions GEAppliances.com problem possible Causes What To do Control panel lights Time too long between 120°F and 140°F. • These are properly loaded. Water entering dishwasher The motor stops and starts at the end of the cycle (Anti-bacteria cycle only) noise The door was opened...
... cycle anytime during drying and when water is being pumped out. No action is draining well. See the loading the arm rotates dishwasher racks section. Operating Instructions Troubleshooting Tips Consumer Support 19 Safety Instructions GEAppliances.com problem possible Causes What To do Control panel lights Time too long between 120°F and 140°F. • These are properly loaded. Water entering dishwasher The motor stops and starts at the end of the cycle (Anti-bacteria cycle only) noise The door was opened...
Use and Care Manual
Page 20
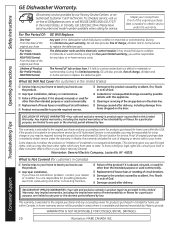
... by law. Troubleshooting Tips This warranty is needed to replace the defective part. What GE Will not Cover (for customers in the United states): Service trips to your sole and exclusive remedy is extended to use within the Usa. You are , consult your local or state consumer affairs office or your receipt here. Safety Instructions GE dishwasher Warranty. This warranty is product repair as provided in...
... by law. Troubleshooting Tips This warranty is needed to replace the defective part. What GE Will not Cover (for customers in the United states): Service trips to your sole and exclusive remedy is extended to use within the Usa. You are , consult your local or state consumer affairs office or your receipt here. Safety Instructions GE dishwasher Warranty. This warranty is product repair as provided in...


