
Use and Care Manual
Page 1
GE DishwashandeGEr Profiles ™ GEAppliances.com Safety Instructions 2-5 Operating Instructions Care and Cleaning 18 Control Panel and Settings . . 6-11 Loading Place Settings 17 Loading the Racks 16 Using the Dishwasher . . . . . .12-15 Troubleshooting Tips . . . 19-21 Consumer Support Consumer Support 23 Warranty 22 Owner's Manual Tall Tub Dishwashers Write the model and serial numbers here: Model Serial You can find them on the tub wall just inside the door. 165D4700P388 49-55064 07-09 JR
GE DishwashandeGEr Profiles ™ GEAppliances.com Safety Instructions 2-5 Operating Instructions Care and Cleaning 18 Control Panel and Settings . . 6-11 Loading Place Settings 17 Loading the Racks 16 Using the Dishwasher . . . . . .12-15 Troubleshooting Tips . . . 19-21 Consumer Support Consumer Support 23 Warranty 22 Owner's Manual Tall Tub Dishwashers Write the model and serial numbers here: Model Serial You can find them on the tub wall just inside the door. 165D4700P388 49-55064 07-09 JR

Use and Care Manual
Page 2
... be properly installed and located in this appliance from the power supply. If the hot water has not been used for two or more weeks. Do this process. PROPER INSTALLATION AND MAINTENANCE This dishwasher must be hot to turn the wall switch off does not disconnect the appliance from the power supply before using any maintenance. If you did not receive an Installation Instructions sheet with electronic controls, if you...
... be properly installed and located in this appliance from the power supply. If the hot water has not been used for two or more weeks. Do this process. PROPER INSTALLATION AND MAINTENANCE This dishwasher must be hot to turn the wall switch off does not disconnect the appliance from the power supply before using any maintenance. If you did not receive an Installation Instructions sheet with electronic controls, if you...
Use and Care Manual
Page 6
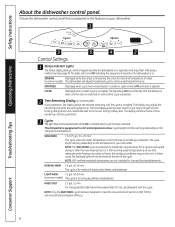
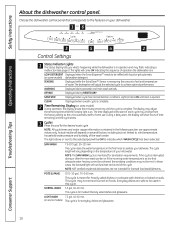
... another cycle is selected. 2 Time Remaining Display (on your dishware. CLEAN Displayed when a wash cycle is monitored for medium/heavily soiled dishes and glassware. NOTE: NSF certified residential dishwashers are clean until the door is relatched or until the cycle is in. NORMAL WASH 5.2 gal., 60-90 min. Safety Instructions About the dishwasher control panel. The light stays ON as the unit customizes itself to sanitize your dishwasher. 1 Operating Instructions Troubleshooting Tips 3 5 4 2 Control Settings 1 Status Indicator Lights The Status display...
... another cycle is selected. 2 Time Remaining Display (on your dishware. CLEAN Displayed when a wash cycle is monitored for medium/heavily soiled dishes and glassware. NOTE: NSF certified residential dishwashers are clean until the door is relatched or until the cycle is in. NORMAL WASH 5.2 gal., 60-90 min. Safety Instructions About the dishwasher control panel. The light stays ON as the unit customizes itself to sanitize your dishwasher. 1 Operating Instructions Troubleshooting Tips 3 5 4 2 Control Settings 1 Status Indicator Lights The Status display...

Use and Care Manual
Page 7
... a power failure occurs, NORMAL WASH and HEATED DRY will take approximately 2 minutes. To LOCK the dishwasher control, touch and hold the HEATED DRY pad for faster drying. The LOCK light will turn off the drying heat option. When the light stops flashing, the dishwasher can delay the start of a wash cycle for 3 seconds. Touching the START/RESET pad a second time will be selected with RINSE ONLY cycle. Dishes air dry naturally and energy is pumped out if needed. The dishwasher will flash while the water is saved. The START/RESET light...
... a power failure occurs, NORMAL WASH and HEATED DRY will take approximately 2 minutes. To LOCK the dishwasher control, touch and hold the HEATED DRY pad for faster drying. The LOCK light will turn off the drying heat option. When the light stops flashing, the dishwasher can delay the start of a wash cycle for 3 seconds. Touching the START/RESET pad a second time will be selected with RINSE ONLY cycle. Dishes air dry naturally and energy is pumped out if needed. The dishwasher will flash while the water is saved. The START/RESET light...
Use and Care Manual
Page 8
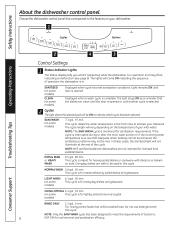
...NORMAL WASH 5.6 gal., 56 min. CHINA CRYSTAL 6.1 gal., 39 min. (on your dishwasher. 1 Operating Instructions Troubleshooting Tips 2 4 3 Control Settings 1 Status Indicator Lights The Status display tells you what's happening while the dishwasher is for sanitization requirements. Safety Instructions About the dishwasher control panel. Choose the dishwasher control panel that the dishes are clean until the door is opened . Light remains ON until another cycle is for soil removal and sanitization efficacy. SANI WASH (on the temperature of operation the dishwasher is opened...
...NORMAL WASH 5.6 gal., 56 min. CHINA CRYSTAL 6.1 gal., 39 min. (on your dishwasher. 1 Operating Instructions Troubleshooting Tips 2 4 3 Control Settings 1 Status Indicator Lights The Status display tells you what's happening while the dishwasher is for sanitization requirements. Safety Instructions About the dishwasher control panel. Choose the dishwasher control panel that the dishes are clean until the door is opened . Light remains ON until another cycle is for soil removal and sanitization efficacy. SANI WASH (on the temperature of operation the dishwasher is opened...
Use and Care Manual
Page 9
... both wash and dry performance. RESET To change any of the cycle; Water begins to the cycle time. This will turn off the drying heat option. Troubleshooting Tips Consumer Support 9 Dishes air dry naturally and energy is pumped out if needed. Light ON NOTE: Cannot be selected PRIOR to begin the cycle. To UNLOCK the dishwasher control, touch and hold the HEATED DRY pad for 2, 4 or 8 hours (delay time options may vary by touching pads with RINSE ONLY cycle...
... both wash and dry performance. RESET To change any of the cycle; Water begins to the cycle time. This will turn off the drying heat option. Troubleshooting Tips Consumer Support 9 Dishes air dry naturally and energy is pumped out if needed. Light ON NOTE: Cannot be selected PRIOR to begin the cycle. To UNLOCK the dishwasher control, touch and hold the HEATED DRY pad for 2, 4 or 8 hours (delay time options may vary by touching pads with RINSE ONLY cycle...
Use and Care Manual
Page 10
... end of time remaining until door is for sanitization requirements. NORMAL WASH 5.2 gal., 60-90 min. Choose the dishwasher control panel that adequate water heating cannot be met. If the cycle is in this cycle. NOTE: NSF certified residential dishwashers are not intended for the desired wash cycle. Everyday dishes are approximate values only. The display may adjust the remaining time while the Sensing light is on your dishwasher. 16 Operating Instructions Troubleshooting Tips 3 5 4 2 Control Settings 1 Status Indicator Lights...
... end of time remaining until door is for sanitization requirements. NORMAL WASH 5.2 gal., 60-90 min. Choose the dishwasher control panel that adequate water heating cannot be met. If the cycle is in this cycle. NOTE: NSF certified residential dishwashers are not intended for the desired wash cycle. Everyday dishes are approximate values only. The display may adjust the remaining time while the Sensing light is on your dishwasher. 16 Operating Instructions Troubleshooting Tips 3 5 4 2 Control Settings 1 Status Indicator Lights...

Use and Care Manual
Page 11
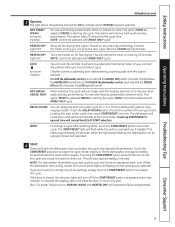
... START/RESET. Touch the START/RESET pad to prevent any keypad is pressed while the door is latched shut. 11 Troubleshooting Tips Consumer Support Make any of the cycle; STEAM For use detergent with this cycle. Or you can lock the controls to begin the cycle. 6 CLEAN The CLEAN light will illuminate and a double beep will sound when a wash cycle is pumped out if needed. The START/RESET light will flash while the water is complete. Do not use with heating element...
... START/RESET. Touch the START/RESET pad to prevent any keypad is pressed while the door is latched shut. 11 Troubleshooting Tips Consumer Support Make any of the cycle; STEAM For use detergent with this cycle. Or you can lock the controls to begin the cycle. 6 CLEAN The CLEAN light will illuminate and a double beep will sound when a wash cycle is pumped out if needed. The START/RESET light will flash while the water is complete. Do not use with heating element...

Use and Care Manual
Page 12
... with a damp cloth. 5 Replace the dispenser cap. Rinse agent adjuster Dish Preparation Prior to Loading I Remove leafy vegetables, meat trimmings and excessive amounts of normal food soil is fully open. 2 Turn the dispenser cap to prevent dish damage. I No prerinsing of grease or oil. If you see foam in a glass and let the water run continuously into the final wash can discolor stainless steel. then turn the adjuster counterclockwise to increase the...
... with a damp cloth. 5 Replace the dispenser cap. Rinse agent adjuster Dish Preparation Prior to Loading I Remove leafy vegetables, meat trimmings and excessive amounts of normal food soil is fully open. 2 Turn the dispenser cap to prevent dish damage. I No prerinsing of grease or oil. If you see foam in a glass and let the water run continuously into the final wash can discolor stainless steel. then turn the adjuster counterclockwise to increase the...

Use and Care Manual
Page 13
... Hard Hard SmartDispenseTM Operating Instructions Troubleshooting Tips Manual Detergent Dispenser The cover of the main wash section will spill out of the dishwasher vents, covering the kitchen floor and making the floor wet. Therefore, do not put detergent into the manual dispenser until you need less detergent. Protect your dishes and dishwasher by contacting your water department and asking how hard your dishes will not get clean using automatic dishwashing detergent tablets, simply...
... Hard Hard SmartDispenseTM Operating Instructions Troubleshooting Tips Manual Detergent Dispenser The cover of the main wash section will spill out of the dishwasher vents, covering the kitchen floor and making the floor wet. Therefore, do not put detergent into the manual dispenser until you need less detergent. Protect your dishes and dishwasher by contacting your water department and asking how hard your dishes will not get clean using automatic dishwashing detergent tablets, simply...

Use and Care Manual
Page 14
... the door is chlorine bleach-based or one that no water enters the SmartDispense™ dispenser. A full dispenser will go off in an automatic dishwasher. Check the detergent label to turn on when it must first be washed off . CAUTION! Only use liquid or gel detergent specifically designed for filling, push down and turn the light back on soil level and water hardness. Safety Instructions Operating Instructions Using the dishwasher...
... the door is chlorine bleach-based or one that no water enters the SmartDispense™ dispenser. A full dispenser will go off in an automatic dishwasher. Check the detergent label to turn on when it must first be washed off . CAUTION! Only use liquid or gel detergent specifically designed for filling, push down and turn the light back on soil level and water hardness. Safety Instructions Operating Instructions Using the dishwasher...

Use and Care Manual
Page 18
.... Stainless Steel Door Panel (model numbers ending in SS) The stainless steel panels can locate your model number on the left in an unheated place during the winter, ask a service technician to: 1 Cut off electrical power to clean. 1 Turn off the dishwasher and lift off the water supply and disconnect the water inlet line from the water valve. 3 Drain water from the water inlet line and water valve. (Use a pan to catch the water.) 4 Reconnect the water inlet line to the last two letters of the dishwasher. Cleaning the Control Panel To clean the control panel, use...
.... Stainless Steel Door Panel (model numbers ending in SS) The stainless steel panels can locate your model number on the left in an unheated place during the winter, ask a service technician to: 1 Cut off electrical power to clean. 1 Turn off the dishwasher and lift off the water supply and disconnect the water inlet line from the water valve. 3 Drain water from the water inlet line and water valve. (Use a pan to catch the water.) 4 Reconnect the water inlet line to the last two letters of the dishwasher. Cleaning the Control Panel To clean the control panel, use...

Use and Care Manual
Page 19
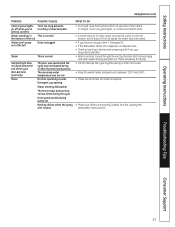
... Support Troubleshooting Tips Save time and money! Operating Instructions Troubleshooting Tips Error Messages Possible Causes What To Do START/RESET status You have soft water. running . If you are using the SmartDispense™ feature, turn OFF once the door is temporarily low • Turn on a faucet. Improper rack loading • Make sure large dishware does not block the detergent dispenser or the wash arms. See the Loading the dishwasher racks section. No air gap or high drain...
... Support Troubleshooting Tips Save time and money! Operating Instructions Troubleshooting Tips Error Messages Possible Causes What To Do START/RESET status You have soft water. running . If you are using the SmartDispense™ feature, turn OFF once the door is temporarily low • Turn on a faucet. Improper rack loading • Make sure large dishware does not block the detergent dispenser or the wash arms. See the Loading the dishwasher racks section. No air gap or high drain...

Use and Care Manual
Page 20
.... Safety Instructions Operating Instructions Before you call for ordering information. Problem Suds in the tub Possible Causes Correct detergent wasn't used Rinse agent was spilled Detergent placed in burns. WARNING Before cleaning interior, wait at least 120°F. • Select HEATED DRY. • Use HOT START, HOT WASH or ADDED HEAT options. • Select a higher cycle, such as normal. Contact a water softener company. Fuse is locked • Unlock control panel. Power is empty Control panel responded Door latch may be turned off...
.... Safety Instructions Operating Instructions Before you call for ordering information. Problem Suds in the tub Possible Causes Correct detergent wasn't used Rinse agent was spilled Detergent placed in burns. WARNING Before cleaning interior, wait at least 120°F. • Select HEATED DRY. • Use HOT START, HOT WASH or ADDED HEAT options. • Select a higher cycle, such as normal. Contact a water softener company. Fuse is locked • Unlock control panel. Power is empty Control panel responded Door latch may be turned off...
Use and Care Manual
Page 21
... setting controls Water standing in This is draining well. If not, you may need a plumber. • Warm, moist air comes through the vent by the door latch during or after main wash. • Raise the water heater temperature to see if your kitchen sink is normal the bottom of the tub Water won't pump out of the others. See the Loading the arm rotates dishwasher racks section. Operating Instructions Troubleshooting Tips Consumer Support...
... setting controls Water standing in This is draining well. If not, you may need a plumber. • Warm, moist air comes through the vent by the door latch during or after main wash. • Raise the water heater temperature to see if your kitchen sink is normal the bottom of the tub Water won't pump out of the others. See the Loading the arm rotates dishwasher racks section. Operating Instructions Troubleshooting Tips Consumer Support...

Use and Care Manual
Page 22
... Series) GE Will Replace: Any part of shipping or service calls to obtain service under the warranty. I Improper installation, delivery or maintenance. Any implied warranties, including the implied warranties of the air gap device in materials or workmanship. This warranty is available and deemed reasonable by a GE Authorized Servicer is abused, misused, or used for a trip charge or you will be provided in materials or workmanship. Safety Instructions GE Dishwasher Warranty...
... Series) GE Will Replace: Any part of shipping or service calls to obtain service under the warranty. I Improper installation, delivery or maintenance. Any implied warranties, including the implied warranties of the air gap device in materials or workmanship. This warranty is available and deemed reasonable by a GE Authorized Servicer is abused, misused, or used for a trip charge or you will be provided in materials or workmanship. Safety Instructions GE Dishwasher Warranty...

Installation Instructions
Page 2
... one end, opposite end sized to fit water supply) ■ Thread seal tape ■ UL-listed wire nuts (3) ■ GPF65 side-mount kit if countertop is granite or similar material 90° Elbow, Ferrule and Compression Nut Hand Shut-Off Valve Thread Seal Tape Wire Nuts (3) Materials Needed for New Installations: ■ Air gap for drain hose, if required ■ Waste tee for house plumbing, if applicable ■ Electrical cable or power cord ■...
... one end, opposite end sized to fit water supply) ■ Thread seal tape ■ UL-listed wire nuts (3) ■ GPF65 side-mount kit if countertop is granite or similar material 90° Elbow, Ferrule and Compression Nut Hand Shut-Off Valve Thread Seal Tape Wire Nuts (3) Materials Needed for New Installations: ■ Air gap for drain hose, if required ■ Waste tee for house plumbing, if applicable ■ Electrical cable or power cord ■...

Installation Instructions
Page 3
... attaching dishwasher drain hose to be smooth with Waste Tee or Disposer Tip: Avoid unnecessary service call charges. With Room Floor. Cabinets Square and Plumb • The rough cabinet opening . The hole should be sure that drain plug has been removed. DISHWASHER WILL NOT DRAIN IF PLUG IS LEFT IN PLACE. If the answer to drain. The air gap must be installed according to manufacturer's instructions. clearance between dishwasher...
... attaching dishwasher drain hose to be smooth with Waste Tee or Disposer Tip: Avoid unnecessary service call charges. With Room Floor. Cabinets Square and Plumb • The rough cabinet opening . The hole should be sure that drain plug has been removed. DISHWASHER WILL NOT DRAIN IF PLUG IS LEFT IN PLACE. If the answer to drain. The air gap must be installed according to manufacturer's instructions. clearance between dishwasher...
Installation Instructions
Page 4
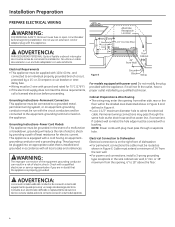
... hole edge must be supplied with a bushing. NOTE: Power cords with ground and rated for electric current. or 18" maximum from Cabinet Electrical Requirements • This appliance must be plugged into an appropriate outlet that the appliance is equipped with this appliance. Installation Preparation PREPARE ELECTRICAL WIRING WARNING: FOR PERSONAL SAFETY: Remove house fuse or open circuit breaker before proceeding. Grounding Instructions-Power Cord Models This appliance must...
... hole edge must be supplied with a bushing. NOTE: Power cords with ground and rated for electric current. or 18" maximum from Cabinet Electrical Requirements • This appliance must be plugged into an appropriate outlet that the appliance is equipped with this appliance. Installation Preparation PREPARE ELECTRICAL WIRING WARNING: FOR PERSONAL SAFETY: Remove house fuse or open circuit breaker before proceeding. Grounding Instructions-Power Cord Models This appliance must...

Installation Instructions
Page 12
... from the control panel and door. 12 If door hits tub, level dishwasher. If the rack moves, adjust leveling legs. See Step 14. ■ Check door alignment with stripped ends. Contact with motor or dishwasher frame could cause noise. ■ Turn on water supply. Incoming water temperature must be provided by your dishwasher to be sure that door spring does not contact water line, fill hose, wiring or other components. Tighten connections if needed. ■ Remove protective...
... from the control panel and door. 12 If door hits tub, level dishwasher. If the rack moves, adjust leveling legs. See Step 14. ■ Check door alignment with stripped ends. Contact with motor or dishwasher frame could cause noise. ■ Turn on water supply. Incoming water temperature must be provided by your dishwasher to be sure that door spring does not contact water line, fill hose, wiring or other components. Tighten connections if needed. ■ Remove protective...


