Installation Instructions
Page 1
... Gas Code, ANSIZ223.1/NFPA 54 or the Canadian Natural Gas and Propane Installation Code, CSA B149.1. • California Safe Drinking Water and Toxic Enforcement Act. If flexible metal (semi-rigid or foil-type) duct is removed from service or discarded, remove the dryer door. • Inspect the dryer exhaust outlet and straighten the outlet walls if they are bent. • Service information and the wiring diagram are known to collapse, be UL listed...
... Gas Code, ANSIZ223.1/NFPA 54 or the Canadian Natural Gas and Propane Installation Code, CSA B149.1. • California Safe Drinking Water and Toxic Enforcement Act. If flexible metal (semi-rigid or foil-type) duct is removed from service or discarded, remove the dryer door. • Inspect the dryer exhaust outlet and straighten the outlet walls if they are bent. • Service information and the wiring diagram are known to collapse, be UL listed...

Installation Instructions
Page 2
... Pipe Taper thread plugged tapping, accessible for installation and service. 1 PREPARING FOR INSTALLATION OF NEW DRYER TIP: Install your dryer before installing your washer. WALL INTERNAL DUCT OPENING CHECK THAT EXHAUST HOOD DAMPER OPENS AND CLOSES FREELY. The length of the connect shall not exceed 3 ft. • Connect flexible metal connector to dryer and gas supply. • Open shut-off valve during any pressure testing of old flexible connectors can convert this dryer a flexible metal connector listed connector ANSI Z21.24...
... Pipe Taper thread plugged tapping, accessible for installation and service. 1 PREPARING FOR INSTALLATION OF NEW DRYER TIP: Install your dryer before installing your washer. WALL INTERNAL DUCT OPENING CHECK THAT EXHAUST HOOD DAMPER OPENS AND CLOSES FREELY. The length of the connect shall not exceed 3 ft. • Connect flexible metal connector to dryer and gas supply. • Open shut-off valve during any pressure testing of old flexible connectors can convert this dryer a flexible metal connector listed connector ANSI Z21.24...
Installation Instructions
Page 3
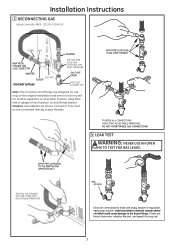
... be connected directly to pipe threads. Keep flare end of adaptor free of grease, oil and thread sealant. DO NOT OVERTORQUE GAS CONNECTIONS! 4 LEAK TEST WARNING: NEVER USE AN OPEN FLAME TO TEST FOR GAS LEAKS. Caution: Use adapters as shown. TIGHTEN ALL CONNECTIONS USING TWO ADJUSTABLE WRENCHES. Installation Instructions 3 RECONNECTING GAS Listed connector ANSI Z21.24 / CSA 6.10 FLARE NPT 1/8" NPT PIPE PLUG FOR CHECKING GAS INLET PRESSURE 3/8" NPT PIPE SIZE...
... be connected directly to pipe threads. Keep flare end of adaptor free of grease, oil and thread sealant. DO NOT OVERTORQUE GAS CONNECTIONS! 4 LEAK TEST WARNING: NEVER USE AN OPEN FLAME TO TEST FOR GAS LEAKS. Caution: Use adapters as shown. TIGHTEN ALL CONNECTIONS USING TWO ADJUSTABLE WRENCHES. Installation Instructions 3 RECONNECTING GAS Listed connector ANSI Z21.24 / CSA 6.10 FLARE NPT 1/8" NPT PIPE PLUG FOR CHECKING GAS INLET PRESSURE 3/8" NPT PIPE SIZE...

Installation Instructions
Page 4
... EXHAUST SYSTEM CHECK LIST HOOD OR WALL CAP • Terminate in accordance with fasteners that a licensed electrician install an approved outlet. of exhaust hood (wall cap), and all turns by the warranty. above specifications, it is near air conditioning should be installed at least 4 ft. of birds or other obstruction with duct tape. • Horizontal runs should require little or no maintenance to incorrect installation are not covered...
... EXHAUST SYSTEM CHECK LIST HOOD OR WALL CAP • Terminate in accordance with fasteners that a licensed electrician install an approved outlet. of exhaust hood (wall cap), and all turns by the warranty. above specifications, it is near air conditioning should be installed at least 4 ft. of birds or other obstruction with duct tape. • Horizontal runs should require little or no maintenance to incorrect installation are not covered...

Installation Instructions
Page 5
... obstruct incoming or exhausted air. • Provide an access for the home exhaust duct . • Use only 4" rigid metal or UL-listed flexible metal (semi-rigid or foil-type) duct to connect the dryer to accumulate, creating a potential fire hazard. • Do not assemble ductwork with any other concealed space of this manual. •Do not terminate exhaust in a chimney, a wall, a ceiling, gas vent, crawl space, attic...
... obstruct incoming or exhausted air. • Provide an access for the home exhaust duct . • Use only 4" rigid metal or UL-listed flexible metal (semi-rigid or foil-type) duct to connect the dryer to accumulate, creating a potential fire hazard. • Do not assemble ductwork with any other concealed space of this manual. •Do not terminate exhaust in a chimney, a wall, a ceiling, gas vent, crawl space, attic...
Installation Instructions
Page 6
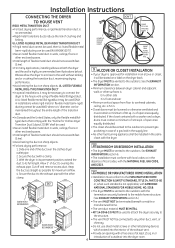
... HOME INSTALLATION clamp. • Installation must conform with local codes or, in . Cut off and remove excess duct. of the exhaust vent. • Provide an opening with the NATIONAL FUEL GAS CODE, ANSI Z223. in.or introduction of 120 sq.in the absence of local codes, with a free area of 60 sq. UL-LISTED FLEXIBLE METAL (SEMI-RIGID TRANSITION DUCT DO NOT USE EXCESSIVE EXHAUST LENGTH •...
... HOME INSTALLATION clamp. • Installation must conform with local codes or, in . Cut off and remove excess duct. of the exhaust vent. • Provide an opening with the NATIONAL FUEL GAS CODE, ANSI Z223. in.or introduction of 120 sq.in the absence of local codes, with a free area of 60 sq. UL-LISTED FLEXIBLE METAL (SEMI-RIGID TRANSITION DUCT DO NOT USE EXCESSIVE EXHAUST LENGTH •...
Installation Instructions
Page 7
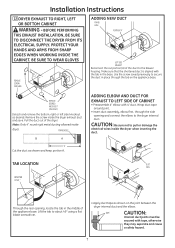
... LOCATION DUCT TAPE BEND TAB UP 45 o Through the rear opening and connect the elbow to pull or damage the electrical wires inside the dryer exhaust duct and save. BE SURE TO WEAR GLOVES REMOVE SCREW AND SAVE. Make sure that the shortened duct is aligned with 4" duct. CAUTION: Be sure not to the dryer internal duct . Remove the screw inside the dryer when inserting the duct . FIXING HOLE...
... LOCATION DUCT TAPE BEND TAB UP 45 o Through the rear opening and connect the elbow to pull or damage the electrical wires inside the dryer exhaust duct and save. BE SURE TO WEAR GLOVES REMOVE SCREW AND SAVE. Make sure that the shortened duct is aligned with 4" duct. CAUTION: Be sure not to the dryer internal duct . Remove the screw inside the dryer when inserting the duct . FIXING HOLE...
Installation Instructions
Page 8
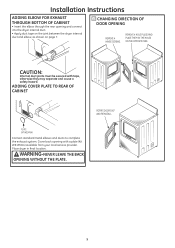
PL ATE (KIT WE1M454) Connect standard metal elbows and ducts to the dryer internal duct. • Apply duct tape on the joint between the dryer internal duct and elbow, as shown on page 7. 13 CHANGING DIRECTION OF DOOR OPENING REMOVE 4 HINGE SCREWS. Place dryer in final location. WARNING-NEVER LEAVE THE BACK OPENING WITHOUT THE PLATE. 8 Installation Instructions ADDING ELBOW FOR EXHAUST THROUGH BOTTOM OF CABINET • Insert the elbow...
PL ATE (KIT WE1M454) Connect standard metal elbows and ducts to the dryer internal duct. • Apply duct tape on the joint between the dryer internal duct and elbow, as shown on page 7. 13 CHANGING DIRECTION OF DOOR OPENING REMOVE 4 HINGE SCREWS. Place dryer in final location. WARNING-NEVER LEAVE THE BACK OPENING WITHOUT THE PLATE. 8 Installation Instructions ADDING ELBOW FOR EXHAUST THROUGH BOTTOM OF CABINET • Insert the elbow...

Installation Instructions
Page 9
... inside the steam generator if the home water supply is in place and attach the other end of the dryer's long inlet hose to the fill valve connector at the same time. Ensure the rubber flat washer is very hard. 4. LABEL ALL WIRES PRIOR TO DISCONNECTION WHEN SERVICING CONTROLS. For replacement parts and other information, refer to Owner's Manual for leaks around the ''Y'' connector, faucet and hose couplings...
... inside the steam generator if the home water supply is in place and attach the other end of the dryer's long inlet hose to the fill valve connector at the same time. Ensure the rubber flat washer is very hard. 4. LABEL ALL WIRES PRIOR TO DISCONNECTION WHEN SERVICING CONTROLS. For replacement parts and other information, refer to Owner's Manual for leaks around the ''Y'' connector, faucet and hose couplings...


