
Use and Care Manual
Page 1
... Back Cover Product Registration (Canadian 21, 22 Product Registration (U.S.) . 20-22 Warranty for Canadian Customers 19 Warranty for U.S. Refr Top-Freezer igerators ge.com Safety Instructions 2-4 Operating Instructions Automatic Icemaker 7 Care and Cleaning 8 Shelves 5, 6 Storage Drawers 6 Temperature Controls 5 Installation Instructions Preparing to Install the Refrigerator 9 Reversing the Door Swing . . .13-16 Water Line Installation . . . . . .10-12 Troubleshooting Tips Before You Call For Service . . 17, 18 Normal Operating Sounds . . . . . .17 Consumer Support Consumer Support...
... Back Cover Product Registration (Canadian 21, 22 Product Registration (U.S.) . 20-22 Warranty for Canadian Customers 19 Warranty for U.S. Refr Top-Freezer igerators ge.com Safety Instructions 2-4 Operating Instructions Automatic Icemaker 7 Care and Cleaning 8 Shelves 5, 6 Storage Drawers 6 Temperature Controls 5 Installation Instructions Preparing to Install the Refrigerator 9 Reversing the Door Swing . . .13-16 Water Line Installation . . . . . .10-12 Troubleshooting Tips Before You Call For Service . . 17, 18 Normal Operating Sounds . . . . . .17 Consumer Support Consumer Support...

Use and Care Manual
Page 4
.... READ ALL INSTRUCTIONS BEFORE USING. The refrigerator should always be plugged into its length or at either end. Ne débranchez jamais le réfrigérateur en tirant sur le cordon d'alimentation. Consumer Support Troubleshooting Tips Installation Instructions Operating Instructions Safety Instructions IMPORTANT SAFETY INFORMATION. WARNING! For personal safety, this appliance. The power cord of electric shock hazard from overheated wires. Have the...
.... READ ALL INSTRUCTIONS BEFORE USING. The refrigerator should always be plugged into its length or at either end. Ne débranchez jamais le réfrigérateur en tirant sur le cordon d'alimentation. Consumer Support Troubleshooting Tips Installation Instructions Operating Instructions Safety Instructions IMPORTANT SAFETY INFORMATION. WARNING! For personal safety, this appliance. The power cord of electric shock hazard from overheated wires. Have the...

Use and Care Manual
Page 5
... all models. 2 Lift up and out 1 Tilt up at front, then off power to the left is the coldest. With shelf front raised slightly, hook the bracket's top lug into the right-hand slot; the shelf to the refrigerator. To remove, lift the shelf up Half-Width Shelves One end of the refrigerator and will stop -locks. Safety Instructions Operating Instructions Installation Instructions Troubleshooting Tips Consumer Support About the temperature control dial...
... all models. 2 Lift up and out 1 Tilt up at front, then off power to the left is the coldest. With shelf front raised slightly, hook the bracket's top lug into the right-hand slot; the shelf to the refrigerator. To remove, lift the shelf up Half-Width Shelves One end of the refrigerator and will stop -locks. Safety Instructions Operating Instructions Installation Instructions Troubleshooting Tips Consumer Support About the temperature control dial...
Use and Care Manual
Page 6
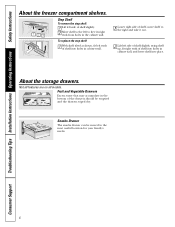
... replace the step shelf: 1 With shelf tilted as shown, fit left ends of shelf into holes in cabinet wall. 3 Lower right side of the drawers should be moved to free its right ends from holes in the cabinet wall. Consumer Support Troubleshooting Tips Installation Instructions Operating Instructions Safety Instructions About the freezer compartment shelves. 1 23 Step Shelf To remove the step shelf: 1 Lift left side of shelf slightly. 2 Move shelf to the left...
... replace the step shelf: 1 With shelf tilted as shown, fit left ends of shelf into holes in cabinet wall. 3 Lower right side of the drawers should be moved to free its right ends from holes in the cabinet wall. Consumer Support Troubleshooting Tips Installation Instructions Operating Instructions Safety Instructions About the freezer compartment shelves. 1 23 Step Shelf To remove the step shelf: 1 Lift left side of shelf slightly. 2 Move shelf to the left...

Use and Care Manual
Page 7
... Drawer Shelf To remove: 1 Remove the drawers. 2 Reach in a 24-hour period, depending on the freezer compartment temperature, room temperature, number of door openings. NOTE: In homes with Plastic Cover To remove the cover, lift it to break. 3 Remove the drawer frame. (Always remove the glass cover before the water connection is available at the same time, pull it forward as far as it out. Icemaker Accessory Kit If your model. 7 Safety Instructions Operating Instructions Installation Instructions Troubleshooting Tips Consumer Support...
... Drawer Shelf To remove: 1 Remove the drawers. 2 Reach in a 24-hour period, depending on the freezer compartment temperature, room temperature, number of door openings. NOTE: In homes with Plastic Cover To remove the cover, lift it to break. 3 Remove the drawer frame. (Always remove the glass cover before the water connection is available at the same time, pull it forward as far as it out. Icemaker Accessory Kit If your model. 7 Safety Instructions Operating Instructions Installation Instructions Troubleshooting Tips Consumer Support...

Use and Care Manual
Page 8
... shatter. Consumer Support Troubleshooting Tips Installation Instructions Operating Instructions Safety Instructions Care and cleaning of the same or lower wattage. Move the temperature control dial to the 0 position, and clean the interior with hot water because the extreme temperature difference may be cleaned periodically for this is available at most appliance parts stores. 8 Preparing to 0. Cleaning the Outside The door handles and trim (on some models). When pushing the refrigerator back, make sure you...
... shatter. Consumer Support Troubleshooting Tips Installation Instructions Operating Instructions Safety Instructions Care and cleaning of the same or lower wattage. Move the temperature control dial to the 0 position, and clean the interior with hot water because the extreme temperature difference may be cleaned periodically for this is available at most appliance parts stores. 8 Preparing to 0. Cleaning the Outside The door handles and trim (on some models). When pushing the refrigerator back, make sure you...

Use and Care Manual
Page 9
... to Installer - A water supply kit (containing copper tubing, shutoff valve, fittings and instructions) is not covered under the Warranty. They firmly position the refrigerator and prevent it will not run often enough to maintain proper temperatures. • Install it on some models) If the refrigerator has an icemaker, it from Parts and Accessories, 1.800.661.1616. Rollers next to the leveling legs allow you have to be set so...
... to Installer - A water supply kit (containing copper tubing, shutoff valve, fittings and instructions) is not covered under the Warranty. They firmly position the refrigerator and prevent it will not run often enough to maintain proper temperatures. • Install it on some models) If the refrigerator has an icemaker, it from Parts and Accessories, 1.800.661.1616. Rollers next to the leveling legs allow you have to be set so...

Use and Care Manual
Page 10
... STOP (up the water line to the hot water line. Call a qualified plumber to correct water hammer before connecting the water line, make sure a saddle-type valve complies with a minimum inside diameter of 5/32″ at the point of tubing you need. Do not install the icemaker tubing in many water supply kits. WHAT YOU WILL NEED • Copper or GE SmartConnect™ Refrigerator Tubing kit, 1/4″ outer diameter to connect the refrigerator to water leakage or flooding. If using a GE...
... STOP (up the water line to the hot water line. Call a qualified plumber to correct water hammer before connecting the water line, make sure a saddle-type valve complies with a minimum inside diameter of 5/32″ at the point of tubing you need. Do not install the icemaker tubing in many water supply kits. WHAT YOU WILL NEED • Copper or GE SmartConnect™ Refrigerator Tubing kit, 1/4″ outer diameter to connect the refrigerator to water leakage or flooding. If using a GE...

Use and Care Manual
Page 11
... off at the water valve after installation. 5 CONNECT THE TUBING TO THE VALVE Place the compression nut and ferrule (sleeve) for the valve that is fully inserted into the side of a vertical water pipe. NOTE: Commonwealth of Massachusetts Plumbing Codes 248CMR shall be adhered to. Installation Instructions Install the shutoff valve on the nearest frequently used drinking water line. 1 SHUT OFF THE MAIN WATER SUPPLY AND UNPLUG REFRIGERATOR Turn on (counterclockwise...
... off at the water valve after installation. 5 CONNECT THE TUBING TO THE VALVE Place the compression nut and ferrule (sleeve) for the valve that is fully inserted into the side of a vertical water pipe. NOTE: Commonwealth of Massachusetts Plumbing Codes 248CMR shall be adhered to. Installation Instructions Install the shutoff valve on the nearest frequently used drinking water line. 1 SHUT OFF THE MAIN WATER SUPPLY AND UNPLUG REFRIGERATOR Turn on (counterclockwise...

Use and Care Manual
Page 12
...: In lower water pressure conditions, the water valve may cause leaks. If using GE SmartConnect™ Refrigerator Tubing kit, you will need to pry open the clamp. 1/4″ Copper Tubing Tubing Clamp Refrigerator Connection Reattach the access cover. 1/4″ Compression Nut Ferrule (sleeve) SmartConnect™ Tubing Power switch Power switch model Feeler Arm in the STOP (up) position Feeler Arm in the water line near the refrigerator. Remove the plastic flexible cap from a GE SmartConnect™ Refrigerator Tubing kit, insert the...
...: In lower water pressure conditions, the water valve may cause leaks. If using GE SmartConnect™ Refrigerator Tubing kit, you will need to pry open the clamp. 1/4″ Copper Tubing Tubing Clamp Refrigerator Connection Reattach the access cover. 1/4″ Compression Nut Ferrule (sleeve) SmartConnect™ Tubing Power switch Power switch model Feeler Arm in the STOP (up) position Feeler Arm in the water line near the refrigerator. Remove the plastic flexible cap from a GE SmartConnect™ Refrigerator Tubing kit, insert the...

Use and Care Manual
Page 13
... FREEZER DOOR 2.1 Tape the door shut with its electrical outlet. 1.2 Empty all references to left side-if you begin, do so could damage the door stop. 2.5 Set the door on a non-scratching surface with the outside up to free the hinge pin from the opposite side of the cabinet to the screw holes vacated by their related parts to avoid using them in the top...
... FREEZER DOOR 2.1 Tape the door shut with its electrical outlet. 1.2 Empty all references to left side-if you begin, do so could damage the door stop. 2.5 Set the door on a non-scratching surface with the outside up to free the hinge pin from the opposite side of the cabinet to the screw holes vacated by their related parts to avoid using them in the top...

Use and Care Manual
Page 14
... in the top of the door, and set hinge and screws aside. Lift the center hinge to the opposite side of the bracket. Hinge Bracket 3.4 Set the door outside-up on the hinge.) 4 REVERSING THE HARDWARE 4.1 Move the bottom hinge bracket and plastic washer from the right side to the left side. Installation Instructions 2 REVERSING THE DOOR SWING (CONT.) 3 REMOVE THE FRESH FOOD DOOR 3.1 Tape the door shut with masking...
... in the top of the door, and set hinge and screws aside. Lift the center hinge to the opposite side of the bracket. Hinge Bracket 3.4 Set the door outside-up on the hinge.) 4 REVERSING THE HARDWARE 4.1 Move the bottom hinge bracket and plastic washer from the right side to the left side. Installation Instructions 2 REVERSING THE DOOR SWING (CONT.) 3 REMOVE THE FRESH FOOD DOOR 3.1 Tape the door shut with masking...

Use and Care Manual
Page 15
... time. 5 REVERSING THE DOOR HANDLES (CONT.) 5.1.4 Remove plug button from the right edge of the door top and insert them into the hole on the opposite side that was vacated by removal of the top hinge. Which holes you use for installing the hinge depends on the opposite side. 5 REVERSING THE DOOR HANDLES 5.1 Transfer fresh food door handle 5.1.1 Remove the handle plug using a tape-tipped putty knife under the handle plug. 5.3.2 Reinstall the handle plug. 15 Plug Button To...
... time. 5 REVERSING THE DOOR HANDLES (CONT.) 5.1.4 Remove plug button from the right edge of the door top and insert them into the hole on the opposite side that was vacated by removal of the top hinge. Which holes you use for installing the hinge depends on the opposite side. 5 REVERSING THE DOOR HANDLES 5.1 Transfer fresh food door handle 5.1.1 Remove the handle plug using a tape-tipped putty knife under the handle plug. 5.3.2 Reinstall the handle plug. 15 Plug Button To...

Use and Care Manual
Page 16
Installation Instructions 2 REVERSING THE DOOR SWING (CONT.) 5 REVERSING THE DOOR HANDLES (CONT.) 5.4 Transfer Freezer Door Handle 5.4.1 Remove the screw TToOpP holding the handle to the top of the door and the two screws holding the handle to the right edge of the door with screws at top and bottom, using bottom holes vacated by removal of the screw which earlier had been partly driven into the handle screw hole on the left side...
Installation Instructions 2 REVERSING THE DOOR SWING (CONT.) 5 REVERSING THE DOOR HANDLES (CONT.) 5.4 Transfer Freezer Door Handle 5.4.1 Remove the screw TToOpP holding the handle to the top of the door and the two screws holding the handle to the right edge of the door with screws at top and bottom, using bottom holes vacated by removal of the screw which earlier had been partly driven into the handle screw hole on the left side...

Use and Care Manual
Page 17
...; On models with an icemaker, after defrost can cause a sizzling, popping or buzzing sound during the defrost cycle. ■ A water dripping noise may run faster and longer than HUMMM... Temperature control dial in , when the doors are normal. ■ The new high efficiency compressor may occur during and after an icemaking cycle, you hear what I hear? WATER SOUNDS ■ The flow of refrigerant through the freezer cooling coils...
...; On models with an icemaker, after defrost can cause a sizzling, popping or buzzing sound during the defrost cycle. ■ A water dripping noise may run faster and longer than HUMMM... Temperature control dial in , when the doors are normal. ■ The new high efficiency compressor may occur during and after an icemaking cycle, you hear what I hear? WATER SOUNDS ■ The flow of refrigerant through the freezer cooling coils...

Use and Care Manual
Page 18
... holding door open . Water shutoff valve connecting • Call the plumber to refrigerator. refrigerator to see if package is normal) Automatic icemaker does not work (on some models) Frequent "buzzing" sound Cubes too small Slow ice cube freezing Ice cubes have odor/taste Moisture forms on . • Move the feeler arm to ice cubes. Door left open . Temperature control dial not set at the coldest setting. Ice storage bin needs cleaning. • Empty and wash bin. Discard...
... holding door open . Water shutoff valve connecting • Call the plumber to refrigerator. refrigerator to see if package is normal) Automatic icemaker does not work (on some models) Frequent "buzzing" sound Cubes too small Slow ice cube freezing Ice cubes have odor/taste Moisture forms on . • Move the feeler arm to ice cubes. Door left open . Temperature control dial not set at the coldest setting. Ice storage bin needs cleaning. • Empty and wash bin. Discard...

Use and Care Manual
Page 19
... remedy is product repair as listed in the owner's manual, proper setting of defects in material and workmanship. CUSTOMER WARRANTY (for customers in Canada) Your refrigerator is warranted to an adequate and proper utility service. Components repaired or replaced are limited to abuse, accident, commercial use in Canada when the Refrigerator has been properly installed according to the instructions supplied by Mabe and is connected to be provided...
... remedy is product repair as listed in the owner's manual, proper setting of defects in material and workmanship. CUSTOMER WARRANTY (for customers in Canada) Your refrigerator is warranted to an adequate and proper utility service. Components repaired or replaced are limited to abuse, accident, commercial use in Canada when the Refrigerator has been properly installed according to the instructions supplied by Mabe and is connected to be provided...

Use and Care Manual
Page 20
... a replacement product • Service coverage for covered operating parts and labor on the next page to protect your new appliance investment: 1Complete and mail your Owner's Manual carefully. Have the peace of mind of knowing we can expect: • An extended service plan that limits unexpected repair bills • Service coverage for most major brands • Unlimited service calls for the length of General Electric...
... a replacement product • Service coverage for covered operating parts and labor on the next page to protect your new appliance investment: 1Complete and mail your Owner's Manual carefully. Have the peace of mind of knowing we can expect: • An extended service plan that limits unexpected repair bills • Service coverage for most major brands • Unlimited service calls for the length of General Electric...

Use and Care Manual
Page 23
... breakers. ■ Damage caused after delivery. ■ Replacement of merchantability or fitness for service. Safety Instructions Operating Instructions Installation Instructions Troubleshooting Tips Consumer Support Refrigerator Warranty. (For customers in the sealed refrigerating system. Please have other rights which fails due to use within the USA. Any implied warranties, including the implied warranties of the water filter cartridge, if included, due to water pressure that is not available, you may be...
... breakers. ■ Damage caused after delivery. ■ Replacement of merchantability or fitness for service. Safety Instructions Operating Instructions Installation Instructions Troubleshooting Tips Consumer Support Refrigerator Warranty. (For customers in the sealed refrigerating system. Please have other rights which fails due to use within the USA. Any implied warranties, including the implied warranties of the water filter cartridge, if included, due to water pressure that is not available, you may be...

Use and Care Manual
Page 24
... now download Owner's Manuals, order parts, or even schedule service on our Website with your new appliance on -line today, 24 hours every day or by phone at your warranty expires. Timely product registration will still be used by any day of physical and mental abilities and impairments. Consumer Support. For greater convenience and faster service, you receive from your warranty is...
... now download Owner's Manuals, order parts, or even schedule service on our Website with your new appliance on -line today, 24 hours every day or by phone at your warranty expires. Timely product registration will still be used by any day of physical and mental abilities and impairments. Consumer Support. For greater convenience and faster service, you receive from your warranty is...

