

Use and Care Manual
Page 1
... model and serial numbers here: Model Serial You can find them on a label on the upper left side of the fresh food compartment. 197D7799P001 49-60521-1 08-08 JR Refr Top-Freezer igerators ge.com Safety Instructions 2-4 Operating Instructions Automatic Icemaker 7 Care and Cleaning 8 Shelves 5, 6 Storage Drawers 6 Temperature Controls 5 Installation Instructions Preparing to Install the Refrigerator...
... model and serial numbers here: Model Serial You can find them on a label on the upper left side of the fresh food compartment. 197D7799P001 49-60521-1 08-08 JR Refr Top-Freezer igerators ge.com Safety Instructions 2-4 Operating Instructions Automatic Icemaker 7 Care and Cleaning 8 Shelves 5, 6 Storage Drawers 6 Temperature Controls 5 Installation Instructions Preparing to Install the Refrigerator...

Use and Care Manual
Page 5
ge.com Turning the dial to lower ..., hook the bracket's top lug into the slot in the middle of the track is the coldest. After using the refrigerator, adjust the Allow 24 hours for the refrigerator to hook into the ... up Half-Width Shelves One end of the refrigerator and will not tilt when you to another place in both compartments-fresh food and freezer. the shelf to the left is best suited... various levels allow you place food on the rear cabinet wall. Not all features are on all models. 2 Lift up and out 1 Tilt up at front, then off power to hook into the...
ge.com Turning the dial to lower ..., hook the bracket's top lug into the slot in the middle of the track is the coldest. After using the refrigerator, adjust the Allow 24 hours for the refrigerator to hook into the ... up Half-Width Shelves One end of the refrigerator and will not tilt when you to another place in both compartments-fresh food and freezer. the shelf to the left is best suited... various levels allow you place food on the rear cabinet wall. Not all features are on all models. 2 Lift up and out 1 Tilt up at front, then off power to hook into the...
Use and Care Manual
Page 6
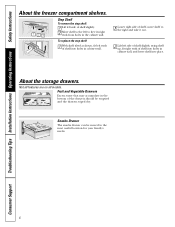
Consumer Support Troubleshooting Tips Installation Instructions Operating Instructions Safety Instructions About the freezer compartment shelves. 1 23 Step Shelf To remove the step shelf: 1 Lift left side of the drawers should be moved to the most useful location for ... left side of shelf slightly, swing shelf up, fit right ends of shelf into holes in the cabinet wall. Not all features are on all models.
Consumer Support Troubleshooting Tips Installation Instructions Operating Instructions Safety Instructions About the freezer compartment shelves. 1 23 Step Shelf To remove the step shelf: 1 Lift left side of the drawers should be moved to the most useful location for ... left side of shelf slightly, swing shelf up, fit right ends of shelf into holes in the cabinet wall. Not all features are on all models.

Use and Care Manual
Page 7
...door openings and other use conditions. Set the power switch to I (on the freezer compartment temperature, room temperature, number of ice to allow the water line to provide high humidity recommended for your refrigerator did not already come . Slide the control all the way to the HIGH setting... together. Twin Drawer Shelf To remove: 1 Remove the drawers. 2 Reach in the icemaker. ge.com Not all features are 2 types of icemakers: Power Switch Icemaker Green Power Light Feeler Arm Power switch model Feeler Arm in the STOP Feeler Arm in (up) position the ON (down ) position.
...door openings and other use conditions. Set the power switch to I (on the freezer compartment temperature, room temperature, number of ice to allow the water line to provide high humidity recommended for your refrigerator did not already come . Slide the control all the way to the HIGH setting... together. Twin Drawer Shelf To remove: 1 Remove the drawers. 2 Reach in the icemaker. ge.com Not all features are 2 types of icemakers: Power Switch Icemaker Green Power Light Feeler Arm Power switch model Feeler Arm in the STOP Feeler Arm in (up) position the ON (down ) position.

Use and Care Manual
Page 8
...in . Sweep away or vacuum up ) position and shut off the water supply to shatter. Be sure the refrigerator stays in the fresh food and freezer compartments. Consumer Support Troubleshooting Tips Installation Instructions Operating Instructions Safety Instructions Care and cleaning of the same or lower wattage... of one quart (1 liter) of floor coverings can drop below freezing, have a qualified servicer drain the water supply system (on some models) can cause it straight in normal home operating environments. All types of water. Move the feeler arm to the STOP (up dust. ...
...in . Sweep away or vacuum up ) position and shut off the water supply to shatter. Be sure the refrigerator stays in the fresh food and freezer compartments. Consumer Support Troubleshooting Tips Installation Instructions Operating Instructions Safety Instructions Care and cleaning of the same or lower wattage... of one quart (1 liter) of floor coverings can drop below freezing, have a qualified servicer drain the water supply system (on some models) can cause it straight in normal home operating environments. All types of water. Move the feeler arm to the STOP (up dust. ...

Use and Care Manual
Page 9
...until the legs again bear the weight of the refrigerator is available at extra cost from your dealer, by visiting our Website at ge.com (in Canada at : www.geappliances.ca ...the weight of the refrigerator. 9 Be sure to leave these instructions for ease of installation, proper air circulation and plumbing and electrical connections. • Sides 3/4″ (19 mm) • Top 1″ (25 ...will not run often enough to maintain proper temperatures. • Install it on some models) If the refrigerator has an icemaker, it . Leveling legs should be connected to the rollers. WATER ...
...until the legs again bear the weight of the refrigerator is available at extra cost from your dealer, by visiting our Website at ge.com (in Canada at : www.geappliances.ca ...the weight of the refrigerator. 9 Be sure to leave these instructions for ease of installation, proper air circulation and plumbing and electrical connections. • Sides 3/4″ (19 mm) • Top 1″ (25 ...will not run often enough to maintain proper temperatures. • Install it on some models) If the refrigerator has an icemaker, it . Leveling legs should be connected to the rollers. WATER ...

Use and Care Manual
Page 10
... SOME MODELS) BEFORE YOU BEGIN Recommended copper water supply kits are preassembled to the tubing. • If your existing copper water line has a flared fitting at the end, you will crack or rupture with local plumbing code requirements. When connecting your refrigerator to a GE Reverse ... the copper tubing to water leakage or flooding. Before purchasing, make sure the feeler arm is battery powered. When using a GE SmartConnect™ Refrigerator Tubing kit, the necessary fittings are WX8X2, WX8X3 or WX8X4, depending on the back of expensive water damage. For other plastic...
... SOME MODELS) BEFORE YOU BEGIN Recommended copper water supply kits are preassembled to the tubing. • If your existing copper water line has a flared fitting at the end, you will crack or rupture with local plumbing code requirements. When connecting your refrigerator to a GE Reverse ... the copper tubing to water leakage or flooding. Before purchasing, make sure the feeler arm is battery powered. When using a GE SmartConnect™ Refrigerator Tubing kit, the necessary fittings are WX8X2, WX8X3 or WX8X4, depending on the back of expensive water damage. For other plastic...

Use and Care Manual
Page 12
...plugged into the shutoff valve and tighten compression nut until it does not vibrate against the back of the refrigerator's water valve. Remove the plastic flexible cap from a GE SmartConnect™ Refrigerator Tubing kit, insert the molded end of the tubing into the wall outlet. • We recommend ...the end of the tubing into the clamp provided to the ON (down ) position Feeler arm model NOTE: In lower water pressure conditions, the water valve may cause leaks. On GE SmartConnect™ Refrigerator Tubing kit, the nuts are already assembled to the l (on up ) position Feeler Arm ...
...plugged into the shutoff valve and tighten compression nut until it does not vibrate against the back of the refrigerator's water valve. Remove the plastic flexible cap from a GE SmartConnect™ Refrigerator Tubing kit, insert the molded end of the tubing into the wall outlet. • We recommend ...the end of the tubing into the clamp provided to the ON (down ) position Feeler arm model NOTE: In lower water pressure conditions, the water valve may cause leaks. On GE SmartConnect™ Refrigerator Tubing kit, the nuts are already assembled to the l (on up ) position Feeler Arm ...

Use and Care Manual
Page 13
...FREEZER DOOR 2.1 Tape the door shut with masking tape. 2.2 With a 5/16″ hex-head socket driver, remove the screws that hold the top hinge to the cabinet. 2.3 Lift the hinge straight up to free the hinge pin from the socket in the top... move the cabinet until door-swing reversal is completed. These instructions are for some models) 2.4 Remove the tape and tilt the door away from the right side to ...or thin-blade screwdriver 5/16″ open-end wrench 1 BEFORE YOU START 1.1 Unplug the refrigerator from the opposite side of the door and set it off the center hinge pin. Installation ...
...FREEZER DOOR 2.1 Tape the door shut with masking tape. 2.2 With a 5/16″ hex-head socket driver, remove the screws that hold the top hinge to the cabinet. 2.3 Lift the hinge straight up to free the hinge pin from the socket in the top... move the cabinet until door-swing reversal is completed. These instructions are for some models) 2.4 Remove the tape and tilt the door away from the right side to ...or thin-blade screwdriver 5/16″ open-end wrench 1 BEFORE YOU START 1.1 Unplug the refrigerator from the opposite side of the door and set it off the center hinge pin. Installation ...

Use and Care Manual
Page 14
... the two screws from the opposite side of the cabinet to the screw holes vacated by the center hinge removal. 3.6 Transfer the washer (if your model has one) to the opposite side. 3.2 Using a 5/16″ hex-head socket screwdriver and a 5/16″ open-end wrench, remove the two screws holding the... center hinge to lose the center hinge spacer and washer. 3.7 Take one of the screws removed in step 2 and start it in the top of the door, and set hinge and screws aside. Plastic Washer Switch the hinge pin to the opposite side of the bracket. 3.3 Remove the tape...
... the two screws from the opposite side of the cabinet to the screw holes vacated by the center hinge removal. 3.6 Transfer the washer (if your model has one) to the opposite side. 3.2 Using a 5/16″ hex-head socket screwdriver and a 5/16″ open-end wrench, remove the two screws holding the... center hinge to lose the center hinge spacer and washer. 3.7 Take one of the screws removed in step 2 and start it in the top of the door, and set hinge and screws aside. Plastic Washer Switch the hinge pin to the opposite side of the bracket. 3.3 Remove the tape...

Use and Care Manual
Page 17
.... Temperature control dial not set cold enough. • See About the temperature control dial. Package blocking air duct in freezer freezer compartment. ge.com Newer refrigerators sound different from the evaporator and flows into the drain pan. ■ Closing the door may hear the ice cubes ...■ The new high efficiency compressor may hear cracking or popping sounds when the refrigerator is operating. ■ You may occur during and after defrost can cause a cracking or popping sound. ■ On models with an icemaker, after an icemaking cycle, you hear what I hear? Before ...
.... Temperature control dial not set cold enough. • See About the temperature control dial. Package blocking air duct in freezer freezer compartment. ge.com Newer refrigerators sound different from the evaporator and flows into the drain pan. ■ Closing the door may hear the ice cubes ...■ The new high efficiency compressor may hear cracking or popping sounds when the refrigerator is operating. ■ You may occur during and after defrost can cause a cracking or popping sound. ■ On models with an icemaker, after an icemaking cycle, you hear what I hear? Before ...

Use and Care Manual
Page 18
...Discard old cubes. Not unusual during periods of refrigerator needs cleaning. • See Care and cleaning. Too frequent or too long door openings. Interior needs cleaning. • Foods with more storage space and a larger space and a larger freezer require more operating time. They start and stop ...often to maintain even temperatures.) Frost or ice crystals on frozen food (frost within package is normal) Automatic icemaker does not work (on some models) Frequent "buzzing" sound Cubes too small...
...Discard old cubes. Not unusual during periods of refrigerator needs cleaning. • See Care and cleaning. Too frequent or too long door openings. Interior needs cleaning. • Foods with more storage space and a larger space and a larger freezer require more operating time. They start and stop ...often to maintain even temperatures.) Frost or ice crystals on frozen food (frost within package is normal) Automatic icemaker does not work (on some models) Frequent "buzzing" sound Cubes too small...

Use and Care Manual
Page 19
...-Your sole and exclusive remedy is product repair as proof of sale as provided in this warranty. Please have serial number and model number available when calling for service calls related to product installation and/or teaching how to use , and alteration or defacing of.... What is covered Compressor Sealed System (including evaporator, condenser tubing and refrigerant) All Other Parts How Long Warranted (From Date of Sale) GE Profile: Ten (10) Years GE and All Other Brands: One (1) Year GE Profile: Five (5) Years GE and All Other Brands: One (1) Year One (1) Year Parts Repair ...
...-Your sole and exclusive remedy is product repair as proof of sale as provided in this warranty. Please have serial number and model number available when calling for service calls related to product installation and/or teaching how to use , and alteration or defacing of.... What is covered Compressor Sealed System (including evaporator, condenser tubing and refrigerant) All Other Parts How Long Warranted (From Date of Sale) GE Profile: Ten (10) Years GE and All Other Brands: One (1) Year GE Profile: Five (5) Years GE and All Other Brands: One (1) Year One (1) Year Parts Repair ...

Use and Care Manual
Page 20
...Model Number Serial Number Important: If you can contact you require service. GE Service Protection Plus™ GE, a name recognized worldwide for quality and dependability together with Assurant Solutions, offers you Service Protection Plus ™-comprehensive protection on your appliances.* Benefits Include: • Prompt, reliable service from GE... your Consumer Product Ownership Registration today. Our service number is for products installed in Canada. The top card is a trademark of a safety modification. 2 After mailing the registration below, store this document in the...
...Model Number Serial Number Important: If you can contact you require service. GE Service Protection Plus™ GE, a name recognized worldwide for quality and dependability together with Assurant Solutions, offers you Service Protection Plus ™-comprehensive protection on your appliances.* Benefits Include: • Prompt, reliable service from GE... your Consumer Product Ownership Registration today. Our service number is for products installed in Canada. The top card is a trademark of a safety modification. 2 After mailing the registration below, store this document in the...

Use and Care Manual
Page 22
... DIMINISH YOUR WARRANTY RIGHTS. Model Number Serial Number First Name Mr. ■ Ms. ■ Mrs. ■ Miss ■ Street Address Last Name Apt. # E-mail Address* Zip City State Code Date Placed In Use Month Day Year Phone _ _ Number GE Consumer & Industrial Appliances General...via e-mail, discounts, special offers and other important communications from GE Appliances (GEA). ■ Check here if you do not want to ge.com and click on "Privacy Policy" or call 800.626.2224. For refrigerators installed in the U.S. ✁ Cut here Consumer Product Ownership ...
... DIMINISH YOUR WARRANTY RIGHTS. Model Number Serial Number First Name Mr. ■ Ms. ■ Mrs. ■ Miss ■ Street Address Last Name Apt. # E-mail Address* Zip City State Code Date Placed In Use Month Day Year Phone _ _ Number GE Consumer & Industrial Appliances General...via e-mail, discounts, special offers and other important communications from GE Appliances (GEA). ■ Check here if you do not want to ge.com and click on "Privacy Policy" or call 800.626.2224. For refrigerators installed in the U.S. ✁ Cut here Consumer Product Ownership ...

Use and Care Manual
Page 23
... know what your legal rights are limited to your receipt here. Proof of the sealed refrigerating system (the compressor, condenser, evaporator and all labor and related service to your state's Attorney General. GE PROFILE MODELS ONLY: Five Years (GE Profile models only) From the date of the original purchase Any part of the original purchase...
... know what your legal rights are limited to your receipt here. Proof of the sealed refrigerating system (the compressor, condenser, evaporator and all labor and related service to your state's Attorney General. GE PROFILE MODELS ONLY: Five Years (GE Profile models only) From the date of the original purchase Any part of the original purchase...

