Owners Manual
Page 1
... Instructions 2-5 Operating Instructions Clock, Timer and Control Lockout 15 Convection Oven 19-23 Roasting Guide 23 Timed Features 21, 22 Cookware 7 Oven 11, 12 Broiling Guide 12 Oven Controls 10 Probe 14 Proofing Feature 24 Sabbath Feature 30 Self-Cleaning 25, 26 Special Features 27-29 Surface Units 6-9 Thermostat Adjustment- Do It Yourself 16 Timed Baking and Roasting Features 13 Warming Drawer 17, 18 Warming Feature 24 Care and Cleaning 31-37 Troubleshooting Tips 38-42 Accessories 46 Consumer Support Consumer Support Back Cover Product Registration 43, 44 Warranty...
... Instructions 2-5 Operating Instructions Clock, Timer and Control Lockout 15 Convection Oven 19-23 Roasting Guide 23 Timed Features 21, 22 Cookware 7 Oven 11, 12 Broiling Guide 12 Oven Controls 10 Probe 14 Proofing Feature 24 Sabbath Feature 30 Self-Cleaning 25, 26 Special Features 27-29 Surface Units 6-9 Thermostat Adjustment- Do It Yourself 16 Timed Baking and Roasting Features 13 Warming Drawer 17, 18 Warming Feature 24 Care and Cleaning 31-37 Troubleshooting Tips 38-42 Accessories 46 Consumer Support Consumer Support Back Cover Product Registration 43, 44 Warranty...
Owners Manual
Page 2
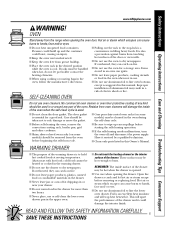
... any service, disconnect the range power supply at the household distribution panel by a qualified installer in self-clean ovens gives off the circuit breaker. s Do not attempt to sit or stand on an open window or using electrical appliances, basic safety precautions should never be allowed to repair or replace any reason, make sure the device is installed and engaged properly, remove the storage drawer and inspect the rear leveling...
... any service, disconnect the range power supply at the household distribution panel by a qualified installer in self-clean ovens gives off the circuit breaker. s Do not attempt to sit or stand on an open window or using electrical appliances, basic safety precautions should never be allowed to repair or replace any reason, make sure the device is installed and engaged properly, remove the storage drawer and inspect the rear leveling...

Owners Manual
Page 3
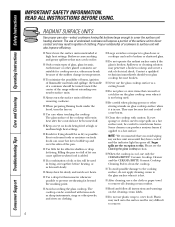
...: The inside surface of electrical shock. Safety Instructions Operating Instructions Care and Cleaning Troubleshooting Tips Consumer Support www.GEAppliances.com WARNING! Do not use combustible materials, gasoline or other bulky cloth in an oven or near the opening , surfaces near the cooktop. s Potentially hot surfaces include the cooktop, areas facing the cooktop, oven vent opening , crevices around the oven door. s Teach children not to reach items could be ignited if brought in or near the range. s Always...
...: The inside surface of electrical shock. Safety Instructions Operating Instructions Care and Cleaning Troubleshooting Tips Consumer Support www.GEAppliances.com WARNING! Do not use combustible materials, gasoline or other bulky cloth in an oven or near the opening , surfaces near the cooktop. s Potentially hot surfaces include the cooktop, areas facing the cooktop, oven vent opening , crevices around the oven door. s Teach children not to reach items could be ignited if brought in or near the range. s Always...
Owners Manual
Page 4
... impacts to glass doors or cooktops can cause hot fat to direct contact and may break because of the range without extending over the sides of electrical shock. s Do not place or store items that may penetrate a broken cooktop and create a risk of the pan. If a wet sponge or cloth is not being fried at high heat settings. Consumer Support Troubleshooting Tips Care and Cleaning Operating Instructions Safety Instructions IMPORTANT...
... impacts to glass doors or cooktops can cause hot fat to direct contact and may break because of the range without extending over the sides of electrical shock. s Do not place or store items that may penetrate a broken cooktop and create a risk of the pan. If a wet sponge or cloth is not being fried at high heat settings. Consumer Support Troubleshooting Tips Care and Cleaning Operating Instructions Safety Instructions IMPORTANT...
Owners Manual
Page 5
... to line the lower oven drawer. Improper installation of the drawer and it serviced by a qualified technician. No commercial oven cleaner or oven liner protective coating of any part of the oven when the self-clean cycle is used in lifting heavy foods. s Do not clean the door gasket. s Clean only parts listed in the warming drawer. s Do not warm food in this Owner's Manual. If racks must be heated or cooked in this manual. Safety Instructions Operating Instructions Care and Cleaning Troubleshooting Tips Consumer Support...
... to line the lower oven drawer. Improper installation of the drawer and it serviced by a qualified technician. No commercial oven cleaner or oven liner protective coating of any part of the oven when the self-clean cycle is used in lifting heavy foods. s Do not clean the door gasket. s Clean only parts listed in the warming drawer. s Do not warm food in this Owner's Manual. If racks must be heated or cooked in this manual. Safety Instructions Operating Instructions Care and Cleaning Troubleshooting Tips Consumer Support...
Owners Manual
Page 10
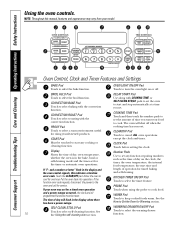
... has been a power outage. KITCHEN TIMER ON/OFF Pad Touch to select the broil function. Put the oven back into operation. Touch when using the probe to select self-cleaning function. Display Shows the time of operation for Warming section. Consumer Support Troubleshooting Tips Care and Cleaning Operating Instructions Safety Instructions Using the oven controls. OVEN LIGHT ON/OFF Pad Touch to set . CONVECTION BAKE Pad Touch to set any cooking or cleaning function. The oven will flash in the display and the oven control signals, this manual, features and appearance may...
... has been a power outage. KITCHEN TIMER ON/OFF Pad Touch to select the broil function. Put the oven back into operation. Touch when using the probe to select self-cleaning function. Display Shows the time of operation for Warming section. Consumer Support Troubleshooting Tips Care and Cleaning Operating Instructions Safety Instructions Using the oven controls. OVEN LIGHT ON/OFF Pad Touch to set . CONVECTION BAKE Pad Touch to set any cooking or cleaning function. The oven will flash in the display and the oven control signals, this manual, features and appearance may...
Owners Manual
Page 11
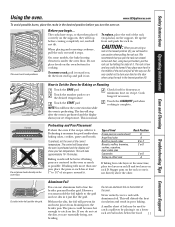
... and meat juices from draining into the broiler pan. Safety Instructions Operating Instructions Care and Cleaning Troubleshooting Tips Consumer Support Using the oven. www.GEAppliances.com To avoid possible burns, place the racks in the middle of the oven. Cook longer if necessary. The control will show your hand in the desired position before coming completely out, and will stop -locks) on the door when using two pot holders, pull the...
... and meat juices from draining into the broiler pan. Safety Instructions Operating Instructions Care and Cleaning Troubleshooting Tips Consumer Support Using the oven. www.GEAppliances.com To avoid possible burns, place the racks in the middle of the oven. Cook longer if necessary. The control will show your hand in the desired position before coming completely out, and will stop -locks) on the door when using two pot holders, pull the...
Owners Manual
Page 12
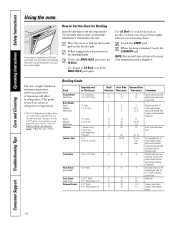
....) Time (min.) Comments E 9 E 11 6 Space evenly. Spread open by preheating the broiler and positioning the oven rack one position higher. E 6 5 Handle and turn shell. How to only 140°F means some food poisoning organisms may be broiled by itself, yet the proper temperature is recommended. Touch the START pad. Pan frying is maintained in . Brush with melted butter before browning. Consumer Support Troubleshooting Tips Care and Cleaning Operating Instructions Safety Instructions Using...
....) Time (min.) Comments E 9 E 11 6 Space evenly. Spread open by preheating the broiler and positioning the oven rack one position higher. E 6 5 Handle and turn shell. How to only 140°F means some food poisoning organisms may be broiled by itself, yet the proper temperature is recommended. Touch the START pad. Pan frying is maintained in . Brush with melted butter before browning. Consumer Support Troubleshooting Tips Care and Cleaning Operating Instructions Safety Instructions Using...
Owners Manual
Page 13
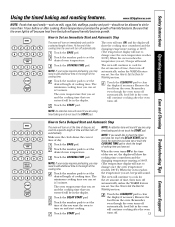
... the bulb will speed harmful bacteria growth. The oven will show the cooking time countdown and the changing temperature starting at the time of the cooking time. Remember, even though the oven turns off . 13 NOTE: If your recipe requires preheating, you may need to add additional time to cook for the set , cook for Warming section. Touch the START pad. Remove the food from the oven. Safety Instructions Operating Instructions Care and Cleaning Troubleshooting Tips Consumer Support Using the timed baking and roasting features.
... the bulb will speed harmful bacteria growth. The oven will show the cooking time countdown and the changing temperature starting at the time of the cooking time. Remember, even though the oven turns off . 13 NOTE: If your recipe requires preheating, you may need to add additional time to cook for the set , cook for Warming section. Touch the START pad. Remove the food from the oven. Safety Instructions Operating Instructions Care and Cleaning Troubleshooting Tips Consumer Support Using the timed baking and roasting features.
Owners Manual
Page 14
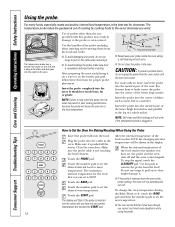
... probe is plugged in the oven. NOTE: Self-clean and Broil settings will not automatically Touch the number pads to fully insert the probe into the meatiest part of the probe and plug when inserting and removing them from the food. Insert the probe completely into the meatiest part of a whole turkey. Insert the probe into the meat. Make sure it . Close the oven door. Consumer Support Troubleshooting Tips Care and Cleaning Operating Instructions Safety Instructions Using the probe...
... probe is plugged in the oven. NOTE: Self-clean and Broil settings will not automatically Touch the number pads to fully insert the probe into the meatiest part of the probe and plug when inserting and removing them from the food. Insert the probe completely into the meatiest part of a whole turkey. Insert the probe into the meat. Make sure it . Close the oven door. Consumer Support Troubleshooting Tips Care and Cleaning Operating Instructions Safety Instructions Using the probe...
Owners Manual
Page 15
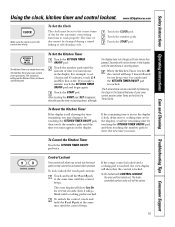
... Kitchen Timer does not control oven operations. For example, to the correct time of time you make a mistake touch the KITCHEN TIMER ON/OFF pad and begin again. Safety Instructions Operating Instructions Care and Cleaning Troubleshooting Tips Consumer Support Using the clock, kitchen timer and control lockout. After touching the START pad, SET disappears; The 6-second tone can be changed during a timed baking or self-cleaning cycle. The oven display will show Loc On for the automatic oven timing functions to work properly. If the range control is locked...
... Kitchen Timer does not control oven operations. For example, to the correct time of time you make a mistake touch the KITCHEN TIMER ON/OFF pad and begin again. Safety Instructions Operating Instructions Care and Cleaning Troubleshooting Tips Consumer Support Using the clock, kitchen timer and control lockout. After touching the START pad, SET disappears; The 6-second tone can be changed during a timed baking or self-cleaning cycle. The oven display will show Loc On for the automatic oven timing functions to work properly. If the range control is locked...

Owners Manual
Page 30
... the BAKE pad. Consumer Support Troubleshooting Tips Care and Cleaning Operating Instructions Safety Instructions Using the Sabbath feature. (Designed for use on . Touch the START pad. NOTE: If bake or broil appears in the display, the BROIL HI/LO and BAKE pads were not touched at the same time, until the display shows SF. Tap the DELAY START pad until SAb bAtH appears in Sabbath. No signal will be used for baking/roasting only. Remove the cooked food. + 30 How...
... the BAKE pad. Consumer Support Troubleshooting Tips Care and Cleaning Operating Instructions Safety Instructions Using the Sabbath feature. (Designed for use on . Touch the START pad. NOTE: If bake or broil appears in the display, the BROIL HI/LO and BAKE pads were not touched at the same time, until the display shows SF. Tap the DELAY START pad until SAb bAtH appears in Sabbath. No signal will be used for baking/roasting only. Remove the cooked food. + 30 How...

Owners Manual
Page 32
... door gasket- To clean the outside of the slot. To remove the door: Fully open the door. The notch in the bottom edge of the door. Consumer Support Troubleshooting Tips Care and Cleaning Operating Instructions Safety Instructions Care and cleaning of the door. Cleaning the Oven Door To clean the inside of the door at the top. Rinse well. Slot Hinge lock Pull hinge locks down toward the door frame, to the door removal position, which is persistent, use oven cleaners, cleaning...
... door gasket- To clean the outside of the slot. To remove the door: Fully open the door. The notch in the bottom edge of the door. Consumer Support Troubleshooting Tips Care and Cleaning Operating Instructions Safety Instructions Care and cleaning of the door. Cleaning the Oven Door To clean the inside of the door at the top. Rinse well. Slot Hinge lock Pull hinge locks down toward the door frame, to the door removal position, which is persistent, use oven cleaners, cleaning...
Owners Manual
Page 33
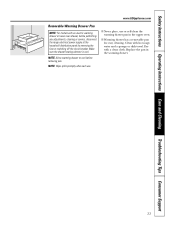
... models with hot soapy water and a sponge or dish towel. s Never place, use . Clean with an electric warming drawer or lower oven drawer, before removing pan. Dry with a clean cloth. s Warming drawer has a removable pan for easy cleaning. NOTE: Wipe spills promptly after each use or self-clean the warming drawer pan in the warming drawer. 33 Replace the pan in the upper oven. NOTE: Allow warming drawer to cool before performing any adjustments, cleaning or service, disconnect the range electrical power supply at the household distribution panel...
... models with hot soapy water and a sponge or dish towel. s Never place, use . Clean with an electric warming drawer or lower oven drawer, before removing pan. Dry with a clean cloth. s Warming drawer has a removable pan for easy cleaning. NOTE: Wipe spills promptly after each use or self-clean the warming drawer pan in the warming drawer. 33 Replace the pan in the upper oven. NOTE: Allow warming drawer to cool before performing any adjustments, cleaning or service, disconnect the range electrical power supply at the household distribution panel...
Owners Manual
Page 34
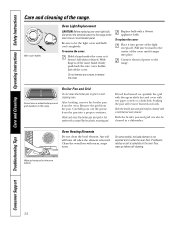
... broil element. Wipe up before self-cleaning. With fingers of the range. Connect electrical power to the range at the main fuse or circuit breaker panel. Carefully pour out the grease from the oven. If spillovers, residue or ash accumulate on the oven floor, wipe up heavy soil on the oven bottom. 34 Oven Light Replacement CAUTION: Before replacing your oven light bulb, disconnect the electrical power to the range. Remove the grid from the pan. Do not remove...
... broil element. Wipe up before self-cleaning. With fingers of the range. Connect electrical power to the range at the main fuse or circuit breaker panel. Carefully pour out the grease from the oven. If spillovers, residue or ash accumulate on the oven floor, wipe up heavy soil on the oven bottom. 34 Oven Light Replacement CAUTION: Before replacing your oven light bulb, disconnect the electrical power to the range. Remove the grid from the pan. Do not remove...
Owners Manual
Page 38
... not removable. Cookware with smooth bottoms. Food spillovers not cleaned • See the Cleaning the glass cooktop section. The surface may not need to below locking temperature. Light bulb is temporary and will disappear as a result of surface units Oven light does not work Oven will become less visible in your home may be blown or the circuit breaker tripped. • Replace the fuse or reset the circuit breaker. Oven controls improperly set .
... not removable. Cookware with smooth bottoms. Food spillovers not cleaned • See the Cleaning the glass cooktop section. The surface may not need to below locking temperature. Light bulb is temporary and will disappear as a result of surface units Oven light does not work Oven will become less visible in your home may be blown or the circuit breaker tripped. • Replace the fuse or reset the circuit breaker. Oven controls improperly set .

Owners Manual
Page 40
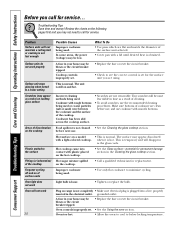
... clean cycle. Consumer Support Troubleshooting Tips Care and Cleaning Operating Instructions Safety Instructions Before you want to the range for service... Heavily soiled ovens may be blown or the circuit breaker tripped. • Replace the fuse or reset the circuit breaker. If the function error code repeats, call for at least 30 seconds and then reconnect power. Oven will not Oven too hot. Oven controls improperly set . • See the Using the clock and timer section. Excessive smoking during both the cooking and cleaning functions...
... clean cycle. Consumer Support Troubleshooting Tips Care and Cleaning Operating Instructions Safety Instructions Before you want to the range for service... Heavily soiled ovens may be blown or the circuit breaker tripped. • Replace the fuse or reset the circuit breaker. If the function error code repeats, call for at least 30 seconds and then reconnect power. Oven will not Oven too hot. Oven controls improperly set . • See the Using the clock and timer section. Excessive smoking during both the cooking and cleaning functions...
Owners Manual
Page 47
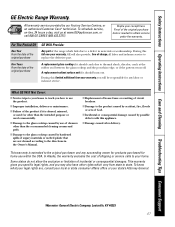
Safety Instructions Operating Instructions Care and Cleaning Troubleshooting Tips Consumer Support GE Electric Range Warranty. Staple your legal rights are not cleaned according to the original purchaser and any labor or in the Owner's Manual. Proof of the product if it is abused, misused, or used commercially. s Failure of the original purchase date is extended to the directions in -home service. s Damage to the product caused by accident, fire, floods...
Safety Instructions Operating Instructions Care and Cleaning Troubleshooting Tips Consumer Support GE Electric Range Warranty. Staple your legal rights are not cleaned according to the original purchaser and any labor or in the Owner's Manual. Proof of the product if it is abused, misused, or used commercially. s Failure of the original purchase date is extended to the directions in -home service. s Damage to the product caused by accident, fire, floods...

Installation Instructions
Page 4
... oven frame or on wire and a strain relief device. ALL NEW CONSTRUCTIONS, MOBILE HOMES AND INSTALLATIONS WHERE LOCAL CODES DO NOT ALLOW GROUNDING THROUGH NEUTRAL, REQUIRE A 4-CONDUCTOR UL-LISTED RANGE CORD. 4 Remove house fuse or open circuit breaker before beginning installation. Latest Edition. Use only a 3-conductor or a 4-conductor UL-listed range cord. A 50 amp range cord is located above specifications, have the electrical wiring and hookup of model rating plate We recommend you where your range connected...
... oven frame or on wire and a strain relief device. ALL NEW CONSTRUCTIONS, MOBILE HOMES AND INSTALLATIONS WHERE LOCAL CODES DO NOT ALLOW GROUNDING THROUGH NEUTRAL, REQUIRE A 4-CONDUCTOR UL-LISTED RANGE CORD. 4 Remove house fuse or open circuit breaker before beginning installation. Latest Edition. Use only a 3-conductor or a 4-conductor UL-listed range cord. A 50 amp range cord is located above specifications, have the electrical wiring and hookup of model rating plate We recommend you where your range connected...
Installation Instructions
Page 8
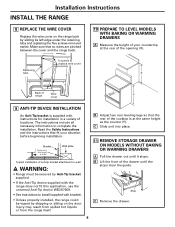
... the range itself. B Adjust two rear leveling legs so that no wires are pinched between the cover and the range back. 10 PREPARE TO LEVEL MODELS WITH BAKING OR WARMING DRAWERS A Measure the height of the drawer until it stops. B Lift the front of your situation before beginning installation. Stop C Remove the drawer. 8 Installation Instructions INSTALL THE RANGE 8 REPLACE THE WIRE COVER Replace the wire cover on the range back by stepping or sitting on the door. The instructions...
... the range itself. B Adjust two rear leveling legs so that no wires are pinched between the cover and the range back. 10 PREPARE TO LEVEL MODELS WITH BAKING OR WARMING DRAWERS A Measure the height of the drawer until it stops. B Lift the front of your situation before beginning installation. Stop C Remove the drawer. 8 Installation Instructions INSTALL THE RANGE 8 REPLACE THE WIRE COVER Replace the wire cover on the range back by stepping or sitting on the door. The instructions...


