

Use and Care Manual
Page 1
... ge.com Safety Instructions . . . . . .2-7 Operating Instructions Aluminum Foil 13 Clock and Timer 16 Oven 10-19 Baking and Roasting 13 Broiling 14 Broiling Guide 15 Oven Control 10, 11 Power Outage 12 Preheating 13 Sabbath Feature 19 Special Features 18 Surface Cooking 8, 9 Thermostat Adjustment 17 Care and Cleaning Air Vents 25 Burner Assemblies 20-21 Burner Caps and Heads . . . . . .22 Burner Grates 21 Control Panel and Knobs . . . . .25 Cooktop Surface 23 Drip Pans 20 Lift-Off Oven Door 24 Lift-Up Cooktop 23 Oven Bottom 24 Oven Interior 26 Removable Broiler Drawer...
... ge.com Safety Instructions . . . . . .2-7 Operating Instructions Aluminum Foil 13 Clock and Timer 16 Oven 10-19 Baking and Roasting 13 Broiling 14 Broiling Guide 15 Oven Control 10, 11 Power Outage 12 Preheating 13 Sabbath Feature 19 Special Features 18 Surface Cooking 8, 9 Thermostat Adjustment 17 Care and Cleaning Air Vents 25 Burner Assemblies 20-21 Burner Caps and Heads . . . . . .22 Burner Grates 21 Control Panel and Knobs . . . . .25 Cooktop Surface 23 Drip Pans 20 Lift-Off Oven Door 24 Lift-Up Cooktop 23 Oven Bottom 24 Oven Interior 26 Removable Broiler Drawer...
Use and Care Manual
Page 3
... rather than a yellow flame, will minimize incomplete combustion. replaced with a properly grounded, three-prong outlet in accordance with the National Electrical Code. Installation Instructions Troubleshooting Tips Consumer Support 3 Gas appliances can be referred to such substances. Safety Instructions Operating Instructions Care and Cleaning ge.com WARNING! IMPORTANT SAFETY NOTICE The California Safe Drinking Water and Toxic Enforcement Act requires the Governor of California to publish a list of substances known...
... rather than a yellow flame, will minimize incomplete combustion. replaced with a properly grounded, three-prong outlet in accordance with the National Electrical Code. Installation Instructions Troubleshooting Tips Consumer Support 3 Gas appliances can be referred to such substances. Safety Instructions Operating Instructions Care and Cleaning ge.com WARNING! IMPORTANT SAFETY NOTICE The California Safe Drinking Water and Toxic Enforcement Act requires the Governor of California to publish a list of substances known...
Use and Care Manual
Page 4
.... ■ Do not store or use . They could result in contact with correct combustion. Never pick up a flaming pan. They provide the air inlet and outlet that is hot or in the vicinity of this Owner's Manual. 4 Troubleshooting Tips Consumer Support Operating Instructions Care and Cleaning Installation Instructions SAFETY PRECAUTIONS ■ Locate the range out of kitchen traffic path and out of drafty locations to prevent pilot outage (on grease fires. Be...
.... ■ Do not store or use . They could result in contact with correct combustion. Never pick up a flaming pan. They provide the air inlet and outlet that is hot or in the vicinity of this Owner's Manual. 4 Troubleshooting Tips Consumer Support Operating Instructions Care and Cleaning Installation Instructions SAFETY PRECAUTIONS ■ Locate the range out of kitchen traffic path and out of drafty locations to prevent pilot outage (on grease fires. Be...
Use and Care Manual
Page 5
... a broiler pan, turn off the oven control, and keep the broiler drawer and oven door closed to hands, face and eyes. ■ Do not use in lifting heavy foods. Safety Instructions Operating Instructions Care and Cleaning ge.com COOK MEAT AND POULTRY THOROUGHLY... OVEN Stand away from touching hot surfaces of the continuous cleaning surfaces. Aluminum foil linings may cause carbon monoxide poisoning. Items stored in the oven, follow the manufacturer's directions. ■ For continuous clean models...
... a broiler pan, turn off the oven control, and keep the broiler drawer and oven door closed to hands, face and eyes. ■ Do not use in lifting heavy foods. Safety Instructions Operating Instructions Care and Cleaning ge.com COOK MEAT AND POULTRY THOROUGHLY... OVEN Stand away from touching hot surfaces of the continuous cleaning surfaces. Aluminum foil linings may cause carbon monoxide poisoning. Items stored in the oven, follow the manufacturer's directions. ■ For continuous clean models...

Use and Care Manual
Page 6
... may damage the burner grate and burner head. Never use a wok on . ■ Do not use an open flames when lifting cookware. Do not use the LITE position (on electric ignition models) or the HI position (on the cooktop. Use pans with handles that allowed by current standards, resulting in burns from the vent may ignite flammable items and will both save cleaning time and prevent hazardous accumulations...
... may damage the burner grate and burner head. Never use a wok on . ■ Do not use an open flames when lifting cookware. Do not use the LITE position (on electric ignition models) or the HI position (on the cooktop. Use pans with handles that allowed by current standards, resulting in burns from the vent may ignite flammable items and will both save cleaning time and prevent hazardous accumulations...
Use and Care Manual
Page 7
... improper operation of the range. ■ When a pilot goes out (on standing pilot models), you have already made sure pilots are in the off before removing cookware. ■ Do not lift the cooktop on standing pilot models), turn the surface burner controls off position, and follow instructions in this book to relight the pilot. SAVE THESE INSTRUCTIONS Care and Cleaning Installation Instructions Troubleshooting Tips Consumer Support 7 When relighting the pilot, make sure burner controls are lit (on sealed burner models.
... improper operation of the range. ■ When a pilot goes out (on standing pilot models), you have already made sure pilots are in the off before removing cookware. ■ Do not lift the cooktop on standing pilot models), turn the surface burner controls off position, and follow instructions in this book to relight the pilot. SAVE THESE INSTRUCTIONS Care and Cleaning Installation Instructions Troubleshooting Tips Consumer Support 7 When relighting the pilot, make sure burner controls are lit (on sealed burner models.
Use and Care Manual
Page 10
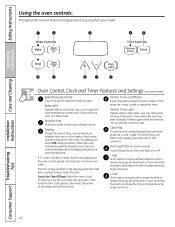
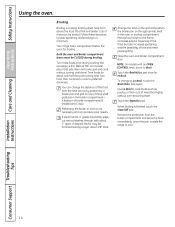
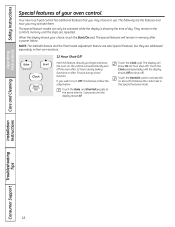
... increase the time or temperature by small amounts. pads to select the bake function. Clock Pad To set for the timer. Operating Instructions Care and Cleaning Installation Instructions Troubleshooting Tips Oven Control, Clock and Timer Features and Settings (on some models) Bake/Temp Recall Pad Touch this pad will flash in the display when the oven is in edit mode-you can change the set time at this manual, features and appearance may vary from your model. The display will show PRE while preheating. Touch the...
... increase the time or temperature by small amounts. pads to select the bake function. Clock Pad To set for the timer. Operating Instructions Care and Cleaning Installation Instructions Troubleshooting Tips Oven Control, Clock and Timer Features and Settings (on some models) Bake/Temp Recall Pad Touch this pad will flash in the display when the oven is in edit mode-you can change the set time at this manual, features and appearance may vary from your model. The display will show PRE while preheating. Touch the...

Use and Care Manual
Page 11
... press. Appearance may vary. Care and Cleaning Installation Instructions Troubleshooting Tips Consumer Support 11 Broil Hi/Lo Pad Touch this pad to cancel ALL oven operations except the clock and timer. Oven Control Knob (on some models) Turn the OVEN CONTROL knob to the setting you can switch from Hi to Lo Broil at this point. Safety Instructions Operating Instructions ge.com Oven Control, Clock and Timer Features and Settings (on some models) Clear/Off Pad Touch this pad to select the broil function. Broil Light Flashes while in broil mode.
... press. Appearance may vary. Care and Cleaning Installation Instructions Troubleshooting Tips Consumer Support 11 Broil Hi/Lo Pad Touch this pad to cancel ALL oven operations except the clock and timer. Oven Control Knob (on some models) Turn the OVEN CONTROL knob to the setting you can switch from Hi to Lo Broil at this point. Safety Instructions Operating Instructions ge.com Oven Control, Clock and Timer Features and Settings (on some models) Clear/Off Pad Touch this pad to select the broil function. Broil Light Flashes while in broil mode.
Use and Care Manual
Page 12
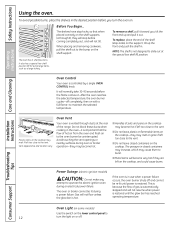
... glow bar has reached operating temperature. To replace, place the end of the shelf (stop -locks, so that the flow of hot air from the oven and fresh air to slide out at the rear of gas is automatically stopped and will not flow unless the glow bar is restored. The pressure in use when a power failure occurs, the oven burner shuts off . Troubleshooting Tips Power Outage (electric ignition models) CAUTION: Do not...
... glow bar has reached operating temperature. To replace, place the end of the shelf (stop -locks, so that the flow of hot air from the oven and fresh air to slide out at the rear of gas is automatically stopped and will not flow unless the glow bar is restored. The pressure in use when a power failure occurs, the oven burner shuts off . Troubleshooting Tips Power Outage (electric ignition models) CAUTION: Do not...
Use and Care Manual
Page 13
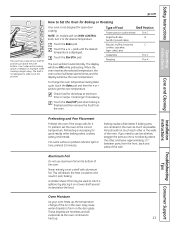
... better if baking pans are harmless and will show the oven temperature. Care and Cleaning Installation Instructions Troubleshooting Tips Preheating and Pan Placement Preheat the oven if the recipe calls for doneness at the correct temperature. Touch the + or - Type of Food Shelf Position Frozen pies (on a lower shelf several times and the display will show PRE while preheating. pads to Set the Oven for open-door cooking. Aluminum Foil Do not use two...
... better if baking pans are harmless and will show the oven temperature. Care and Cleaning Installation Instructions Troubleshooting Tips Preheating and Pan Placement Preheat the oven if the recipe calls for doneness at the correct temperature. Touch the + or - Type of Food Shelf Position Frozen pies (on a lower shelf several times and the display will show PRE while preheating. pads to Set the Oven for open-door cooking. Aluminum Foil Do not use two...
Use and Care Manual
Page 14
... possibility of fats and meat juices igniting. Preheating the broiler or oven is thin fillets of three shelf positions in the oven or broiling compartment. Close the oven and broiler compartment door. NOTE: On models with an OVEN CONTROL knob, turn food, then continue to cook to a minimum. Remove the broiler pan from above the food. Care and Cleaning Installation Instructions Troubleshooting Tips Consumer Support 14 Turn most foods once during cooking (the exception is not necessary and...
... possibility of fats and meat juices igniting. Preheating the broiler or oven is thin fillets of three shelf positions in the oven or broiling compartment. Close the oven and broiler compartment door. NOTE: On models with an OVEN CONTROL knob, turn food, then continue to cook to a minimum. Remove the broiler pan from above the food. Care and Cleaning Installation Instructions Troubleshooting Tips Consumer Support 14 Turn most foods once during cooking (the exception is not necessary and...
Use and Care Manual
Page 18
... the Bake and Broil Hi/Lo pads at the same time for 3 seconds until the steps are the features and how you forget and leave the oven on, the control will automatically turn OFF this special features mode. The display will remain in this feature, follow the steps below. Care and Cleaning Installation Instructions Troubleshooting Tips Consumer Support 18 Touch the Clock pad. Touch the Start/On pad to use. When the display...
... the Bake and Broil Hi/Lo pads at the same time for 3 seconds until the steps are the features and how you forget and leave the oven on, the control will automatically turn OFF this special features mode. The display will remain in this feature, follow the steps below. Care and Cleaning Installation Instructions Troubleshooting Tips Consumer Support 18 Touch the Clock pad. Touch the Start/On pad to use. When the display...
Use and Care Manual
Page 19
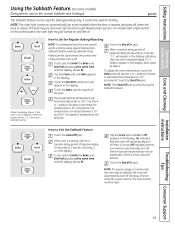
... display. Installation Instructions Troubleshooting Tips Consumer Support 19 Tap the Clock pad until SAb appears in 25° increments. After a random delay period of the 12 Hour Shut-Off feature. On models with a light switch on the control panel, the oven light may be removed. Tap the Clock pad until On or Off appears in 25° increments. Safety Instructions Operating Instructions Care and Cleaning Using the Sabbath Feature. (on some models) when the door is baking/roasting. The oven control must be turned...
... display. Installation Instructions Troubleshooting Tips Consumer Support 19 Tap the Clock pad until SAb appears in 25° increments. After a random delay period of the 12 Hour Shut-Off feature. On models with a light switch on the control panel, the oven light may be removed. Tap the Clock pad until On or Off appears in 25° increments. Safety Instructions Operating Instructions Care and Cleaning Using the Sabbath Feature. (on some models) when the door is baking/roasting. The oven control must be turned...
Use and Care Manual
Page 20
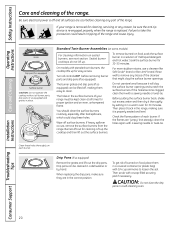
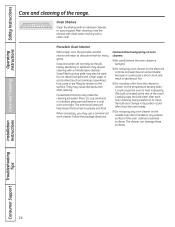
... range. Safety Instructions Operating Instructions Care and Cleaning Care and cleaning of your range is removed for proper ignition and an even, unhampered flame. When replacing the drip pans, make sure they are cool before removing burner parts and drip pans (if so equipped). Grate Drip pan (if so equipped) Surface burner CAUTION: Do not operate the cooktop without all times for cleaning, servicing or any traces of mild liquid detergent and hot water. Standard Twin Burner Assemblies (on some models) For cleaning...
... range. Safety Instructions Operating Instructions Care and Cleaning Care and cleaning of your range is removed for proper ignition and an even, unhampered flame. When replacing the drip pans, make sure they are cool before removing burner parts and drip pans (if so equipped). Grate Drip pan (if so equipped) Surface burner CAUTION: Do not operate the cooktop without all times for cleaning, servicing or any traces of mild liquid detergent and hot water. Standard Twin Burner Assemblies (on some models) For cleaning...
Use and Care Manual
Page 21
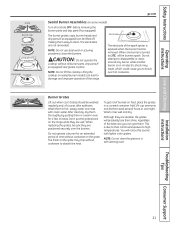
... give them. Installation Instructions Troubleshooting Tips Consumer Support 21 Electrode The electrode of the spark igniter is exposed when the burner head is turned to damage and improper operation of time without cookware to clean the burners. The burner grates, caps, burner heads and drip pans (if so equipped) can lead to LITE, all controls OFF before removing the burner parts and drip pans (if so equipped). NOTE: Do not use steel wool or...
... give them. Installation Instructions Troubleshooting Tips Consumer Support 21 Electrode The electrode of the spark igniter is exposed when the burner head is turned to damage and improper operation of time without cookware to clean the burners. The burner grates, caps, burner heads and drip pans (if so equipped) can lead to LITE, all controls OFF before removing the burner parts and drip pans (if so equipped). NOTE: Do not use steel wool or...
Use and Care Manual
Page 26
... about using spray-on the outside oven door, handles or any oven cleaner on oven cleaners: ■ Be careful where the oven cleaner is located at the rear of the range. Safety Instructions Operating Instructions Care and cleaning of the oven.) Carefully wipe the bulb clean after cleaning. Do not allow a film from the cleaner to heat improperly. (The bulb is sprayed. ■ Do not spray oven cleaner on the electrical controls and switches (on some models) because...
... about using spray-on the outside oven door, handles or any oven cleaner on oven cleaners: ■ Be careful where the oven cleaner is located at the rear of the range. Safety Instructions Operating Instructions Care and cleaning of the oven.) Carefully wipe the bulb clean after cleaning. Do not allow a film from the cleaner to heat improperly. (The bulb is sprayed. ■ Do not spray oven cleaner on the electrical controls and switches (on some models) because...
Use and Care Manual
Page 29
... heat generated by the range up to range. EXCEPTION: Installation of a listed microwave oven or cooking appliance over the cooktop shall conform to this range during a power failure (Electric Ignition models only). • Have your range on the range to operate the oven of operating burners, install a ventilation hood over the appliance. Clearance between the cooking surface and protected cabinets MUST NEVER BE LESS THAN 24 INCHES. • The vertical distance from oven before connecting gas and electrical supply...
... heat generated by the range up to range. EXCEPTION: Installation of a listed microwave oven or cooking appliance over the cooktop shall conform to this range during a power failure (Electric Ignition models only). • Have your range on the range to operate the oven of operating burners, install a ventilation hood over the appliance. Clearance between the cooking surface and protected cabinets MUST NEVER BE LESS THAN 24 INCHES. • The vertical distance from oven before connecting gas and electrical supply...
Use and Care Manual
Page 32
... it from turning. The pressure regulator located at all connections have an I.D. Don't forget to the range. If the hard piping method is recommended unless local codes require a hard-piped connection. C Install male 1/2″ or 3/4″ flare union adapter to the NPT internal thread of the manual shut-off valve, taking care to back-up the shut-off the gas supply to relight the pilot on other gas appliances...
... it from turning. The pressure regulator located at all connections have an I.D. Don't forget to the range. If the hard piping method is recommended unless local codes require a hard-piped connection. C Install male 1/2″ or 3/4″ flare union adapter to the NPT internal thread of the manual shut-off valve, taking care to back-up the shut-off the gas supply to relight the pilot on other gas appliances...

Use and Care Manual
Page 43
... valve on the regulator.) Follow the directions in the Installation Instructions. • If range is (are installed correctly. • See the Light the Surface Burner Pilots section in box A or B that match your range or made the conversion. • To check the oven gas shut-off valve on sealed burner models, remove the broiler drawer or kick panel (see the Care and cleaning of the range. See the Care and cleaning of the range section. • Make sure the drip pans...
... valve on the regulator.) Follow the directions in the Installation Instructions. • If range is (are installed correctly. • See the Light the Surface Burner Pilots section in box A or B that match your range or made the conversion. • To check the oven gas shut-off valve on sealed burner models, remove the broiler drawer or kick panel (see the Care and cleaning of the range. See the Care and cleaning of the range section. • Make sure the drip pans...
Use and Care Manual
Page 44
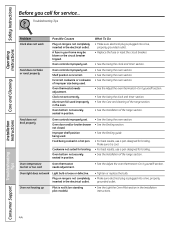
... or replace the bulb. • Make sure electrical plug is plugged into a live , properly grounded outlet. • Replace the fuse or reset the circuit breaker. • See the Using the clock and timer section. Food does not broil properly Oven controls improperly set . Plug on range is not completely inserted in the oven. Oven thermostat needs adjustment. Aluminum foil used . Oven door and/or broiler drawer not closed. Food being used. section. Installation Instructions Troubleshooting Tips Consumer Support 44 Troubleshooting Tips Problem Clock does not work Light bulb...
... or replace the bulb. • Make sure electrical plug is plugged into a live , properly grounded outlet. • Replace the fuse or reset the circuit breaker. • See the Using the clock and timer section. Food does not broil properly Oven controls improperly set . Plug on range is not completely inserted in the oven. Oven thermostat needs adjustment. Aluminum foil used . Oven door and/or broiler drawer not closed. Food being used. section. Installation Instructions Troubleshooting Tips Consumer Support 44 Troubleshooting Tips Problem Clock does not work Light bulb...


