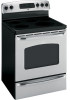

Use and Care Manual
Page 1
... Consumer Support Consumer Support Back Cover Warranty 39 For a Spanish version of this manual, visit our Website at : www.GEAppliances.ca Write the model and serial numbers here: Model Serial You can find them on a label behind the drawer or behind the lower oven door on Recycled Paper 49-80591-1 05-09...
... Consumer Support Consumer Support Back Cover Warranty 39 For a Spanish version of this manual, visit our Website at : www.GEAppliances.ca Write the model and serial numbers here: Model Serial You can find them on a label behind the drawer or behind the lower oven door on Recycled Paper 49-80591-1 05-09...

Use and Care Manual
Page 2
... it should stop the range within 4 inches. WARNING Read all safety instructions before attempting to such substances. Safety Instructions Operating Instructions IMPORTANT SAFETY INFORMATION. On models without a storage drawer or kick panel, carefully tip the range forward. For Drop-In Ranges: To check if the bracket is installed and engaged properly...
... it should stop the range within 4 inches. WARNING Read all safety instructions before attempting to such substances. Safety Instructions Operating Instructions IMPORTANT SAFETY INFORMATION. On models without a storage drawer or kick panel, carefully tip the range forward. For Drop-In Ranges: To check if the bracket is installed and engaged properly...

Use and Care Manual
Page 5
... burns from grease buildup. Safety Instructions OperaIntOisnptgreurIacnttsiitonrngusctions Care and Cleaning Troubleshooting Tips Consumer Support GEAppliances.com WARNING RADIANT COOKTOP SAFETY INSTRUCTIONS (Some models) ■ Use care when touching the cooktop. The glass surface of the door and oven walls. ■ Do not leave.... See the Cleaning the glass cooktop section for all surface units are in an oven. WARNING COIL COOKTOP SAFETY INSTRUCTIONS (Some models) ■ Do not immerse or soak the removable surface units. Do not selfclean the surface units in place. Hot air...
... burns from grease buildup. Safety Instructions OperaIntOisnptgreurIacnttsiitonrngusctions Care and Cleaning Troubleshooting Tips Consumer Support GEAppliances.com WARNING RADIANT COOKTOP SAFETY INSTRUCTIONS (Some models) ■ Use care when touching the cooktop. The glass surface of the door and oven walls. ■ Do not leave.... See the Cleaning the glass cooktop section for all surface units are in an oven. WARNING COIL COOKTOP SAFETY INSTRUCTIONS (Some models) ■ Do not immerse or soak the removable surface units. Do not selfclean the surface units in place. Hot air...

Use and Care Manual
Page 6
... drawer a crack and let hot air or steam escape before removing or replacing food. WARNING WARMING DRAWER/LOWER OVEN DRAWER SAFETY INSTRUCTIONS (Some models) ■ The purpose of any part of the drawer and potentially cause a fire hazard. No commercial oven cleaner or oven liner protective coating.... Hot air or steam that escapes can cause burns to clean other utensils from the oven. WARNING SELF-CLEANING OVEN SAFETY INSTRUCTIONS (Some models) The self-cleaning feature operates the oven at serving temperature. Do not use self-clean to hands, face and/or eyes. ■...
... drawer a crack and let hot air or steam escape before removing or replacing food. WARNING WARMING DRAWER/LOWER OVEN DRAWER SAFETY INSTRUCTIONS (Some models) ■ The purpose of any part of the drawer and potentially cause a fire hazard. No commercial oven cleaner or oven liner protective coating.... Hot air or steam that escapes can cause burns to clean other utensils from the oven. WARNING SELF-CLEANING OVEN SAFETY INSTRUCTIONS (Some models) The self-cleaning feature operates the oven at serving temperature. Do not use self-clean to hands, face and/or eyes. ■...

Use and Care Manual
Page 7
... A surface unit ON indicator light will remain on until the surface is cooled to approximately 150°F. The WM (warm) setting (on some models) on the right REAR surface unit keeps already heated food warm until the unit is cooled to approximately 150°F. Turn off . ■ ...glow until ready to serve. BURNER SIZE 9" 6" 12" OFF On some models. 7 At both OFF and HI the control clicks into position. You may vary from your desired setting. Dual and Triple Surface Units and Control Knobs...
... A surface unit ON indicator light will remain on until the surface is cooled to approximately 150°F. The WM (warm) setting (on some models) on the right REAR surface unit keeps already heated food warm until the unit is cooled to approximately 150°F. Turn off . ■ ...glow until ready to serve. BURNER SIZE 9" 6" 12" OFF On some models. 7 At both OFF and HI the control clicks into position. You may vary from your desired setting. Dual and Triple Surface Units and Control Knobs...

Use and Care Manual
Page 8
... or breads, the cover should be covered with hot food. Always use pot holders or oven mitts when removing food from your model. Throughout this manual, features and appearance may grow in foodborne illness. The temperature limiter protects the glass cooktop from getting too hot... reference only. Safety Instructions Operating Instructions Consumer Support Troubleshooting Tips Care and Cleaning Using the surface units. Temperature Limiter on the unit. Models with hot food. Failure to heat cold food. ■ Do not use the bridge burner, turn the control knob to the BRIDGE...
... or breads, the cover should be covered with hot food. Always use pot holders or oven mitts when removing food from your model. Throughout this manual, features and appearance may grow in foodborne illness. The temperature limiter protects the glass cooktop from getting too hot... reference only. Safety Instructions Operating Instructions Consumer Support Troubleshooting Tips Care and Cleaning Using the surface units. Temperature Limiter on the unit. Models with hot food. Failure to heat cold food. ■ Do not use the bridge burner, turn the control knob to the BRIDGE...

Use and Care Manual
Page 9
..., the glass cooktop retains enough heat to place hot cookware on the bottom. To prevent burns from manufacturers such as a cutting board. For Models With a Radiant Glass Cooktop The radiant cooktop features heating units beneath a smooth glass surface. It is cooked. To avoid overcooking, remove pans ...cooktops, it has cooled completely. Use of window cleaner may extend the time required to bring the water to a boil. NOTE: On models with rippled bottoms may leave an iridescent film on glass cooktops. This is normal for the first time. It is safe to continue cooking...
..., the glass cooktop retains enough heat to place hot cookware on the bottom. To prevent burns from manufacturers such as a cutting board. For Models With a Radiant Glass Cooktop The radiant cooktop features heating units beneath a smooth glass surface. It is cooked. To avoid overcooking, remove pans ...cooktops, it has cooled completely. Use of window cleaner may extend the time required to bring the water to a boil. NOTE: On models with rippled bottoms may leave an iridescent film on glass cooktops. This is normal for the first time. It is safe to continue cooking...

Use and Care Manual
Page 10
... good performance on the glass cooktop. Will scratch the surface. May scratch the surface. Cast Iron: not recommended-unless designed specifically for radiant glass cooktop models. Do not place lids on the ceramic cooktop. Aluminum residues sometimes appear as scratches. The residues can bond to glass cooktops. Glass-ceramic: not recommended...
... good performance on the glass cooktop. Will scratch the surface. May scratch the surface. Cast Iron: not recommended-unless designed specifically for radiant glass cooktop models. Do not place lids on the ceramic cooktop. Aluminum residues sometimes appear as scratches. The residues can bond to glass cooktops. Glass-ceramic: not recommended...

Use and Care Manual
Page 11
... oven temperature. pads to set time at this pad to turn off after a power outage. Bake Light Flashes while in edit mode-you want your model. The display will decrease the time or temperature by larger amounts. 11 Touch and hold the pad to start and stop automatically at the same...
... oven temperature. pads to set time at this pad to turn off after a power outage. Bake Light Flashes while in edit mode-you want your model. The display will decrease the time or temperature by larger amounts. 11 Touch and hold the pad to start and stop automatically at the same...

Use and Care Manual
Page 12
... you will need to select baking with Bake-the Start Time pad will be burned if you place your model. CAUTION When you are using two pot holders, pull the rack out by model. 12 The racks have experienced a power failure. Self Clean Light Flashes while in . Broil Hi/Lo Broil Hi...
... you will need to select baking with Bake-the Start Time pad will be burned if you place your model. CAUTION When you are using two pot holders, pull the rack out by model. 12 The racks have experienced a power failure. Self Clean Light Flashes while in . Broil Hi/Lo Broil Hi...

Use and Care Manual
Page 14
... broil element) meat, slash fat at 1″ intervals. *Use rack position A for the smaller 2-rack position oven. Door Positioning During Broiling: For models JSS28 and JDS28: For all other models: How to Set the Oven for 2 minutes to 208 volts, rare steaks may survive." (Source: Safe Food Book. The size, weight, thickness...
... broil element) meat, slash fat at 1″ intervals. *Use rack position A for the smaller 2-rack position oven. Door Positioning During Broiling: For models JSS28 and JDS28: For all other models: How to Set the Oven for 2 minutes to 208 volts, rare steaks may survive." (Source: Safe Food Book. The size, weight, thickness...

Use and Care Manual
Page 15
... with cookies, biscuits, brownies, cupcakes, cream puffs, sweet rolls, angel food cake and bread. Convection Baking Ideal for evenly browned baked foods cooked on some models) GEAppliances.com In a convection oven, a fan circulates hot air over and around food in your cookware leaves room for doneness at temperatures higher than shiny...
... with cookies, biscuits, brownies, cupcakes, cream puffs, sweet rolls, angel food cake and bread. Convection Baking Ideal for evenly browned baked foods cooked on some models) GEAppliances.com In a convection oven, a fan circulates hot air over and around food in your cookware leaves room for doneness at temperatures higher than shiny...

Use and Care Manual
Page 16
... food. ■ Repeated opening of the drawer allows the hot air to escape and the food to use a higher warming drawer setting and cover some models) WARNING FOOD POISON HAZARD: Bacteria may grow in warming drawer. Safety Instructions Using the warming drawer. (on some of the cooked food items. ■ Do...
... food. ■ Repeated opening of the drawer allows the hot air to escape and the food to use a higher warming drawer setting and cover some models) WARNING FOOD POISON HAZARD: Bacteria may grow in warming drawer. Safety Instructions Using the warming drawer. (on some of the cooked food items. ■ Do...

Use and Care Manual
Page 17
... ending temperature of the lower oven drawer. Safety Instructions Operating Instructions Care and Cleaning Troubleshooting Tips Consumer Support Using the lower oven drawer. (on some models) GEAppliances.com The lower oven drawer may be used during a self-clean cycle of the upper oven. ■ Do not put liquid or water in...
... ending temperature of the lower oven drawer. Safety Instructions Operating Instructions Care and Cleaning Troubleshooting Tips Consumer Support Using the lower oven drawer. (on some models) GEAppliances.com The lower oven drawer may be used during a self-clean cycle of the upper oven. ■ Do not put liquid or water in...

Use and Care Manual
Page 18
... Timer On/Off pad and then touching the + or - Times more than 59 minutes should be changed to the correct time of day. Not all models. Touch the + or - If this happens, touch the Clock pad twice and reenter the time of time you make a mistake, touch the Kitchen Timer On...
... Timer On/Off pad and then touching the + or - Times more than 59 minutes should be changed to the correct time of day. Not all models. Touch the + or - If this happens, touch the Clock pad twice and reenter the time of time you make a mistake, touch the Kitchen Timer On...

Use and Care Manual
Page 19
... pad. At the end of the cooking time, the oven will turn off automatically. Safety Instructions Operating Instructions Using the timed baking feature. (on some models) GEAppliances.com Do not lock the oven door with PrE if showing the oven temperature.) The oven will continue to cook for the programmed amount...
... pad. At the end of the cooking time, the oven will turn off automatically. Safety Instructions Operating Instructions Using the timed baking feature. (on some models) GEAppliances.com Do not lock the oven door with PrE if showing the oven temperature.) The oven will continue to cook for the programmed amount...

Use and Care Manual
Page 21
... 30 seconds to set in the display. Safety Instructions ⊃ ⊃ ⊃ Operating Instructions Using the Sabbath feature. (on some models) (Designed for use on some models) when the door is opened and goes off when the door is closed. It cannot be set to ⊃ indicating that the oven... has turned OFF but is in the display indicating that the oven will appear in the display. On models with a light switch on the control panel, the oven light may be turned on and left on. Start On When the display shows ⊃...
... 30 seconds to set in the display. Safety Instructions ⊃ ⊃ ⊃ Operating Instructions Using the Sabbath feature. (on some models) (Designed for use on some models) when the door is opened and goes off when the door is closed. It cannot be set to ⊃ indicating that the oven... has turned OFF but is in the display indicating that the oven will appear in the display. On models with a light switch on the control panel, the oven light may be turned on and left on. Start On When the display shows ⊃...

Use and Care Manual
Page 22
... is displayed. NOTE: Never force the latch handle. IMPORTANT: The health of day. The Clean Time is extremely sensitive to display the time of some models) WARNING FIRE HAZARD: Wipe grease and heavy soil from the oven. Slide the latch handle to remain intact. NOTE: ■ If your oven is essential...
... is displayed. NOTE: Never force the latch handle. IMPORTANT: The health of day. The Clean Time is extremely sensitive to display the time of some models) WARNING FIRE HAZARD: Wipe grease and heavy soil from the oven. Slide the latch handle to remain intact. NOTE: ■ If your oven is essential...
Use and Care Manual
Page 23
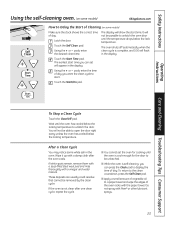
...thoroughly with the paper towel. These deposits are usually a salt residue that cannot be able to Delay the Start of Cleaning (on some models) Make sure the clock shows the correct time of the oven racks with a vinegar and water mixture. Wait until the temperature drops ...Touch the Clear/Off pad. Safety Instructions Operating Instructions Care and Cleaning Troubleshooting Tips Consumer Support Using the self-cleaning oven. (on some models) GEAppliances.com Self Clean Start Time How to open the door right away unless the oven has cooled below the locking temperature. The ...
...thoroughly with the paper towel. These deposits are usually a salt residue that cannot be able to Delay the Start of Cleaning (on some models) Make sure the clock shows the correct time of the oven racks with a vinegar and water mixture. Wait until the temperature drops ...Touch the Clear/Off pad. Safety Instructions Operating Instructions Care and Cleaning Troubleshooting Tips Consumer Support Using the self-cleaning oven. (on some models) GEAppliances.com Self Clean Start Time How to open the door right away unless the oven has cooled below the locking temperature. The ...

Use and Care Manual
Page 24
... is initiated without water, press the Clear/Off pad to cause burns. Wait for additional options. 24 The Steam Clean cycle performs best on some models) CAUTION During the steam clean cycle, the oven bottom becomes hot enough to end the cycle. Pour 8 ounces of abrasive pads will sound upon opening...
... is initiated without water, press the Clear/Off pad to cause burns. Wait for additional options. 24 The Steam Clean cycle performs best on some models) CAUTION During the steam clean cycle, the oven bottom becomes hot enough to end the cycle. Pour 8 ounces of abrasive pads will sound upon opening...


