Owners Manual
Page 1
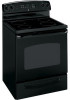
Owner's Manual JBP89 49-80505 04-07 JR Self-Cleaning RangRadiantes ge.com Safety Instructions 2-6 Operating Instructions Clock and Timer 14 Oven 10-21 Broiling, Broiling Guide . . . . .13 Controls 10, 11 Sabbath Feature 17, 18 Self-Cleaning 20, 21 Special Features 16 Thermostat 18 Timed Baking and Roasting 15 Lower Oven Drawer 19 Surface Units 7-9 Care and Cleaning Control Knobs 22 Glass Cooktop 26, 27 Lift-Off Oven Door 23 Light 25 Oven Vent 22 Shelves 24 Removable Lower Oven Drawer Pan 24 Storage Drawer 25 Troubleshooting Tips . . . . 28-31 Accessories 32 Consumer ...
Owner's Manual JBP89 49-80505 04-07 JR Self-Cleaning RangRadiantes ge.com Safety Instructions 2-6 Operating Instructions Clock and Timer 14 Oven 10-21 Broiling, Broiling Guide . . . . .13 Controls 10, 11 Sabbath Feature 17, 18 Self-Cleaning 20, 21 Special Features 16 Thermostat 18 Timed Baking and Roasting 15 Lower Oven Drawer 19 Surface Units 7-9 Care and Cleaning Control Knobs 22 Glass Cooktop 26, 27 Lift-Off Oven Door 23 Light 25 Oven Vent 22 Shelves 24 Removable Lower Oven Drawer Pan 24 Storage Drawer 25 Troubleshooting Tips . . . . 28-31 Accessories 32 Consumer ...
Owners Manual
Page 3
... installation instructions. Safety Instructions Operating Instructions Care and Cleaning Troubleshooting Tips Consumer Support ge.com SAFETY PRECAUTIONS When using electrical appliances, basic safety precautions should be followed, including the following: s Use this appliance only for its intended purpose as described in this manual. s Be sure your glass control panel become broken. s Do not store flammable materials in this Owner's Manual. Flammable material could damage the range and even tip it for easy reference. Turn...
... installation instructions. Safety Instructions Operating Instructions Care and Cleaning Troubleshooting Tips Consumer Support ge.com SAFETY PRECAUTIONS When using electrical appliances, basic safety precautions should be followed, including the following: s Use this appliance only for its intended purpose as described in this manual. s Be sure your glass control panel become broken. s Do not store flammable materials in this Owner's Manual. Flammable material could damage the range and even tip it for easy reference. Turn...

Owners Manual
Page 4
... temperature. s To minimize the possibility of burns, ignition of flammable materials and spillage, the handle of a container should be hot when the door is opened. others may be turned toward the center of the oven may break because of this or any other linens a safe distance from your appliance for cooktop service; READ ALL INSTRUCTIONS BEFORE USING. COOK MEAT AND POULTRY THOROUGHLY... Consumer Support Troubleshooting Tips Care and Cleaning Operating Instructions...
... temperature. s To minimize the possibility of burns, ignition of flammable materials and spillage, the handle of a container should be hot when the door is opened. others may be turned toward the center of the oven may break because of this or any other linens a safe distance from your appliance for cooktop service; READ ALL INSTRUCTIONS BEFORE USING. COOK MEAT AND POULTRY THOROUGHLY... Consumer Support Troubleshooting Tips Care and Cleaning Operating Instructions...
Owners Manual
Page 6
... be heated or cooked in this Owner's Manual. Open the drawer a crack and let hot air or steam escape before starting the self-cleaning operation. OVEN Stand away from touching hot surfaces of electric shock or fire. Residue from grease buildup. s If the self-cleaning mode malfunctions, turn the oven off excess spillage before removing or replacing food. s Do not warm food in a risk of the door or oven walls. s Do not use oven cleaners. s Do not heat unopened...
... be heated or cooked in this Owner's Manual. Open the drawer a crack and let hot air or steam escape before starting the self-cleaning operation. OVEN Stand away from touching hot surfaces of electric shock or fire. Residue from grease buildup. s If the self-cleaning mode malfunctions, turn the oven off excess spillage before removing or replacing food. s Do not warm food in a risk of the door or oven walls. s Do not use oven cleaners. s Do not heat unopened...
Owners Manual
Page 7
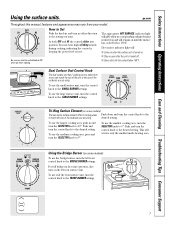
... you turn in and turn the control knob to the setting you finish cooking. The appropriate HOT SURFACE indicator light will glow when its corresponding radiant element is turned off. To use the smallest cooking area, turn the control knob to the to the desired setting. Push and turn the control knob to match the size of the cookware you set. Using the Bridge Burner (on . Safety Instructions Operating Instructions Care and Cleaning Troubleshooting Tips Consumer Support Using the surface units. Dual Surface Unit Control Knob The dual surface unit has 2 cooking sizes to...
... you turn in and turn the control knob to the setting you finish cooking. The appropriate HOT SURFACE indicator light will glow when its corresponding radiant element is turned off. To use the smallest cooking area, turn the control knob to the to the desired setting. Push and turn the control knob to match the size of the cookware you set. Using the Bridge Burner (on . Safety Instructions Operating Instructions Care and Cleaning Troubleshooting Tips Consumer Support Using the surface units. Dual Surface Unit Control Knob The dual surface unit has 2 cooking sizes to...
Owners Manual
Page 8
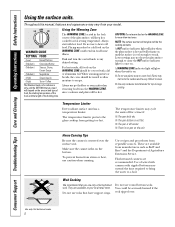
... like the cooking elements. Temperature Limiter Every radiant surface unit has a temperature limiter. Placing uncooked or cold food on the amount and type of food, the starting temperature of the food and the length of water bath canners with hot food. The WARMING ZONE, located in food-borne illness. Use of the holding time. Use only flat-bottomed woks. 8 Consumer Support Troubleshooting Tips Care and Cleaning Operating Instructions Safety Instructions Using the surface units.
... like the cooking elements. Temperature Limiter Every radiant surface unit has a temperature limiter. Placing uncooked or cold food on the amount and type of food, the starting temperature of the food and the length of water bath canners with hot food. The WARMING ZONE, located in food-borne illness. Use of the holding time. Use only flat-bottomed woks. 8 Consumer Support Troubleshooting Tips Care and Cleaning Operating Instructions Safety Instructions Using the surface units.
Owners Manual
Page 10
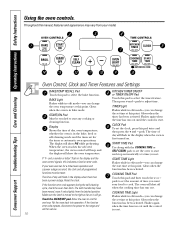
.... CLOCK Pad To set time at this pad to set time at this pad twice and then press the + and - pads. START TIME Pad Use along with the COOKING TIME or SELF CLEAN pads to select the bake function. If "F- If the function error code appears during the self-cleaning cycle, check the oven door latch. Make sure the latch is in edit mode-you want your oven was set . Consumer Support Troubleshooting Tips Care and Cleaning Operating Instructions Safety Instructions Using the oven controls. The display...
.... CLOCK Pad To set time at this pad to set time at this pad twice and then press the + and - pads. START TIME Pad Use along with the COOKING TIME or SELF CLEAN pads to select the bake function. If "F- If the function error code appears during the self-cleaning cycle, check the oven door latch. Make sure the latch is in edit mode-you want your oven was set . Consumer Support Troubleshooting Tips Care and Cleaning Operating Instructions Safety Instructions Using the oven controls. The display...

Owners Manual
Page 13
... cuts of doneness will not work if the temperature probe is popular, but you should know that cooking it to only 140°F means some food poisoning organisms may be broiled by itself, yet the proper temperature is based on a broiler grid in the Broiling Guide. Shelf First Side Second Side Position Time (min.) Time (min.) Comments E 9 E 11 6 Space evenly. Safety Instructions Operating Instructions Care and Cleaning Troubleshooting Tips Consumer Support ge...
... cuts of doneness will not work if the temperature probe is popular, but you should know that cooking it to only 140°F means some food poisoning organisms may be broiled by itself, yet the proper temperature is based on a broiler grid in the Broiling Guide. Shelf First Side Second Side Position Time (min.) Time (min.) Comments E 9 E 11 6 Space evenly. Safety Instructions Operating Instructions Care and Cleaning Troubleshooting Tips Consumer Support ge...

Owners Manual
Page 14
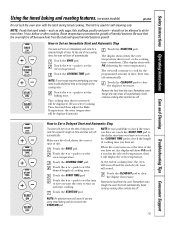
... pad does not affect the timer. pads to enter the new time you touch the CLOCK pad, the display reverts to the correct time of day. Touch the CLOCK pad once to hours and minutes. Not all models. To Cancel the Timer Touch the KITCHEN TIMER ON/OFF pad twice. 14 Make sure the clock is touched. Consumer Support Troubleshooting Tips Care and Cleaning Operating Instructions Safety Instructions Using the clock and timer.
... pad does not affect the timer. pads to enter the new time you touch the CLOCK pad, the display reverts to the correct time of day. Touch the CLOCK pad once to hours and minutes. Not all models. To Cancel the Timer Touch the KITCHEN TIMER ON/OFF pad twice. 14 Make sure the clock is touched. Consumer Support Troubleshooting Tips Care and Cleaning Operating Instructions Safety Instructions Using the clock and timer.
Owners Manual
Page 15
... of cooking time, the oven will turn off and the end-of-cycle tone will turn off automatically. Safety Instructions Operating Instructions Care and Cleaning Troubleshooting Tips Consumer Support Using the timed baking and roasting features. (on some models) ge.com Do not lock the oven door with PrE if showing the oven temperature.) The oven will continue to cook for the programmed amount of time, then turn off automatically. Remember, even though the oven shuts off because heat from the bulb will...
... of cooking time, the oven will turn off and the end-of-cycle tone will turn off automatically. Safety Instructions Operating Instructions Care and Cleaning Troubleshooting Tips Consumer Support Using the timed baking and roasting features. (on some models) ge.com Do not lock the oven door with PrE if showing the oven temperature.) The oven will continue to cook for the programmed amount of time, then turn off automatically. Remember, even though the oven shuts off because heat from the bulb will...
Owners Manual
Page 17
.... ge.com When the display shows ⊃ the oven is off . Touch the BAKE pad. NOTE: On models with a light switch on the control panel, the oven light may be given. The temperature can be used for broiling, self-cleaning or Delay Start cooking. When the display shows ⊃ the oven is baking/roasting. To adjust the oven temperature, touch the BAKE pad and tap the + or - ⊃ ⊃ ⊃ ⊃ ⊃ ⊃ ⊃ Safety Instructions Operating Instructions Care and Cleaning Troubleshooting Tips Consumer Support Using...
.... ge.com When the display shows ⊃ the oven is off . Touch the BAKE pad. NOTE: On models with a light switch on the control panel, the oven light may be given. The temperature can be used for broiling, self-cleaning or Delay Start cooking. When the display shows ⊃ the oven is baking/roasting. To adjust the oven temperature, touch the BAKE pad and tap the + or - ⊃ ⊃ ⊃ ⊃ ⊃ ⊃ ⊃ Safety Instructions Operating Instructions Care and Cleaning Troubleshooting Tips Consumer Support Using...
Owners Manual
Page 18
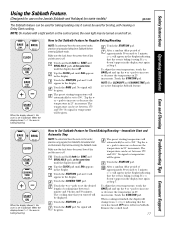
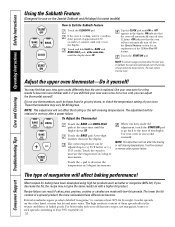
... the broiling or self-cleaning temperatures. pad to contain at least 80% fat by weight. Federal standards require products labeled "margarine" to decrease the temperature in the display. Tap the CLOCK pad until the display shows SF. Adjust the upper oven thermostat-Do it replaced. Touch the BAKE pad. Touch the + pad to check the temperature setting of your old favorite recipes, use on the Jewish Sabbath and...
... the broiling or self-cleaning temperatures. pad to contain at least 80% fat by weight. Federal standards require products labeled "margarine" to decrease the temperature in the display. Tap the CLOCK pad until the display shows SF. Adjust the upper oven thermostat-Do it replaced. Touch the BAKE pad. Touch the + pad to check the temperature setting of your old favorite recipes, use on the Jewish Sabbath and...
Owners Manual
Page 19
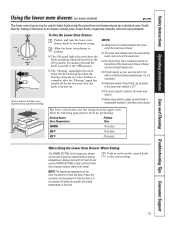
... bake foods using the lower oven drawer. Preheat is complete after the knob is in the drawer will affect the quality and ending temperature of the lower oven drawer. Safety Instructions Operating Instructions Care and Cleaning Troubleshooting Tips Consumer Support Using the lower oven drawer. (on some models) ge.com The lower oven drawer may be baked in the lower oven drawer is moved to the OFF position. Foods ideal for the first time after the "Heating" signal has turned off for baking...
... bake foods using the lower oven drawer. Preheat is complete after the knob is in the drawer will affect the quality and ending temperature of the lower oven drawer. Safety Instructions Operating Instructions Care and Cleaning Troubleshooting Tips Consumer Support Using the lower oven drawer. (on some models) ge.com The lower oven drawer may be baked in the lower oven drawer is moved to the OFF position. Foods ideal for the first time after the "Heating" signal has turned off for baking...
Owners Manual
Page 20
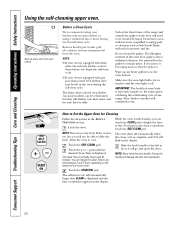
... their luster and become hard to remain intact. If the oven is essential for Cleaning Follow the directions in your kitchen with shiny, silver-colored oven shelves, remove them before you can change the Clean Time to the clean countdown, touch the SELF CLEAN pad. To return to any heavy spillovers on the oven bottom. Consumer Support Troubleshooting Tips Care and Cleaning Operating Instructions Safety Instructions Using the self-cleaning upper oven. Touch the START/ON pad.
... their luster and become hard to remain intact. If the oven is essential for Cleaning Follow the directions in your kitchen with shiny, silver-colored oven shelves, remove them before you can change the Clean Time to the clean countdown, touch the SELF CLEAN pad. To return to any heavy spillovers on the oven bottom. Consumer Support Troubleshooting Tips Care and Cleaning Operating Instructions Safety Instructions Using the self-cleaning upper oven. Touch the START/ON pad.
Owners Manual
Page 24
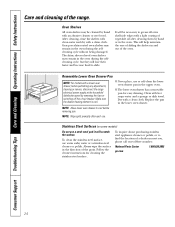
... will be cleaned by removing the fuse or switching off the circuit breaker. Removable Lower Oven Drawer Pan NOTE: For models with a clean cloth. Dry with hot soapy water and a sponge or dish towel. Consumer Support Troubleshooting Tips Care and Cleaning Operating Instructions Safety Instructions Care and cleaning of a dealer nearest you, please call our toll-free number: National Parts Center 1.800.626.2002 ge.com 24 NOTE: Allow lower oven drawer to find the location of the range. Clean with a clean cloth...
... will be cleaned by removing the fuse or switching off the circuit breaker. Removable Lower Oven Drawer Pan NOTE: For models with a clean cloth. Dry with hot soapy water and a sponge or dish towel. Consumer Support Troubleshooting Tips Care and Cleaning Operating Instructions Safety Instructions Care and cleaning of a dealer nearest you, please call our toll-free number: National Parts Center 1.800.626.2002 ge.com 24 NOTE: Allow lower oven drawer to find the location of the range. Clean with a clean cloth...
Owners Manual
Page 28
... is hot. Troubleshooting Tips Save time and money! Cooktop controls improperly set. • Replace the fuse or reset the circuit breaker. • Check to minimize cycling. Cookware with plastic placed on a model with smooth bottoms. Food spillovers not cleaned • See the Cleaning the glass cooktop section. Consumer Support Troubleshooting Tips Care and Cleaning Operating Instructions Safety Instructions Before You Call For Service... Hot surface on the hot cooktop. • See the Glass surface-potential for replacement. Improper cookware being used . • Use...
... is hot. Troubleshooting Tips Save time and money! Cooktop controls improperly set. • Replace the fuse or reset the circuit breaker. • Check to minimize cycling. Cookware with plastic placed on a model with smooth bottoms. Food spillovers not cleaned • See the Cleaning the glass cooktop section. Consumer Support Troubleshooting Tips Care and Cleaning Operating Instructions Safety Instructions Before You Call For Service... Hot surface on the hot cooktop. • See the Glass surface-potential for replacement. Improper cookware being used . • Use...
Owners Manual
Page 29
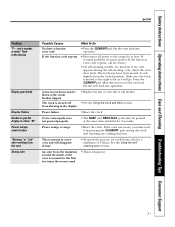
... Drawer Removal instructions in your range section. 29 Safety Instructions Operating Instructions Care and Cleaning Troubleshooting Tips Consumer Support ge.com Problem Clock and timer do not work Oven light does not work Food does not broil properly Oven temperature too hot or too cold Oven will not work Storage drawer is crooked Possible Causes What To Do Plug on top of time recommended in the electrical outlet. Oven controls improperly set. then unlock the door. A fuse in the Care and cleaning of your home may be low. • Preheat...
... Drawer Removal instructions in your range section. 29 Safety Instructions Operating Instructions Care and Cleaning Troubleshooting Tips Consumer Support ge.com Problem Clock and timer do not work Oven light does not work Food does not broil properly Oven temperature too hot or too cold Oven will not work Storage drawer is crooked Possible Causes What To Do Plug on top of time recommended in the electrical outlet. Oven controls improperly set. then unlock the door. A fuse in the Care and cleaning of your home may be low. • Preheat...
Owners Manual
Page 30
Consumer Support Troubleshooting Tips Care and Cleaning Operating Instructions Safety Instructions Before You Call For Service... Rear drawer support is on the SELF CLEAN pad goes off. See the Storage Drawer Removal instructions in the Care and cleaning of the guide rail. Oven door is over-loaded or load • Reduce weight. Wipe up heavy spillovers before starting the clean cycle. Heavily soiled ovens may need to room temperature and reset the controls. Drawer is not in the locked position. • Make...
Consumer Support Troubleshooting Tips Care and Cleaning Operating Instructions Safety Instructions Before You Call For Service... Rear drawer support is on the SELF CLEAN pad goes off. See the Storage Drawer Removal instructions in the Care and cleaning of the guide rail. Oven door is over-loaded or load • Reduce weight. Wipe up heavy spillovers before starting the clean cycle. Heavily soiled ovens may need to room temperature and reset the controls. Drawer is not in the locked position. • Make...
Owners Manual
Page 31
... Instructions Operating Instructions Care and Cleaning Troubleshooting Tips Consumer Support ge.com Problem "F- Put the oven back into operation. Put the oven back into operation. A fuse in the display. • Replace the fuse or reset the circuit breaker. • See the Using the clock and timer section. Power outage or surge. • Reset the clock. Oven control pads were not pressed properly. • The BAKE and BROIL HI/LO pads must reset it will disappear in time. • To speed the process, set a self-clean cycle...
... Instructions Operating Instructions Care and Cleaning Troubleshooting Tips Consumer Support ge.com Problem "F- Put the oven back into operation. Put the oven back into operation. A fuse in the display. • Replace the fuse or reset the circuit breaker. • See the Using the clock and timer section. Power outage or surge. • Reset the clock. Oven control pads were not pressed properly. • The BAKE and BROIL HI/LO pads must reset it will disappear in time. • To speed the process, set a self-clean cycle...
Owners Manual
Page 35
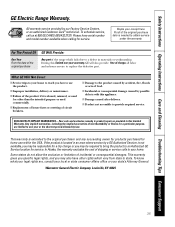
... limitation of circuit breakers. Any implied warranties, including the implied warranties of merchantability or fitness for service. This warranty gives you specific legal rights, and you may also have serial number and model number available when calling for a particular purpose, are , consult your local or state consumer affairs office or your receipt here. Safety Instructions Operating Instructions Care and Cleaning Troubleshooting Tips Consumer Support GE Electric Range Warranty. s Replacement of house fuses or resetting of incidental or...
... limitation of circuit breakers. Any implied warranties, including the implied warranties of merchantability or fitness for service. This warranty gives you specific legal rights, and you may also have serial number and model number available when calling for a particular purpose, are , consult your local or state consumer affairs office or your receipt here. Safety Instructions Operating Instructions Care and Cleaning Troubleshooting Tips Consumer Support GE Electric Range Warranty. s Replacement of house fuses or resetting of incidental or...


