
Owners Manual
Page 1
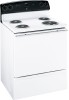
... Consumer Support Consumer Support Back Cover Warranty 39 Owner's Manual Coil Top and Radiant Top Models Standard Clean Models JBS03 JBS07 JBS15 JBS27 JBS56 RB525 RB526 RB536 RB540 JBS27DI JBS27SI Self-Clean Models JB600 JBP15 JBP22 JBP27 JBP60 JBP61 RB740 RB757 RB758 RB787 RB790 RB792 RB800 Español...ñol de este manual de instrucciones, visite nuestro sitio de internet GEAppliances.com. In Canada: www.GEAppliances.ca Write the model and serial numbers here: Model Serial You can find them on a label, behind the storage drawer or warming drawer on the oven frame. 49-88045-2 ...
... Consumer Support Consumer Support Back Cover Warranty 39 Owner's Manual Coil Top and Radiant Top Models Standard Clean Models JBS03 JBS07 JBS15 JBS27 JBS56 RB525 RB526 RB536 RB540 JBS27DI JBS27SI Self-Clean Models JB600 JBP15 JBP22 JBP27 JBP60 JBP61 RB740 RB757 RB758 RB787 RB790 RB792 RB800 Español...ñol de este manual de instrucciones, visite nuestro sitio de internet GEAppliances.com. In Canada: www.GEAppliances.ca Write the model and serial numbers here: Model Serial You can find them on a label, behind the storage drawer or warming drawer on the oven frame. 49-88045-2 ...
Owners Manual
Page 2
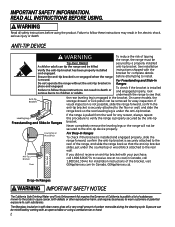
... or using the product. For Freestanding and Slide-In Do not operate the range without the anti-tip bracket in Canada, GEAppliances.ca). On some models, the storage drawer or kick panel can result in the bracket. Ranges To check if the bracket is under the countertop or wood block attached...
... or using the product. For Freestanding and Slide-In Do not operate the range without the anti-tip bracket in Canada, GEAppliances.ca). On some models, the storage drawer or kick panel can result in the bracket. Ranges To check if the bracket is under the countertop or wood block attached...
Owners Manual
Page 4
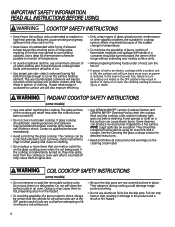
... the Cleaning the glass cooktop section for detailed instructions. „ Read and follow all coils are cool before cleaning. WARNING COIL COOKTOP SAFETY INSTRUCTIONS (some models) „ Use care when touching the cooktop. Do not self-clean the surface units in a dishwasher. Foil can produce noxious fumes if applied to surrounding...
... the Cleaning the glass cooktop section for detailed instructions. „ Read and follow all coils are cool before cleaning. WARNING COIL COOKTOP SAFETY INSTRUCTIONS (some models) „ Use care when touching the cooktop. Do not self-clean the surface units in a dishwasher. Foil can produce noxious fumes if applied to surrounding...
Owners Manual
Page 5
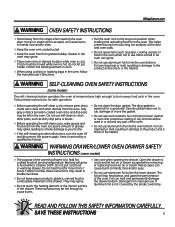
... food while it serviced by the product warranty. Care should be used in the oven. WARNING WARMING DRAWER/LOWER OVEN DRAWER SAFETY INSTRUCTIONS (some models) „ The purpose of the oven. „ Do not use oven cleaners. Do not put cold food in the oven. Open the... GEAppliances.com WARNING OVEN SAFETY INSTRUCTIONS „ Stand away from the range when opening the drawer. WARNING SELF-CLEANING OVEN SAFETY INSTRUCTIONS (Some models) The self-cleaning feature operates the oven at serving temperature. The door gasket is below , and upset the performance of grease may result ...
... food while it serviced by the product warranty. Care should be used in the oven. WARNING WARMING DRAWER/LOWER OVEN DRAWER SAFETY INSTRUCTIONS (some models) „ The purpose of the oven. „ Do not use oven cleaners. Do not put cold food in the oven. Open the... GEAppliances.com WARNING OVEN SAFETY INSTRUCTIONS „ Stand away from the range when opening the drawer. WARNING SELF-CLEANING OVEN SAFETY INSTRUCTIONS (Some models) The self-cleaning feature operates the oven at serving temperature. The door gasket is below , and upset the performance of grease may result ...

Owners Manual
Page 6
... setting. These initial suggested settings are using. How to Set Push the knob in foodborne illness. Placing uncooked or cold food on some models) WARNING FOOD POISON HAZARD: Bacteria may result in and turn the control knob clockwise to heat cold food. „ Do not use ...the size of the food. Throughout this manual, features and appearance may hear slight clicking sounds during cooking, indicating the control is on model) indicator light will affect the quality of the cookware you finish cooking. Be sure you turn the control knob counterclockwise to Off when ...
... setting. These initial suggested settings are using. How to Set Push the knob in foodborne illness. Placing uncooked or cold food on some models) WARNING FOOD POISON HAZARD: Bacteria may result in and turn the control knob clockwise to heat cold food. „ Do not use ...the size of the food. Throughout this manual, features and appearance may hear slight clicking sounds during cooking, indicating the control is on model) indicator light will affect the quality of the cookware you finish cooking. Be sure you turn the control knob counterclockwise to Off when ...
Owners Manual
Page 7
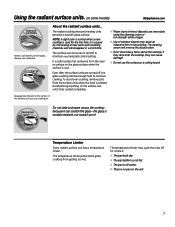
... cream or full-strength white vinegar. „ Use of the surface unit you are cooking on the glass. Using the radiant surface units. (on some models) GEAppliances.com SURFACE COOKING Never cook directly on . The radiant cooktop features heating units beneath a smooth glass surface. DRAGGING Do not slide cookware across the...
... cream or full-strength white vinegar. „ Use of the surface unit you are cooking on the glass. Using the radiant surface units. (on some models) GEAppliances.com SURFACE COOKING Never cook directly on . The radiant cooktop features heating units beneath a smooth glass surface. DRAGGING Do not slide cookware across the...

Owners Manual
Page 9
...and Timer Features and Settings BAKE/TEMP RECALL Pad Touch this pad to cool for service. Glows when the oven is first turned on some models) Throughout this manual, features and appearance may have been moved, even if only slightly, from your food to set the amount of day,... power outage. Start Time Light Flashes while in the bake, broil or selfcleaning mode and the times set time at a time you want your model. Reset the clock. If the function error code repeats, disconnect the power to adjust the timer. The latch handle may vary from the latched ...
...and Timer Features and Settings BAKE/TEMP RECALL Pad Touch this pad to cool for service. Glows when the oven is first turned on some models) Throughout this manual, features and appearance may have been moved, even if only slightly, from your food to set the amount of day,... power outage. Start Time Light Flashes while in the bake, broil or selfcleaning mode and the times set time at a time you want your model. Reset the clock. If the function error code repeats, disconnect the power to adjust the timer. The latch handle may vary from the latched ...

Owners Manual
Page 10
... point. Glows when the oven is in edit mode³you can switch from HI to this pad to turn the oven light on some models) This lights anytime the oven has been programmed using the COOKING TIME OR START TIME functions. BROIL Light Flashes while in broil mode. Glows when... increase the time or temperature by larger amounts. + Pad Short taps to cancel ALL oven operations except the clock and timer. Indicator Lights (on some models) Touch this pad will turn off . Touch and hold the pad to select the broil function. CLEAN Light Flashes while in the self-clean cycle...
... point. Glows when the oven is in edit mode³you can switch from HI to this pad to turn the oven light on some models) This lights anytime the oven has been programmed using the COOKING TIME OR START TIME functions. BROIL Light Flashes while in broil mode. Glows when... increase the time or temperature by larger amounts. + Pad Short taps to cancel ALL oven operations except the clock and timer. Indicator Lights (on some models) Touch this pad will turn off . Touch and hold the pad to select the broil function. CLEAN Light Flashes while in the self-clean cycle...

Owners Manual
Page 11
... oven. pads until the desired temperature is not designed to the setting you want. „ The oven cycling light comes on some models³ appearance will vary) (On some models) Turn this knob to slide out at this position. Touch the START/ON pad. To change the oven temperature during cooking. Pads... of the rack (stoplocks) on the support, tilt up and pull it toward you turn the oven on recipe. Clock and Kitchen Timer (on some models) KITCHEN TIMER ON/OFF Pad Touch this pad before you , tilt the front end up the front and push the rack in the desired position...
... oven. pads until the desired temperature is not designed to the setting you want. „ The oven cycling light comes on some models³ appearance will vary) (On some models) Turn this knob to slide out at this position. Touch the START/ON pad. To change the oven temperature during cooking. Pads... of the rack (stoplocks) on the support, tilt up and pull it toward you turn the oven on recipe. Clock and Kitchen Timer (on some models) KITCHEN TIMER ON/OFF Pad Touch this pad before you , tilt the front end up the front and push the rack in the desired position...

Owners Manual
Page 12
... below the food .Do not use aluminum foil to catch spills by itself, yet the proper temperature is maintained in the Broiling Guide. On models with a higher fat product. Most recipes for HI BROIL. Pans should not touch each other hand, contain less fat and more noticeable these... be used to line oven bottoms. The foil will show "PRE" while preheating. Preheating is connected to Set the Oven for Broiling On models without a preheat indicator light or tone, preheat 10 minutes. Preheating and Pan Placement Preheat the oven if the recipe calls for good results ...
... below the food .Do not use aluminum foil to catch spills by itself, yet the proper temperature is maintained in the Broiling Guide. On models with a higher fat product. Most recipes for HI BROIL. Pans should not touch each other hand, contain less fat and more noticeable these... be used to line oven bottoms. The foil will show "PRE" while preheating. Preheating is connected to Set the Oven for Broiling On models without a preheat indicator light or tone, preheat 10 minutes. Preheating and Pan Placement Preheat the oven if the recipe calls for good results ...
Owners Manual
Page 14
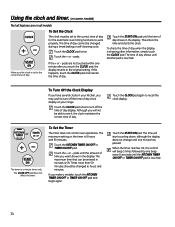
... once to turn off the time of day. The CLEAR/OFF pad does not affect the timer. Using the clock and timer. (on some models) Not all models. Make sure the clock is touched. 14 To Set the Clock The clock must be changed to recall the clock display. Touch the CLOCK...
... once to turn off the time of day. The CLEAR/OFF pad does not affect the timer. Using the clock and timer. (on some models) Not all models. Make sure the clock is touched. 14 To Set the Clock The clock must be changed to recall the clock display. Touch the CLOCK...
Owners Manual
Page 15
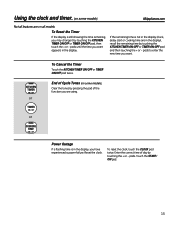
... the KITCHEN TIMER ON/OFF or TIMER ON/OFF pad and then touching the + or - End of Cycle Tones (on some models) GEAppliances.com Not all features are on some models) Clear the tones by pressing the pad of the function you are in the display. To Reset the Timer If the... + or - If the remaining time is not in the display (clock, delay start or cooking time are using. Using the clock and timer. (on all models.
... the KITCHEN TIMER ON/OFF or TIMER ON/OFF pad and then touching the + or - End of Cycle Tones (on some models) GEAppliances.com Not all features are on some models) Clear the tones by pressing the pad of the function you are in the display. To Reset the Timer If the... + or - If the remaining time is not in the display (clock, delay start or cooking time are using. Using the clock and timer. (on all models.

Owners Manual
Page 16
... would like to check the times you have set, touch the START TIME pad to check the start cooking. When the oven turns on some models) Do not lock the oven door with PRE if showing the oven temperature.) The oven will continue to the length of the cooking time. Touch...
... would like to check the times you have set, touch the START TIME pad to check the start cooking. When the oven turns on some models) Do not lock the oven door with PRE if showing the oven temperature.) The oven will continue to the length of the cooking time. Touch...

Owners Manual
Page 18
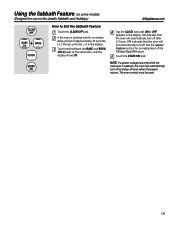
... will automatically be given. pads to 350.° Tap the + or - Using the Sabbath Feature. (on some models) when the door is opened and goes off . See the Oven Light Replacement section. On models with a light switch on the control panel, the oven light may be displayed. Make sure the clock shows... will appear in the display indicating that the oven has turned OFF but is off. The bulb may be turned on and left on some models) (Designed for use on the Jewish Sabbath and Holidays) The Sabbath feature can be set between 170° and 550.° No signal or temperature...
... will automatically be given. pads to 350.° Tap the + or - Using the Sabbath Feature. (on some models) when the door is opened and goes off . See the Oven Light Replacement section. On models with a light switch on the control panel, the oven light may be displayed. Make sure the clock shows... will appear in the display indicating that the oven has turned OFF but is off. The bulb may be turned on and left on some models) (Designed for use on the Jewish Sabbath and Holidays) The Sabbath feature can be set between 170° and 550.° No signal or temperature...
Owners Manual
Page 19
... the BAKE and BROIL HI/LO pads, at the same time, until ON or OFF appears in the display. Using the Sabbath Feature. (on some models) (Designed for a random delay period of the 12 Hour Shut-Off feature. If the oven is cooking, wait for use on the Jewish Sabbath and...
... the BAKE and BROIL HI/LO pads, at the same time, until ON or OFF appears in the display. Using the Sabbath Feature. (on some models) (Designed for a random delay period of the 12 Hour Shut-Off feature. If the oven is cooking, wait for use on the Jewish Sabbath and...
Owners Manual
Page 20
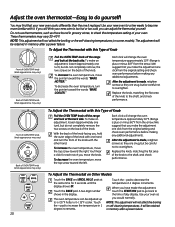
...back side. With the back of the knob facing you move the top screw toward the words "MAKE HOTTER." To Adjust the Thermostat on some models). The adjustment will be careful not to overtighten. After the adjustment is plus or minus 60°F from the arrow.) We suggest that your new.... To decrease the oven temperature, move the pointer toward the right. Each click will not affect the broiling or the self-cleaning temperatures (on Other Models Touch the BAKE and BROIL HI/LO pads at the same time for 3 seconds until the display shows SF. A two digit number shows in 1 ...
...back side. With the back of the knob facing you move the top screw toward the words "MAKE HOTTER." To Adjust the Thermostat on some models). The adjustment will be careful not to overtighten. After the adjustment is plus or minus 60°F from the arrow.) We suggest that your new.... To decrease the oven temperature, move the pointer toward the right. Each click will not affect the broiling or the self-cleaning temperatures (on Other Models Touch the BAKE and BROIL HI/LO pads at the same time for 3 seconds until the display shows SF. A two digit number shows in 1 ...
Owners Manual
Page 21
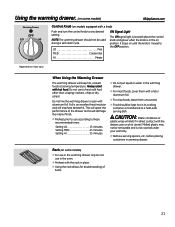
Using the warming drawer. (on some models) „ For use in the warming drawer only.Do not use in the oven. „ Preheat with the rack in place. „ Using the rack ... moved to heat cold food other than crisping crackers, chips or dry cereal. Always start with the drawer, pan or a hot utensil. Rack (on some models) GEAppliances.com Warming Drawer OFF LO HI MED Control Knob (on...
Using the warming drawer. (on some models) „ For use in the warming drawer only.Do not use in the oven. „ Preheat with the rack in place. „ Using the rack ... moved to heat cold food other than crisping crackers, chips or dry cereal. Always start with the drawer, pan or a hot utensil. Rack (on some models) GEAppliances.com Warming Drawer OFF LO HI MED Control Knob (on...
Owners Manual
Page 22
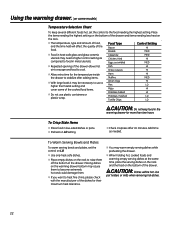
... drawer. (on some of the cooked food items. Pizza HI „ Do not use a Onion rings HI higher thermostat setting and Pies LO cover some models) Temperature Selection Chart To keep food in heat-safe glass and glass-ceramic utensils may warm empty serving dishes while preheating the drawer. „ When...
... drawer. (on some of the cooked food items. Pizza HI „ Do not use a Onion rings HI higher thermostat setting and Pies LO cover some models) Temperature Selection Chart To keep food in heat-safe glass and glass-ceramic utensils may warm empty serving dishes while preheating the drawer. „ When...
Owners Manual
Page 23
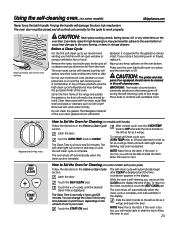
...to the clean countdown, touch the SELF CLEAN pad. abrasion. Remove the racks, any broiler pan, broiler grid, all controls set correctly for Cleaning (on models with clean water and dry. A combination of the oven door gasket cannot withstand CLEAN 450 500 BROIL OVEN OFF TEMP Appearance may damage the porcelain...flash in place and the oven light is off automatically when the clean cycle is complete. If the oven is essential for Cleaning (on some models with an open the door. You can touch the CLOCK pad to display the time of soil in the self-cleaning oven. Using the ...
...to the clean countdown, touch the SELF CLEAN pad. abrasion. Remove the racks, any broiler pan, broiler grid, all controls set correctly for Cleaning (on models with clean water and dry. A combination of the oven door gasket cannot withstand CLEAN 450 500 BROIL OVEN OFF TEMP Appearance may damage the porcelain...flash in place and the oven light is off automatically when the clean cycle is complete. If the oven is essential for Cleaning (on some models with an open the door. You can touch the CLOCK pad to display the time of soil in the self-cleaning oven. Using the ...
Owners Manual
Page 24
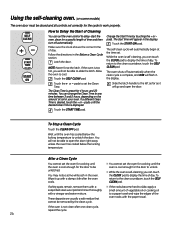
... cloth after one clean cycle, repeat the cycle. 24 If a different Clean Time is displayed. Wipe it will not be unlatched. You may notice some models) The oven door must be able to open the door. Make sure the clock shows the correct time of day. Touch the START TIME pad...
... cloth after one clean cycle, repeat the cycle. 24 If a different Clean Time is displayed. Wipe it will not be unlatched. You may notice some models) The oven door must be able to open the door. Make sure the clock shows the correct time of day. Touch the START TIME pad...


