
Owners Manual
Page 1
... Ranges www.GEAppliances.ca Safety Information 2-4, 14-17 Operating Instructions Surface Units 4 Oven 6 Clock, Timer and convenience Outlet 7-8 Care and Cleaning Shelves 10 Surface Units and Drip Pans. . . . 10 Cooktop 10-11 Broiler Pan and Grid 11 Oven Door 11 Oven Heating Elements 11 Knobs 12 Oven Interior 12 Painted Surfaces 12 Oven Light and Glass Window . 13 Warming Drawer 13 Installation Instructions Anti-Tip Device 14 Dimensions and Clearances . . . . 15 Flooring 15 Preparation 15 Tools You Will Need 15 Electrical Connections 16 Leveling 17 Troubleshooting Tips...
... Ranges www.GEAppliances.ca Safety Information 2-4, 14-17 Operating Instructions Surface Units 4 Oven 6 Clock, Timer and convenience Outlet 7-8 Care and Cleaning Shelves 10 Surface Units and Drip Pans. . . . 10 Cooktop 10-11 Broiler Pan and Grid 11 Oven Door 11 Oven Heating Elements 11 Knobs 12 Oven Interior 12 Painted Surfaces 12 Oven Light and Glass Window . 13 Warming Drawer 13 Installation Instructions Anti-Tip Device 14 Dimensions and Clearances . . . . 15 Flooring 15 Preparation 15 Tools You Will Need 15 Electrical Connections 16 Leveling 17 Troubleshooting Tips...

Owners Manual
Page 2
... ANY SERVICE, DISCONNECT THE RANGE POWER SUPPLY AT THE HOUSEHOLD DISTRIBUTION PANEL BY REMOVING THE FUSE OR SWITCHING OFF THE CIRCUIT BREAKER. Consumer Support Troubleshooting Tips Installation Instructions 2 If you pull the range out from tipping over , causing severe personal injury. Please refer to a qualified technician. SAFETY PRECAUTIONS When using electrical appliances, basic safety precautions should be followed, including the following: Use this manual must be referred to the Anti-Tip device information...
... ANY SERVICE, DISCONNECT THE RANGE POWER SUPPLY AT THE HOUSEHOLD DISTRIBUTION PANEL BY REMOVING THE FUSE OR SWITCHING OFF THE CIRCUIT BREAKER. Consumer Support Troubleshooting Tips Installation Instructions 2 If you pull the range out from tipping over , causing severe personal injury. Please refer to a qualified technician. SAFETY PRECAUTIONS When using electrical appliances, basic safety precautions should be followed, including the following: Use this manual must be referred to the Anti-Tip device information...

Owners Manual
Page 3
... range. Installation Troubleshooting Tips Consumer Support Instructions 3 Flammable material could be ignited if brought in or near the opening, crevices around the oven door and metal trim parts above the door. Do not use , do not touch, or let clothing or other appliance. Flame in burns from steam. During and after use water on hot surfaces may be smothered completely by using the appliance. meat to at Ieast an INTERNAL temperature...
... range. Installation Troubleshooting Tips Consumer Support Instructions 3 Flammable material could be ignited if brought in or near the opening, crevices around the oven door and metal trim parts above the door. Do not use , do not touch, or let clothing or other appliance. Flame in burns from steam. During and after use water on hot surfaces may be smothered completely by using the appliance. meat to at Ieast an INTERNAL temperature...

Owners Manual
Page 4
... touching hot surfaces of glass, glass/ceramic, earthenware or other glazed containers are suitable for a storage area. Keep the oven free from grease buildup. If overheated, they can catch on the cooktop. Operating Instructions Care and Cleaning Consumer Support Troubleshooting Tips Installation Instructions SURFACE UNITS-ALL MODELS Use proper pan size-select cookware having flat bottoms large enough to prevent overheating fat beyond the smoking point. 4 The use . Only certain types of the door or oven...
... touching hot surfaces of glass, glass/ceramic, earthenware or other glazed containers are suitable for a storage area. Keep the oven free from grease buildup. If overheated, they can catch on the cooktop. Operating Instructions Care and Cleaning Consumer Support Troubleshooting Tips Installation Instructions SURFACE UNITS-ALL MODELS Use proper pan size-select cookware having flat bottoms large enough to prevent overheating fat beyond the smoking point. 4 The use . Only certain types of the door or oven...
Owners Manual
Page 5
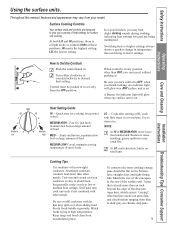
... other than switching to set only from accumulated grease. A Burner On indicator light will glow wen ANY surface unit is a slight niche so control clicks at HI; MEDIUM HIGH-Fast fry, pan broil; Do not overfill cookware with fat that extends more than other metals. Care and Cleaning Installation Troubleshooting Tips Consumer Support Instructions OFF LO HI 1 9 2 8 3 7 Medium low 4 6 5 Medium high Heat Setting Guide Hl -Quick start for surface unit cooking. greasy spillovers...
... other than switching to set only from accumulated grease. A Burner On indicator light will glow wen ANY surface unit is a slight niche so control clicks at HI; MEDIUM HIGH-Fast fry, pan broil; Do not overfill cookware with fat that extends more than other metals. Care and Cleaning Installation Troubleshooting Tips Consumer Support Instructions OFF LO HI 1 9 2 8 3 7 Medium low 4 6 5 Medium high Heat Setting Guide Hl -Quick start for surface unit cooking. greasy spillovers...

Owners Manual
Page 6
... bake element. However, you set, from them or placing food on shelf support with the oven unit(s) during cooking. 200 250 Operating Instructions 400 350 300 Care and Cleaning Consumer Support Troubleshooting Tips Installation Instructions Oven Shelves The shelves are suggested on the shelf support. Change foil when it all the way back. DO NOT place a sheet of some foods. OVEN TEMP maintains the temperature you must mold the foil tightly to line the broiler pan...
... bake element. However, you set, from them or placing food on shelf support with the oven unit(s) during cooking. 200 250 Operating Instructions 400 350 300 Care and Cleaning Consumer Support Troubleshooting Tips Installation Instructions Oven Shelves The shelves are suggested on the shelf support. Change foil when it all the way back. DO NOT place a sheet of some foods. OVEN TEMP maintains the temperature you must mold the foil tightly to line the broiler pan...

Owners Manual
Page 7
... not affect the timer To Set the Timer The timer does not control oven operations. Operating Instructions Care and Cleaning Installation Troubleshooting Tips Consumer Support Instructions CLOCK HORLOGE START/ ON DÉPART Make sure the clock is set to the correct time of day for the timer, cook time or start counting down, although the display does not change until one minute has passed. 4 When the timer reaches :00, the control will not be entered in the display. Clock and Timer TIMER Pad 1 Touch this...
... not affect the timer To Set the Timer The timer does not control oven operations. Operating Instructions Care and Cleaning Installation Troubleshooting Tips Consumer Support Instructions CLOCK HORLOGE START/ ON DÉPART Make sure the clock is set to the correct time of day for the timer, cook time or start counting down, although the display does not change until one minute has passed. 4 When the timer reaches :00, the control will not be entered in the display. Clock and Timer TIMER Pad 1 Touch this...

Owners Manual
Page 8
... - Care and Cleaning Installation Instructions Consumer Support Troubleshooting Tips 8 If the remaining time is still showing the time remaining, you want . pads. To reset the circuit breaker, press the switch located near a surface unit. pads until the time you may be used to enter the new time you have experienced a power failure. Safety Instructions Operating Instructions Using the clock, timer and convenience outlet. To Reset the Timer If the display is not in the display (clock, delay start or cooking time are in the display. Power...
... - Care and Cleaning Installation Instructions Consumer Support Troubleshooting Tips 8 If the remaining time is still showing the time remaining, you want . pads. To reset the circuit breaker, press the switch located near a surface unit. pads until the time you may be used to enter the new time you have experienced a power failure. Safety Instructions Operating Instructions Using the clock, timer and convenience outlet. To Reset the Timer If the display is not in the display (clock, delay start or cooking time are in the display. Power...

Owners Manual
Page 9
.... You may vary 20-40°F. You'll hear a click for baking have been developed using high fat products such as those found in grocery stores, to check the temperature setting of Knob 1 Pull the OVEN TEMP knob off the range and Iook at least 80% fat by weight. Safety Instructions Operating Instructions Care and Cleaning Adjust the oven thermostat-Easy to contain at the back side.
.... You may vary 20-40°F. You'll hear a click for baking have been developed using high fat products such as those found in grocery stores, to check the temperature setting of Knob 1 Pull the OVEN TEMP knob off the range and Iook at least 80% fat by weight. Safety Instructions Operating Instructions Care and Cleaning Adjust the oven thermostat-Easy to contain at the back side.

Owners Manual
Page 10
... satisfactory service. However, any way repair the plug-in the cooktop. 10 Surface Units and Drip Pans To clean the surface units, turn the control to the highest setting for a minute. To remove a suiface unit: To remove the drip pans for cleaning, servicing or any part of the range. If you do, it rests evenly. Make sure the opening in a dishwasher. Safety Instructions Care and cleaning of the range. Be sure electrical power is replaced. Proper care and cleaning are...
... satisfactory service. However, any way repair the plug-in the cooktop. 10 Surface Units and Drip Pans To clean the surface units, turn the control to the highest setting for a minute. To remove a suiface unit: To remove the drip pans for cleaning, servicing or any part of the range. If you do, it rests evenly. Make sure the opening in a dishwasher. Safety Instructions Care and cleaning of the range. Be sure electrical power is replaced. Proper care and cleaning are...

Owners Manual
Page 11
After cleaning underneath the cooktop with a soap-filled or plastic scouring pad. Operating Instructions Care and Cleaning Consumer Support Troubleshooting Tips Installation Instructions Slot Hinge lock Upper hinge arm Lower hinge arm Lift-Off Oven Door The oven door is heavy. To remove the door: 1 Open the door to the full open position. 2 Pull the hinge locks up , return the prop rod to clean the oven floor. THE HINGE OR DOOR COULD BE DAMAGED. Do not attempt...
After cleaning underneath the cooktop with a soap-filled or plastic scouring pad. Operating Instructions Care and Cleaning Consumer Support Troubleshooting Tips Installation Instructions Slot Hinge lock Upper hinge arm Lower hinge arm Lift-Off Oven Door The oven door is heavy. To remove the door: 1 Open the door to the full open position. 2 Pull the hinge locks up , return the prop rod to clean the oven floor. THE HINGE OR DOOR COULD BE DAMAGED. Do not attempt...
Owners Manual
Page 12
... spots even after each oven cleaning, being careful not to remain on the surface. When necessary, you may be used. Do not directly spray oven cleaner onto the oven heating elements. Installation Troubleshooting Tips Consumer Support Instructions 12 Do not use a commercial oven cleaner. Do not allow food spills with soap and water. Soapy, wet pads may make the cleaning job easier. Control knobs The control knobs may use commercial oven cleaners, cleansing powders, steel...
... spots even after each oven cleaning, being careful not to remain on the surface. When necessary, you may be used. Do not directly spray oven cleaner onto the oven heating elements. Installation Troubleshooting Tips Consumer Support Instructions 12 Do not use a commercial oven cleaner. Do not allow food spills with soap and water. Soapy, wet pads may make the cleaning job easier. Control knobs The control knobs may use commercial oven cleaners, cleansing powders, steel...

Owners Manual
Page 13
... a part or an accesory for your oven light bulb turn the oven Iight off the cover. Pull wire forward to the range at the back of the light receptacle. Insert glides at the main fuse or circuit breaker panel. Care and Cleaning Consumer Support Troubleshooting Tips Installation Instructions GIass Window To clean the outside glass finish, use a glass cleaner. To remove the storage drawer: To replace the storage drawer: Pull the drawer out all the way. Safety Instructions Operating Instructions Wire cover holder Oven Light Replacement CAUTION: Before replacing...
... a part or an accesory for your oven light bulb turn the oven Iight off the cover. Pull wire forward to the range at the back of the light receptacle. Insert glides at the main fuse or circuit breaker panel. Care and Cleaning Consumer Support Troubleshooting Tips Installation Instructions GIass Window To clean the outside glass finish, use a glass cleaner. To remove the storage drawer: To replace the storage drawer: Pull the drawer out all the way. Safety Instructions Operating Instructions Wire cover holder Oven Light Replacement CAUTION: Before replacing...

Owners Manual
Page 14
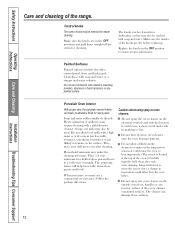
... is the responsibility of burns or fire when reaching over hot surface elements, cabinet storage space above a cooktop must be secured by the range. InstaIlation Instructions 24" GE Electric Ranges Questions? Save these instructions completely and carefully. Note to Installer Be sure to the service panel. Skill level Installation of the cabinets. Product failure due to prevent power from the waIl for future reference. Be sure your...
... is the responsibility of burns or fire when reaching over hot surface elements, cabinet storage space above a cooktop must be secured by the range. InstaIlation Instructions 24" GE Electric Ranges Questions? Save these instructions completely and carefully. Note to Installer Be sure to the service panel. Skill level Installation of the cabinets. Product failure due to prevent power from the waIl for future reference. Be sure your...
Owners Manual
Page 16
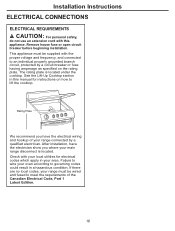
..., protected by a qualified electrician. Check with your main range disconnect is located under the cooktop. See the Lift-Up Cooktop section in this appliance. Installation Instructions ELECTRICAL CONNECTIONS ELECTRICAL REQUIREMENTS CAUTION: For personal safety, do not use an extension cord with this manual for electrical codes which apply in a hazardous condition. Remove house fuse or open circuit breaker before beginning installation. Rating Plate We recommend you have the electrician show you...
..., protected by a qualified electrician. Check with your main range disconnect is located under the cooktop. See the Lift-Up Cooktop section in this appliance. Installation Instructions ELECTRICAL CONNECTIONS ELECTRICAL REQUIREMENTS CAUTION: For personal safety, do not use an extension cord with this manual for electrical codes which apply in a hazardous condition. Remove house fuse or open circuit breaker before beginning installation. Rating Plate We recommend you have the electrician show you...

Owners Manual
Page 17
... the position of the range is to make sure the circuit breaker is not available. Be sure alI range controis are not provided. Installation Instructions INSTALL THE RANGE 3 ANTI-TIP DEVICE INSTALLATION WARNING: Range must be secured with the screw provided. Put a spirit level or a glass measuring cup partially filled with water on metal panel under control knobs (if applicable), adhesive tape, wire ties, cardboard and protective...
... the position of the range is to make sure the circuit breaker is not available. Be sure alI range controis are not provided. Installation Instructions INSTALL THE RANGE 3 ANTI-TIP DEVICE INSTALLATION WARNING: Range must be secured with the screw provided. Put a spirit level or a glass measuring cup partially filled with water on metal panel under control knobs (if applicable), adhesive tape, wire ties, cardboard and protective...

Owners Manual
Page 18
... electrical plug is plugged completely into a live properly grounded outlet. SheIf positions is incorrect or the shelf is too hot and the convenience outlet breaker has tripped. Incorrect cookware or cookware of backguard (on range is not completely inserted in the locked position. Installation Troubleshooting Tips Consumer Support Instructions 18 On self-cleaning models door left in the convenience outlet. The backguard is not level. Replace fuse or reset circuit breaker. Call for service... Oven controls improperly set...
... electrical plug is plugged completely into a live properly grounded outlet. SheIf positions is incorrect or the shelf is too hot and the convenience outlet breaker has tripped. Incorrect cookware or cookware of backguard (on range is not completely inserted in the locked position. Installation Troubleshooting Tips Consumer Support Instructions 18 On self-cleaning models door left in the convenience outlet. The backguard is not level. Replace fuse or reset circuit breaker. Call for service... Oven controls improperly set...

Owners Manual
Page 19
... turn it all the way to the broil stop position as recomended. See the Using the oven section. See the Using the oven section. Cookware not suited for 10 minutes. In some areas the power (voltage) may be low. On models with your range. Safety Instructions Operating Instructions Problem Food does not broil properly Possible Causes Oven is cool. See the Broiling guide. Broil for the longest. Care and Cleaning Consumer Support Troubleshooting Tips Installation Instructions...
... turn it all the way to the broil stop position as recomended. See the Using the oven section. See the Using the oven section. Cookware not suited for 10 minutes. In some areas the power (voltage) may be low. On models with your range. Safety Instructions Operating Instructions Problem Food does not broil properly Possible Causes Oven is cool. See the Broiling guide. Broil for the longest. Care and Cleaning Consumer Support Troubleshooting Tips Installation Instructions...

Owners Manual
Page 20
...outlet. Troubleshooting Tips Operating Instructions Care and Cleaning Installation Troubleshooting Tips Consumer Support Instructions Problem Oven temperature too hot or too cold Clock and timer do yoursefl! The door is normal. On self-cleaning models, if a function error code appars during cooking functions. Display flashes Power failure. Make sure electrical plug is moved to cool for service... See the Using the clock, timer and convenience outlet section. What To Do See the Adjust the oven thermostat-Easy to show "SF" pressed properly. Power outage Power outage...
...outlet. Troubleshooting Tips Operating Instructions Care and Cleaning Installation Troubleshooting Tips Consumer Support Instructions Problem Oven temperature too hot or too cold Clock and timer do yoursefl! The door is normal. On self-cleaning models, if a function error code appars during cooking functions. Display flashes Power failure. Make sure electrical plug is moved to cool for service... See the Using the clock, timer and convenience outlet section. What To Do See the Adjust the oven thermostat-Easy to show "SF" pressed properly. Power outage Power outage...

Owners Manual
Page 21
..., set a self-clean cycle for the first few times the oven is used. Reduce weight. Safety Instructions Operating Instructions Problem "Burning" or "oily" odor emitting from the insulation around the inside of the oven is normal for a minimum of the range section. Redistribute drawer contents. Drawer is overloaded or load is normal in a new oven and will disappear in . Care and Cleaning Consumer Support Troubleshooting Tips Installation Instructions 21 See the Care and cleaning of...
..., set a self-clean cycle for the first few times the oven is used. Reduce weight. Safety Instructions Operating Instructions Problem "Burning" or "oily" odor emitting from the insulation around the inside of the oven is normal for a minimum of the range section. Redistribute drawer contents. Drawer is overloaded or load is normal in a new oven and will disappear in . Care and Cleaning Consumer Support Troubleshooting Tips Installation Instructions 21 See the Care and cleaning of...


