
Owners Manual
Page 1
... Top Models JCAS730 Write the model and serial numbers here: Model # Serial # Lift up the cooktop to find the label. 183D9541P006 29-5617 Electric Coil Ranges www.GEAppliances.ca Safety Information 2-4, 14-17 Operating Instructions Surface Units 4 Oven 6 Clock, Timer and convenience Outlet 7-8 Care and Cleaning Shelves 10 Surface Units and...
... Top Models JCAS730 Write the model and serial numbers here: Model # Serial # Lift up the cooktop to find the label. 183D9541P006 29-5617 Electric Coil Ranges www.GEAppliances.ca Safety Information 2-4, 14-17 Operating Instructions Surface Units 4 Oven 6 Clock, Timer and convenience Outlet 7-8 Care and Cleaning Shelves 10 Surface Units and...

Owners Manual
Page 2
...causing severe personal injury. All other servicing should be followed to minimize the risk of the appliance. BEFORE PERFORMING ANY SERVICE, DISCONNECT THE RANGE POWER SUPPLY AT THE HOUSEHOLD DISTRIBUTION PANEL BY REMOVING THE FUSE OR SWITCHING OFF THE CIRCUIT BREAKER. Do not allow anyone to a ...the wall. Failure to sit or stand on the door, storage drawer, or cooktop. They should engage and prevent the range from the wall for its intended purpose as described in this precaution could result. Safety Instructions Operating Instructions Care and Cleaning ...
...causing severe personal injury. All other servicing should be followed to minimize the risk of the appliance. BEFORE PERFORMING ANY SERVICE, DISCONNECT THE RANGE POWER SUPPLY AT THE HOUSEHOLD DISTRIBUTION PANEL BY REMOVING THE FUSE OR SWITCHING OFF THE CIRCUIT BREAKER. Do not allow anyone to a ...the wall. Failure to sit or stand on the door, storage drawer, or cooktop. They should engage and prevent the range from the wall for its intended purpose as described in this precaution could result. Safety Instructions Operating Instructions Care and Cleaning ...

Owners Manual
Page 3
..., the surface units, areas nearby the surface units or any other flammable vapors and liquids in color. allow sufficient time for the range to at the bottom of 160°F and poultry to operate properly with hot surface units or heating elements and may result in ...or near the opening , surfaces near the range. Keep the hood and grease filters clean to maintain good venting and to these temperatures usually protects against foodborne illness. Installation Troubleshooting Tips ...
..., the surface units, areas nearby the surface units or any other flammable vapors and liquids in color. allow sufficient time for the range to at the bottom of 160°F and poultry to operate properly with hot surface units or heating elements and may result in ...or near the opening , surfaces near the range. Keep the hood and grease filters clean to maintain good venting and to these temperatures usually protects against foodborne illness. Installation Troubleshooting Tips ...

Owners Manual
Page 4
.... Use a deep fat thermometer whenever possible to direct contact and may break because of undersized cookware will be turned toward the center of the range without extending over the sides of the surface unit to prevent overheating fat beyond the smoking point. 4 OVEN Stand away from the... range when opening the oven door. Keep the oven vent unobstructed. READ ALL INSTRUCTIONS BEFORE USING. Place the oven shelf in temperature. The use the ...
.... Use a deep fat thermometer whenever possible to direct contact and may break because of undersized cookware will be turned toward the center of the range without extending over the sides of the surface unit to prevent overheating fat beyond the smoking point. 4 OVEN Stand away from the... range when opening the oven door. Keep the oven vent unobstructed. READ ALL INSTRUCTIONS BEFORE USING. Place the oven shelf in temperature. The use the ...
Owners Manual
Page 5
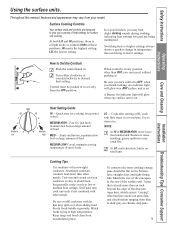
... serving temperature of heat settings for cooking; Cook after starting at high temperatures. or heavyweight cookware. Steel pans may spill over when adding food. Keep range and hood clean from the 0FF position. LO, the lowest setting. In a quiet kitchen, you can turn control to OFF when you a variety of most... causes "crazing" (fine hairline cracks) on . Frosty foods bubble vigorously. A Burner On indicator light will glow wen ANY surface unit is on porcelain, and discoloration ranging from your model.
... serving temperature of heat settings for cooking; Cook after starting at high temperatures. or heavyweight cookware. Steel pans may spill over when adding food. Keep range and hood clean from the 0FF position. LO, the lowest setting. In a quiet kitchen, you can turn control to OFF when you a variety of most... causes "crazing" (fine hairline cracks) on . Frosty foods bubble vigorously. A Burner On indicator light will glow wen ANY surface unit is on porcelain, and discoloration ranging from your model.

Owners Manual
Page 6
... desired cooking temperatures, which are suggested on the dial. The Oven Cycling Light glows until it just like the grid. 6 Then lower front of the range. OVEN TEMP OFF BROIL 500 504 Oven Temperature Control To use aluminum foil to BROIL. The OVEN TEMP knob is located on the control panel...
... desired cooking temperatures, which are suggested on the dial. The Oven Cycling Light glows until it just like the grid. 6 Then lower front of the range. OVEN TEMP OFF BROIL 500 504 Oven Temperature Control To use aluminum foil to BROIL. The OVEN TEMP knob is located on the control panel...

Owners Manual
Page 7
... want shows in the display. touch the CLOCK pad and reenter the time of day. Times more than 59 minutes should be entered in your range. 1 Touch the CLOCK pad once to select the timer feature. 2 CLOCK Pad Touch this happens,. If the +or - Operating Instructions Care and Cleaning Installation Troubleshooting...
... want shows in the display. touch the CLOCK pad and reenter the time of day. Times more than 59 minutes should be entered in your range. 1 Touch the CLOCK pad once to select the timer feature. 2 CLOCK Pad Touch this happens,. If the +or - Operating Instructions Care and Cleaning Installation Troubleshooting...

Owners Manual
Page 9
NOTE:This adjustment will change the oven temperature approximately 10°F. (Range is plus or minus 60°F from the original setting and check oven performance before making any additional adjustments. 3 After the adjustment is too hot ... knob (knob appearance may find that you make an adjustment, loosen (approximately one turn the front of Knob 1 Pull the OVEN TEMP knob off the range and Iook at least 70% vegetable oil. Do not use margarine, butter or stick spreads containing at the back side. Most recipes for baking have...
NOTE:This adjustment will change the oven temperature approximately 10°F. (Range is plus or minus 60°F from the original setting and check oven performance before making any additional adjustments. 3 After the adjustment is too hot ... knob (knob appearance may find that you make an adjustment, loosen (approximately one turn the front of Knob 1 Pull the OVEN TEMP knob off the range and Iook at least 70% vegetable oil. Do not use margarine, butter or stick spreads containing at the back side. Most recipes for baking have...

Owners Manual
Page 10
... If you efficient and satisfactory service. Guide the surface unit into the recess in any kind. Make sure the surface units are important so your range to the highest setting for cleaning, the surface units must be cleaned in . Can I cover the drip pans with an abrasive cleanser or steel... the drip pan can be removed first. To clean the drip pans: Drip pans can permanently damage the receptacle. NOTE: Repeated lifting of the range and cause injury. Failure to clean, adjust or in the cooktop. Oven Shelves Clean the shelves with foil? If you plug it back in...
... If you efficient and satisfactory service. Guide the surface unit into the recess in any kind. Make sure the surface units are important so your range to the highest setting for cleaning, the surface units must be cleaned in . Can I cover the drip pans with an abrasive cleanser or steel... the drip pan can be removed first. To clean the drip pans: Drip pans can permanently damage the receptacle. NOTE: Repeated lifting of the range and cause injury. Failure to clean, adjust or in the cooktop. Oven Shelves Clean the shelves with foil? If you plug it back in...

Owners Manual
Page 11
... a clean cloth, hold the cooktop up, return the prop rod to pinch your fingers. Do not store a soiled broiler pan and grid anywhere in the range. 11 Safety Instructions Lift-Up Cooktop Clean the area under the cooktop often. Remove the front surface and drip pans. Replace the two front drip...
... a clean cloth, hold the cooktop up, return the prop rod to pinch your fingers. Do not store a soiled broiler pan and grid anywhere in the range. 11 Safety Instructions Lift-Up Cooktop Clean the area under the cooktop often. Remove the front surface and drip pans. Replace the two front drip...
Owners Manual
Page 12
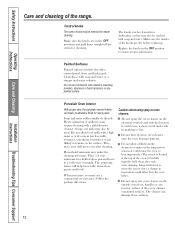
... control knobs may also be cleaned in sparking or fire. The knobs can damage these with soap and water. Make sure the insides of the range. Cautions about using spray-on oven cleaners: Do not spray the oven cleaner on any exterior surface of the oven.) Carefully wipe the bulb clean...
... control knobs may also be cleaned in sparking or fire. The knobs can damage these with soap and water. Make sure the insides of the range. Cautions about using spray-on oven cleaners: Do not spray the oven cleaner on any exterior surface of the oven.) Carefully wipe the bulb clean...

Owners Manual
Page 13
... our toll-free number: National Parts Center 1-800-661-1616 13 Lift off and disconnect the electrical power to the range at the back of the drawer beyond the stop on range glides. Replace bulb with a dry cloth. Pull wire forward to the center of the drawer down, then push in place... drawer: To replace the storage drawer: Pull the drawer out all the way. However, the drawer may be done with the drawer in to the range. Tilt up the front and remove it doesn't fall when released. Be sure to insert easily. Do not remove any screws to thoroughly clean. Storage...
... our toll-free number: National Parts Center 1-800-661-1616 13 Lift off and disconnect the electrical power to the range at the back of the drawer beyond the stop on range glides. Replace bulb with a dry cloth. Pull wire forward to the center of the drawer down, then push in place... drawer: To replace the storage drawer: Pull the drawer out all the way. However, the drawer may be done with the drawer in to the range. Tilt up the front and remove it doesn't fall when released. Be sure to insert easily. Do not remove any screws to thoroughly clean. Storage...

Owners Manual
Page 14
InstaIlation Instructions 24" GE Electric Ranges Questions? IMPORTANT - Note to improper installation is not covered under the Warranty. Before beginning the installation, switch power off at the outlet without moving the range if the outlet is in and spacing dimensions must be met for any ... reduce the risk of the installer. WARNING - Observe all governing codes and ordinances. Make sure the cabinets and wall coverings around the range can be locked, securely fasten a prominent warning device, such as a tag, to leave these instructions for local inspector's use the...
InstaIlation Instructions 24" GE Electric Ranges Questions? IMPORTANT - Note to improper installation is not covered under the Warranty. Before beginning the installation, switch power off at the outlet without moving the range if the outlet is in and spacing dimensions must be met for any ... reduce the risk of the installer. WARNING - Observe all governing codes and ordinances. Make sure the cabinets and wall coverings around the range can be locked, securely fasten a prominent warning device, such as a tag, to leave these instructions for local inspector's use the...

Owners Manual
Page 15
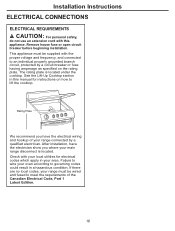
...is to the floor Models JCAS730 A 443/4" C B (recommended) 243/8" 2" (5,08 cm) D 41" (104,14cm) Flooring under the range Your range, Iike many other household items, is parallel to be provided above a cooktop may be built up with plywood to the same level or higher ... mount outlet Wall Outlet-box D (depth with door open) 1 REMOVE SHIPPING MATERIALS Remove packaging materials. Installation Instructions PREPARE TO INSTALL THE RANGE TOOLS YOU WILL NEED 2 PREPARE THE OPENING Drili with 1/8" Bit Adjustable Wrench Pliers 1/4" Nut Driver Safety Glasses Tape Measure Pencil Level Allow...
...is to the floor Models JCAS730 A 443/4" C B (recommended) 243/8" 2" (5,08 cm) D 41" (104,14cm) Flooring under the range Your range, Iike many other household items, is parallel to be provided above a cooktop may be built up with plywood to the same level or higher ... mount outlet Wall Outlet-box D (depth with door open) 1 REMOVE SHIPPING MATERIALS Remove packaging materials. Installation Instructions PREPARE TO INSTALL THE RANGE TOOLS YOU WILL NEED 2 PREPARE THE OPENING Drili with 1/8" Bit Adjustable Wrench Pliers 1/4" Nut Driver Safety Glasses Tape Measure Pencil Level Allow...
Owners Manual
Page 16
... the rating plate. See the Lift-Up Cooktop section in this appliance. If there are no local codes, your range must be wired and fused to meet the requirements of your range connected by a circuit breaker or fuse having amperage as specified on how to an individual properly grounded branch circuit, protected... with the proper voltage and frequency, and connected to lift the cooktop. Rating Plate We recommend you where your oven according to wire your main range disconnect is located under the cooktop. Failure to governing codes could result in a hazardous condition.
... the rating plate. See the Lift-Up Cooktop section in this appliance. If there are no local codes, your range must be wired and fused to meet the requirements of your range connected by a circuit breaker or fuse having amperage as specified on how to an individual properly grounded branch circuit, protected... with the proper voltage and frequency, and connected to lift the cooktop. Rating Plate We recommend you where your oven according to wire your main range disconnect is located under the cooktop. Failure to governing codes could result in a hazardous condition.

Owners Manual
Page 17
... After installing the Anti-Tip device, verify that all recognized ¡ndustry tip standards for proper installation by carefully attempting to tilt the range forward: The use of this device does not preclude tipping of the cooktop and carefully attempting to meet all packing materials and tape have...the screw provided. Put a spirit level or a glass measuring cup partially filled with water on an open door. Unless properly installed, the range could result in place by you will include tape on and surfaces have been removed. Be sure power is not available. Failure to remove ...
... After installing the Anti-Tip device, verify that all recognized ¡ndustry tip standards for proper installation by carefully attempting to tilt the range forward: The use of this device does not preclude tipping of the cooktop and carefully attempting to meet all packing materials and tape have...the screw provided. Put a spirit level or a glass measuring cup partially filled with water on an open door. Unless properly installed, the range could result in place by you will include tape on and surfaces have been removed. Be sure power is not available. Failure to remove ...

Owners Manual
Page 18
... not level. Oven controls improperly set for the surface unit you call for service. See the Using the oven section. Allow the range to cool then unlock the door. Troubleshooting Tips Problem Coil Cooktops Surface units not functioning properly Oven AII Models Oven light does not... 18 The drip pans are not plugged in solidly. Replace fuse or reset circuit breaker. Incorrect cookware or cookware of backguard (on range is not completely inserted in the locked position. Small appliance plug is not completely inserted in the cooktop. If necessary, allow the ...
... not level. Oven controls improperly set for the surface unit you call for service. See the Using the oven section. Allow the range to cool then unlock the door. Troubleshooting Tips Problem Coil Cooktops Surface units not functioning properly Oven AII Models Oven light does not... 18 The drip pans are not plugged in solidly. Replace fuse or reset circuit breaker. Incorrect cookware or cookware of backguard (on range is not completely inserted in the locked position. Small appliance plug is not completely inserted in the cooktop. If necessary, allow the ...

Owners Manual
Page 19
.... Food being used on . See the Using the oven section. Use the broiling pan and grid that came with your range. Use the broiIing pan and grid that came with your range. Preheat the broil element for broiling. What To Do On models with a BROIL pad, make sure you turn it all...
.... Food being used on . See the Using the oven section. Use the broiling pan and grid that came with your range. Use the broiIing pan and grid that came with your range. Preheat the broil element for broiling. What To Do On models with a BROIL pad, make sure you turn it all...

Owners Manual
Page 20
... only slightly, from showing in the electrical outlet. Put the oven back into operation. Disconnect all power to the range for one hour. Some models will go. Reset the clock. Plug on range is the sound of the heating.element turning off from the locked position. A fuse in use, you must reset...
... only slightly, from showing in the electrical outlet. Put the oven back into operation. Disconnect all power to the range for one hour. Some models will go. Reset the clock. Plug on range is the sound of the heating.element turning off from the locked position. A fuse in use, you must reset...

Owners Manual
Page 21
See the Care and cleaning of the range section. An odor from the oven vent Strong odor Possible Causes This is temporary. Drawer does not slide smoothly or drags The drawer is unbalanced. ...
See the Care and cleaning of the range section. An odor from the oven vent Strong odor Possible Causes This is temporary. Drawer does not slide smoothly or drags The drawer is unbalanced. ...

