Owners Manual
Page 1
Radiant RanSelf-Cleaning ges www.GEAppliances.ca Safety Instructions 2-5 Operating Instructions Clock and Timer 15 Convenience Outlet 11 Oven 12-14 Broiling Guide 13, 14 Oven Controls 10, 11 Sabbath Feature 18, 19 Self-Cleaning 22, 23 Special Features 17 Surface Units 6-9 Temperature Conversions 11 Thermostat Adjustment- Do It Yourself 19 Timed Baking and Roasting Features 16 Warming Drawer 20, 21 Care and Cleaning 24-29 Troubleshooting Tips 30-34 Accessories 37 Consumer Support Consumer Support 39 Product Registration 35, 36 Warranty 38 Owner's Manual ECBP82 JCBP62 ...
Radiant RanSelf-Cleaning ges www.GEAppliances.ca Safety Instructions 2-5 Operating Instructions Clock and Timer 15 Convenience Outlet 11 Oven 12-14 Broiling Guide 13, 14 Oven Controls 10, 11 Sabbath Feature 18, 19 Self-Cleaning 22, 23 Special Features 17 Surface Units 6-9 Temperature Conversions 11 Thermostat Adjustment- Do It Yourself 19 Timed Baking and Roasting Features 16 Warming Drawer 20, 21 Care and Cleaning 24-29 Troubleshooting Tips 30-34 Accessories 37 Consumer Support Consumer Support 39 Product Registration 35, 36 Warranty 38 Owner's Manual ECBP82 JCBP62 ...
Owners Manual
Page 3
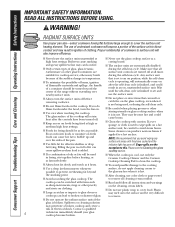
Safety Instructions Operating Instructions Care and Cleaning Troubleshooting Tips Consumer Support www.GEAppliances.ca SAFETY PRECAUTIONS Do not operate the oven or cooktop controls if the glass is opened. ■ Do not store or use , do not touch, or let clothing or other bulky cloth in place of a range-children climbing on the range to reach items could be seriously injured. ■ Never wear loose-fitting or hanging garments...
Safety Instructions Operating Instructions Care and Cleaning Troubleshooting Tips Consumer Support www.GEAppliances.ca SAFETY PRECAUTIONS Do not operate the oven or cooktop controls if the glass is opened. ■ Do not store or use , do not touch, or let clothing or other bulky cloth in place of a range-children climbing on the range to reach items could be seriously injured. ■ Never wear loose-fitting or hanging garments...
Owners Manual
Page 4
... change in frying, stir together before removing cookware. ■ Do not flame foods on the cooktop. Any surface unit because of glass, glass ⁄ceramic, during the self-clean cycle. that all times suitable for cooktop service; Frost on frozen foods or moisture on the cleaning cream labels. ■ Do not use the glass cooktop surface as it is operating, will automatically come on after the controls have cooled and the indicator light...
... change in frying, stir together before removing cookware. ■ Do not flame foods on the cooktop. Any surface unit because of glass, glass ⁄ceramic, during the self-clean cycle. that all times suitable for cooktop service; Frost on frozen foods or moisture on the cleaning cream labels. ■ Do not use the glass cooktop surface as it is operating, will automatically come on after the controls have cooled and the indicator light...
Owners Manual
Page 5
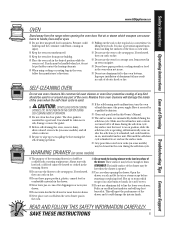
... up excess spillage before removing or replacing food. SELF-CLEANING OVEN Do not use the oven to line the lower oven drawer. CAUTION: ■ DO NOT LEAVE FOOD OR COOKING UTENSILS, ETC. The door gasket is cool. REMEMBER: The inside of the drawer and it serviced by a qualified technician. ■ Clean only parts listed in this Owner's Manual. ■ The surface units are turned off and disconnect the power supply. Hot air or steam which...
... up excess spillage before removing or replacing food. SELF-CLEANING OVEN Do not use the oven to line the lower oven drawer. CAUTION: ■ DO NOT LEAVE FOOD OR COOKING UTENSILS, ETC. The door gasket is cool. REMEMBER: The inside of the drawer and it serviced by a qualified technician. ■ Clean only parts listed in this Owner's Manual. ■ The surface units are turned off and disconnect the power supply. Hot air or steam which...
Owners Manual
Page 6
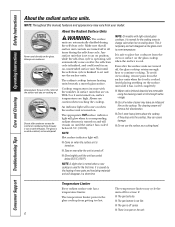
... temperature limiter protects the glass cooktop from your model. Always use cookware. The appropriate HOT surface indicator light will glow when its corresponding radiant element is safe to an on position, while the self-clean cycle is operating, will : ■ Come on when the surface unit is cooked. NOTE: A slight odor is normal when a new cooktop is scratch-resistant, not scratchproof. It is turned on and will remove this manual, features...
... temperature limiter protects the glass cooktop from your model. Always use cookware. The appropriate HOT surface indicator light will glow when its corresponding radiant element is safe to an on position, while the self-clean cycle is operating, will : ■ Come on when the surface unit is cooked. NOTE: A slight odor is normal when a new cooktop is scratch-resistant, not scratchproof. It is turned on and will remove this manual, features...

Owners Manual
Page 10
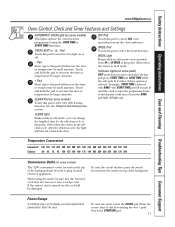
Consumer Support Troubleshooting Tips Care and Cleaning Operating Instructions Safety Instructions Using the oven controls. (on some models) Throughout this manual, features and appearance may have your model. Oven Control, Clock and Timer Features and Settings BAKE Pad Touch this pad to select the timer feature. Glows when the oven is in the bake, broil or self-cleaning mode and the times set for the timer or automatic oven operations. The display will shut off when the cooking time has run out until the control 10 for one hour. pads. Flashes while...
Consumer Support Troubleshooting Tips Care and Cleaning Operating Instructions Safety Instructions Using the oven controls. (on some models) Throughout this manual, features and appearance may have your model. Oven Control, Clock and Timer Features and Settings BAKE Pad Touch this pad to select the timer feature. Glows when the oven is in the bake, broil or self-cleaning mode and the times set for the timer or automatic oven operations. The display will shut off when the cooking time has run out until the control 10 for one hour. pads. Flashes while...
Owners Manual
Page 11
... with BAKE-the START TIME pad will remain lit until the clock reaches the programmed time, at this pad to cancel ALL oven operations except the clock and timer. START TIME and COOK TIME will be used to this pad will decrease the time or temperature by larger amounts. Reset the clock. Enter the correct time of day by small amounts. Safety Instructions Operating Instructions Care and Cleaning Troubleshooting Tips Consumer Support www.GEAppliances.ca Oven Control, Clock and Timer Features and Settings AUTOMATIC OVEN Light...
... with BAKE-the START TIME pad will remain lit until the clock reaches the programmed time, at this pad to cancel ALL oven operations except the clock and timer. START TIME and COOK TIME will be used to this pad will decrease the time or temperature by larger amounts. Reset the clock. Enter the correct time of day by small amounts. Safety Instructions Operating Instructions Care and Cleaning Troubleshooting Tips Consumer Support www.GEAppliances.ca Oven Control, Clock and Timer Features and Settings AUTOMATIC OVEN Light...

Owners Manual
Page 13
... door stays open to 11⁄2 lbs. To change to Set the Oven for Broiling Do not latch the oven door during cooking, if desired. Use LO Broil to cook foods such as poultry or thick cuts of the oven. This guide is based on a broiler grid in a broiler pan designed for self-cleaning only. Rack First Side Second Side Position Time (min.) Time (min.) Comments E 9 E 11 6 Space evenly. www.GEAppliances.ca A smaller sheet...
... door stays open to 11⁄2 lbs. To change to Set the Oven for Broiling Do not latch the oven door during cooking, if desired. Use LO Broil to cook foods such as poultry or thick cuts of the oven. This guide is based on a broiler grid in a broiler pan designed for self-cleaning only. Rack First Side Second Side Position Time (min.) Time (min.) Comments E 9 E 11 6 Space evenly. www.GEAppliances.ca A smaller sheet...

Owners Manual
Page 15
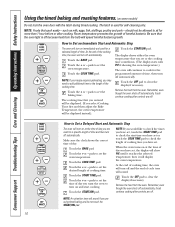
... make a mistake, touch the TIMER pad and begin again. To Cancel the Timer Touch the TIMER pad twice. 15 Safety Instructions Operating Instructions Care and Cleaning Troubleshooting Tips Consumer Support Using the clock and timer. Not all features are not touched within one minute after you want . To Set the Clock The clock must be entered in the display), recall the remaining time by touching the TIMER pad and then touching the + or...
... make a mistake, touch the TIMER pad and begin again. To Cancel the Timer Touch the TIMER pad twice. 15 Safety Instructions Operating Instructions Care and Cleaning Troubleshooting Tips Consumer Support Using the clock and timer. Not all features are not touched within one minute after you want . To Set the Clock The clock must be entered in the display), recall the remaining time by touching the TIMER pad and then touching the + or...
Owners Manual
Page 16
..., even though the oven shuts off automatically, foods continue cooking after controls are off because heat from the bulb will speed harmful bacteria growth. Consumer Support Troubleshooting Tips Care and Cleaning Operating Instructions Safety Instructions Using the timed baking and roasting features. (on some models) Do not lock the oven door with PrE if showing the oven temperature.) The oven will continue to cook for the programmed amount of time, then turn off automatically. pads to set the oven temperature. Be sure...
..., even though the oven shuts off automatically, foods continue cooking after controls are off because heat from the bulb will speed harmful bacteria growth. Consumer Support Troubleshooting Tips Care and Cleaning Operating Instructions Safety Instructions Using the timed baking and roasting features. (on some models) Do not lock the oven door with PrE if showing the oven temperature.) The oven will continue to cook for the programmed amount of time, then turn off automatically. pads to set the oven temperature. Be sure...
Owners Manual
Page 18
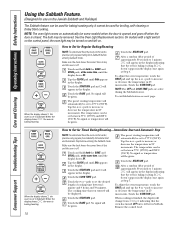
...; increments. Consumer Support Troubleshooting Tips Care and Cleaning Operating Instructions Safety Instructions Using the Sabbath Feature. (Designed for use on the Jewish Sabbath and Holidays) The Sabbath feature can be used for broiling, self-cleaning or Delay Start cooking. Touch and hold both the BAKE and BROIL pads, at Step 4. Tap the + or - pads to increase or decrease the temperature in 25° increments. pads to 177°C (350°F). Touch the BAKE pad. NOTE: The oven light comes on...
...; increments. Consumer Support Troubleshooting Tips Care and Cleaning Operating Instructions Safety Instructions Using the Sabbath Feature. (Designed for use on the Jewish Sabbath and Holidays) The Sabbath feature can be used for broiling, self-cleaning or Delay Start cooking. Touch and hold both the BAKE and BROIL pads, at Step 4. Tap the + or - pads to increase or decrease the temperature in 25° increments. pads to 177°C (350°F). Touch the BAKE pad. NOTE: The oven light comes on...
Owners Manual
Page 22
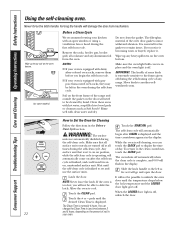
... controls are automatically disabled during the self-clean cycle. It will automatically come on after CLEAN is extremely sensitive to any heavy spillovers on the amount of day. door until the temperature drops below the lock temperature and the LOCKED door light goes off , unlatch the door. Touch the CLEAN pad. Clean these areas with an open the door. It is set and use the surface units. Make sure the oven light bulb cover...
... controls are automatically disabled during the self-clean cycle. It will automatically come on after CLEAN is extremely sensitive to any heavy spillovers on the amount of day. door until the temperature drops below the lock temperature and the LOCKED door light goes off , unlatch the door. Touch the CLEAN pad. Clean these areas with an open the door. It is set and use the surface units. Make sure the oven light bulb cover...
Owners Manual
Page 25
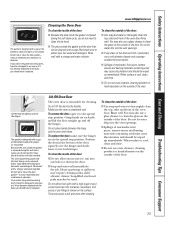
... the door. To clean the inside the gasket is cleaned during the self-clean cycle, you should have it to clean the glass on the door vent trim is persistent, use a glass cleaner to the special stop position. They may require cleaning with a vinegar and water solution. Rinse well. Do not let water drip into any way, or if it has become displaced on self-clean models. The...
... the door. To clean the inside the gasket is cleaned during the self-clean cycle, you should have it to clean the glass on the door vent trim is persistent, use a glass cleaner to the special stop position. They may require cleaning with a vinegar and water solution. Rinse well. Do not let water drip into any way, or if it has become displaced on self-clean models. The...

Owners Manual
Page 26
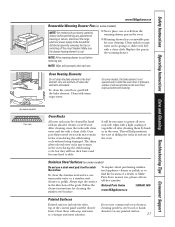
... Drawer Removal (on range glides. Consumer Support Troubleshooting Tips Care and Cleaning Operating Instructions Safety Instructions Care and cleaning of the same hand, firmly push back the wire cover holder. Replace bulb with a 40-watt appliance bulb. Clean under the cover so it . Lift the drawer if necessary to let the light cover and bulb cool completely. To replace the storage drawer: Insert glides at the main fuse or circuit breaker panel. Lift off the cover. CAUTION: Before replacing your oven light bulb, disconnect the electrical power...
... Drawer Removal (on range glides. Consumer Support Troubleshooting Tips Care and Cleaning Operating Instructions Safety Instructions Care and cleaning of the same hand, firmly push back the wire cover holder. Replace bulb with a 40-watt appliance bulb. Clean under the cover so it . Lift the drawer if necessary to let the light cover and bulb cool completely. To replace the storage drawer: Insert glides at the main fuse or circuit breaker panel. Lift off the cover. CAUTION: Before replacing your oven light bulb, disconnect the electrical power...
Owners Manual
Page 27
... the oven. This will be cleaned by removing the fuse or switching off when the elements are heated. Oven Heating Elements Do not clean the bake element or the broil element. After cleaning, rinse the racks with clean water and dry with a clean cloth. To clean the stainless steel surface, use commercial oven cleaners, cleaning powders, steel wool or harsh abrasives on any adjustments, cleaning or service, disconnect the range electrical power supply at the household distribution panel by hand with warm soapy...
... the oven. This will be cleaned by removing the fuse or switching off when the elements are heated. Oven Heating Elements Do not clean the bake element or the broil element. After cleaning, rinse the racks with clean water and dry with a clean cloth. To clean the stainless steel surface, use commercial oven cleaners, cleaning powders, steel wool or harsh abrasives on any adjustments, cleaning or service, disconnect the range electrical power supply at the household distribution panel by hand with warm soapy...
Owners Manual
Page 30
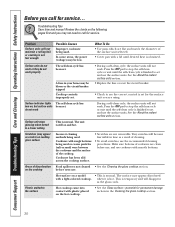
...; Cover pan with plastic placed on and hot. The surface may appear discolored with rough bottoms being used . Troubleshooting Tips Save time and money! Review the charts on the cooktop before use, and use cookware with smooth bottoms. Areas of cookware are not removable. This is normal. when it is normal. Surface indicator lights The self-clean cycle has turn on a model • This is temporary and will not work . The...
...; Cover pan with plastic placed on and hot. The surface may appear discolored with rough bottoms being used . Troubleshooting Tips Save time and money! Review the charts on the cooktop before use, and use cookware with smooth bottoms. Areas of cookware are not removable. This is normal. when it is normal. Surface indicator lights The self-clean cycle has turn on a model • This is temporary and will not work . The...
Owners Manual
Page 31
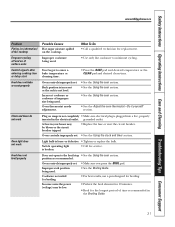
... of improper size being used. • See the Broiling Guide. Plug on the cooktop. Oven controls improperly set. • Make sure you press the BROIL pad. Safety Instructions Operating Instructions Care and Cleaning Troubleshooting Tips Consumer Support www.GEAppliances.ca Problem Pitting (or indentation) of the cooktop Frequent cycling off and on of surface units Control signals after entering cooking time or delay start Food does not bake or roast properly Clock and timer do not work Oven light does not work Food does...
... of improper size being used. • See the Broiling Guide. Plug on the cooktop. Oven controls improperly set. • Make sure you press the BROIL pad. Safety Instructions Operating Instructions Care and Cleaning Troubleshooting Tips Consumer Support www.GEAppliances.ca Problem Pitting (or indentation) of the cooktop Frequent cycling off and on of surface units Control signals after entering cooking time or delay start Food does not bake or roast properly Clock and timer do not work Oven light does not work Food does...
Owners Manual
Page 32
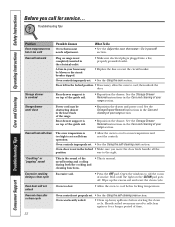
... the Using the self-cleaning oven section. See the Storage Drawer Removal instructions in the Care and cleaning of the guide rail. • Reposition the drawer and power cord. Oven controls improperly set . • See the Using the self-cleaning oven section. then unlock the door. Rear drawer support is normal. Wait until the light on top of your home may be obstructing drawer in the locked • Make sure you call for a longer period of the metal heating...
... the Using the self-cleaning oven section. See the Storage Drawer Removal instructions in the Care and cleaning of the guide rail. • Reposition the drawer and power cord. Oven controls improperly set . • See the Using the self-cleaning oven section. then unlock the door. Rear drawer support is normal. Wait until the light on top of your home may be obstructing drawer in the locked • Make sure you call for a longer period of the metal heating...
Owners Manual
Page 33
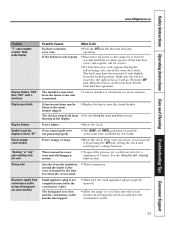
... breaker tripped. • Replace the fuse or reset the circuit breaker. If the oven was in a new oven and will go. An odor from • See the Using the clock and timer section. If the function error code repeats, call for one hour. The installed connection from the locked position. This is not completely inserted in the display. Press the OFF pad. Power failure. • Reset the clock. A fuse in the display Display...
... breaker tripped. • Replace the fuse or reset the circuit breaker. If the oven was in a new oven and will go. An odor from • See the Using the clock and timer section. If the function error code repeats, call for one hour. The installed connection from the locked position. This is not completely inserted in the display. Press the OFF pad. Power failure. • Reset the clock. A fuse in the display Display...
Owners Manual
Page 38
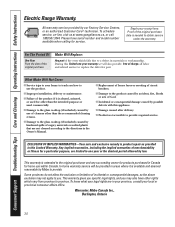
... the glass cooktop (if included) caused by possible defects with this Limited Warranty. In-home warranty service will also provide, free of the oven which vary from province to provide. Consumer Support Troubleshooting Tips Care and Cleaning Operating Instructions Safety Instructions Electric Range Warranty. For The Period Of: One Year From the date of the original purchase Mabe Will Replace: Any part of charge, all labor and related service to provide required service. Staple...
... the glass cooktop (if included) caused by possible defects with this Limited Warranty. In-home warranty service will also provide, free of the oven which vary from province to provide. Consumer Support Troubleshooting Tips Care and Cleaning Operating Instructions Safety Instructions Electric Range Warranty. For The Period Of: One Year From the date of the original purchase Mabe Will Replace: Any part of charge, all labor and related service to provide required service. Staple...


