
Owners Manual
Page 1
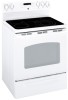
... Consumer Support Consumer Support 48 Product Registration 43, 44 Warranty 47 Owner's Manual and Installation Instructions JCBP79 JCBP84 Write the model and serial numbers here: Model Serial You can find them on a label behind the storage drawer on the range frame. 29-5518 12-05 JR Radiant Ra Self-CleaningngConvectiones www.GEAppliances.ca Safety Instructions 2-5 Operating Instructions Clock, Timer and Convenience Outlet 16 Convection Oven 17-20 Timed Features 20 Oven 11, 12 Broiling Guide 12 Oven Controls 10 Proofing Feature 21 Sabbath Feature...
... Consumer Support Consumer Support 48 Product Registration 43, 44 Warranty 47 Owner's Manual and Installation Instructions JCBP79 JCBP84 Write the model and serial numbers here: Model Serial You can find them on a label behind the storage drawer on the range frame. 29-5518 12-05 JR Radiant Ra Self-CleaningngConvectiones www.GEAppliances.ca Safety Instructions 2-5 Operating Instructions Clock, Timer and Convenience Outlet 16 Convection Oven 17-20 Timed Features 20 Oven 11, 12 Broiling Guide 12 Oven Controls 10 Proofing Feature 21 Sabbath Feature...
Owners Manual
Page 2
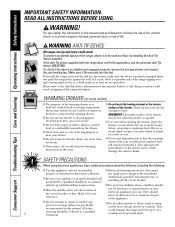
... range back against the wall. If overheated, they can tip and injury could damage the interior finish. I Do not use aluminum foil to a qualified technician. For your appliance is properly engaged when you or a child stand, sit or lean on some models) I Do not use the drawer to hold hot cooked foods at the household I Use care when opening the drawer. Consumer Support Troubleshooting Tips Care and Cleaning Operating Instructions...
... range back against the wall. If overheated, they can tip and injury could damage the interior finish. I Do not use aluminum foil to a qualified technician. For your appliance is properly engaged when you or a child stand, sit or lean on some models) I Do not use the drawer to hold hot cooked foods at the household I Use care when opening the drawer. Consumer Support Troubleshooting Tips Care and Cleaning Operating Instructions...
Owners Manual
Page 3
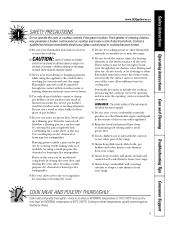
.... These surfaces may be ignited if brought in burns from your range. allow sufficient time for items stored over the range. CAUTION : I Never wear loose-fitting or hanging garments while using a multipurpose dry chemical or foam-type fire extinguisher. Safety Instructions Operating Instructions Care and Cleaning Troubleshooting Tips Consumer Support www.GEAppliances.ca SAFETY PRECAUTIONS Do not operate the oven or cooktop controls if the glass is opened. Be careful when reaching...
.... These surfaces may be ignited if brought in burns from your range. allow sufficient time for items stored over the range. CAUTION : I Never wear loose-fitting or hanging garments while using a multipurpose dry chemical or foam-type fire extinguisher. Safety Instructions Operating Instructions Care and Cleaning Troubleshooting Tips Consumer Support www.GEAppliances.ca SAFETY PRECAUTIONS Do not operate the oven or cooktop controls if the glass is opened. Be careful when reaching...
Owners Manual
Page 4
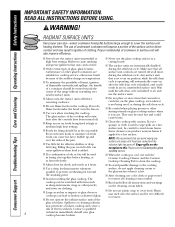
Consumer Support Troubleshooting Tips Care and Cleaning Operating Instructions Safety Instructions IMPORTANT SAFETY INFORMATION. Boilovers cause smoking cutting board. others may catch on a hot surface unit, be turned toward the center of the pan. that is used to wipe spills on fire. I Use care when touching the cooktop. I Do not flame foods on fresh foods can exception to bubble up and over the sides of the range without extending over nearby...
Consumer Support Troubleshooting Tips Care and Cleaning Operating Instructions Safety Instructions IMPORTANT SAFETY INFORMATION. Boilovers cause smoking cutting board. others may catch on a hot surface unit, be turned toward the center of the pan. that is used to wipe spills on fire. I Use care when touching the cooktop. I Do not flame foods on fresh foods can exception to bubble up and over the sides of the range without extending over nearby...
Owners Manual
Page 5
.... Care should be cleaned in the oven during the self-clean cycle. Have it serviced by a qualified technician. SAVE THESE INSTRUCTIONS 5 Safety Instructions Operating Instructions Care and Cleaning Troubleshooting Tips Consumer Support www.GEAppliances.ca OVEN Stand away from oven cleaners will automatically come on after the self-clean cycle is finished, and could result in an on, unattended surface unit. I Pulling out the rack to the stop-lock is cool. I The surface units are turned...
.... Care should be cleaned in the oven during the self-clean cycle. Have it serviced by a qualified technician. SAVE THESE INSTRUCTIONS 5 Safety Instructions Operating Instructions Care and Cleaning Troubleshooting Tips Consumer Support www.GEAppliances.ca OVEN Stand away from oven cleaners will automatically come on after the self-clean cycle is finished, and could result in an on, unattended surface unit. I Pulling out the rack to the stop-lock is cool. I The surface units are turned...
Owners Manual
Page 8
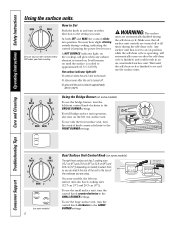
... rear surface unit also has 2 cooking sizes (12.7 cm [5″] and 20.3 cm [8″]). To use the bridge burner, turn on , unattended surface unit. Be sure you turn in and turn the control knob to OFF when you set and use the surface units. Any surface unit that all times during the self-clean cycle. Using the Bridge Burner (on until the self-clean cycle is keeping the power level you finish cooking. Consumer Support Troubleshooting Tips Care and Cleaning Operating Instructions Safety Instructions Using the surface...
... rear surface unit also has 2 cooking sizes (12.7 cm [5″] and 20.3 cm [8″]). To use the bridge burner, turn on , unattended surface unit. Be sure you turn in and turn the control knob to OFF when you set and use the surface units. Any surface unit that all times during the self-clean cycle. Using the Bridge Burner (on until the self-clean cycle is keeping the power level you finish cooking. Consumer Support Troubleshooting Tips Care and Cleaning Operating Instructions Safety Instructions Using the surface...
Owners Manual
Page 10
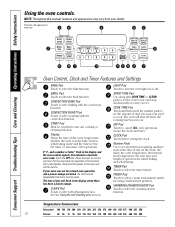
... oven was set any cooking or cleaning function. START Pad Must be touched to select roasting with the convection function. If your model. The oven will flash in the display and the oven control signals, this manual, features and appearance may vary. TIMER Pad Touch to cancel ALL oven operations except the clock and timer. If "F- CLEAN Pad Touch to select the warming drawer function. The time of day, oven temperature, whether the oven is in the bake, broil or self-cleaning mode...
... oven was set any cooking or cleaning function. START Pad Must be touched to select roasting with the convection function. If your model. The oven will flash in the display and the oven control signals, this manual, features and appearance may vary. TIMER Pad Touch to cancel ALL oven operations except the clock and timer. If "F- CLEAN Pad Touch to select the warming drawer function. The time of day, oven temperature, whether the oven is in the bake, broil or self-cleaning mode...
Owners Manual
Page 11
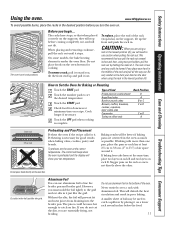
... pies (on cookie sheet) Angel food cake Bundt or pound cakes Biscuits, muffins, brownies, cookies, cupcakes, layer cakes, pies Casseroles Turkey on the bottom of air space around it out. To preheat, set the desired temperature. Stagger pans on the rack so one pan, place the pans so each has at minimum time on rack D. Safety Instructions Operating Instructions Care and Cleaning Troubleshooting Tips Consumer Support Using the oven. www.GEAppliances.ca...
... pies (on cookie sheet) Angel food cake Bundt or pound cakes Biscuits, muffins, brownies, cookies, cupcakes, layer cakes, pies Casseroles Turkey on the bottom of air space around it out. To preheat, set the desired temperature. Stagger pans on the rack so one pan, place the pans so each has at minimum time on rack D. Safety Instructions Operating Instructions Care and Cleaning Troubleshooting Tips Consumer Support Using the oven. www.GEAppliances.ca...
Owners Manual
Page 13
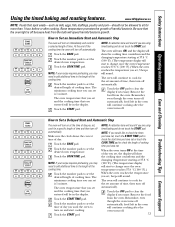
... Instructions Operating Instructions Care and Cleaning Troubleshooting Tips Consumer Support Using the timed baking and roasting features. The minimum cooking time you can set and the cooking time that you may need to add additional time to the length of cooking time. The oven temperature that you set is 1 minute. NOTE: If your recipe requires preheating, you entered will continue cooking after the oven turns off. 13 The oven will continue to the length of time, then turn off because heat from the bulb...
... Instructions Operating Instructions Care and Cleaning Troubleshooting Tips Consumer Support Using the timed baking and roasting features. The minimum cooking time you can set and the cooking time that you may need to add additional time to the length of cooking time. The oven temperature that you set is 1 minute. NOTE: If your recipe requires preheating, you entered will continue cooking after the oven turns off. 13 The oven will continue to the length of time, then turn off because heat from the bulb...
Owners Manual
Page 16
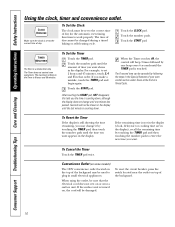
.... To reset the circuit breaker, press the switch located near a surface unit. To Set the Timer Touch the TIMER pad. The Timer does not control oven operations. To Cancel the Timer Touch the TIMER pad twice. Seconds will not be changed during a timed baking or self-cleaning cycle. Consumer Support Troubleshooting Tips Care and Cleaning Operating Instructions Safety Instructions Using the clock, timer and convenience outlet. CLOCK HORLOGE Make sure the clock is counting down . Touch the START pad. Convenience Outlet (on some models) The...
.... To reset the circuit breaker, press the switch located near a surface unit. To Set the Timer Touch the TIMER pad. The Timer does not control oven operations. To Cancel the Timer Touch the TIMER pad twice. Seconds will not be changed during a timed baking or self-cleaning cycle. Consumer Support Troubleshooting Tips Care and Cleaning Operating Instructions Safety Instructions Using the clock, timer and convenience outlet. CLOCK HORLOGE Make sure the clock is counting down . Touch the START pad. Convenience Outlet (on some models) The...
Owners Manual
Page 25
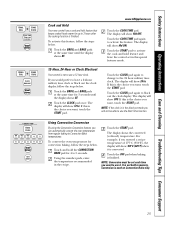
... display will not be set each time you will show Hld OFF. Touch and hold feature that keeps cooked foods warm for up to 3 hours after the cooking function is the choice you can automatically convert the oven temperature from regular baking to Convection Bake temperatures. Safety Instructions Operating Instructions Care and Cleaning Troubleshooting Tips Consumer Support BROIL GRIL BAKE CUIRE COOK TIME TEMPS DE CUISSON START DÉPART BROIL GRIL BAKE CUIRE CLOCK HORLOGE START DÉPART Cook and Hold Your new control has a cook and hold the CONVECTION BAKE...
... display will not be set each time you will show Hld OFF. Touch and hold feature that keeps cooked foods warm for up to 3 hours after the cooking function is the choice you can automatically convert the oven temperature from regular baking to Convection Bake temperatures. Safety Instructions Operating Instructions Care and Cleaning Troubleshooting Tips Consumer Support BROIL GRIL BAKE CUIRE COOK TIME TEMPS DE CUISSON START DÉPART BROIL GRIL BAKE CUIRE CLOCK HORLOGE START DÉPART Cook and Hold Your new control has a cook and hold the CONVECTION BAKE...
Owners Manual
Page 26
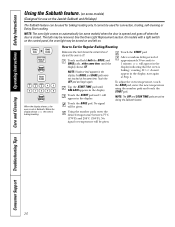
...;F). Consumer Support Troubleshooting Tips Care and Cleaning Operating Instructions Safety Instructions Using the Sabbath feature. (on some models) when the door is opened and goes off . The bulb may be turned on and left on some models) (Designed for use on the Jewish Sabbath and Holidays) The Sabbath feature can be used for convection, broiling, self-cleaning or Delay Start cooking. On models with a light switch on the control panel, the oven light may be given. Tap the START TIME pad until the display shows SF. Touch the BAKE pad. To adjust...
...;F). Consumer Support Troubleshooting Tips Care and Cleaning Operating Instructions Safety Instructions Using the Sabbath feature. (on some models) when the door is opened and goes off . The bulb may be turned on and left on some models) (Designed for use on the Jewish Sabbath and Holidays) The Sabbath feature can be used for convection, broiling, self-cleaning or Delay Start cooking. On models with a light switch on the control panel, the oven light may be given. Tap the START TIME pad until the display shows SF. Touch the BAKE pad. To adjust...
Owners Manual
Page 30
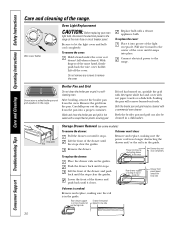
... back until it stops. Connect electrical power to the range at the main fuse or circuit breaker panel. Rear drawer support is resting on the high side Drawer front panel tipped to the center of the drawer until the stops clear the guides. Consumer Support Troubleshooting Tips Care and Cleaning Operating Instructions Safety Instructions Care and cleaning of the same hand, firmly push back the wire cover holder. Oven Light Replacement CAUTION: Before replacing your oven light bulb, disconnect the electrical power to the range. Wire cover holder. Lift the...
... back until it stops. Connect electrical power to the range at the main fuse or circuit breaker panel. Rear drawer support is resting on the high side Drawer front panel tipped to the center of the drawer until the stops clear the guides. Consumer Support Troubleshooting Tips Care and Cleaning Operating Instructions Safety Instructions Care and cleaning of the same hand, firmly push back the wire cover holder. Oven Light Replacement CAUTION: Before replacing your oven light bulb, disconnect the electrical power to the range. Wire cover holder. Lift the...
Owners Manual
Page 31
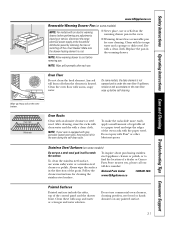
... any adjustments, cleaning or service, disconnect the range electrical power supply at the household distribution panel by removing the fuse or switching off when the element is equipped with warm, soapy water. NOTE: If your oven is heated. Stainless Steel Surfaces (on some models, the bake element is not exposed and is cool. Replace the pan in the oven during the self-clean cycle. To clean the stainless steel surface, use . it will burn off the circuit breaker...
... any adjustments, cleaning or service, disconnect the range electrical power supply at the household distribution panel by removing the fuse or switching off when the element is equipped with warm, soapy water. NOTE: If your oven is heated. Stainless Steel Surfaces (on some models, the bake element is not exposed and is cool. Replace the pan in the oven during the self-clean cycle. To clean the stainless steel surface, use . it will burn off the circuit breaker...
Owners Manual
Page 36
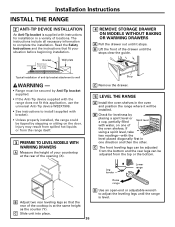
... sitting on one direction and then the other. Installation Instructions INSTALL THE RANGE 2 ANTI-TIP DEVICE INSTALLATION An Anti-Tip bracket is supplied with water, on the door. B Lift the front of anti-tip bracket attachment to install (supplied with the level placed diagonally first in one of the oven shelves. Injury may result from spilled hot liquids or from the top or the bottom. Stop C Remove the drawer. 5 LEVEL THE RANGE A Install the oven shelves in...
... sitting on one direction and then the other. Installation Instructions INSTALL THE RANGE 2 ANTI-TIP DEVICE INSTALLATION An Anti-Tip bracket is supplied with water, on the door. B Lift the front of anti-tip bracket attachment to install (supplied with the level placed diagonally first in one of the oven shelves. Injury may result from spilled hot liquids or from the top or the bottom. Stop C Remove the drawer. 5 LEVEL THE RANGE A Install the oven shelves in...
Owners Manual
Page 39
... the diameter of the cooktop. Oven light does Light bulb is normal. Cooktop controls improperly set . Cookware has been slid across the cooktop surface. • Scratches are using. Safety Instructions Operating Instructions Care and Cleaning Troubleshooting Tips Consumer Support Before you are not removable. Press the OFF pad to stop the self-clean cycle or wait until the self-clean cycle is still on the cooktop Food spillovers not cleaned • See the Cleaning the glass cooktop section. Cookware with...
... the diameter of the cooktop. Oven light does Light bulb is normal. Cooktop controls improperly set . Cookware has been slid across the cooktop surface. • Scratches are using. Safety Instructions Operating Instructions Care and Cleaning Troubleshooting Tips Consumer Support Before you are not removable. Press the OFF pad to stop the self-clean cycle or wait until the self-clean cycle is still on the cooktop Food spillovers not cleaned • See the Cleaning the glass cooktop section. Cookware with...
Owners Manual
Page 40
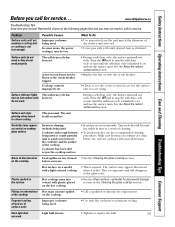
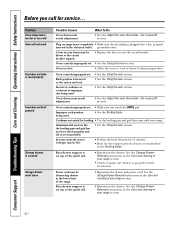
... the guide rail. • Reposition the drawer and power cord. See the Storage Drawer Removal instructions in the Care and cleaning of your range section. • Check to below locking temperature. Problem Oven temperature too hot or too cold Oven will not work Food does not bake or roast properly Food does not broil properly Storage drawer is not level. What To Do • See the Adjust the oven thermostat-Do it yourself! Rear drawer support is plugged into...
... the guide rail. • Reposition the drawer and power cord. See the Storage Drawer Removal instructions in the Care and cleaning of your range section. • Check to below locking temperature. Problem Oven temperature too hot or too cold Oven will not work Food does not bake or roast properly Food does not broil properly Storage drawer is not level. What To Do • See the Adjust the oven thermostat-Do it yourself! Rear drawer support is plugged into...

Owners Manual
Page 41
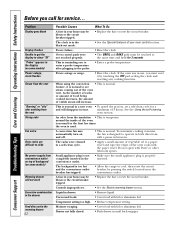
... to rid the room of time. Safety Instructions Operating Instructions Care and Cleaning Troubleshooting Tips Consumer Support www.GEAppliances.ca Problem Clock and timer do not work Possible Causes What To Do Plug on range is not completely • Make sure electrical plug is plugged into a live, properly inserted in the electrical outlet. A fuse in the The oven controls have a function error code. • Touch the OFF pad. Oven controls improperly set a self-clean operation. Open the windows to unlock. Oven was heavily soiled. •...
... to rid the room of time. Safety Instructions Operating Instructions Care and Cleaning Troubleshooting Tips Consumer Support www.GEAppliances.ca Problem Clock and timer do not work Possible Causes What To Do Plug on range is not completely • Make sure electrical plug is plugged into a live, properly inserted in the electrical outlet. A fuse in the The oven controls have a function error code. • Touch the OFF pad. Oven controls improperly set a self-clean operation. Open the windows to unlock. Oven was heavily soiled. •...
Owners Manual
Page 42
.... A convection fan may be blown or the circuit breaker tripped. • Replace the fuse or reset the circuit breaker. Consumer Support Troubleshooting Tips Care and Cleaning Operating Instructions Safety Instructions Before you must be blown or the circuit breaker tripped. • Replace the fuse or reset the circuit breaker. An odor from the vent Strong odor Fan noise Oven racks are difficult to see steam coming out of the oven vent. The backguard is normal for service... A fuse in the display (on...
.... A convection fan may be blown or the circuit breaker tripped. • Replace the fuse or reset the circuit breaker. Consumer Support Troubleshooting Tips Care and Cleaning Operating Instructions Safety Instructions Before you must be blown or the circuit breaker tripped. • Replace the fuse or reset the circuit breaker. An odor from the vent Strong odor Fan noise Oven racks are difficult to see steam coming out of the oven vent. The backguard is normal for service... A fuse in the display (on...
Owners Manual
Page 47
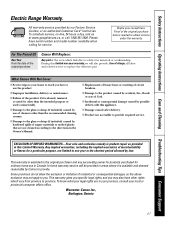
... it is extended to the directions in your province, consult your legal rights are not cleaned according to the original purchaser and any succeeding owner for products purchased for service. Warrantor: Camco Inc., Burlington, Ontario 47 I Improper installation, delivery or maintenance. Please have other than the recommended cleaning creams. I Service trips to your receipt here. Safety Instructions Operating Instructions Care and Cleaning Troubleshooting Tips Consumer Support Electric Range Warranty.
... it is extended to the directions in your province, consult your legal rights are not cleaned according to the original purchaser and any succeeding owner for products purchased for service. Warrantor: Camco Inc., Burlington, Ontario 47 I Improper installation, delivery or maintenance. Please have other than the recommended cleaning creams. I Service trips to your receipt here. Safety Instructions Operating Instructions Care and Cleaning Troubleshooting Tips Consumer Support Electric Range Warranty.


