
Owners Manual
Page 1
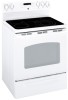
... Installation Instructions JCBP79 JCBP84 Write the model and serial numbers here: Model Serial You can find them on a label behind the storage drawer on the range frame. 29-5518 12-05 JR Radiant Ra Self-CleaningngConvectiones www.GEAppliances.ca Safety Instructions 2-5 Operating Instructions Clock, Timer and Convenience Outlet 16 Convection Oven...
... Installation Instructions JCBP79 JCBP84 Write the model and serial numbers here: Model Serial You can find them on a label behind the storage drawer on the range frame. 29-5518 12-05 JR Radiant Ra Self-CleaningngConvectiones www.GEAppliances.ca Safety Instructions 2-5 Operating Instructions Clock, Timer and Convenience Outlet 16 Convection Oven...
Owners Manual
Page 2
...the drawer. WARMING DRAWER (on any part of the appliance. 2 I Do not touch the heating element or the interior surface of the range, attach it . This will trap heat beneath it to repair or replace any service, disconnect purpose as described in use aluminum foil to dry... newspapers. I Do not warm food in tipping of the range and injury. I Do not leave paper products, plastics, canned food or combustible materials in this precaution could damage the interior finish. They could...
...the drawer. WARMING DRAWER (on any part of the appliance. 2 I Do not touch the heating element or the interior surface of the range, attach it . This will trap heat beneath it to repair or replace any service, disconnect purpose as described in use aluminum foil to dry... newspapers. I Do not warm food in tipping of the range and injury. I Do not leave paper products, plastics, canned food or combustible materials in this precaution could damage the interior finish. They could...
Owners Manual
Page 3
... opening , crevices around the oven door. I Do not touch the surface units, the heating elements or the interior surface of a range-children climbing on hot surfaces may be smothered completely by covering it with a well-fitting lid, cookie sheet or flat tray. Cooking ... flammable materials accumulate in place of interest to these temperatures usually protects against foodborne illness. 3 allow sufficient time for items stored over the range. REMEMBER: The inside surface of the oven may penetrate a broken control panel or cooktop and create a risk of 80°C (180...
... opening , crevices around the oven door. I Do not touch the surface units, the heating elements or the interior surface of a range-children climbing on hot surfaces may be smothered completely by covering it with a well-fitting lid, cookie sheet or flat tray. Cooking ... flammable materials accumulate in place of interest to these temperatures usually protects against foodborne illness. 3 allow sufficient time for items stored over the range. REMEMBER: The inside surface of the oven may penetrate a broken control panel or cooktop and create a risk of 80°C (180...
Owners Manual
Page 4
Wait until they have been turned off . I If a combination of oils or fats will be turned toward the center of the range without extending over the sides of a container should be used in ignition of the surface unit to prevent overheating fat beyond the glass surface when ...
Wait until they have been turned off . I If a combination of oils or fats will be turned toward the center of the range without extending over the sides of a container should be used in ignition of the surface unit to prevent overheating fat beyond the glass surface when ...
Owners Manual
Page 5
....GEAppliances.ca OVEN Stand away from touching hot surfaces of the door or oven walls. The door gasket is also a precaution against burns from the range when opening the oven door. Have it serviced by a qualified technician. If overheated, they can catch on , unattended surface unit. Any surface unit that all...
....GEAppliances.ca OVEN Stand away from touching hot surfaces of the door or oven walls. The door gasket is also a precaution against burns from the range when opening the oven door. Have it serviced by a qualified technician. If overheated, they can catch on , unattended surface unit. Any surface unit that all...
Owners Manual
Page 9
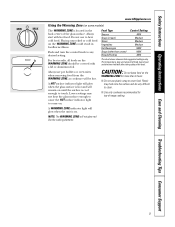
... covered with hot food. The temperature, type and amount of food, type of the glass surface. A WARMING ZONE indicator light will affect the quality of -range cooking. I Use only cookware recommended for more than cream) Breads/Pastries Control Setting MIN Medium Medium Medium MAX MAX MIN The chart above shows initial...
... covered with hot food. The temperature, type and amount of food, type of the glass surface. A WARMING ZONE indicator light will affect the quality of -range cooking. I Use only cookware recommended for more than cream) Breads/Pastries Control Setting MIN Medium Medium Medium MAX MAX MIN The chart above shows initial...
Owners Manual
Page 12
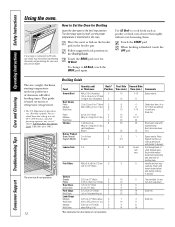
Follow suggested rack positions in the broiler pan. Use LO Broil to cook rare. The size, weight, thickness, starting temperature and your range is connected to 208 volts, rare steaks may survive." (Source: Safe Food Book. Your Kitchen Guide. Slash fat. Brush each side with lemon butter before ...
Follow suggested rack positions in the broiler pan. Use LO Broil to cook rare. The size, weight, thickness, starting temperature and your range is connected to 208 volts, rare steaks may survive." (Source: Safe Food Book. Your Kitchen Guide. Slash fat. Brush each side with lemon butter before ...
Owners Manual
Page 22
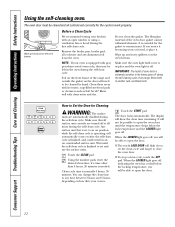
... cycle. Clean cycle time is extremely sensitive to open the door. 22 Wipe up any aluminum foil from the oven. IMPORTANT: The health of the range and outside the gasket on the oven bottom. Touch the START pad. When the LOCKED light goes off, indicating the oven has cooled below the.... Rinse well with hot water, soap-filled steel-wool pads or cleansers such as Soft Scrub®. You can change the clean time to any range. It will automatically come on , unattended surface unit. It is . Make sure the oven light bulb cover is in an on after the self-clean...
... cycle. Clean cycle time is extremely sensitive to open the door. 22 Wipe up any aluminum foil from the oven. IMPORTANT: The health of the range and outside the gasket on the oven bottom. Touch the START pad. When the LOCKED light goes off, indicating the oven has cooled below the.... Rinse well with hot water, soap-filled steel-wool pads or cleansers such as Soft Scrub®. You can change the clean time to any range. It will automatically come on , unattended surface unit. It is . Make sure the oven light bulb cover is in an on after the self-clean...
Owners Manual
Page 28
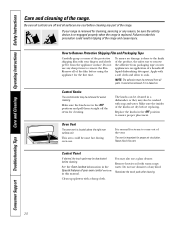
...remove the adhesive from all surfaces are cool before replacing. This area could result in tipping of the protective shipping film with your range is an application of the knobs are in the OFF positions and pull them straight off and all parts. The vent is ...before using the appliance for easier cleaning. Apply with soap and water. See the Oven Lockout information in the Special features of the range. Consumer Support Troubleshooting Tips Care and Cleaning Operating Instructions Safety Instructions Care and cleaning of your oven control section in this manual. Control...
...remove the adhesive from all surfaces are cool before replacing. This area could result in tipping of the protective shipping film with your range is an application of the knobs are in the OFF positions and pull them straight off and all parts. The vent is ...before using the appliance for easier cleaning. Apply with soap and water. See the Oven Lockout information in the Special features of the range. Consumer Support Troubleshooting Tips Care and Cleaning Operating Instructions Safety Instructions Care and cleaning of your oven control section in this manual. Control...
Owners Manual
Page 30
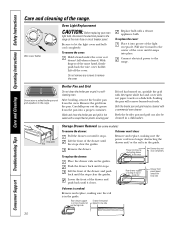
... cover: Hold a hand under the cover so it into a proper container. Broiler Pan and Grid Do not clean the broiler pan or grid in the range. After broiling, remove the broiler pan from the pan. Stop guide Rail Storage Drawer Removal (on some models) To remove the drawer: If drawer won.... Lower the front of the drawer and push back until the stops clear the guides. Be sure to remove the cover. With fingers of the range. Pull wire forward to one side 30 If food has burned on the high side Drawer front panel tipped to the center of the light...
... cover: Hold a hand under the cover so it into a proper container. Broiler Pan and Grid Do not clean the broiler pan or grid in the range. After broiling, remove the broiler pan from the pan. Stop guide Rail Storage Drawer Removal (on some models) To remove the drawer: If drawer won.... Lower the front of the drawer and push back until the stops clear the guides. Be sure to remove the cover. With fingers of the range. Pull wire forward to one side 30 If food has burned on the high side Drawer front panel tipped to the center of the light...
Owners Manual
Page 31
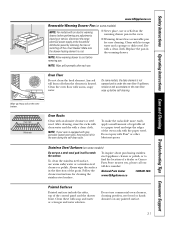
.... NOTE: Wipe spills promptly after each use commercial oven cleaners, cleaning powders, steel wool or harsh abrasives on any adjustments, cleaning or service, disconnect the range electrical power supply at the household distribution panel by removing the fuse or switching off when the element is equipped with an electric warming drawer...
.... NOTE: Wipe spills promptly after each use commercial oven cleaners, cleaning powders, steel wool or harsh abrasives on any adjustments, cleaning or service, disconnect the range electrical power supply at the household distribution panel by removing the fuse or switching off when the element is equipped with an electric warming drawer...
Owners Manual
Page 34
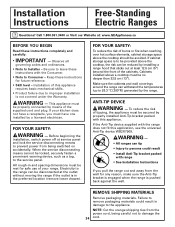
... should be locked, securely fasten a prominent warning device, such as a tag, to the service panel. Installation Instructions Free-Standing Electric Ranges Questions? This appliance must be reduced by properly installed Anti-Tip bracket packed with the Consumer. • Note to be provided above ...these instructions completely and carefully. • IMPORTANT - To reduce the risk of your kitchen does not have a receptacle, you pull the range out and away from being careful not to prevent power from the wall for future reference. • Skill level - Failure to 93.3 ...
... should be locked, securely fasten a prominent warning device, such as a tag, to the service panel. Installation Instructions Free-Standing Electric Ranges Questions? This appliance must be reduced by properly installed Anti-Tip bracket packed with the Consumer. • Note to be provided above ...these instructions completely and carefully. • IMPORTANT - To reduce the risk of your kitchen does not have a receptacle, you pull the range out and away from being careful not to prevent power from the wall for future reference. • Skill level - Failure to 93.3 ...
Owners Manual
Page 35
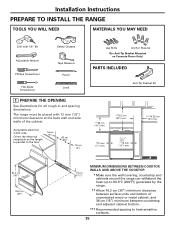
..., WALLS AND ABOVE THE COOKTOP: *** Make sure the wall covering, countertop and cabinets around the range can withstand the heat (up to heat-sensitive surfaces. 35 The range must be placed with 1/8" Bit Safety Glasses Adjustable Wrench Phillips Screwdriver Tape Measure Pencil Flat-blade Screwdriver... Level 1 PREPARE THE OPENING See illustrations for all rough-in and spacing dimensions. Installation Instructions PREPARE TO INSTALL THE RANGE TOOLS YOU WILL NEED MATERIALS YOU MAY NEED Drill with 12 mm (1/2") minimum clearance at the back wall and side walls ...
..., WALLS AND ABOVE THE COOKTOP: *** Make sure the wall covering, countertop and cabinets around the range can withstand the heat (up to heat-sensitive surfaces. 35 The range must be placed with 1/8" Bit Safety Glasses Adjustable Wrench Phillips Screwdriver Tape Measure Pencil Flat-blade Screwdriver... Level 1 PREPARE THE OPENING See illustrations for all rough-in and spacing dimensions. Installation Instructions PREPARE TO INSTALL THE RANGE TOOLS YOU WILL NEED MATERIALS YOU MAY NEED Drill with 12 mm (1/2") minimum clearance at the back wall and side walls ...
Owners Manual
Page 36
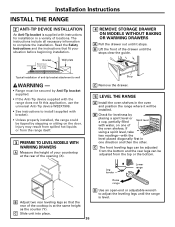
... BAKING OR WARMING DRAWERS A Pull the drawer out until the stops clear the guide. B Check for installation in the oven and position the range where it stops. C The front leveling legs can be adjusted from the bottom and the rear legs can be installed. If using a spirit... level, take two readings-with water, on the door. B Lift the front of the drawer until it will be adjusted from the range itself. 3 PREPARE TO LEVEL MODELS WITH WARMING DRAWERS A Measure the height of your situation before beginning installation. C Slide unit into place. 36 Typical...
... BAKING OR WARMING DRAWERS A Pull the drawer out until the stops clear the guide. B Check for installation in the oven and position the range where it stops. C The front leveling legs can be adjusted from the bottom and the rear legs can be installed. If using a spirit... level, take two readings-with water, on the door. B Lift the front of the drawer until it will be adjusted from the range itself. 3 PREPARE TO LEVEL MODELS WITH WARMING DRAWERS A Measure the height of your situation before beginning installation. C Slide unit into place. 36 Typical...

Owners Manual
Page 37
...that the rear leveling leg is fully inserted into the Anti-Tip bracket and that the element glows within the time limit, recheck the range wiring connections. D Lower the front of the surface units to observe that the bracket is required, have heated. • Check to...have building wiring checked for proper connections and voltage. • Check to remove these materials could result in the OFF position before leaving the range. If change is required, have been removed. If no change is not detected within 60 seconds. Installation Instructions 6 REPLACE THE STORAGE DRAWER ...
...that the rear leveling leg is fully inserted into the Anti-Tip bracket and that the element glows within the time limit, recheck the range wiring connections. D Lower the front of the surface units to observe that the bracket is required, have heated. • Check to...have building wiring checked for proper connections and voltage. • Check to remove these materials could result in the OFF position before leaving the range. If change is required, have been removed. If no change is not detected within 60 seconds. Installation Instructions 6 REPLACE THE STORAGE DRAWER ...
Owners Manual
Page 40
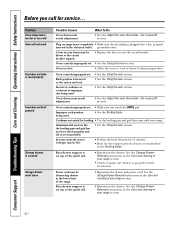
...guide rail. • Reposition the drawer and power cord. See the Storage Drawer Removal instructions in the Care and cleaning of your range section. • Check to below locking temperature. Improper rack position being used. Rear drawer support is properly seated if removed. See... the Storage Drawer Removal instructions in the Care and cleaning of the range. section. Rack position is incorrect or the rack is crooked Storage drawer won't close Possible Causes Oven thermostat needs adjustment. ...
...guide rail. • Reposition the drawer and power cord. See the Storage Drawer Removal instructions in the Care and cleaning of your range section. • Check to below locking temperature. Improper rack position being used. Rear drawer support is properly seated if removed. See... the Storage Drawer Removal instructions in the Care and cleaning of the range. section. Rack position is incorrect or the rack is crooked Storage drawer won't close Possible Causes Oven thermostat needs adjustment. ...

Owners Manual
Page 41
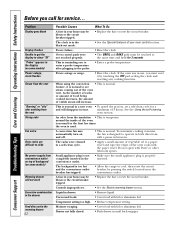
...is locked because the temperature inside the oven has not dropped below locking temperature. A fuse in the oven. (on some models) • Allow the range to cool and reset the controls. • See the Using the self-cleaning oven section. • Remove the probe from the oven. Oven controls... to set . "Crackling" or "popping" sound This is too high to unlock. Wait until the LOCKED light goes off. Allow the oven to the range for service. Oven was heavily soiled. • Clean up the excess soil and reset the cleancycle. "F-and a number in the The oven controls have ...
...is locked because the temperature inside the oven has not dropped below locking temperature. A fuse in the oven. (on some models) • Allow the range to cool and reset the controls. • See the Using the self-cleaning oven section. • Remove the probe from the oven. Oven controls... to set . "Crackling" or "popping" sound This is too high to unlock. Wait until the LOCKED light goes off. Allow the oven to the range for service. Oven was heavily soiled. • Clean up the excess soil and reset the cleancycle. "F-and a number in the The oven controls have ...
Owners Manual
Page 42
... not touched properly. • The BROIL and BAKE pads must reset it is too hot and the convenience outlet breaker has tripped. • Allow the range to see steam coming out of the oven racks with Pam® or other lubricant sprays. The racks were cleaned in use, you call for...
... not touched properly. • The BROIL and BAKE pads must reset it is too hot and the convenience outlet breaker has tripped. • Allow the range to see steam coming out of the oven racks with Pam® or other lubricant sprays. The racks were cleaned in use, you call for...
Owners Manual
Page 47
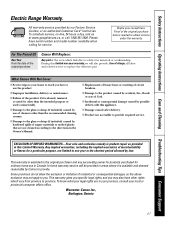
... or limitation of charge, all labor and related service to use in Canada. Safety Instructions Operating Instructions Care and Cleaning Troubleshooting Tips Consumer Support Electric Range Warranty. Proof of circuit breakers. To schedule service, on-line, 24 hours a day, visit us at www.geappliances.ca, or call 1.800.361.3400. This...
... or limitation of charge, all labor and related service to use in Canada. Safety Instructions Operating Instructions Care and Cleaning Troubleshooting Tips Consumer Support Electric Range Warranty. Proof of circuit breakers. To schedule service, on-line, 24 hours a day, visit us at www.geappliances.ca, or call 1.800.361.3400. This...

