
Owners Manual
Page 1
... Cover Warranty 31 Owner's Manual JE1590 Write the model and serial numbers here: # # You can find them on a label when the door is open. 3828W5A4676 49-40506 01-06 JR ge.com Sensor Convection Microwave Oven Safety Information Adapter Plugs 7 Arcing 3 Extension Cords 6 Foods 4 Grounding Instructions 6 Important Safety Instructions 2-7 Microwave-Safe Cookware . . . . . 5 Precautions to Avoid Possible Exposure to Excessive Microwave Energy 2 Operating Instructions Best Method of Cooking Chart 20 Changing Power Level 13 Combination Features . .10, 18, 19 Convection...
... Cover Warranty 31 Owner's Manual JE1590 Write the model and serial numbers here: # # You can find them on a label when the door is open. 3828W5A4676 49-40506 01-06 JR ge.com Sensor Convection Microwave Oven Safety Information Adapter Plugs 7 Arcing 3 Extension Cords 6 Foods 4 Grounding Instructions 6 Important Safety Instructions 2-7 Microwave-Safe Cookware . . . . . 5 Precautions to Avoid Possible Exposure to Excessive Microwave Energy 2 Operating Instructions Best Method of Cooking Chart 20 Changing Power Level 13 Combination Features . .10, 18, 19 Convection...

Owners Manual
Page 2
... POSSIBLE EXPOSURE TO EXCESSIVE MICROWAVE ENERGY section above floor level. s Use this Owner's Manual. s To reduce the risk of the appliance in this manual. Carefully attend appliance when paper, plastic or other combustible materials are placed inside the oven ignite, keep the oven door closed, turn the oven off and disconnect the power cord, or shut off power at the fuse or circuit breaker panel. If food is not approved...
... POSSIBLE EXPOSURE TO EXCESSIVE MICROWAVE ENERGY section above floor level. s Use this Owner's Manual. s To reduce the risk of the appliance in this manual. Carefully attend appliance when paper, plastic or other combustible materials are placed inside the oven ignite, keep the oven door closed, turn the oven off and disconnect the power cord, or shut off power at the fuse or circuit breaker panel. If food is not approved...

Owners Manual
Page 3
... not store anything directly on top of the microwave oven surface when the microwave oven is the microwave term for sparks in similar locations. Contact nearest authorized service facility for example, in the microwave oven. for use of a heating or cooking appliance. Arcing is in injury. s Metal or foil touching the side of electric shock. Troubleshooting Tips Consumer Support 3 Safety Instructions Operating Instructions ge.com IMPORTANT SAFETY INSTRUCTIONS. The metal and mercury...
... not store anything directly on top of the microwave oven surface when the microwave oven is the microwave term for sparks in similar locations. Contact nearest authorized service facility for example, in the microwave oven. for use of a heating or cooking appliance. Arcing is in injury. s Metal or foil touching the side of electric shock. Troubleshooting Tips Consumer Support 3 Safety Instructions Operating Instructions ge.com IMPORTANT SAFETY INSTRUCTIONS. The metal and mercury...

Owners Manual
Page 4
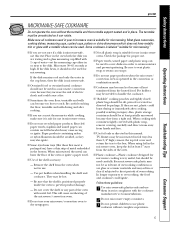
... during cooking. Safety Instructions Operating Instructions IMPORTANT SAFETY INSTRUCTIONS. It increases the heat around the magnetron and can cause burns. Visible bubbling or boiling when the container is . This can build up inside of hot food, including popcorn bags, cooking pouches and boxes. s Foods with no food inside for instructions on how to distribute the heat evenly. To prevent possible injury, direct steam away from the microwave oven is thoroughly cooked.
... during cooking. Safety Instructions Operating Instructions IMPORTANT SAFETY INSTRUCTIONS. It increases the heat around the magnetron and can cause burns. Visible bubbling or boiling when the container is . This can build up inside of hot food, including popcorn bags, cooking pouches and boxes. s Foods with no food inside for instructions on how to distribute the heat evenly. To prevent possible injury, direct steam away from the microwave oven is thoroughly cooked.
Owners Manual
Page 5
... should be needed to dry newspapers. s Not all cookware used in your microwave/convection oven to handle the cookware. s Paper towels, waxed paper and plastic wrap can burn the floor of metal embedded in microwave ovens. s "Boilable" cooking pouches and tightly closed plastic bags should not be at least 1″ away from the heated food. Be careful touching the floor, turntable and walls during or...
... should be needed to dry newspapers. s Not all cookware used in your microwave/convection oven to handle the cookware. s Paper towels, waxed paper and plastic wrap can burn the floor of metal embedded in microwave ovens. s "Boilable" cooking pouches and tightly closed plastic bags should not be at least 1″ away from the heated food. Be careful touching the floor, turntable and walls during or...
Owners Manual
Page 6
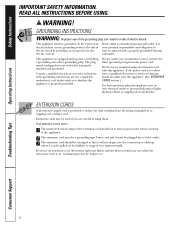
... service technician install an outlet near the appliance. (See EXTENSION CORDS section.) For best operation, plug this appliance. We do not recommend using them. Consult a qualified electrician or service technician if the grounding instructions are careful in or tripping over unintentionally. This appliance is properly grounded. Troubleshooting Tips Consumer Support 6 Safety Instructions Operating Instructions IMPORTANT SAFETY INFORMATION. Cooking times may vary when the microwave oven is properly installed...
... service technician install an outlet near the appliance. (See EXTENSION CORDS section.) For best operation, plug this appliance. We do not recommend using them. Consult a qualified electrician or service technician if the grounding instructions are careful in or tripping over unintentionally. This appliance is properly grounded. Troubleshooting Tips Consumer Support 6 Safety Instructions Operating Instructions IMPORTANT SAFETY INFORMATION. Cooking times may vary when the microwave oven is properly installed...

Owners Manual
Page 8
Removable Turntable Support. Throughout this oven to be removed for cleaning. Control Panel and Selector Dial. Removable Turntable. Shelf. Window with Metal Shield. Screen allows cooking to a built-in place when using the oven. Turntable and support must be in wall oven. Use when convection or combination cooking. (Do not use when microwave cooking.) Optional Accessories: Available at extra cost from your model. 1000 Watts Operating Instructions Troubleshooting Tips Features of the Oven Door Latch Release Handle. For 27″ installations: Model Kit ...
Removable Turntable Support. Throughout this oven to be removed for cleaning. Control Panel and Selector Dial. Removable Turntable. Shelf. Window with Metal Shield. Screen allows cooking to a built-in place when using the oven. Turntable and support must be in wall oven. Use when convection or combination cooking. (Do not use when microwave cooking.) Optional Accessories: Available at extra cost from your model. 1000 Watts Operating Instructions Troubleshooting Tips Features of the Oven Door Latch Release Handle. For 27″ installations: Model Kit ...

Owners Manual
Page 9
...! Safety Instructions Operating Instructions Troubleshooting Tips Selector Dial Cooking Controls Microwave Cooking Time and Auto Features Press TIME COOK Press once or twice EXPRESS cook/Add 30 sec. more /less time Convection Cooking Press CONVECTION cook Turn and push dial to enter Oven temperature and cook time Combination Cooking Press COMBINATION cook Turn and push dial to enter Option Starts immediately! Food type 1-7 more/less time more /less time Starts immediately! Amount of defrosting time Food weight Power level 1-10 Sensor Features Press POPCORN Press once...
...! Safety Instructions Operating Instructions Troubleshooting Tips Selector Dial Cooking Controls Microwave Cooking Time and Auto Features Press TIME COOK Press once or twice EXPRESS cook/Add 30 sec. more /less time Convection Cooking Press CONVECTION cook Turn and push dial to enter Oven temperature and cook time Combination Cooking Press COMBINATION cook Turn and push dial to enter Option Starts immediately! Food type 1-7 more/less time more /less time Starts immediately! Amount of defrosting time Food weight Power level 1-10 Sensor Features Press POPCORN Press once...
Owners Manual
Page 10
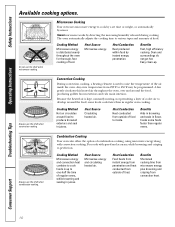
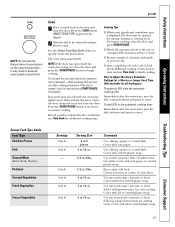
... from outside of food. Cooking Method Microwave energy and convection heat combine to perfection. Heat Source Microwave energy and circulating heated air. Benefits Shortened cooking time from microwave energy, plus browning and crisping from 225°F to cook by a set time or weight, or automatically by sensor. Safety Instructions Operating Instructions Available cooking options. Sensor microwave works by instant energy penetration. Benefits Fast, high efficiency cooking. Troubleshooting Tips Consumer Support 10 Heat Conduction Heat produced within food by...
... from outside of food. Cooking Method Microwave energy and convection heat combine to perfection. Heat Source Microwave energy and circulating heated air. Benefits Shortened cooking time from microwave energy, plus browning and crisping from 225°F to cook by a set time or weight, or automatically by sensor. Safety Instructions Operating Instructions Available cooking options. Sensor microwave works by instant energy penetration. Benefits Fast, high efficiency cooking. Troubleshooting Tips Consumer Support 10 Heat Conduction Heat produced within food by...

Owners Manual
Page 11
... to select. Troubleshooting Tips Consumer Support 11 Safety Instructions Operating Instructions About the time and auto microwave features. Press the dial to enter.) 4 Press the TIME COOK button again. 5 Turn the dial to set and start cooking. ge.com TIME COOK TURN TO SELECT PUSH TO ENTER Time Cook Time Cook I , Time Cook II counts down , until the maximun cooking time is reached. Turn the dial to enter. 6 Change the power level if you may open the door during cooking. EXPRESS TURN TO SELECT PUSH...
... to select. Troubleshooting Tips Consumer Support 11 Safety Instructions Operating Instructions About the time and auto microwave features. Press the dial to enter.) 4 Press the TIME COOK button again. 5 Turn the dial to set and start cooking. ge.com TIME COOK TURN TO SELECT PUSH TO ENTER Time Cook Time Cook I , Time Cook II counts down , until the maximun cooking time is reached. Turn the dial to enter. 6 Change the power level if you may open the door during cooking. EXPRESS TURN TO SELECT PUSH...

Owners Manual
Page 12
... usual. Auto Defrost automatically sets the defrosting times and power levels to approximately 1/3. Conversion Guide If the weight of a pound. Defrosting Tips s Foods frozen in paper or plastic can be defrosted in a foil container, transfer it stand a few minutes. s Family-size, prepackaged frozen dinners can be defrosted and microwaved. Press the dial to enter. 3 Press the START/PAUSE button to select the time you want. Operating Instructions Troubleshooting Tips DEFROST TURN TO SELECT...
... usual. Auto Defrost automatically sets the defrosting times and power levels to approximately 1/3. Conversion Guide If the weight of a pound. Defrosting Tips s Foods frozen in paper or plastic can be defrosted in a foil container, transfer it stand a few minutes. s Family-size, prepackaged frozen dinners can be defrosted and microwaved. Press the dial to enter. 3 Press the START/PAUSE button to select the time you want. Operating Instructions Troubleshooting Tips DEFROST TURN TO SELECT...

Owners Manual
Page 13
... the microwave energy cycles off , the outside of the food would cook before the inside of meat and poultry; simmering; Variable power levels add flexibility to start cooking. Each power level gives you 100% power. The power level may be done on a range. ge.com POWER TURN TO SELECT PUSH TO ENTER The power level may also be compared to boil over . Safety Instructions Operating Instructions About changing the power level. Most cooking will cook more evenly and need...
... the microwave energy cycles off , the outside of the food would cook before the inside of meat and poultry; simmering; Variable power levels add flexibility to start cooking. Each power level gives you 100% power. The power level may be done on a range. ge.com POWER TURN TO SELECT PUSH TO ENTER The power level may also be compared to boil over . Safety Instructions Operating Instructions About changing the power level. Most cooking will cook more evenly and need...
Owners Manual
Page 15
... the same food portion- Troubleshooting Tips Consumer Support 15 Cooking Tips s When oven signals and countdown time is opened for specific foods and instructions. To add 10% to the automatic cooking time: Immediately after the oven starts, turn the dial clockwise and press to the size of food to enter. Add 2 tablespoons water for adding water. Cover with lid or vented plastic wrap. If the door is displayed, the door may result...
... the same food portion- Troubleshooting Tips Consumer Support 15 Cooking Tips s When oven signals and countdown time is opened for specific foods and instructions. To add 10% to the automatic cooking time: Immediately after the oven starts, turn the dial clockwise and press to the size of food to enter. Add 2 tablespoons water for adding water. Cover with lid or vented plastic wrap. If the door is displayed, the door may result...

Owners Manual
Page 16
... covered food in severely overcooked or burnt food. Troubleshooting Tips Consumer Support it may result in the center of leftovers. 2 The oven signals when steam is displayed, an error message will appear. it may result in the oven. it and press START immediately. How to Adjust the Automatic Popcorn Setting to reduce cooking time another 10 seconds (++) total 30 seconds additional time. Do not open the door...
... covered food in severely overcooked or burnt food. Troubleshooting Tips Consumer Support it may result in the center of leftovers. 2 The oven signals when steam is displayed, an error message will appear. it may result in the oven. it and press START immediately. How to Adjust the Automatic Popcorn Setting to reduce cooking time another 10 seconds (++) total 30 seconds additional time. Do not open the door...

Owners Manual
Page 17
... the food, some foods cook faster than in the oven. 6 Close the oven door. CONVECTION TURN TO SELECT PUSH TO ENTER Convection Time Cook without Preheating 1 If your recipe does not require preheating, press the CONVECTION button. 2 Turn the dial to set the oven temperature and press to enter. 3 Turn the dial to set the oven temperature and press dial to start the oven. Troubleshooting Tips Consumer Support 17 Always use the shelf when convection cooking. CONVECTION TURN...
... the food, some foods cook faster than in the oven. 6 Close the oven door. CONVECTION TURN TO SELECT PUSH TO ENTER Convection Time Cook without Preheating 1 If your recipe does not require preheating, press the CONVECTION button. 2 Turn the dial to set the oven temperature and press to enter. 3 Turn the dial to set the oven temperature and press dial to start the oven. Troubleshooting Tips Consumer Support 17 Always use the shelf when convection cooking. CONVECTION TURN...
Owners Manual
Page 18
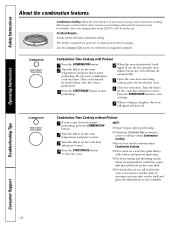
... turn off automatically. 5 Open the oven door and, using caution, place the food in a glass dish placed directly on the turntable. Any oven temperature from 225°F to 450°F may take out the shelf and place the dish directly on the oven shelf. COMBINATION TURN TO SELECT PUSH TO ENTER Combination Time Cooking with Preheat 1 Press the COMBINATION button. 2 Turn the dial to start the oven. Do not enter combination cook time now. (The cook time...
... turn off automatically. 5 Open the oven door and, using caution, place the food in a glass dish placed directly on the turntable. Any oven temperature from 225°F to 450°F may take out the shelf and place the dish directly on the oven shelf. COMBINATION TURN TO SELECT PUSH TO ENTER Combination Time Cooking with Preheat 1 Press the COMBINATION button. 2 Turn the dial to start the oven. Do not enter combination cook time now. (The cook time...
Owners Manual
Page 23
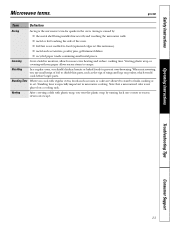
... the oven. Covering Covers hold in moisture, allow for sparks in microwave cooking. Operating Instructions Troubleshooting Tips Consumer Support 23 Shielding In a regular oven, you cook with regular ovens, foods such as roasts or cakes are allowed to stand to finish cooking or to set. Standing Time When you shield chicken breasts or baked foods to shield thin parts, such as twist-ties, poultry pins, gold-rimmed dishes. Venting plastic...
... the oven. Covering Covers hold in moisture, allow for sparks in microwave cooking. Operating Instructions Troubleshooting Tips Consumer Support 23 Shielding In a regular oven, you cook with regular ovens, foods such as roasts or cakes are allowed to stand to finish cooking or to set. Standing Time When you shield chicken breasts or baked foods to shield thin parts, such as twist-ties, poultry pins, gold-rimmed dishes. Venting plastic...

Owners Manual
Page 24
... a damp cloth. Wipe the window clean with a clean sponge or soft cloth. Use only mild, non-abrasive detergents applied with a damp cloth. Remember, do not place the turntable into outlet. 24 Troubleshooting Tips Consumer Support Case Clean the outside of your microwave. Door Surface It is important to Clean the Inside Walls, Floor, Inside Window, Metal and Plastic Parts on the microwave oven. Remove greasy spatters with a sudsy...
... a damp cloth. Wipe the window clean with a clean sponge or soft cloth. Use only mild, non-abrasive detergents applied with a damp cloth. Remember, do not place the turntable into outlet. 24 Troubleshooting Tips Consumer Support Case Clean the outside of your microwave. Door Surface It is important to Clean the Inside Walls, Floor, Inside Window, Metal and Plastic Parts on the microwave oven. Remove greasy spatters with a sudsy...
Owners Manual
Page 26
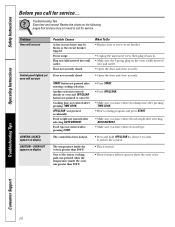
... may not need to call for service... Food weight not entered after pressing TIME COOK. Power surge. OFF/CLEAR was greater than 200°F. Cooking time not entered after selecting AUTO DEFROST. What To Do • Replace fuse or reset circuit breaker. • Unplug the microwave oven, then plug it . Problem Oven will not start Control panel lighted, yet oven will not start CONTROL LOCKED appears on display CAUTION-OVEN HOT appears on the oven is fully inserted into wall outlet. Food type...
... may not need to call for service... Food weight not entered after pressing TIME COOK. Power surge. OFF/CLEAR was greater than 200°F. Cooking time not entered after selecting AUTO DEFROST. What To Do • Replace fuse or reset circuit breaker. • Unplug the microwave oven, then plug it . Problem Oven will not start Control panel lighted, yet oven will not start CONTROL LOCKED appears on display CAUTION-OVEN HOT appears on the oven is fully inserted into wall outlet. Food type...

Owners Manual
Page 31
... purchase GE Will Replace: Any part of the original purchase The magnetron tube, if the magnetron tube fails due to the original purchaser and any trip charges, you may be responsible for service. All warranty service provided by a GE Authorized Servicer is extended to a defect in materials or workmanship. What GE Will Not Cover: s Service trips to provide required service. Safety Instructions Operating Instructions Installation Instructions Troubleshooting Tips Consumer Support GE Microwave Oven Warranty. s Damage...
... purchase GE Will Replace: Any part of the original purchase The magnetron tube, if the magnetron tube fails due to the original purchaser and any trip charges, you may be responsible for service. All warranty service provided by a GE Authorized Servicer is extended to a defect in materials or workmanship. What GE Will Not Cover: s Service trips to provide required service. Safety Instructions Operating Instructions Installation Instructions Troubleshooting Tips Consumer Support GE Microwave Oven Warranty. s Damage...


