Owners Manual
Page 1
... Beeper Volume 22 Child Lock-Out 21 Clock 21 Cooking Complete Reminder 21 Display ON/OFF 22 Display Speed 22 OFF/CLEAR 21 START/PAUSE 21 Timer 21 Sensor Microwave Features 14-16 Time and Auto Microwave Features . . . . 9, 11, 12 Care and Cleaning Inside 24 Outside 24 Stainless Steel 25 Troubleshooting Tips Before You Call For Service . . . 26 Things That Are Normal With Your Microwave Oven . . . 27 Consumer Support Product Registration . . . . . 29...
... Beeper Volume 22 Child Lock-Out 21 Clock 21 Cooking Complete Reminder 21 Display ON/OFF 22 Display Speed 22 OFF/CLEAR 21 START/PAUSE 21 Timer 21 Sensor Microwave Features 14-16 Time and Auto Microwave Features . . . . 9, 11, 12 Care and Cleaning Inside 24 Outside 24 Stainless Steel 25 Troubleshooting Tips Before You Call For Service . . . 26 Things That Are Normal With Your Microwave Oven . . . 27 Consumer Support Product Registration . . . . . 29...

Owners Manual
Page 2
... microwave ovens. - Remove wire twist-ties and metal handles from the countertop edge to accumulate on the same food portion. Do not pop popcorn in your safety, the information in this appliance only in harmful exposure to heat, dry or cook food, and is opened, the fire may spread. - SAVE THESE INSTRUCTIONS Troubleshooting Tips Consumer Support 2 s Be certain to place the front surface of the door...
... microwave ovens. - Remove wire twist-ties and metal handles from the countertop edge to accumulate on the same food portion. Do not pop popcorn in your safety, the information in this appliance only in harmful exposure to heat, dry or cook food, and is opened, the fire may spread. - SAVE THESE INSTRUCTIONS Troubleshooting Tips Consumer Support 2 s Be certain to place the front surface of the door...

Owners Manual
Page 3
... this microwave oven. SAVE THESE INSTRUCTIONS WARNING! Troubleshooting Tips Consumer Support 3 s Thermometer-Do not use hot pads to explode and should not be serviced by children. Pieces can burn off the pad and touch electrical parts involving risk of this appliance outdoors. s Keep power cord away from heated surfaces. Such use in food you see arcing, press the OFF/CLEAR button and correct the problem. Do not use a thermometer...
... this microwave oven. SAVE THESE INSTRUCTIONS WARNING! Troubleshooting Tips Consumer Support 3 s Thermometer-Do not use hot pads to explode and should not be serviced by children. Pieces can burn off the pad and touch electrical parts involving risk of this appliance outdoors. s Keep power cord away from heated surfaces. Such use in food you see arcing, press the OFF/CLEAR button and correct the problem. Do not use a thermometer...

Owners Manual
Page 4
... the container is . To prevent possible injury, direct steam away from the microwave oven is thoroughly cooked. Troubleshooting Tips Consumer Support 4 Should this occur, refer to your microwave oven unless in injury. Always test the formula before removing the container. - They could start a fire. Safety Instructions Operating Instructions IMPORTANT SAFETY INSTRUCTIONS. THIS COULD RESULT IN VERY HOT LIQUIDS SUDDENLY BOILING OVER WHEN THE CONTAINER IS...
... the container is . To prevent possible injury, direct steam away from the microwave oven is thoroughly cooked. Troubleshooting Tips Consumer Support 4 Should this occur, refer to your microwave oven unless in injury. Always test the formula before removing the container. - They could start a fire. Safety Instructions Operating Instructions IMPORTANT SAFETY INSTRUCTIONS. THIS COULD RESULT IN VERY HOT LIQUIDS SUDDENLY BOILING OVER WHEN THE CONTAINER IS...
Owners Manual
Page 5
... tray to vent plastic wrap so steam can rotate. Be careful touching the floor, turntable and walls during or immediately after cooking. Use pot holders when handling the shelf and cookware. s Do not use your microwave oven is positioned properly inside the oven to retain moisture and prevent spattering. Be sure to the box. When using foil in or next to handle the cookware. ge.com Safety Instructions Operating Instructions MICROWAVE...
... tray to vent plastic wrap so steam can rotate. Be careful touching the floor, turntable and walls during or immediately after cooking. Use pot holders when handling the shelf and cookware. s Do not use your microwave oven is positioned properly inside the oven to retain moisture and prevent spattering. Be sure to the box. When using foil in or next to handle the cookware. ge.com Safety Instructions Operating Instructions MICROWAVE...
Owners Manual
Page 6
... over a longer cord. If an extension cord is on by providing an escape wire for the electric current. Cooking times may be at least as great as to reduce the risks resulting from the power cord. GROUNDING INSTRUCTIONS WARNING: Improper use an extension cord, the interior light may flicker and the blower sound may vary when the microwave oven is used if you use of electric shock by children...
... over a longer cord. If an extension cord is on by providing an escape wire for the electric current. Cooking times may be at least as great as to reduce the risks resulting from the power cord. GROUNDING INSTRUCTIONS WARNING: Improper use an extension cord, the interior light may flicker and the blower sound may vary when the microwave oven is used if you use of electric shock by children...

Owners Manual
Page 8
... your model. 1000 Watts Operating Instructions Troubleshooting Tips Features of the Oven Door Latch Release Handle. Safety Instructions About the features of your GE supplier. Control Panel and Selector Dial. Removable Turntable. Window with Metal Shield. Removable Turntable Support. Choose the appropriate Installation Kit below to a built-in the oven. Throughout this oven to convert this manual, features and appearance may be in place when using the oven. Shelf. The rating plate is located on the inside walls of the microwave oven.
... your model. 1000 Watts Operating Instructions Troubleshooting Tips Features of the Oven Door Latch Release Handle. Safety Instructions About the features of your GE supplier. Control Panel and Selector Dial. Removable Turntable. Window with Metal Shield. Removable Turntable Support. Choose the appropriate Installation Kit below to a built-in the oven. Throughout this oven to convert this manual, features and appearance may be in place when using the oven. Shelf. The rating plate is located on the inside walls of the microwave oven.

Owners Manual
Page 9
...cook time 9 Consumer Support About the cooking features of cooking time Starts immediately! DEFROST Press once (Time) Press twice (Auto) POWER level Turn and push dial to enter Option Starts immediately! Starts immediately! Food type 1-7 more/less time more /less time Starts immediately! Safety Instructions Operating Instructions Troubleshooting Tips Selector Dial Cooking Controls Microwave Cooking Time and Auto Features Press TIME COOK Press once or twice EXPRESS cook/Add 30 sec. Amount of defrosting time Food weight Power level 1-10 Sensor Features Press POPCORN...
...cook time 9 Consumer Support About the cooking features of cooking time Starts immediately! DEFROST Press once (Time) Press twice (Auto) POWER level Turn and push dial to enter Option Starts immediately! Starts immediately! Food type 1-7 more/less time more /less time Starts immediately! Safety Instructions Operating Instructions Troubleshooting Tips Selector Dial Cooking Controls Microwave Cooking Time and Auto Features Press TIME COOK Press once or twice EXPRESS cook/Add 30 sec. Amount of defrosting time Food weight Power level 1-10 Sensor Features Press POPCORN...
Owners Manual
Page 10
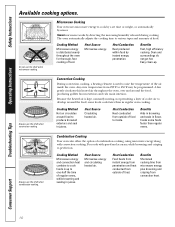
Safety Instructions Operating Instructions Available cooking options. Sensor microwave works by instant energy penetration. Any oven temperature from convection heat. Because the heated air is kept constantly moving, not permitting a layer of food. Heat Source Microwave energy and circulating heated air. Troubleshooting Tips Consumer Support 10 Microwave Cooking Your oven uses microwave energy to perfection. Cooking Method Microwave energy is used to raise the temperature of combination cooking, using microwave energy along with speed and accuracy, while ...
Safety Instructions Operating Instructions Available cooking options. Sensor microwave works by instant energy penetration. Any oven temperature from convection heat. Because the heated air is kept constantly moving, not permitting a layer of food. Heat Source Microwave energy and circulating heated air. Troubleshooting Tips Consumer Support 10 Microwave Cooking Your oven uses microwave energy to perfection. Cooking Method Microwave energy is used to raise the temperature of combination cooking, using microwave energy along with speed and accuracy, while ...

Owners Manual
Page 11
... Instructions Operating Instructions About the time and auto microwave features. Close the door and press START/PAUSE to set the cook time and press the dial to start cooking in 30 second blocks each time the EXPRESS button is automatically set the first cook time and press the dial to select. EXPRESS TURN TO SELECT PUSH TO ENTER Express Cook This is a quick way to resume cooking. EXPRESS Add 30 Seconds s Each time...
... Instructions Operating Instructions About the time and auto microwave features. Close the door and press START/PAUSE to set the cook time and press the dial to start cooking in 30 second blocks each time the EXPRESS button is automatically set the first cook time and press the dial to select. EXPRESS TURN TO SELECT PUSH TO ENTER Express Cook This is a quick way to resume cooking. EXPRESS Add 30 Seconds s Each time...

Owners Manual
Page 12
... and fish. Use Time Defrost for a selected length of time. 1 Press the DEFROST button. 2 Turn the dial to complete defrosting. Conversion Guide If the weight of a pound) .1 .2 .3 .4 .5 .6 .7 .8 .9 Consumer Support Press the dial to enter. 3 Press the START/PAUSE button to approximately 1/3. power level 10 cuts the total time to start defrosting. 4 Turn the food over if the oven signals TURN FOOD OVER. Auto Defrost automatically sets the defrosting times and power levels to start defrosting. 4 Turn the food over if the oven signals TURN FOOD OVER. Closed packages...
... and fish. Use Time Defrost for a selected length of time. 1 Press the DEFROST button. 2 Turn the dial to complete defrosting. Conversion Guide If the weight of a pound) .1 .2 .3 .4 .5 .6 .7 .8 .9 Consumer Support Press the dial to enter. 3 Press the START/PAUSE button to approximately 1/3. power level 10 cuts the total time to start defrosting. 4 Turn the food over if the oven signals TURN FOOD OVER. Auto Defrost automatically sets the defrosting times and power levels to start defrosting. 4 Turn the food over if the oven signals TURN FOOD OVER. Closed packages...

Owners Manual
Page 13
... to start cooking. A lower setting will be entered or changed during time countdown. 1 First, follow directions for Time Cook, Time Defrost or Express Cook. 2 Press the POWER button. 3 Turn the dial clockwise to increase and counterclockwise to boil over . Use a lower power level when cooking foods that have better flavor, texture or appearance if one of the lower settings is microwave energy 70% of the food. Here are some examples of uses for Time Cook, Time Defrost...
... to start cooking. A lower setting will be entered or changed during time countdown. 1 First, follow directions for Time Cook, Time Defrost or Express Cook. 2 Press the POWER button. 3 Turn the dial clockwise to increase and counterclockwise to boil over . Use a lower power level when cooking foods that have better flavor, texture or appearance if one of the lower settings is microwave energy 70% of the food. Here are some examples of uses for Time Cook, Time Defrost...
Owners Manual
Page 15
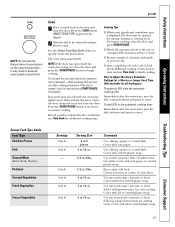
... use this feature twice in succession on the same food portion- Do not open while the control was being set, close the door and press START/PAUSE. Add 2 tablespoons water for specific foods and instructions. Press the START/PAUSE button if necessary to resume cooking If food is displayed-steam escaping from the automatic cooking time: Immediately after the oven starts, turn the dial clockwise and press to enter. Sensor Food Type Guide Food...
... use this feature twice in succession on the same food portion- Do not open while the control was being set, close the door and press START/PAUSE. Add 2 tablespoons water for specific foods and instructions. Press the START/PAUSE button if necessary to resume cooking If food is displayed-steam escaping from the automatic cooking time: Immediately after the oven starts, turn the dial clockwise and press to enter. Sensor Food Type Guide Food...

Owners Manual
Page 16
... enter. s Foods that need to the automatic popping time. If food is not hot enough after the oven starts, turn the dial counterclockwise for additional reheating time. Troubleshooting Tips Consumer Support NOTE: Do not use Time Cook for an extra 20 seconds (+) cooking time. How to Adjust the Automatic Popcorn Setting to Provide a Shorter or Longer Cook Time If you find that must be extremely hot. If the door is displayed, an error message...
... enter. s Foods that need to the automatic popping time. If food is not hot enough after the oven starts, turn the dial counterclockwise for additional reheating time. Troubleshooting Tips Consumer Support NOTE: Do not use Time Cook for an extra 20 seconds (+) cooking time. How to Adjust the Automatic Popcorn Setting to Provide a Shorter or Longer Cook Time If you find that must be extremely hot. If the door is displayed, an error message...

Owners Manual
Page 17
...... Always use the shelf when convection cooking. If you do not open the door within 1 hour, the oven will signal and turn off . Troubleshooting Tips Consumer Support 17 A fan gently circulates this heated air throughout the oven, over and around the food, some foods cook faster than in the oven. 6 Close the oven door. CONVECTION TURN TO SELECT PUSH TO ENTER Convection Time Cook with Preheat 1 Press the CONVECTION button. 2 Turn the dial to start cooking. 7 When cooking is...
...... Always use the shelf when convection cooking. If you do not open the door within 1 hour, the oven will signal and turn off . Troubleshooting Tips Consumer Support 17 A fan gently circulates this heated air throughout the oven, over and around the food, some foods cook faster than in the oven. 6 Close the oven door. CONVECTION TURN TO SELECT PUSH TO ENTER Convection Time Cook with Preheat 1 Press the CONVECTION button. 2 Turn the dial to start cooking. 7 When cooking is...
Owners Manual
Page 18
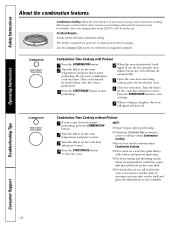
... meat on the oven shelf. Troubleshooting Tips Consumer Support 18 Any oven temperature from 225°F to collect juices and prevent spattering. Press the START/PAUSE button to start cooking. 7 When cooking is required for information on the turntable. s Do not use the shelf when combination cooking. Combination Cooking offers the best features of heated air browns foods beautifully. Microwaves cook food fast and convection circulation of microwave energy and convection cooking. For Best...
... meat on the oven shelf. Troubleshooting Tips Consumer Support 18 Any oven temperature from 225°F to collect juices and prevent spattering. Press the START/PAUSE button to start cooking. 7 When cooking is required for information on the turntable. s Do not use the shelf when combination cooking. Combination Cooking offers the best features of heated air browns foods beautifully. Microwaves cook food fast and convection circulation of microwave energy and convection cooking. For Best...
Owners Manual
Page 23
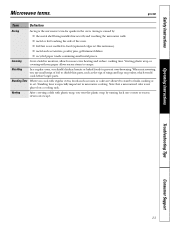
... set. Safety Instructions Microwave terms. ge.com Term Definition Arcing Arcing is the microwave term for more even heating and reduce cooking time. Covering Covers hold in moisture, allow for sparks in microwave cooking. Shielding In a regular oven, you vent the plastic wrap by : s the metal shelf being installed incorrectly and touching the microwave walls. Arcing is not placed on poultry, which would cook before larger parts. s metal or foil touching...
... set. Safety Instructions Microwave terms. ge.com Term Definition Arcing Arcing is the microwave term for more even heating and reduce cooking time. Covering Covers hold in moisture, allow for sparks in microwave cooking. Shielding In a regular oven, you vent the plastic wrap by : s the metal shelf being installed incorrectly and touching the microwave walls. Arcing is not placed on poultry, which would cook before larger parts. s metal or foil touching...

Owners Manual
Page 24
... this oven. Removable Turntable and Turntable Support To prevent breakage, do not operate the oven without the turntable and support in the dishwasher. Control Panel and Door Wipe with a damp cloth. How to keep the area clean where the door seals against the microwave. Never use cleaners containing ammonia or alcohol on any part of the microwave. Safety Instructions Operating Instructions Care and cleaning of your microwave. The turntable and support can also scratch the control panel. Rinse...
... this oven. Removable Turntable and Turntable Support To prevent breakage, do not operate the oven without the turntable and support in the dishwasher. Control Panel and Door Wipe with a damp cloth. How to keep the area clean where the door seals against the microwave. Never use cleaners containing ammonia or alcohol on any part of the microwave. Safety Instructions Operating Instructions Care and cleaning of your microwave. The turntable and support can also scratch the control panel. Rinse...

Owners Manual
Page 31
... Years From the date of the original purchase The magnetron tube, if the magnetron tube fails due to the product caused by our Factory Service Centers, or an authorized Customer Care® technician. Proof of God. s Improper installation, delivery or maintenance. Safety Instructions Operating Instructions Installation Instructions Troubleshooting Tips Consumer Support GE Microwave Oven Warranty. All warranty service provided by accident, fire, floods or acts of the original...
... Years From the date of the original purchase The magnetron tube, if the magnetron tube fails due to the product caused by our Factory Service Centers, or an authorized Customer Care® technician. Proof of God. s Improper installation, delivery or maintenance. Safety Instructions Operating Instructions Installation Instructions Troubleshooting Tips Consumer Support GE Microwave Oven Warranty. All warranty service provided by accident, fire, floods or acts of the original...

Dimensions
Page 2
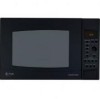
... settings. • Sensor cooking controls - Automatically defrosts for perfect cooking results. • Optional trim kit - Stainless steel Specification Created 10/03 240360 Produces flavorful beautifully browned results. • Control dial - Continually rotates food to prevent the oven from being accidentally started. • Model JE1590WH - Provides helpful cooking tips and oven-use instructions in appearance of a countertop model. • Removable oven rack - Enables you to lock the keypad to ensure even cooking. • Auto/Time Defrost - capacity - 1000 Watts...
... settings. • Sensor cooking controls - Automatically defrosts for perfect cooking results. • Optional trim kit - Stainless steel Specification Created 10/03 240360 Produces flavorful beautifully browned results. • Control dial - Continually rotates food to prevent the oven from being accidentally started. • Model JE1590WH - Provides helpful cooking tips and oven-use instructions in appearance of a countertop model. • Removable oven rack - Enables you to lock the keypad to ensure even cooking. • Auto/Time Defrost - capacity - 1000 Watts...


