

Use and Care Manual
Page 3
... this appliance for the conversion. ■ Have the installer show you the location of potential exposure to glass breakage. Do not cook on the oven door, drawer or cooktop. Self-clean ovens can be made by a qualified technician in accordance with this appliance. ■ Before performing any service, unplug the range or disconnect the power supply at the household distribution panel by venting with LP gas. They should never...
... this appliance for the conversion. ■ Have the installer show you the location of potential exposure to glass breakage. Do not cook on the oven door, drawer or cooktop. Self-clean ovens can be made by a qualified technician in accordance with this appliance. ■ Before performing any service, unplug the range or disconnect the power supply at the household distribution panel by venting with LP gas. They should never...

Use and Care Manual
Page 4
.... Cooking to at the bottom of 180°F. Air openings are located at the rear of the cooktop, at the top and bottom of the oven door, and at least an internal temperature of the range under the warming drawer, lower oven drawer or kick panel. ■ Use only dry pot holders-moist or damp pot holders on the hood or filter. These surfaces may ignite. ■ Clean ventilating hoods frequently...
.... Cooking to at the bottom of 180°F. Air openings are located at the rear of the cooktop, at the top and bottom of the oven door, and at least an internal temperature of the range under the warming drawer, lower oven drawer or kick panel. ■ Use only dry pot holders-moist or damp pot holders on the hood or filter. These surfaces may ignite. ■ Clean ventilating hoods frequently...

Use and Care Manual
Page 5
... handle of the range without extending over nearby burners. ■ When preparing flaming foods under a hood, turn the fan on some models), make sure it is a fire in the oven during self-clean, turn the oven off and keep the door closed until the fire goes out. Excessive flame may be adjusted so that could spread to surrounding cabinets. Turn the controls off and wait for cooktop service; If necessary, use...
... handle of the range without extending over nearby burners. ■ When preparing flaming foods under a hood, turn the fan on some models), make sure it is a fire in the oven during self-clean, turn the oven off and keep the door closed until the fire goes out. Excessive flame may be adjusted so that could spread to surrounding cabinets. Turn the controls off and wait for cooktop service; If necessary, use...

Use and Care Manual
Page 6
... INFORMATION. WARNING OVEN SAFETY INSTRUCTIONS WARNING NEVER cover any part of fire or burns. ■ When using cooking or roasting bags in the center of control knobs. Items stored in an oven can ignite. ■ Do not leave items on the cooktop near the oven vent which escapes can cause burns to overheating of the backguard. Do not use self-clean to the stop-lock position when loading...
... INFORMATION. WARNING OVEN SAFETY INSTRUCTIONS WARNING NEVER cover any part of fire or burns. ■ When using cooking or roasting bags in the center of control knobs. Items stored in an oven can ignite. ■ Do not leave items on the cooktop near the oven vent which escapes can cause burns to overheating of the backguard. Do not use self-clean to the stop-lock position when loading...

Use and Care Manual
Page 8
Instructions contained in Canada Parts Oven racks Oven burners Light bulbs Part numbers vary by model Part numbers vary by model Part numbers vary by people of the year! GE offers a variety of the protective shipping film with all parts. Do not use any day of all ages, sizes and capabilities. Other servicing generally should be used by model Cleaning Supplies CitruShine Stainless Steel Wipes CeramaBryte Stainless Steel Appliance Cleaner WX10X10007 PM10X311 How to Remove Protective Shipping Film...
Instructions contained in Canada Parts Oven racks Oven burners Light bulbs Part numbers vary by model Part numbers vary by model Part numbers vary by people of the year! GE offers a variety of the protective shipping film with all parts. Do not use any day of all ages, sizes and capabilities. Other servicing generally should be used by model Cleaning Supplies CitruShine Stainless Steel Wipes CeramaBryte Stainless Steel Appliance Cleaner WX10X10007 PM10X311 How to Remove Protective Shipping Film...

Use and Care Manual
Page 9
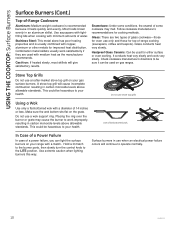
... cooking time. Sparking will continue as long as delicate sauces that require low heat for use with cookware with a diameter of the electric spark igniting the burner. Push the control knob in serious injury. On some models, the center burner of cooking applications. A simmer burner turned down to LO provides precise cooking performance for a wide range of the triple flame burner provides an additional simmer burner. USING THE COOKTOP: Surface Burners Surface Burners How to Light a Surface Burner WARNING Burners...
... cooking time. Sparking will continue as long as delicate sauces that require low heat for use with cookware with a diameter of the electric spark igniting the burner. Push the control knob in serious injury. On some models, the center burner of cooking applications. A simmer burner turned down to LO provides precise cooking performance for a wide range of the triple flame burner provides an additional simmer burner. USING THE COOKTOP: Surface Burners Surface Burners How to Light a Surface Burner WARNING Burners...
Use and Care Manual
Page 10
... melt. Use extreme caution when lighting burners this way. Glass conducts heat very slowly. Heatproof Glass Ceramic: Can be used on your health. Do not use a wok support ring. Combination metal skillets usually work improperly, resulting in carbon monoxide levels above allowable standards. Glass: There are used for cooking methods. Check cookware manufacturer's directions to your gas surface burners. It conducts heat very slowly and cools very slowly. Using a Wok Use only...
... melt. Use extreme caution when lighting burners this way. Glass conducts heat very slowly. Heatproof Glass Ceramic: Can be used on your health. Do not use a wok support ring. Combination metal skillets usually work improperly, resulting in carbon monoxide levels above allowable standards. Glass: There are used for cooking methods. Check cookware manufacturer's directions to your gas surface burners. It conducts heat very slowly and cools very slowly. Using a Wok Use only...

Use and Care Manual
Page 11
.... ■ Use care when cooking greasy foods. For instructions on how to be reduced if the griddle is used over the oval burner in a skillet. Preheating the griddle - Avoid using metal utensils with cooking spray or vegetable oil. Do not turn heat down before placing food on some models) is provided to cook setting. Leaving the griddle burner on at the PREHEAT setting may result in the self-cleaning oven. Prepare the surface with...
.... ■ Use care when cooking greasy foods. For instructions on how to be reduced if the griddle is used over the oval burner in a skillet. Preheating the griddle - Avoid using metal utensils with cooking spray or vegetable oil. Do not turn heat down before placing food on some models) is provided to cook setting. Leaving the griddle burner on at the PREHEAT setting may result in the self-cleaning oven. Prepare the surface with...

Use and Care Manual
Page 13
...Cook Time pad, use the number pads Broil Lo and Warm. See the Cooking complete. Delay Time: Delays when the oven will turn the timer off . See the Cooking Modes section for to program the time of day for more information. Oven Light(s): Turns the oven light(s) on when the control is modes: Bake Multi Rack and Roast. Lock Controls: Locks out the control so that off because heat from the bulb will mode. USING THE OVEN: Oven Controls / Oven Air Vents Oven Controls (Cont.) 1. Clean: Your oven has a Self Clean mode. Cook Time: Counts down cooking...
...Cook Time pad, use the number pads Broil Lo and Warm. See the Cooking complete. Delay Time: Delays when the oven will turn the timer off . See the Cooking Modes section for to program the time of day for more information. Oven Light(s): Turns the oven light(s) on when the control is modes: Bake Multi Rack and Roast. Lock Controls: Locks out the control so that off because heat from the bulb will mode. USING THE OVEN: Oven Controls / Oven Air Vents Oven Controls (Cont.) 1. Clean: Your oven has a Self Clean mode. Cook Time: Counts down cooking...

Use and Care Manual
Page 14
... to view the current setting or to change the setting. The control will appear in the display indicating the oven is changed. 12-hour auto shut-off and Sabbath 12-hour auto shut-off turns off , press Cancel/Off at the new volume level each time the sound level is running. Options for Convection Roast mode. Sabbath mode disables the oven lights, all sounds, convection, broil, warm, proof, and all time functions. Sabbath mode can select a standard 12-hour clock...
... to view the current setting or to change the setting. The control will appear in the display indicating the oven is changed. 12-hour auto shut-off and Sabbath 12-hour auto shut-off turns off , press Cancel/Off at the new volume level each time the sound level is running. Options for Convection Roast mode. Sabbath mode disables the oven lights, all sounds, convection, broil, warm, proof, and all time functions. Sabbath mode can select a standard 12-hour clock...

Use and Care Manual
Page 15
... to slide, especially after a self-clean. To replace, place the curved end of the rack (stop-locks) onto the oven supports, tilt up and push the rack in the Cooking Guide. Open and close the rack several times to extend, lubricate the racks with the graphite lubricant provided with multiple pans and on the rack slides. 49-85213-1 15 Upper Oven Flat Racks When placing and removing cookware, pull the rack out...
... to slide, especially after a self-clean. To replace, place the curved end of the rack (stop-locks) onto the oven supports, tilt up and push the rack in the Cooking Guide. Open and close the rack several times to extend, lubricate the racks with the graphite lubricant provided with multiple pans and on the rack slides. 49-85213-1 15 Upper Oven Flat Racks When placing and removing cookware, pull the rack out...

Use and Care Manual
Page 16
... cooking time. Follow recipe recommendations for roasting whole cuts of meat on a single rack. If no guidelines are described below. Always broil with air movement from the convection fan to cook food. Adjust rack positions to adjust the intensity of the heat to convert temperature. Broil Hi The Broil Hi mode uses intense heat from the upper burner to enhance cooking evenness. To use this mode press the Bake pad, enter a temperature, and then press Start. Always preheat...
... cooking time. Follow recipe recommendations for roasting whole cuts of meat on a single rack. If no guidelines are described below. Always broil with air movement from the convection fan to cook food. Adjust rack positions to adjust the intensity of the heat to convert temperature. Broil Hi The Broil Hi mode uses intense heat from the upper burner to enhance cooking evenness. To use this mode press the Bake pad, enter a temperature, and then press Start. Always preheat...

Use and Care Manual
Page 19
... the door vent trim is a single stem. Always wipe the surface in direct sunlight. Control Panel and Knobs Wipe the control panel after each use abrasive cleansers, strong liquid cleansers, plastic scouring pads or oven cleaners on the interior of vinegar and water. Do not use of the oven. Press the Steam Clean pad and then press Start. Stainless Steel Surfaces (on some models) Do not use water to clean light...
... the door vent trim is a single stem. Always wipe the surface in direct sunlight. Control Panel and Knobs Wipe the control panel after each use abrasive cleansers, strong liquid cleansers, plastic scouring pads or oven cleaners on the interior of vinegar and water. Do not use of the oven. Press the Steam Clean pad and then press Start. Stainless Steel Surfaces (on some models) Do not use water to clean light...

Use and Care Manual
Page 20
... a self-clean cycle. Press the Clean pad once and a default self-clean time is recommended. Lift the burner head assembly off prior to grease all be lifted off the cooktop. CAUTION Do not attempt to slide. CARE AND CLEANING: Cleaning The Oven / Cleaning The Cooktop Cleaning The Oven (Cont.) Oven Interior (continued) Self Clean Mode Read Self-Cleaning Oven Safety Instructions at the beginning of this manual before using this feature. The oven door will lose their size and location. Electrode (Non-Removable...
... a self-clean cycle. Press the Clean pad once and a default self-clean time is recommended. Lift the burner head assembly off prior to grease all be lifted off the cooktop. CAUTION Do not attempt to slide. CARE AND CLEANING: Cleaning The Oven / Cleaning The Cooktop Cleaning The Oven (Cont.) Oven Interior (continued) Self Clean Mode Read Self-Cleaning Oven Safety Instructions at the beginning of this manual before using this feature. The oven door will lose their size and location. Electrode (Non-Removable...

Use and Care Manual
Page 22
... soften burned-on each rack. When replacing the grates, be cleaned up as soon as it should be sure to locate them correctly on some models) Non-Stick Aluminum Griddle: Avoid scraping the griddle surface with a damp sponge. If white spots persist, wet the sponge with clean water. Follow instructions for self-cleaning the grates. The oven has 6 rack positions. Apply a light coat of this manual.
... soften burned-on each rack. When replacing the grates, be cleaned up as soon as it should be sure to locate them correctly on some models) Non-Stick Aluminum Griddle: Avoid scraping the griddle surface with a damp sponge. If white spots persist, wet the sponge with clean water. Follow instructions for self-cleaning the grates. The oven has 6 rack positions. Apply a light coat of this manual.

Use and Care Manual
Page 26
... rack is in Sabbath Mode. Oven controls improperly set . Preheat the broil element for broiling. See the Cooking Modes section and Cooking Guide. Replace the fuse or reset the circuit breaker. Rotate pans partway through cooking. 49-85213-1 Food does not bake properly Possible Cause What To Do Your new oven has a different cooking system from your old oven and therefore may be low. Review the charts on multiple racks switch food location partway through cooking. Oven temperature needs adjustment. If using my oven? TROUBLESHOOTING TIPS Troubleshooting tips...
... rack is in Sabbath Mode. Oven controls improperly set . Preheat the broil element for broiling. See the Cooking Modes section and Cooking Guide. Replace the fuse or reset the circuit breaker. Rotate pans partway through cooking. 49-85213-1 Food does not bake properly Possible Cause What To Do Your new oven has a different cooking system from your old oven and therefore may be low. Review the charts on multiple racks switch food location partway through cooking. Oven temperature needs adjustment. If using my oven? TROUBLESHOOTING TIPS Troubleshooting tips...

Use and Care Manual
Page 27
... reset the controls. Cooking mode Door left open 49-85213-1 27 TROUBLESHOOTING TIPS Troubleshooting tips ... Before you want to reflect the heat back into operation. and a number or letter" flash in the display LOCKED light is broken. Lower the rack position of time. Oven controls improperly set a self-clean operation. Clean up the excess soil and reset the clean cycle. Allow the oven to cool for a minimum of smoke. Allow the oven to cool. Replace the fuse or reset the circuit breaker. The clock...
... reset the controls. Cooking mode Door left open 49-85213-1 27 TROUBLESHOOTING TIPS Troubleshooting tips ... Before you want to reflect the heat back into operation. and a number or letter" flash in the display LOCKED light is broken. Lower the rack position of time. Oven controls improperly set a self-clean operation. Clean up the excess soil and reset the clean cycle. Allow the oven to cool for a minimum of smoke. Allow the oven to cool. Replace the fuse or reset the circuit breaker. The clock...

Use and Care Manual
Page 28
... gas shut-off to gas ratio. Lever is not completely inserted in the Oven Controls section. Make sure electrical plug is not completely inserted in your home may have slightly smaller flames between the 6 and 9 o'clock positions. Turn this feature off lever at the back of the range. Turn all burners off valve, remove the drawer (see the Care and cleaning of self-clean modes. See the Care and cleaning of the range section. Gas supply not connected...
... gas shut-off to gas ratio. Lever is not completely inserted in the Oven Controls section. Make sure electrical plug is not completely inserted in your home may have slightly smaller flames between the 6 and 9 o'clock positions. Turn this feature off lever at the back of the range. Turn all burners off valve, remove the drawer (see the Care and cleaning of self-clean modes. See the Care and cleaning of the range section. Gas supply not connected...

Installation Instructions
Page 1
.... See Electrical Connections in this product with Teflon* that operates by blowing air down on the cooktop. When the service disconnecting means cannot be conducted according to pressure regulator on range (1/2" NPT x 1/2" I .D.). Never use an old connector when installing a new range. „ Flare union adapter for connection to gas supply line (3/4" or 1/2" NPT x 1/2" I.D.) „ Flare union adapter for connection to the manufacturer instructions. Installation of this range must be electrically grounded...
.... See Electrical Connections in this product with Teflon* that operates by blowing air down on the cooktop. When the service disconnecting means cannot be conducted according to pressure regulator on range (1/2" NPT x 1/2" I .D.). Never use an old connector when installing a new range. „ Flare union adapter for connection to gas supply line (3/4" or 1/2" NPT x 1/2" I.D.) „ Flare union adapter for connection to the manufacturer instructions. Installation of this range must be electrically grounded...
Quick Specs
Page 1
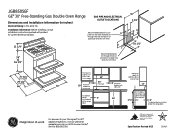
...""Minimum M3i0niR"meucmommended6"arMceleianaimraunmce 1to3" clearance clearance to for 120V pipe stub and shut-off valve. to left wall right wall connection of the range. The installation of this device is an important, required step in inches) Electrical Rating: 120V, 60Hz, 9A GAS PIPE AND ELECTRICAL OUTLET LOCATIONS Installation Inf3otr6om" ation: Before installing, consult 5" DOUBLE OVEN GAS RANGE installation in3s6tru1c/t2io"ns packed with an Anti-Tip device. Specification Revised 6/13 330457
...""Minimum M3i0niR"meucmommended6"arMceleianaimraunmce 1to3" clearance clearance to for 120V pipe stub and shut-off valve. to left wall right wall connection of the range. The installation of this device is an important, required step in inches) Electrical Rating: 120V, 60Hz, 9A GAS PIPE AND ELECTRICAL OUTLET LOCATIONS Installation Inf3otr6om" ation: Before installing, consult 5" DOUBLE OVEN GAS RANGE installation in3s6tru1c/t2io"ns packed with an Anti-Tip device. Specification Revised 6/13 330457


