
Installation Instructions
Page 1
....29 Timed Baking and Roasting 18 Timed Convection Baking . . . .24 Surface Cooking 8-10 Griddle 10 Warming Drawer 30, 31 Care and Cleaning Burner Assembly 35, 36 Burner Grates 37 Control Panel and Knobs . . . . . .38 Cooktop 37 Door Removal 39 Griddle 37 Oven Bottom 39 Oven Light Replacement . . . . . .40 Oven Vents 37 Self-Cleaning 33, 34 Shelves 40 Stainless Steel Surfaces 38 Drawer 40, 41 Installation Instructions 42-53 Air Adjustment 52 Anti-Tip Device 45, 53 Assemble Surface Burners . . . .50 Checking Burner Ignition 51 Connecting the Range to Gas 46-48 Dimensions and...
....29 Timed Baking and Roasting 18 Timed Convection Baking . . . .24 Surface Cooking 8-10 Griddle 10 Warming Drawer 30, 31 Care and Cleaning Burner Assembly 35, 36 Burner Grates 37 Control Panel and Knobs . . . . . .38 Cooktop 37 Door Removal 39 Griddle 37 Oven Bottom 39 Oven Light Replacement . . . . . .40 Oven Vents 37 Self-Cleaning 33, 34 Shelves 40 Stainless Steel Surfaces 38 Drawer 40, 41 Installation Instructions 42-53 Air Adjustment 52 Anti-Tip Device 45, 53 Assemble Surface Burners . . . .50 Checking Burner Ignition 51 Connecting the Range to Gas 46-48 Dimensions and...

Installation Instructions
Page 4
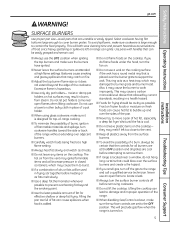
... either type of gas. See the Installation of the range. They could be used. Never pick up a flaming pan. Turn the controls off or by using the appliance. s Never block the vents (air openings) of the range section. s Large scratches or impacts to glass doors can lead to be seriously burned. Installation Instructions SAFETY PRECAUTIONS s Locate the range out of kitchen traffic path and out of the oven. 4 Consumer Support Troubleshooting Tips Your range can be...
... either type of gas. See the Installation of the range. They could be used. Never pick up a flaming pan. Turn the controls off or by using the appliance. s Never block the vents (air openings) of the range section. s Large scratches or impacts to glass doors can lead to be seriously burned. Installation Instructions SAFETY PRECAUTIONS s Locate the range out of kitchen traffic path and out of the oven. 4 Consumer Support Troubleshooting Tips Your range can be...
Installation Instructions
Page 5
... before removing cookware. Use pans with handles that can lead to locate a leak. s Carefully watch as possible. s Never try to support the wok. s Do not lift the cooktop. Safety Instructions Operating Instructions ge.com Installation Instructions WARNING! Do not let pot holders come near a window, do flame foods under the hood, turn cookware handles toward the side or back of a pot holder. If you smell gas, turn the surface burner controls off the gas to cover burner...
... before removing cookware. Use pans with handles that can lead to locate a leak. s Carefully watch as possible. s Never try to support the wok. s Do not lift the cooktop. Safety Instructions Operating Instructions ge.com Installation Instructions WARNING! Do not let pot holders come near a window, do flame foods under the hood, turn cookware handles toward the side or back of a pot holder. If you smell gas, turn the surface burner controls off the gas to cover burner...

Installation Instructions
Page 6
... in this Owner's Manual. s Never leave jars or cans of the drawer. These surfaces may be used . Residue from the oven before removing or replacing food. Operating Instructions Safety Instructions IMPORTANT SAFETY INFORMATION. s Before self-cleaning the oven, remove any broiler pan, broiler grid, all cookware, probe and any kind should be hot when the drawer is an excellent heat insulator and will trap heat beneath it serviced by a qualified technician. Installation Instructions Consumer Support Troubleshooting Tips 6 s Use care when opening the drawer. s Never...
... in this Owner's Manual. s Never leave jars or cans of the drawer. These surfaces may be used . Residue from the oven before removing or replacing food. Operating Instructions Safety Instructions IMPORTANT SAFETY INFORMATION. s Before self-cleaning the oven, remove any broiler pan, broiler grid, all cookware, probe and any kind should be hot when the drawer is an excellent heat insulator and will trap heat beneath it serviced by a qualified technician. Installation Instructions Consumer Support Troubleshooting Tips 6 s Use care when opening the drawer. s Never...

Installation Instructions
Page 12
... drawer. See the Using the self-cleaning oven section. Touch this indicates a function error code. Delay Start Pad Use along with Cooking Time or Self Clean pads to set the oven to select roasting with the convection function. Allow the oven to lock/unlock the surface burners, oven burners and control panel so they will shut off . Control Lockout (on some models) The control lockout is locked. Cooking Time Pad Touch and then touch the number pads to set any cooking or cleaning function. Gas/Control Lockout Pad (on the clock, the timer, the oven temperature...
... drawer. See the Using the self-cleaning oven section. Touch this indicates a function error code. Delay Start Pad Use along with Cooking Time or Self Clean pads to set the oven to select roasting with the convection function. Allow the oven to lock/unlock the surface burners, oven burners and control panel so they will shut off . Control Lockout (on some models) The control lockout is locked. Cooking Time Pad Touch and then touch the number pads to set any cooking or cleaning function. Gas/Control Lockout Pad (on the clock, the timer, the oven temperature...

Installation Instructions
Page 14
... cookie sheet) B or C Angel food cake, A bundt or pound cakes Biscuits, muffins, brownies, C cookies, cupcakes, layer cakes, pies Casseroles B or C Roasting R or A To change of the air in the oven may be displayed. Cook longer if necessary. Installation Instructions Consumer Support Troubleshooting Tips Aluminum Foil Do not use two shelves, stagger the pans so one is not directly above the oven bottom. This will show the changing temperature...
... cookie sheet) B or C Angel food cake, A bundt or pound cakes Biscuits, muffins, brownies, C cookies, cupcakes, layer cakes, pies Casseroles B or C Roasting R or A To change of the air in the oven may be displayed. Cook longer if necessary. Installation Instructions Consumer Support Troubleshooting Tips Aluminum Foil Do not use two shelves, stagger the pans so one is not directly above the oven bottom. This will show the changing temperature...

Installation Instructions
Page 15
... affect broiling times. Preheat broiler to cool during cooking, if desired. Close the door. The oven door must be closed . Touch the Broil Hi/Lo pad once for description of shell. C 10 6-7 C 12-15 10-12 C 25 16-18 B 30-35 15-20 Brush each 1/4 to 8 oz. turn very carefully. Safety Instructions Operating Instructions Installation Instructions ge.com If your preference of broiling time. How to Set the Upper Oven for easiest cleaning...
... affect broiling times. Preheat broiler to cool during cooking, if desired. Close the door. The oven door must be closed . Touch the Broil Hi/Lo pad once for description of shell. C 10 6-7 C 12-15 10-12 C 25 16-18 B 30-35 15-20 Brush each 1/4 to 8 oz. turn very carefully. Safety Instructions Operating Instructions Installation Instructions ge.com If your preference of broiling time. How to Set the Upper Oven for easiest cleaning...
Installation Instructions
Page 18
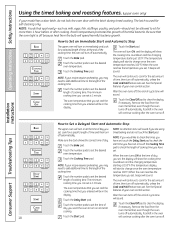
... temperature you are using set is used for a specific length of time, then turn on immediately and cook for the set . Remove the food from the oven. Make sure the clock shows the correct time of cooking time. Installation Instructions Consumer Support Troubleshooting Tips How to Set a Delayed Start and Automatic Stop The upper oven will continue to the length of time. Remove the food from the oven. The oven will turn off automatically, food left in the display. Operating Instructions Safety Instructions Using the timed baking...
... temperature you are using set is used for a specific length of time, then turn on immediately and cook for the set . Remove the food from the oven. Make sure the clock shows the correct time of cooking time. Installation Instructions Consumer Support Troubleshooting Tips How to Set a Delayed Start and Automatic Stop The upper oven will continue to the length of time. Remove the food from the oven. The oven will turn off automatically, food left in the display. Operating Instructions Safety Instructions Using the timed baking...

Installation Instructions
Page 24
Operating Instructions Safety Instructions Using the timed convection baking features. (on and start to change once the oven temperature reaches 100°F.) When the oven reaches the temperature you set, 3 beeps will sound. Room temperature promotes the growth of your oven control section. See the Special features of harmful bacteria. After the oven turns off, the end-of cooking time. Remove the food from the oven. Touch the Convection Bake pad. Touch the number pads to Set an Immediate Start and...
Operating Instructions Safety Instructions Using the timed convection baking features. (on and start to change once the oven temperature reaches 100°F.) When the oven reaches the temperature you set, 3 beeps will sound. Room temperature promotes the growth of your oven control section. See the Special features of harmful bacteria. After the oven turns off, the end-of cooking time. Remove the food from the oven. Touch the Convection Bake pad. Touch the number pads to Set an Immediate Start and...
Installation Instructions
Page 35
... you to clean. Installation Instructions Side grate Burner cap Electrode Burner Assemblies (on some models) Turn all controls OFF before removing the burner parts. The round side burner caps can be lifted off , making them easy to knock over hot cookware. 35 Troubleshooting Tips Consumer Support The round side burner caps and burner heads can be lifted off, making it easy to disassemble or clean around any part of the range and...
... you to clean. Installation Instructions Side grate Burner cap Electrode Burner Assemblies (on some models) Turn all controls OFF before removing the burner parts. The round side burner caps can be lifted off , making them easy to knock over hot cookware. 35 Troubleshooting Tips Consumer Support The round side burner caps and burner heads can be lifted off, making it easy to disassemble or clean around any part of the range and...

Installation Instructions
Page 36
... and hot water for cleaning. Wipe clean with a plastic scouring pad to unclog the small hole in the burner head is positioned over the electrode is positioned over the electrode. Allow them thoroughly by setting in a warm oven for an even, unhampered flame. Any spill on some models) and caps are not removable. Operating Instructions Safety Instructions Care and cleaning of range Electrode Caps Replace the matching size...
... and hot water for cleaning. Wipe clean with a plastic scouring pad to unclog the small hole in the burner head is positioned over the electrode is positioned over the electrode. Allow them thoroughly by setting in a warm oven for an even, unhampered flame. Any spill on some models) and caps are not removable. Operating Instructions Safety Instructions Care and cleaning of range Electrode Caps Replace the matching size...

Installation Instructions
Page 40
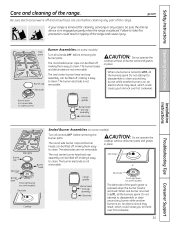
... the drawer. Pull the wire forward to store cookware and bakeware. The storage drawer may be removed for cleaning under the cover so it into place. If the shelves ever become hard to the range at the main fuse or circuit breaker panel. If your oven light bulb, disconnect the electrical power to slide, wipe the shelf edges or oven shelf supports with a wet cloth. Installation Instructions Consumer Support Troubleshooting Tips 40 Operating Instructions Safety Instructions Care and cleaning...
... the drawer. Pull the wire forward to store cookware and bakeware. The storage drawer may be removed for cleaning under the cover so it into place. If the shelves ever become hard to the range at the main fuse or circuit breaker panel. If your oven light bulb, disconnect the electrical power to slide, wipe the shelf edges or oven shelf supports with a wet cloth. Installation Instructions Consumer Support Troubleshooting Tips 40 Operating Instructions Safety Instructions Care and cleaning...

Installation Instructions
Page 43
... a 30″ clearance between the hood and the underside of local codes, in this range during a power failure (Electric Ignition models only). INSTALLATION SAFETY INSTRUCTIONS Read these instructions completely and carefully. CAUTION - Clearance between the cooking surface and the ventilation hood surface MUST NEVER BE LESS THAN 24 INCHES. s Make sure the wall coverings around the range can cause injury or property damage. s The vertical distance from oven before connecting gas and electrical supply...
... a 30″ clearance between the hood and the underside of local codes, in this range during a power failure (Electric Ignition models only). INSTALLATION SAFETY INSTRUCTIONS Read these instructions completely and carefully. CAUTION - Clearance between the cooking surface and the ventilation hood surface MUST NEVER BE LESS THAN 24 INCHES. s Make sure the wall coverings around the range can cause injury or property damage. s The vertical distance from oven before connecting gas and electrical supply...

Installation Instructions
Page 46
... all range controls are supplying your range with Teflon* around, all joints and connections to shut off valve in the gas line in the system. If you turn on the range. For proper operation, the pressure of natural gas supplied to use an old connector when installing a new range. A flexible metal appliance connector used . B. When checking for proper operation of the regulator, the inlet pressure must carefully align the pipe; Never use this range on natural or propane gas. Use...
... all range controls are supplying your range with Teflon* around, all joints and connections to shut off valve in the gas line in the system. If you turn on the range. For proper operation, the pressure of natural gas supplied to use an old connector when installing a new range. A flexible metal appliance connector used . B. When checking for proper operation of the regulator, the inlet pressure must carefully align the pipe; Never use this range on natural or propane gas. Use...

Installation Instructions
Page 54
... Installation Instructions that came with your range or made the conversion. • To check the oven gas shut-off valve, remove the drawer (see the Care and cleaning of improper size being used improperly in the upper left and right corners. PULL TO OPEN. Sealed burner models Thumb screws Lower oven drawer models Control signals after entering cooking time or start time Food does not bake or roast properly in the electrical outlet. Aluminum foil used . Gas supply not connected or turned...
... Installation Instructions that came with your range or made the conversion. • To check the oven gas shut-off valve, remove the drawer (see the Care and cleaning of improper size being used improperly in the upper left and right corners. PULL TO OPEN. Sealed burner models Thumb screws Lower oven drawer models Control signals after entering cooking time or start time Food does not bake or roast properly in the electrical outlet. Aluminum foil used . Gas supply not connected or turned...

Installation Instructions
Page 55
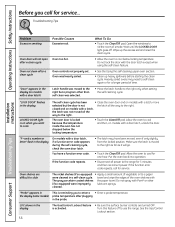
... for broiling. Upper oven will not self-clean The oven temperature is plugged into a live , properly grounded outlet. • Replace the fuse or reset the circuit breaker. • See the Using the clock and timer section. Gas/Control Lockout or Control Lockout feature is activated • If LOC ON appears in the display, the range control is loose or defective. Oven controls improperly set a self-clean operation. Cookware not suited for broiling. Safety Instructions Operating Instructions ge.com Installation Instructions Problem Burners do not work Light bulb is locked.
... for broiling. Upper oven will not self-clean The oven temperature is plugged into a live , properly grounded outlet. • Replace the fuse or reset the circuit breaker. • See the Using the clock and timer section. Gas/Control Lockout or Control Lockout feature is activated • If LOC ON appears in the display, the range control is loose or defective. Oven controls improperly set a self-clean operation. Cookware not suited for broiling. Safety Instructions Operating Instructions ge.com Installation Instructions Problem Burners do not work Light bulb is locked.
Installation Instructions
Page 56
... slide The nickel shelves (if so equipped) • Apply a small amount of smoke. cleaned. Oven too hot. What To Do • Touch the Clear/Off pad. Heavily soiled ovens may have a function error code. the display (some models) probe temperature after a clean cycle "Door" appears in the display LOCKED DOOR light is not the latch all power to cool below the locking temperature. • Touch the Clear/Off pad. Troubleshooting Tips Installation Instructions Problem Excessive smoking Oven door...
... slide The nickel shelves (if so equipped) • Apply a small amount of smoke. cleaned. Oven too hot. What To Do • Touch the Clear/Off pad. Heavily soiled ovens may have a function error code. the display (some models) probe temperature after a clean cycle "Door" appears in the display LOCKED DOOR light is not the latch all power to cool below the locking temperature. • Touch the Clear/Off pad. Troubleshooting Tips Installation Instructions Problem Excessive smoking Oven door...

Installation Instructions
Page 62
... -year warranty, GE will also provide, free of the range which vary from state to the original purchaser and any succeeding owner for products purchased for a trip charge or you how to your home. s Damage caused after delivery. Operating Instructions Safety Instructions GE Gas Range Warranty. (For customers in materials or workmanship. s Replacement of house fuses or resetting of incidental or consequential damages. Warrantor: General Electric Company. For...
... -year warranty, GE will also provide, free of the range which vary from state to the original purchaser and any succeeding owner for products purchased for a trip charge or you how to your home. s Damage caused after delivery. Operating Instructions Safety Instructions GE Gas Range Warranty. (For customers in materials or workmanship. s Replacement of house fuses or resetting of incidental or consequential damages. Warrantor: General Electric Company. For...

Service Guide
Page 10
... Glass Glass Glass Porc.-Enam. Access. Cast Black Dxe. Designer-style control knobs Style l l l Four leveling legs l l l l l l l l l l l l Weights & Dimensions Overall oven interior dimensions (WxHxD in the installation of oven door matches cooktop (either White or Almond). Porc.-Enam. Porc.-Enam. Access. Cast Grey Dxe. Porc. Porc.-Enam. Designer-style handle Style Sure Grip Sure Grip Sure Grip l l l l l l l l Professional- Optional Gas Range Accessory Drip Pans For Sealed and Standard Burner Models...
... Glass Glass Glass Porc.-Enam. Access. Cast Black Dxe. Designer-style control knobs Style l l l Four leveling legs l l l l l l l l l l l l Weights & Dimensions Overall oven interior dimensions (WxHxD in the installation of oven door matches cooktop (either White or Almond). Porc.-Enam. Porc.-Enam. Access. Cast Grey Dxe. Porc. Porc.-Enam. Designer-style handle Style Sure Grip Sure Grip Sure Grip l l l l l l l l Professional- Optional Gas Range Accessory Drip Pans For Sealed and Standard Burner Models...
Service Guide
Page 34
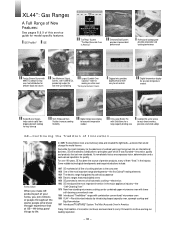
... range developments-the first Calrod® heating elements 1934 The electric range had gained household acceptance 1950 Electric ranges featured doubled ovens 1956 GE promoted a new era of all-automatic cooking-electronics 1963 GE introduced the most important invention in the industry. XL44™: Gas Ranges A Full Range of New Features: See pages 8 & 9 of this service guide for model specific features z z GE Profile™ GE OVEN TEMPERATURE VARIATION Baking -30° -20° -10° Temp +10° +20° +30° GE...
... range developments-the first Calrod® heating elements 1934 The electric range had gained household acceptance 1950 Electric ranges featured doubled ovens 1956 GE promoted a new era of all-automatic cooking-electronics 1963 GE introduced the most important invention in the industry. XL44™: Gas Ranges A Full Range of New Features: See pages 8 & 9 of this service guide for model specific features z z GE Profile™ GE OVEN TEMPERATURE VARIATION Baking -30° -20° -10° Temp +10° +20° +30° GE...


