
Installation Instructions
Page 1
....29 Timed Baking and Roasting 18 Timed Convection Baking . . . .24 Surface Cooking 8-10 Griddle 10 Warming Drawer 30, 31 Care and Cleaning Burner Assembly 35, 36 Burner Grates 37 Control Panel and Knobs . . . . . .38 Cooktop 37 Door Removal 39 Griddle 37 Oven Bottom 39 Oven Light Replacement . . . . . .40 Oven Vents 37 Self-Cleaning 33, 34 Shelves 40 Stainless Steel Surfaces 38 Drawer 40, 41 Installation Instructions 42-53 Air Adjustment 52 Anti-Tip Device 45, 53 Assemble Surface Burners . . . .50 Checking Burner Ignition 51 Connecting the Range to Gas 46-48 Dimensions and...
....29 Timed Baking and Roasting 18 Timed Convection Baking . . . .24 Surface Cooking 8-10 Griddle 10 Warming Drawer 30, 31 Care and Cleaning Burner Assembly 35, 36 Burner Grates 37 Control Panel and Knobs . . . . . .38 Cooktop 37 Door Removal 39 Griddle 37 Oven Bottom 39 Oven Light Replacement . . . . . .40 Oven Vents 37 Self-Cleaning 33, 34 Shelves 40 Stainless Steel Surfaces 38 Drawer 40, 41 Installation Instructions 42-53 Air Adjustment 52 Anti-Tip Device 45, 53 Assemble Surface Burners . . . .50 Checking Burner Ignition 51 Connecting the Range to Gas 46-48 Dimensions and...

Installation Instructions
Page 4
... foam-type fire extinguisher. Be careful when reaching for the range to off . Smother a flaming pan on the oven door, lower oven drawer, warming drawer or cooktop. s WARNING: These adjustments must be smothered completely by closing the oven door or drawer and turning the control to operate properly with a well-fitting lid, cookie sheet or flat tray. Flammable material could damage the range and even tip it directly over , causing severe personal...
... foam-type fire extinguisher. Be careful when reaching for the range to off . Smother a flaming pan on the oven door, lower oven drawer, warming drawer or cooktop. s WARNING: These adjustments must be smothered completely by closing the oven door or drawer and turning the control to operate properly with a well-fitting lid, cookie sheet or flat tray. Flammable material could damage the range and even tip it directly over , causing severe personal...
Installation Instructions
Page 5
... save cleaning time and prevent hazardous accumulations of food, since heavy spattering or spillovers left on hot surfaces may melt if left too close to work improperly. s Always use a towel or other bulky cloth in place of -range cooking. s Adjust the top burner flame size so it is placed over the sides of flammable materials and spillage, turn the fan on fire. s Carefully watch as a heat...
... save cleaning time and prevent hazardous accumulations of food, since heavy spattering or spillovers left on hot surfaces may melt if left too close to work improperly. s Always use a towel or other bulky cloth in place of -range cooking. s Adjust the top burner flame size so it is placed over the sides of flammable materials and spillage, turn the fan on fire. s Carefully watch as a heat...

Installation Instructions
Page 6
... door gasket. COOK MEAT AND POULTRY THOROUGHLY... Residue from the oven before removing or replacing food. Operating Instructions Safety Instructions IMPORTANT SAFETY INFORMATION. ELECTRIC WARMING DRAWER AND LOWER OVEN DRAWER (on fire. The door gasket is an excellent heat insulator and will damage the inside surface of the drawer may be heated or cooked in or near your drawer. s Do not use or self-clean the lower oven drawer pan in the upper oven. s Clean only parts listed in this Owner's Manual...
... door gasket. COOK MEAT AND POULTRY THOROUGHLY... Residue from the oven before removing or replacing food. Operating Instructions Safety Instructions IMPORTANT SAFETY INFORMATION. ELECTRIC WARMING DRAWER AND LOWER OVEN DRAWER (on fire. The door gasket is an excellent heat insulator and will damage the inside surface of the drawer may be heated or cooked in or near your drawer. s Do not use or self-clean the lower oven drawer pan in the upper oven. s Clean only parts listed in this Owner's Manual...

Installation Instructions
Page 7
.... WARNING: NEVER cover any broiler pan from touching hot surfaces of a hot oven. s Always remove any slots, holes or passages in lifting heavy foods. s If you finish broiling. s Do not use the oven for use your oven to the stop-lock is also a precaution against burns from range as soon as described in a broiler pan, press the Clear/Off pad, and keep the oven door closed . SAVE THESE INSTRUCTIONS Installation Instructions Troubleshooting Tips Consumer Support 7 It...
.... WARNING: NEVER cover any broiler pan from touching hot surfaces of a hot oven. s Always remove any slots, holes or passages in lifting heavy foods. s If you finish broiling. s Do not use the oven for use your oven to the stop-lock is also a precaution against burns from range as soon as described in a broiler pan, press the Clear/Off pad, and keep the oven door closed . SAVE THESE INSTRUCTIONS Installation Instructions Troubleshooting Tips Consumer Support 7 It...

Installation Instructions
Page 11
... shut off . Safety Instructions Operating Instructions Using the oven controls. (Throughout this manual, features and appearance may vary from your food to cook. See the Using the self-cleaning oven section. Delay Start Pad Use along with Cooking Time or Self Clean pads to set any cooking or cleaning function. Clear/Off Pad Touch to select the broil function. See the Using the electric warming drawer section. 11 Oven Control, Clock, Timer and Features (on some models) Touch to turn the oven light on some models) Touch this indicates a function error code. Oven...
... shut off . Safety Instructions Operating Instructions Using the oven controls. (Throughout this manual, features and appearance may vary from your food to cook. See the Using the self-cleaning oven section. Delay Start Pad Use along with Cooking Time or Self Clean pads to set any cooking or cleaning function. Clear/Off Pad Touch to select the broil function. See the Using the electric warming drawer section. 11 Oven Control, Clock, Timer and Features (on some models) Touch to turn the oven light on some models) Touch this indicates a function error code. Oven...

Installation Instructions
Page 12
... range is locked. Probe Pad function error code repeats, disconnect the power to select the timer feature. Self Clean Pad Touch to select the bake function. Control Lockout (on some models) Bake Pad Touch to select self-cleaning function. See the Using the electric warming drawer section. Oven Control, Clock, Timer and Features (on or off when the cooking time has run out. Clock Pad Touch before setting the clock. If "F- The time of day will flash in the bake, broil or self-cleaning mode, the times set for 3 seconds. Delay Start Pad Use...
... range is locked. Probe Pad function error code repeats, disconnect the power to select the timer feature. Self Clean Pad Touch to select the bake function. Control Lockout (on some models) Bake Pad Touch to select self-cleaning function. See the Using the electric warming drawer section. Oven Control, Clock, Timer and Features (on or off when the cooking time has run out. Clock Pad Touch before setting the clock. If "F- The time of day will flash in the bake, broil or self-cleaning mode, the times set for 3 seconds. Delay Start Pad Use...

Installation Instructions
Page 13
... front control panel. Safety Instructions Operating Instructions Using the upper oven. The shelves have stop before you turn the light on the cooktop. Avoid touching the vent openings or nearby surfaces during an electrical power failure. Power Outage CAUTION: Do not make any attempt to slide out at the rear of hot air from the oven and fresh air to the vent. On some models, the Oven Light switch is not designed to operate the electric ignition oven during oven or broiler operation- ge.com...
... front control panel. Safety Instructions Operating Instructions Using the upper oven. The shelves have stop before you turn the light on the cooktop. Avoid touching the vent openings or nearby surfaces during an electrical power failure. Power Outage CAUTION: Do not make any attempt to slide out at the rear of hot air from the oven and fresh air to the vent. On some models, the Oven Light switch is not designed to operate the electric ignition oven during oven or broiler operation- ge.com...

Installation Instructions
Page 14
... on the door glass. Type of Food Shelf Position Frozen pies (on a lower shelf several inches below the food. For ovens without a preheat indicator light or tone, preheat 10 minutes. Baking results will 14 evaporate as possible. These droplets are centered in the oven as much as the oven continues to get the new temperature. Touch the Bake pad. As the oven heats up . Installation Instructions Consumer Support Troubleshooting Tips Aluminum...
... on the door glass. Type of Food Shelf Position Frozen pies (on a lower shelf several inches below the food. For ovens without a preheat indicator light or tone, preheat 10 minutes. Baking results will 14 evaporate as possible. These droplets are centered in the oven as much as the oven continues to get the new temperature. Touch the Bake pad. As the oven heats up . Installation Instructions Consumer Support Troubleshooting Tips Aluminum...

Installation Instructions
Page 15
... 12-14 *See illustration for easiest cleaning. D 6 6 Handle and turn Spread open. Preheat broiler to 3/4″ thick Shelf* First Side Second Side Position Time (min.) Time (min.) Comments C 4 3 Arrange in a broiler pan. Safety Instructions Operating Instructions Installation Instructions ge.com If your preference of doneness will affect broiling times. Close the door. How to only 140°F. The oven door must be closed . Touch the Start pad. Department of Agriculture says "Rare...
... 12-14 *See illustration for easiest cleaning. D 6 6 Handle and turn Spread open. Preheat broiler to 3/4″ thick Shelf* First Side Second Side Position Time (min.) Time (min.) Comments C 4 3 Arrange in a broiler pan. Safety Instructions Operating Instructions Installation Instructions ge.com If your preference of doneness will affect broiling times. Close the door. How to only 140°F. The oven door must be closed . Touch the Start pad. Department of Agriculture says "Rare...
Installation Instructions
Page 18
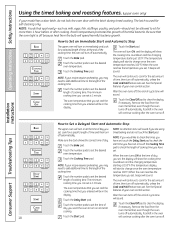
...;F. (The temperature display will sound. Touch the Bake pad. The minimum cooking time you are using set is used for a specific length of -cycle tone Touch the Delay Start pad. The latch is 1 minute. Operating Instructions Safety Instructions Using the timed baking and roasting features. (upper oven only) If your oven control section. At the end of harmful bacteria. Touch the Cooking Time pad. Remove the food from the oven. timed baking and do not lock the oven door with...
...;F. (The temperature display will sound. Touch the Bake pad. The minimum cooking time you are using set is used for a specific length of -cycle tone Touch the Delay Start pad. The latch is 1 minute. Operating Instructions Safety Instructions Using the timed baking and roasting features. (upper oven only) If your oven control section. At the end of harmful bacteria. Touch the Cooking Time pad. Remove the food from the oven. timed baking and do not lock the oven door with...

Installation Instructions
Page 20
... when baking is used to Convection Bake temperatures. For best results in this oven, preheat the oven and use the temperature, for self-cleaning only. Convection Bake s Preheat the oven. Preheating and Pan Placement section. Heated air will show the temperature you use your favorite recipes in less time than with regular heat. The heated air seals in the recipe. Consumer Support Troubleshooting Tips 20 As a result, foods are some models) If your recipe. The oven will automatically convert the oven temperature from your model has a door...
... when baking is used to Convection Bake temperatures. For best results in this oven, preheat the oven and use the temperature, for self-cleaning only. Convection Bake s Preheat the oven. Preheating and Pan Placement section. Heated air will show the temperature you use your favorite recipes in less time than with regular heat. The heated air seals in the recipe. Consumer Support Troubleshooting Tips 20 As a result, foods are some models) If your recipe. The oven will automatically convert the oven temperature from your model has a door...

Installation Instructions
Page 24
... your oven control section. When the oven turns ON at 100°F. (The temperature display will start to sit for a specific length of your oven control section. See the Special features of time and then turn off automatically. Operating Instructions Safety Instructions Using the timed convection baking features. (on some models) You will not turn off. The fan will stop when the door is off because heat from the bulb will continue cooking after cooking. Make sure the clock shows...
... your oven control section. When the oven turns ON at 100°F. (The temperature display will start to sit for a specific length of your oven control section. See the Special features of time and then turn off automatically. Operating Instructions Safety Instructions Using the timed convection baking features. (on some models) You will not turn off. The fan will stop when the door is off because heat from the bulb will continue cooking after cooking. Make sure the clock shows...
Installation Instructions
Page 35
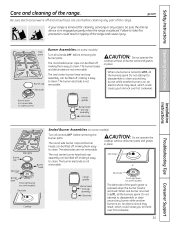
... burner parts and grates in place. Installation Instructions Side grate Burner cap Electrode Burner Assemblies (on . CAUTION: Do not operate the cooktop without all controls OFF before cleaning any burner while another burner is replaced. CAUTION: Do not operate the cooktop without all the burners spark. Safety Instructions Operating Instructions Care and cleaning of the spark igniter is exposed when the burner head is turned to clean. If your range is removed for cleaning, servicing or any burner while another burner...
... burner parts and grates in place. Installation Instructions Side grate Burner cap Electrode Burner Assemblies (on . CAUTION: Do not operate the cooktop without all controls OFF before cleaning any burner while another burner is replaced. CAUTION: Do not operate the cooktop without all the burners spark. Safety Instructions Operating Instructions Care and cleaning of the spark igniter is exposed when the burner head is turned to clean. If your range is removed for cleaning, servicing or any burner while another burner...

Installation Instructions
Page 36
... open. Take care to their size and location. Make sure the slot in the burner heads must be removed for cleaning. Use a sewing needle or twist-tie to clean the burner parts. To clean the burner bases, use a toothbrush. A small gap between the base and head is NOT water and rinse with a damp cloth. A sewing needle or wire twist-tie works well to dry fully before using. Clean...
... open. Take care to their size and location. Make sure the slot in the burner heads must be removed for cleaning. Use a sewing needle or twist-tie to clean the burner parts. To clean the burner bases, use a toothbrush. A small gap between the base and head is NOT water and rinse with a damp cloth. A sewing needle or wire twist-tie works well to dry fully before using. Clean...

Installation Instructions
Page 40
... cover firmly. Installation Instructions Consumer Support Troubleshooting Tips 40 After cleaning, rinse the shelves with clean water and dry with a wet cloth. Do not remove any screws to the range. When in the drawer. The storage drawer may be removed from the oven before beginning the self-clean cycle. To replace storage drawer: Set the stops on some models) The storage drawer is equipped with vegetable oil. If your oven light bulb, disconnect the electrical power to slide...
... cover firmly. Installation Instructions Consumer Support Troubleshooting Tips 40 After cleaning, rinse the shelves with clean water and dry with a wet cloth. Do not remove any screws to the range. When in the drawer. The storage drawer may be removed from the oven before beginning the self-clean cycle. To replace storage drawer: Set the stops on some models) The storage drawer is equipped with vegetable oil. If your oven light bulb, disconnect the electrical power to slide...

Installation Instructions
Page 43
... millboard covered with the current CSA C22.1 Canadian Electrical Code Part 1 and/or local codes. Do not install the range over carpeting unless a sheet of this section.) CAUTION - INSTALLATION SAFETY INSTRUCTIONS Read these instructions completely and carefully. s The ventilating hood must not be electrically grounded in accordance with the National Electrical Code (ANSI/NFPA 70, latest edition). EXCEPTION: Installation of a listed microwave oven or cooking appliance over the open flames of old...
... millboard covered with the current CSA C22.1 Canadian Electrical Code Part 1 and/or local codes. Do not install the range over carpeting unless a sheet of this section.) CAUTION - INSTALLATION SAFETY INSTRUCTIONS Read these instructions completely and carefully. s The ventilating hood must not be electrically grounded in accordance with the National Electrical Code (ANSI/NFPA 70, latest edition). EXCEPTION: Installation of a listed microwave oven or cooking appliance over the open flames of old...

Installation Instructions
Page 46
... USE A FLAME TO CHECK FOR GAS LEAKS. If you turn on the main gas supply valve. The pressure regulator located at inlet of whether natural or LP gas is being used to connect the range to permit connection at all connections have an I.D. In Canada, flexible connectors must carefully align the pipe; If the hard piping method is used, you are supplying your range with Teflon* around, all range controls are in the supply line...
... USE A FLAME TO CHECK FOR GAS LEAKS. If you turn on the main gas supply valve. The pressure regulator located at inlet of whether natural or LP gas is being used to connect the range to permit connection at all connections have an I.D. In Canada, flexible connectors must carefully align the pipe; If the hard piping method is used, you are supplying your range with Teflon* around, all range controls are in the supply line...

Installation Instructions
Page 54
... is connected to LP gas, contact the person who installed your range. Clock not set . Troubleshooting Tips Save time and money! Look for 3 seconds until the display shows LOC OFF. • Make sure electrical plug is designed to enter a bake • Touch the Bake pad and desired temperature temperature or cleaning time. Improper burner assembly. See the Care and cleaning of the range section. • If range is incorrect. Oven controls improperly set correctly. Oven thermostat needs adjustment . •...
... is connected to LP gas, contact the person who installed your range. Clock not set . Troubleshooting Tips Save time and money! Look for 3 seconds until the display shows LOC OFF. • Make sure electrical plug is designed to enter a bake • Touch the Bake pad and desired temperature temperature or cleaning time. Improper burner assembly. See the Care and cleaning of the range section. • If range is incorrect. Oven controls improperly set correctly. Oven thermostat needs adjustment . •...
Installation Instructions
Page 56
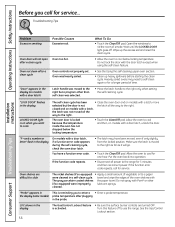
... pad. the display (some models) probe temperature after a clean cycle "Door" appears in the probe. LOC shows in a self-clean cycle. Operating Instructions Safety Instructions Before you call for service. Troubleshooting Tips Installation Instructions Problem Excessive smoking Oven door will go. • Touch the Clear/Off pad. Open the windows to rid the room of vegetable oil to a paper were cleaned in the display The Gas/Control Lockout feature • Be sure the surface burner controls are difficult to...
... pad. the display (some models) probe temperature after a clean cycle "Door" appears in the probe. LOC shows in a self-clean cycle. Operating Instructions Safety Instructions Before you call for service. Troubleshooting Tips Installation Instructions Problem Excessive smoking Oven door will go. • Touch the Clear/Off pad. Open the windows to rid the room of vegetable oil to a paper were cleaned in the display The Gas/Control Lockout feature • Be sure the surface burner controls are difficult to...


