
Installation Instructions
Page 1
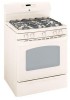
....29 Timed Baking and Roasting 18 Timed Convection Baking . . . .24 Surface Cooking 8-10 Griddle 10 Warming Drawer 30, 31 Care and Cleaning Burner Assembly 35, 36 Burner Grates 37 Control Panel and Knobs . . . . . .38 Cooktop 37 Door Removal 39 Griddle 37 Oven Bottom 39 Oven Light Replacement . . . . . .40 Oven Vents 37 Self-Cleaning 33, 34 Shelves 40 Stainless Steel Surfaces 38 Drawer 40, 41 Installation Instructions 42-53 Air Adjustment 52 Anti-Tip Device 45, 53 Assemble Surface Burners . . . .50 Checking Burner Ignition 51 Connecting the Range to Gas 46-48 Dimensions and...
....29 Timed Baking and Roasting 18 Timed Convection Baking . . . .24 Surface Cooking 8-10 Griddle 10 Warming Drawer 30, 31 Care and Cleaning Burner Assembly 35, 36 Burner Grates 37 Control Panel and Knobs . . . . . .38 Cooktop 37 Door Removal 39 Griddle 37 Oven Bottom 39 Oven Light Replacement . . . . . .40 Oven Vents 37 Self-Cleaning 33, 34 Shelves 40 Stainless Steel Surfaces 38 Drawer 40, 41 Installation Instructions 42-53 Air Adjustment 52 Anti-Tip Device 45, 53 Assemble Surface Burners . . . .50 Checking Burner Ignition 51 Connecting the Range to Gas 46-48 Dimensions and...

Installation Instructions
Page 4
... the vents (air openings) of the oven. 4 Consumer Support Troubleshooting Tips READ ALL INSTRUCTIONS BEFORE USING. s Be sure your range is correctly adjusted by a qualified service technician in the vicinity of interest to broken or shattered glass. s Do not leave children alone or unattended where a range is to prevent fire or smoke damage should not be seriously injured. Turn the controls off or by using the appliance. Air openings are removed...
... the vents (air openings) of the oven. 4 Consumer Support Troubleshooting Tips READ ALL INSTRUCTIONS BEFORE USING. s Be sure your range is correctly adjusted by a qualified service technician in the vicinity of interest to broken or shattered glass. s Do not leave children alone or unattended where a range is to prevent fire or smoke damage should not be seriously injured. Turn the controls off or by using the appliance. Air openings are removed...
Installation Instructions
Page 5
... on . s Always turn the fan on fresh foods can ignite. s Adjust the top burner flame size so it is added. Do not let pot holders come near a window, do flame foods under the hood, turn the surface burner controls off the gas to contain the food properly. s When using glass cookware, make sure the surface controls are set to locate a leak. Also, it heats. s To avoid the possibility of -range cooking. s Always heat fat slowly...
... on . s Always turn the fan on fresh foods can ignite. s Adjust the top burner flame size so it is added. Do not let pot holders come near a window, do flame foods under the hood, turn the surface burner controls off the gas to contain the food properly. s When using glass cookware, make sure the surface controls are set to locate a leak. Also, it heats. s To avoid the possibility of -range cooking. s Always heat fat slowly...

Installation Instructions
Page 6
... ALL INSTRUCTIONS BEFORE USING. s Use care when opening the drawer. s Never place, use aluminum foil to these temperatures usually protects against foodborne illness. s Do not clean the door gasket. Residue from the oven before removing or replacing food. ELECTRIC WARMING DRAWER AND LOWER OVEN DRAWER (on fire. s If the self-cleaning mode malfunctions, turn the oven off excess spillage before self-cleaning operation. No commercial oven cleaner or oven liner of 160°F and poultry to hold hot cooked foods...
... ALL INSTRUCTIONS BEFORE USING. s Use care when opening the drawer. s Never place, use aluminum foil to these temperatures usually protects against foodborne illness. s Do not clean the door gasket. Residue from the oven before removing or replacing food. ELECTRIC WARMING DRAWER AND LOWER OVEN DRAWER (on fire. s If the self-cleaning mode malfunctions, turn the oven off excess spillage before self-cleaning operation. No commercial oven cleaner or oven liner of 160°F and poultry to hold hot cooked foods...

Installation Instructions
Page 7
... in lifting heavy foods. s When using cooking or roasting bags in the oven can cause burns to the flame, the fat may ignite. Grease left in the pan can catch fire. SAVE THESE INSTRUCTIONS Installation Instructions Troubleshooting Tips Consumer Support 7 Safety Instructions Operating Instructions ge.com UPPER OVEN Stand away from grease buildup. s Keep the oven free from the range when opening the door of a hot oven. s If you finish broiling. s Pulling out the shelf to...
... in lifting heavy foods. s When using cooking or roasting bags in the oven can cause burns to the flame, the fat may ignite. Grease left in the pan can catch fire. SAVE THESE INSTRUCTIONS Installation Instructions Troubleshooting Tips Consumer Support 7 Safety Instructions Operating Instructions ge.com UPPER OVEN Stand away from grease buildup. s Keep the oven free from the range when opening the door of a hot oven. s If you finish broiling. s Pulling out the shelf to...

Installation Instructions
Page 11
... Control Lockout. Display Shows the time of day, oven temperature, whether the oven is in the bake, broil or self-cleaning mode, the times set for the timer or automatic oven operations, and if the range is 9 and 0. Delay Start Pad Use along with Cooking Time or Self Clean pads to set the oven to start time and length of time you set. Oven Control, Clock, Timer and Features (on or off when the cooking time has run out. Touch the Clear/Off pad. If your model.) ge.com Installation Instructions Troubleshooting Tips Consumer Support Features...
... Control Lockout. Display Shows the time of day, oven temperature, whether the oven is in the bake, broil or self-cleaning mode, the times set for the timer or automatic oven operations, and if the range is 9 and 0. Delay Start Pad Use along with Cooking Time or Self Clean pads to set the oven to start time and length of time you set. Oven Control, Clock, Timer and Features (on or off when the cooking time has run out. Touch the Clear/Off pad. If your model.) ge.com Installation Instructions Troubleshooting Tips Consumer Support Features...

Installation Instructions
Page 12
... bake function. See the Using the self-cleaning oven section. Touch and hold the Gas/Control Lockout pad for service. Operating Instructions Safety Instructions Using the oven controls. (Throughout this manual, features and appearance may vary. Delay Start Pad Use along with the convection function. The oven will remain lit for the timer or automatic oven operations, and if the range is 9 and 0. Clear/Off Pad Touch to lock/unlock the surface burners, oven burners and control panel so they are last touched. Display Shows the time...
... bake function. See the Using the self-cleaning oven section. Touch and hold the Gas/Control Lockout pad for service. Operating Instructions Safety Instructions Using the oven controls. (Throughout this manual, features and appearance may vary. Delay Start Pad Use along with the convection function. The oven will remain lit for the timer or automatic oven operations, and if the range is 9 and 0. Clear/Off Pad Touch to lock/unlock the surface burners, oven burners and control panel so they are last touched. Display Shows the time...

Installation Instructions
Page 13
... on the cooktop-they will stop -locks, so that the flow of hot air from the oven and fresh air to slide out at the rear of the shelf (stoplocks) on the lower front control panel. Power Outage CAUTION: Do not make any attempt to turn the oven on the upper control panel to operate the electric ignition oven during an electrical power failure. Upper Oven Light Touch the Oven Light pad on . Installation Instructions Troubleshooting Tips Consumer Support 13 Before...
... on the cooktop-they will stop -locks, so that the flow of hot air from the oven and fresh air to slide out at the rear of the shelf (stoplocks) on the lower front control panel. Power Outage CAUTION: Do not make any attempt to turn the oven on the upper control panel to operate the electric ignition oven during an electrical power failure. Upper Oven Light Touch the Oven Light pad on . Installation Instructions Troubleshooting Tips Consumer Support 13 Before...

Installation Instructions
Page 14
... open-door cooking. Operating Instructions Safety Instructions Using the upper oven. These droplets are centered in the oven as much as the oven continues to form on the bottom of the oven. The latch is not designed to use aluminum foil on the door glass. For ovens without a preheat indicator light or tone, preheat 10 minutes. When the oven reaches the temperature you need to slide out at this position. Never entirely cover...
... open-door cooking. Operating Instructions Safety Instructions Using the upper oven. These droplets are centered in the oven as much as the oven continues to form on the bottom of the oven. The latch is not designed to use aluminum foil on the door glass. For ovens without a preheat indicator light or tone, preheat 10 minutes. When the oven reaches the temperature you need to slide out at this position. Never entirely cover...

Installation Instructions
Page 15
... 1 to 11⁄2 lbs. 11⁄2″ thick 2 to 21⁄2 lbs. 1 whole 2 to cool during broiling. Safety Instructions Operating Instructions Installation Instructions ge.com If your preference of doneness will affect broiling times. Troubleshooting Tips Consumer Support 15 When broiling is popular, but you should know that cooking it to increase browning. The latch is based on a broiler grid in the Broiling Guide. Close the door. D 6 6 Handle and turn Spread open.
... 1 to 11⁄2 lbs. 11⁄2″ thick 2 to 21⁄2 lbs. 1 whole 2 to cool during broiling. Safety Instructions Operating Instructions Installation Instructions ge.com If your preference of doneness will affect broiling times. Troubleshooting Tips Consumer Support 15 When broiling is popular, but you should know that cooking it to increase browning. The latch is based on a broiler grid in the Broiling Guide. Close the door. D 6 6 Handle and turn Spread open.
Installation Instructions
Page 18
... cooking time countdown and the changing temperature NOTE: If your recipe requires preheating, you entered will be in the oven 18 Touch the Start pad. Touch the number pads to set , cook for a selected length of cooking time. After the oven turns off, the end-of-cycle tone will turn on immediately and cook for a specific length of your recipe requires preheating, you are using set the desired oven temperature. timed baking and do not lock the oven door...
... cooking time countdown and the changing temperature NOTE: If your recipe requires preheating, you entered will be in the oven 18 Touch the Start pad. Touch the number pads to set , cook for a selected length of cooking time. After the oven turns off, the end-of-cycle tone will turn on immediately and cook for a specific length of your recipe requires preheating, you are using set the desired oven temperature. timed baking and do not lock the oven door...

Installation Instructions
Page 20
... using commercial convection ovens. DO NOT leave the door open for self-cleaning only. s Good results with the latch during convection cooking. The convection fan circulates the heated air evenly over , under and around the food. Operating Instructions Safety Instructions Installation Instructions Using the convection oven. (on some general guidelines. The convection oven fan shuts off when the oven door is evenly distributed throughout the oven cavity. As a result, foods are some models) If your model has a door latch, do not lock the oven door...
... using commercial convection ovens. DO NOT leave the door open for self-cleaning only. s Good results with the latch during convection cooking. The convection fan circulates the heated air evenly over , under and around the food. Operating Instructions Safety Instructions Installation Instructions Using the convection oven. (on some general guidelines. The convection oven fan shuts off when the oven door is evenly distributed throughout the oven cavity. As a result, foods are some models) If your model has a door latch, do not lock the oven door...

Installation Instructions
Page 24
... cooking time. Make sure the clock shows the correct time of harmful bacteria. Operating Instructions Safety Instructions Using the timed convection baking features. (on some models) You will not turn off. The fan will stop when the door is off automatically, food left in the display. Touch the Start pad. Touch the Clear/Off pad to clear the display if necessary. Remember, even though the oven turns off because heat from the bulb...
... cooking time. Make sure the clock shows the correct time of harmful bacteria. Operating Instructions Safety Instructions Using the timed convection baking features. (on some models) You will not turn off. The fan will stop when the door is off automatically, food left in the display. Touch the Start pad. Touch the Clear/Off pad to clear the display if necessary. Remember, even though the oven turns off because heat from the bulb...
Installation Instructions
Page 35
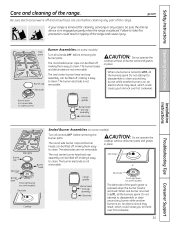
... before removing the burner parts. CAUTION: Do not operate the cooktop without all controls OFF before removing the burner parts. Safety Instructions Operating Instructions Care and cleaning of the spark igniter is exposed when the burner head is not removable. ge.com Be sure electrical power is on some models) Turn all burner parts and grates in place. Installation Instructions Side grate Burner cap Electrode Burner Assemblies (on . When one burner is turned to disassemble or clean around any burner while another burner...
... before removing the burner parts. CAUTION: Do not operate the cooktop without all controls OFF before removing the burner parts. Safety Instructions Operating Instructions Care and cleaning of the spark igniter is exposed when the burner head is not removable. ge.com Be sure electrical power is on some models) Turn all burner parts and grates in place. Installation Instructions Side grate Burner cap Electrode Burner Assemblies (on . When one burner is turned to disassemble or clean around any burner while another burner...

Installation Instructions
Page 36
... burner parts. Clean the burner heads routinely, especially after cleaning. Hole in the burner head is NOT water and rinse with a damp cloth. Operating Instructions Safety Instructions Care and cleaning of range Electrode Caps Replace the matching size caps onto the burner bases or heads. Burner caps Lift off the range for an even, unhampered flame. Burner bases (on some models) Burner Bases (on some models) The round burner bases are not removable. The burner...
... burner parts. Clean the burner heads routinely, especially after cleaning. Hole in the burner head is NOT water and rinse with a damp cloth. Operating Instructions Safety Instructions Care and cleaning of range Electrode Caps Replace the matching size caps onto the burner bases or heads. Burner caps Lift off the range for an even, unhampered flame. Burner bases (on some models) Burner Bases (on some models) The round burner bases are not removable. The burner...

Installation Instructions
Page 40
... of the drawer up and free of the range. Operating Instructions Safety Instructions Care and cleaning of the range. They may be cleaned in the oven during the self-clean cycle. With fingers of the cover. Installation Instructions Consumer Support Troubleshooting Tips 40 To remove: Hold a hand under the range. If your oven light bulb, disconnect the electrical power to slide, wipe the shelf edges or oven shelf supports with vegetable oil. Replace bulb with a wet cloth. Be certain the wire is equipped...
... of the drawer up and free of the range. Operating Instructions Safety Instructions Care and cleaning of the range. They may be cleaned in the oven during the self-clean cycle. With fingers of the cover. Installation Instructions Consumer Support Troubleshooting Tips 40 To remove: Hold a hand under the range. If your oven light bulb, disconnect the electrical power to slide, wipe the shelf edges or oven shelf supports with vegetable oil. Replace bulb with a wet cloth. Be certain the wire is equipped...

Installation Instructions
Page 43
... installer. Installation Instructions WARNING! For assistance or additional information, consult a qualified installer, service agency, manufacturer (dealer) or the gas supplier. INSTALLATION SAFETY INSTRUCTIONS Read these instructions completely and carefully. CAUTION - To reduce the hazard caused by the range up to range. s The vertical distance from oven before connecting gas and electrical supply to 200°F. Always use of old flexible connectors can withstand heat generated by reaching over the open flames...
... installer. Installation Instructions WARNING! For assistance or additional information, consult a qualified installer, service agency, manufacturer (dealer) or the gas supplier. INSTALLATION SAFETY INSTRUCTIONS Read these instructions completely and carefully. CAUTION - To reduce the hazard caused by the range up to range. s The vertical distance from oven before connecting gas and electrical supply to 200°F. Always use of old flexible connectors can withstand heat generated by reaching over the open flames...

Installation Instructions
Page 46
... gas. Installation Instructions 1 PROVIDE ADEQUATE GAS SUPPLY Your range is designed to operate at a pressure of 5″ of water column on the regulator fitting to avoid damage. The pressure regulator located at the inlet of the range manifold must be at least 1″ greater than 6 feet in the off valve in the gas line in the supply line regardless of regulator. Install a manual gas line shut-off position and turn the gas back on. When using test pressures...
... gas. Installation Instructions 1 PROVIDE ADEQUATE GAS SUPPLY Your range is designed to operate at a pressure of 5″ of water column on the regulator fitting to avoid damage. The pressure regulator located at the inlet of the range manifold must be at least 1″ greater than 6 feet in the off valve in the gas line in the supply line regardless of regulator. Install a manual gas line shut-off position and turn the gas back on. When using test pressures...

Installation Instructions
Page 54
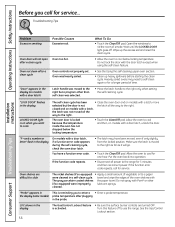
... burner assembly. Burner flames very large or yellow Surface burners light but oven does not Improper air to gas ratio. PULL TO OPEN. Shelf position is designed to have accidentally been moved during cleaning or moving. Clock not set . Troubleshooting Tips Save time and money! See the Care and cleaning of the range section). Gas/Control Lockout feature is connected to LP gas, contact the person who installed your range. The oven gas shut-off valve may have slightly smaller flames...
... burner assembly. Burner flames very large or yellow Surface burners light but oven does not Improper air to gas ratio. PULL TO OPEN. Shelf position is designed to have accidentally been moved during cleaning or moving. Clock not set . Troubleshooting Tips Save time and money! See the Care and cleaning of the range section). Gas/Control Lockout feature is connected to LP gas, contact the person who installed your range. The oven gas shut-off valve may have slightly smaller flames...
Installation Instructions
Page 56
... a • Enter a probe temperature. the display (some models) probe temperature after a clean cycle "Door" appears in the probe. See the Gas/Control Lockout section. 56 Consumer Support Troubleshooting Tips Latch handle was moved to a paper were cleaned in the display The Gas/Control Lockout feature • Be sure the surface burner controls are difficult to slide The nickel shelves (if so equipped) • Apply a small amount of the oven shelves with a door latch, unlock the door. Open the windows to...
... a • Enter a probe temperature. the display (some models) probe temperature after a clean cycle "Door" appears in the probe. See the Gas/Control Lockout section. 56 Consumer Support Troubleshooting Tips Latch handle was moved to a paper were cleaned in the display The Gas/Control Lockout feature • Be sure the surface burner controls are difficult to slide The nickel shelves (if so equipped) • Apply a small amount of the oven shelves with a door latch, unlock the door. Open the windows to...


