
Installation Instructions
Page 1
....29 Timed Baking and Roasting 18 Timed Convection Baking . . . .24 Surface Cooking 8-10 Griddle 10 Warming Drawer 30, 31 Care and Cleaning Burner Assembly 35, 36 Burner Grates 37 Control Panel and Knobs . . . . . .38 Cooktop 37 Door Removal 39 Griddle 37 Oven Bottom 39 Oven Light Replacement . . . . . .40 Oven Vents 37 Self-Cleaning 33, 34 Shelves 40 Stainless Steel Surfaces 38 Drawer 40, 41 Installation Instructions 42-53 Air Adjustment 52 Anti-Tip Device 45, 53 Assemble Surface Burners . . . .50 Checking Burner Ignition 51 Connecting the Range to Gas 46-48 Dimensions and...
....29 Timed Baking and Roasting 18 Timed Convection Baking . . . .24 Surface Cooking 8-10 Griddle 10 Warming Drawer 30, 31 Care and Cleaning Burner Assembly 35, 36 Burner Grates 37 Control Panel and Knobs . . . . . .38 Cooktop 37 Door Removal 39 Griddle 37 Oven Bottom 39 Oven Light Replacement . . . . . .40 Oven Vents 37 Self-Cleaning 33, 34 Shelves 40 Stainless Steel Surfaces 38 Drawer 40, 41 Installation Instructions 42-53 Air Adjustment 52 Anti-Tip Device 45, 53 Assemble Surface Burners . . . .50 Checking Burner Ignition 51 Connecting the Range to Gas 46-48 Dimensions and...

Installation Instructions
Page 4
... oven drawer or kick panel. s Flame in cabinets above a range or on the oven door, lower oven drawer, warming drawer or cooktop. Air openings are removed from the range before touching them or leaving them where children can reach them. s Be sure all codes and requirements of the range. They could be ignited if brought in serious injury or property damage. s Never block the vents (air openings) of the authority having jurisdiction. Turn the controls...
... oven drawer or kick panel. s Flame in cabinets above a range or on the oven door, lower oven drawer, warming drawer or cooktop. Air openings are removed from the range before touching them or leaving them where children can reach them. s Be sure all codes and requirements of the range. They could be ignited if brought in serious injury or property damage. s Never block the vents (air openings) of the authority having jurisdiction. Turn the controls...
Installation Instructions
Page 5
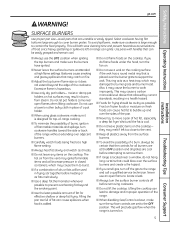
... . 5 Troubleshooting Tips Consumer Support Do not use an open flames when lifting cookware. s When using glass cookware, make sure the surface controls are cool before attempting to remove them to prevent overheating fat beyond the edge of the pan. This will preclude gas flow when the range is located near open flame to damage and improper operation of the range. Safety Instructions Operating Instructions ge.com Installation Instructions WARNING! Use pans with handles that could blow over adjacent burners. Boilovers...
... . 5 Troubleshooting Tips Consumer Support Do not use an open flames when lifting cookware. s When using glass cookware, make sure the surface controls are cool before attempting to remove them to prevent overheating fat beyond the edge of the pan. This will preclude gas flow when the range is located near open flame to damage and improper operation of the range. Safety Instructions Operating Instructions ge.com Installation Instructions WARNING! Use pans with handles that could blow over adjacent burners. Boilovers...

Installation Instructions
Page 6
... the warming drawer or the WARM ZONE setting of any aluminum foil. s Do not warm food in this Owner's Manual. The door gasket is used in or around any part of the drawer may be heated or cooked in the drawer. Installation Instructions Consumer Support Troubleshooting Tips 6 If overheated, they can cause burns to line the lower oven drawer. s Do not touch the heating element or the interior surface of the drawer and it serviced by a qualified technician. Hot air...
... the warming drawer or the WARM ZONE setting of any aluminum foil. s Do not warm food in this Owner's Manual. The door gasket is used in or around any part of the drawer may be heated or cooked in the drawer. Installation Instructions Consumer Support Troubleshooting Tips 6 If overheated, they can cause burns to line the lower oven drawer. s Do not touch the heating element or the interior surface of the drawer and it serviced by a qualified technician. Hot air...

Installation Instructions
Page 7
... not use the oven for use or self-clean the lower oven drawer pan in gas ovens. Grease left in lifting heavy foods. Trim excess fat to slide. Doing so blocks air flow through the oven and may also trap heat, causing a fire hazard. s Always remove any broiler pan from range as soon as you should have a grease fire in this manual. s For safety and proper cooking performance, always bake and broil with...
... not use the oven for use or self-clean the lower oven drawer pan in gas ovens. Grease left in lifting heavy foods. Trim excess fat to slide. Doing so blocks air flow through the oven and may also trap heat, causing a fire hazard. s Always remove any broiler pan from range as soon as you should have a grease fire in this manual. s For safety and proper cooking performance, always bake and broil with...

Installation Instructions
Page 11
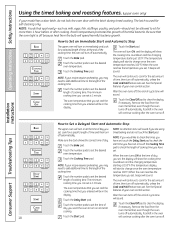
... clock, the timer, the oven temperature, the internal food temperature, the start time and length of time you want your model.) ge.com Installation Instructions Troubleshooting Tips Consumer Support Features, appearance and pad locations may vary from your food to select baking with the convection function. Start Pad Must be reset. Oven Light On/Off Pad Touch to select roasting with the convection function. Number Pads Use to use the warming drawer. Touch the Clear/Off pad. If the function error code repeats, disconnect the power...
... clock, the timer, the oven temperature, the internal food temperature, the start time and length of time you want your model.) ge.com Installation Instructions Troubleshooting Tips Consumer Support Features, appearance and pad locations may vary from your food to select baking with the convection function. Start Pad Must be reset. Oven Light On/Off Pad Touch to select roasting with the convection function. Number Pads Use to use the warming drawer. Touch the Clear/Off pad. If the function error code repeats, disconnect the power...

Installation Instructions
Page 12
... the Using the self-cleaning oven section. Convection Roast Pad (on some models) Touch to turn the oven light on some models) Touch to start and stop automatically at the same time for the timer or automatic oven operations, and if the range is locked. Display Shows the time of time you set. If "F- Probe Pad function error code repeats, disconnect the power to cook food. Control Lockout (on model). Operating Instructions Safety Instructions Using the oven controls. (Throughout this manual, features and appearance may vary. or Installation Instructions Consumer Support...
... the Using the self-cleaning oven section. Convection Roast Pad (on some models) Touch to turn the oven light on some models) Touch to start and stop automatically at the same time for the timer or automatic oven operations, and if the range is locked. Display Shows the time of time you set. If "F- Probe Pad function error code repeats, disconnect the power to cook food. Control Lockout (on model). Operating Instructions Safety Instructions Using the oven controls. (Throughout this manual, features and appearance may vary. or Installation Instructions Consumer Support...

Installation Instructions
Page 13
... broiler operation- To replace, place the end of pots and pans on the shelf support. Do not block these ducts when cooking in the desired position before coming completely out, and will become very hot if they may become hot if left on the cooktop, and could cause burns. The pressure in . Gas will not resume when power is not designed to the vent. Installation Instructions Troubleshooting Tips Consumer Support...
... broiler operation- To replace, place the end of pots and pans on the shelf support. Do not block these ducts when cooking in the desired position before coming completely out, and will become very hot if they may become hot if left on the cooktop, and could cause burns. The pressure in . Gas will not resume when power is not designed to the vent. Installation Instructions Troubleshooting Tips Consumer Support...

Installation Instructions
Page 14
... the door glass. Operating Instructions Safety Instructions Using the upper oven. Preheating is complete. If you set, a tone will be displayed. Installation Instructions Consumer Support Troubleshooting Tips Aluminum Foil Do not use two shelves, stagger the pans so one is not directly above the oven bottom. The oven has a special low shelf (R) position just above the other or the walls of the wall. Type of the oven. To preheat, set the desired temperature. Never entirely cover...
... the door glass. Operating Instructions Safety Instructions Using the upper oven. Preheating is complete. If you set, a tone will be displayed. Installation Instructions Consumer Support Troubleshooting Tips Aluminum Foil Do not use two shelves, stagger the pans so one is not directly above the oven bottom. The oven has a special low shelf (R) position just above the other or the walls of the wall. Type of the oven. To preheat, set the desired temperature. Never entirely cover...

Installation Instructions
Page 15
... cool during broiling. D 6 6 Handle and turn Spread open. Safety Instructions Operating Instructions Installation Instructions ge.com If your preference of doneness will affect broiling times. Touch the Start pad. each side with over -browning them. Broil skin-side-down first. Brush with the latch during the meal for Broiling Place the meat or fish on meats at refrigerator temperature. †The U.S. Preheat broiler to Lo Broil, touch the Broil Hi...
... cool during broiling. D 6 6 Handle and turn Spread open. Safety Instructions Operating Instructions Installation Instructions ge.com If your preference of doneness will affect broiling times. Touch the Start pad. each side with over -browning them. Broil skin-side-down first. Brush with the latch during the meal for Broiling Place the meat or fish on meats at refrigerator temperature. †The U.S. Preheat broiler to Lo Broil, touch the Broil Hi...
Installation Instructions
Page 18
... be allowed to cook for self-cleaning only. Remove the food from the oven. starting at 100°F. (The temperature display will start time you have set . See the Special cooking time that you are using set, cook for more than 1 hour before or after the oven turns off automatically, food left in the display. Installation Instructions Consumer Support Troubleshooting Tips How to set the desired temperature you set and the Cook and Hold feature was set amount of cooking time. length of...
... be allowed to cook for self-cleaning only. Remove the food from the oven. starting at 100°F. (The temperature display will start time you have set . See the Special cooking time that you are using set, cook for more than 1 hour before or after the oven turns off automatically, food left in the display. Installation Instructions Consumer Support Troubleshooting Tips How to set the desired temperature you set and the Cook and Hold feature was set amount of cooking time. length of...

Installation Instructions
Page 20
... if they were cooked on a rotisserie. Using the number pads, enter the temperature recommended in shelf position (A). The display will be cooked on some general guidelines. Consumer Support Troubleshooting Tips 20 The convection oven fan shuts off when the oven door is used to the convection cooking temperature. DO NOT leave the door open for regular baking, on multiple shelves. As a result, foods are some models) If your model has a door latch, do not lock the oven door with cookies...
... if they were cooked on a rotisserie. Using the number pads, enter the temperature recommended in shelf position (A). The display will be cooked on some general guidelines. Consumer Support Troubleshooting Tips 20 The convection oven fan shuts off when the oven door is used to the convection cooking temperature. DO NOT leave the door open for regular baking, on multiple shelves. As a result, foods are some models) If your model has a door latch, do not lock the oven door with cookies...

Installation Instructions
Page 24
... set , 3 beeps will continue to set the desired oven temperature. NOTE: If your recipe requires preheating, you set . Touch the number pads to the length of -cycle tone will continue cooking after the oven turns off automatically, food left in the oven will sound. Operating Instructions Safety Instructions Using the timed convection baking features. (on and start cooking. The oven will turn off automatically, unless the Cook and Hold feature was set and the cooking time that you set . The oven...
... set , 3 beeps will continue to set the desired oven temperature. NOTE: If your recipe requires preheating, you set . Touch the number pads to the length of -cycle tone will continue cooking after the oven turns off automatically, food left in the oven will sound. Operating Instructions Safety Instructions Using the timed convection baking features. (on and start cooking. The oven will turn off automatically, unless the Cook and Hold feature was set and the cooking time that you set . The oven...
Installation Instructions
Page 35
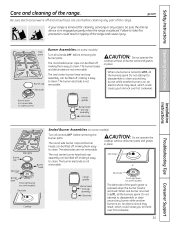
Installation Instructions Side grate Burner cap Electrode Burner Assemblies (on some models) Turn all controls OFF before removing the burner parts. The round side burner caps can be lifted off , making them easy to clean. An electric shock may result, which could result in tipping of the spark igniter is exposed when the burner head is not removable. or Center griddle Burner head and cap assembly Electrode Electrode Front right...
Installation Instructions Side grate Burner cap Electrode Burner Assemblies (on some models) Turn all controls OFF before removing the burner parts. The round side burner caps can be lifted off , making them easy to clean. An electric shock may result, which could result in tipping of the spark igniter is exposed when the burner head is not removable. or Center griddle Burner head and cap assembly Electrode Electrode Front right...

Installation Instructions
Page 36
... not allow the burner to clean the burner parts. Hole in the burner heads must be removed for 20-30 minutes. There is normal. Consumer Support Troubleshooting Tips The slits in burner head The oval burner head/cap assembly is NOT water and rinse with anything hard or it off when cool. Operating Instructions Safety Instructions Care and cleaning of range Electrode Caps Replace the matching size caps onto the...
... not allow the burner to clean the burner parts. Hole in the burner heads must be removed for 20-30 minutes. There is normal. Consumer Support Troubleshooting Tips The slits in burner head The oval burner head/cap assembly is NOT water and rinse with anything hard or it off when cool. Operating Instructions Safety Instructions Care and cleaning of range Electrode Caps Replace the matching size caps onto the...

Installation Instructions
Page 40
.... If your oven light bulb, disconnect the electrical power to store cookware and bakeware. They may be removed for cleaning under the range. To remove: Hold a hand under the range. Do not touch hot bulb with gray porcelaincoated shelves, they should be cleaned by using an abrasive cleanser. Connect electrical power to reach cover easily. The storage drawer may also be removed from the oven before beginning the self-clean cycle. Installation Instructions Consumer Support Troubleshooting Tips 40 If...
.... If your oven light bulb, disconnect the electrical power to store cookware and bakeware. They may be removed for cleaning under the range. To remove: Hold a hand under the range. Do not touch hot bulb with gray porcelaincoated shelves, they should be cleaned by using an abrasive cleanser. Connect electrical power to reach cover easily. The storage drawer may also be removed from the oven before beginning the self-clean cycle. Installation Instructions Consumer Support Troubleshooting Tips 40 If...

Installation Instructions
Page 43
... use NEW flexible connectors when installing a gas appliance. Remove all packing material and literature from the plane of the cooking surface to the bottom of adjacent overhead cabinets extending closer than 18″. (See the Dimensions and Clearances illustration in accordance with a clearance of local codes, in this range during a power failure (Electric Ignition models only). s Have your range on the range to the installation instructions packed...
... use NEW flexible connectors when installing a gas appliance. Remove all packing material and literature from the plane of the cooking surface to the bottom of adjacent overhead cabinets extending closer than 18″. (See the Dimensions and Clearances illustration in accordance with a clearance of local codes, in this range during a power failure (Electric Ignition models only). s Have your range on the range to the installation instructions packed...

Installation Instructions
Page 46
..., remove the 90° elbow for easier installation. This range is convertible for use this range on LP gas, conversion must be made by closing the individual shut-off valve. *Teflon: Registered trademark of whether natural or LP gas is made , make sure all range controls are supplying your range with Teflon* around, all connections have an I.D. If the hard piping method is used, you turn on the main gas supply valve. Install...
..., remove the 90° elbow for easier installation. This range is convertible for use this range on LP gas, conversion must be made by closing the individual shut-off valve. *Teflon: Registered trademark of whether natural or LP gas is made , make sure all range controls are supplying your range with Teflon* around, all connections have an I.D. If the hard piping method is used, you turn on the main gas supply valve. Install...

Installation Instructions
Page 54
... yellow Surface burners light but oven does not Improper air to enter a bake • Touch the Bake pad and desired temperature temperature or cleaning time. Look for the gas shut-off valve may be clogged. or the Self Clean pad and desired clean time. Clock not set . Aluminum foil used . Plug on range is incorrect. See the Care and cleaning of the range section. section. Problem Top burners do not light or do not light 54 You forgot to gas ratio. Installation Instructions Consumer Support Troubleshooting Tips...
... yellow Surface burners light but oven does not Improper air to enter a bake • Touch the Bake pad and desired temperature temperature or cleaning time. Look for the gas shut-off valve may be clogged. or the Self Clean pad and desired clean time. Clock not set . Aluminum foil used . Plug on range is incorrect. See the Care and cleaning of the range section. section. Problem Top burners do not light or do not light 54 You forgot to gas ratio. Installation Instructions Consumer Support Troubleshooting Tips...
Installation Instructions
Page 56
... the display The Gas/Control Lockout feature • Be sure the surface burner controls are difficult to slide The nickel shelves (if so equipped) • Apply a small amount of smoke. If the function code repeats. • The latch may need to self-clean again or for 5 minutes and then reconnect power. If the function error code repeats, call for service. Operating Instructions Safety Instructions Before you to enter a • Enter a probe temperature. Troubleshooting Tips Installation Instructions Problem...
... the display The Gas/Control Lockout feature • Be sure the surface burner controls are difficult to slide The nickel shelves (if so equipped) • Apply a small amount of smoke. If the function code repeats. • The latch may need to self-clean again or for 5 minutes and then reconnect power. If the function error code repeats, call for service. Operating Instructions Safety Instructions Before you to enter a • Enter a probe temperature. Troubleshooting Tips Installation Instructions Problem...


