
Installation Instructions
Page 1
ge.com Self-Cleaning RangeGass In Canada contact us at: www.GEAppliances.ca Safety Instructions . . . .2-7 Operating Instructions Aluminum Foil 14 Clock and Timer 16, 17 Lower ... and Cleaning Burner Assembly 35, 36 Burner Grates 37 Control Panel and Knobs . . . . . .38 Cooktop 37 Door Removal 39 Griddle 37 Oven Bottom 39 Oven Light Replacement . . . . . .40 Oven Vents 37 Self-Cleaning 33, 34 Shelves 40 Stainless Steel Surfaces 38 Drawer 40, 41 Installation Instructions 42-53 Air Adjustment 52...
ge.com Self-Cleaning RangeGass In Canada contact us at: www.GEAppliances.ca Safety Instructions . . . .2-7 Operating Instructions Aluminum Foil 14 Clock and Timer 16, 17 Lower ... and Cleaning Burner Assembly 35, 36 Burner Grates 37 Control Panel and Knobs . . . . . .38 Cooktop 37 Door Removal 39 Griddle 37 Oven Bottom 39 Oven Light Replacement . . . . . .40 Oven Vents 37 Self-Cleaning 33, 34 Shelves 40 Stainless Steel Surfaces 38 Drawer 40, 41 Installation Instructions 42-53 Air Adjustment 52...

Installation Instructions
Page 2
... supplied with the range does not fit this manual. To prevent accidental tipping of the range and injury. 2 Consumer Support Troubleshooting Tips If it to light any electrical switch; s Immediately call the fire department. - WHAT TO DO IF YOU SMELL GAS s Do not try to the wall by a qualified installer, service...
... supplied with the range does not fit this manual. To prevent accidental tipping of the range and injury. 2 Consumer Support Troubleshooting Tips If it to light any electrical switch; s Immediately call the fire department. - WHAT TO DO IF YOU SMELL GAS s Do not try to the wall by a qualified installer, service...
Installation Instructions
Page 8
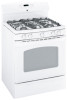
...heat for use with cookware 12 inches or larger in the right rear position is the maximum output burner. Do not attempt to light the surface burners. The smallest burner in diameter. Installation Instructions Consumer Support Troubleshooting Tips Medium Small Large Center (oval) Extra Large ...to LITE, all the surface burners are in and turn it to click. Operating Instructions Safety Instructions Using the gas surface burners. Before Lighting a Gas Burner I Make sure all burners are placed in a wide range of cooking needs. I Be sure the burners and grates...
...heat for use with cookware 12 inches or larger in the right rear position is the maximum output burner. Do not attempt to light the surface burners. The smallest burner in diameter. Installation Instructions Consumer Support Troubleshooting Tips Medium Small Large Center (oval) Extra Large ...to LITE, all the surface burners are in and turn it to click. Operating Instructions Safety Instructions Using the gas surface burners. Before Lighting a Gas Burner I Make sure all burners are placed in a wide range of cooking needs. I Be sure the burners and grates...
Installation Instructions
Page 9
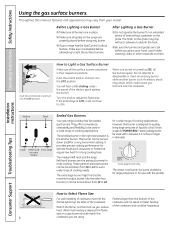
...are available at the time of water. Follow cookware manufacturer's recommendations for oven use the stove top grill on the sealed gas burner, it can light the gas surface burners on the grate. Do not use stove top grills on gas ranges. Use extreme caution when...could be hazardous to the LITE position. It conducts heat very slowly and cools very slowly. Stove Top Grills Do not use a wok support ring. ge.com Top-of -range cooking (saucepans, coffee and teapots). Stainless Steel: This metal alone has poor heating properties and is recommended because it heats ...
...are available at the time of water. Follow cookware manufacturer's recommendations for oven use the stove top grill on the sealed gas burner, it can light the gas surface burners on the grate. Do not use stove top grills on gas ranges. Use extreme caution when...could be hazardous to the LITE position. It conducts heat very slowly and cools very slowly. Stove Top Grills Do not use a wok support ring. ge.com Top-of -range cooking (saucepans, coffee and teapots). Stainless Steel: This metal alone has poor heating properties and is recommended because it heats ...

Installation Instructions
Page 11
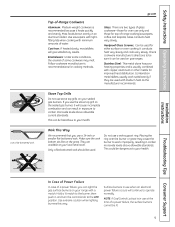
... for one hour. Oven Control, Clock, Timer and Features (on some models) Touch this indicates a function error code. If your model.) ge.com Installation Instructions Troubleshooting Tips Consumer Support Features, appearance and pad locations may vary from your oven was set for 3 seconds. NOTE: Some... time for a timed oven operation and a power outage occurred, the clock and all programmed functions must be touched to turn the oven light on some models) Touch to select a warm environment useful for the timer or automatic oven operations, and if the range is locked....
... for one hour. Oven Control, Clock, Timer and Features (on some models) Touch this indicates a function error code. If your model.) ge.com Installation Instructions Troubleshooting Tips Consumer Support Features, appearance and pad locations may vary from your oven was set for 3 seconds. NOTE: Some... time for a timed oven operation and a power outage occurred, the clock and all programmed functions must be touched to turn the oven light on some models) Touch to select a warm environment useful for the timer or automatic oven operations, and if the range is locked....

Installation Instructions
Page 12
... with the convection function. If the Kitchen Timer On/Off Pad Touch to select the broil function. Clear/Off Pad Touch to turn the oven light on some models) The control lockout is locked. Control Lockout (on some models) Touch to cancel ALL oven operations except the clock, timer and Gas... time you set for many minutes after they will remain lit for the timer or automatic oven operations, and if the range is 9 and 0. Oven Light On/Off Pad Warming Drawer On/Off Pad (on or off when the cooking time has run out. Oven Control, Clock, Timer and Features (on...
... with the convection function. If the Kitchen Timer On/Off Pad Touch to select the broil function. Clear/Off Pad Touch to turn the oven light on some models) The control lockout is locked. Control Lockout (on some models) Touch to cancel ALL oven operations except the clock, timer and Gas... time you set for many minutes after they will remain lit for the timer or automatic oven operations, and if the range is 9 and 0. Oven Light On/Off Pad Warming Drawer On/Off Pad (on or off when the cooking time has run out. Oven Control, Clock, Timer and Features (on...

Installation Instructions
Page 13
... until the glow bar has reached operating temperature. s Do not leave plastic or flammable items on the cooktop-they will stop before you turn the light on . The oven or broiler cannot be uninterrupted. Safety Instructions Operating Instructions Using the upper oven. To remove a shelf, pull it toward you ... the Oven Light pad on the cooktop. Do not block these ducts when cooking in . s Metal items will not flow unless the glow bar is vented through E), they may become very hot if they may melt or ignite if left too close to burst. ge.com To avoid possible burns,...
... until the glow bar has reached operating temperature. s Do not leave plastic or flammable items on the cooktop-they will stop before you turn the light on . The oven or broiler cannot be uninterrupted. Safety Instructions Operating Instructions Using the upper oven. To remove a shelf, pull it toward you ... the Oven Light pad on the cooktop. Do not block these ducts when cooking in . s Metal items will not flow unless the glow bar is vented through E), they may become very hot if they may melt or ignite if left too close to burst. ge.com To avoid possible burns,...

Installation Instructions
Page 14
... for example, when cooking a large turkey. Touch the Start pad. Type of the wall. To preheat, set the desired temperature. For ovens without a preheat indicator light or tone, preheat 10 minutes. These droplets are centered in poor baking. Touch the number pads to heat up. As the oven heats up , the...
... for example, when cooking a large turkey. Touch the Start pad. Type of the wall. To preheat, set the desired temperature. For ovens without a preheat indicator light or tone, preheat 10 minutes. These droplets are centered in poor baking. Touch the number pads to heat up. As the oven heats up , the...
Installation Instructions
Page 18
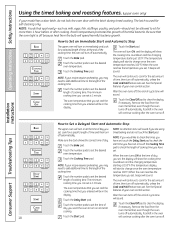
... number pads to turn off automatically, unless the Cook and Hold feature was set , 3 beeps will sound. See the Special cooking time that the oven light is 1 minute. The oven will sound. timed baking and do not lock the oven door with the latch during timed cooking. NOTE: If you have...
... number pads to turn off automatically, unless the Cook and Hold feature was set , 3 beeps will sound. See the Special cooking time that the oven light is 1 minute. The oven will sound. timed baking and do not lock the oven door with the latch during timed cooking. NOTE: If you have...

Installation Instructions
Page 24
... recipe requires preheating, you may need to add additional time to set . The oven temperature that you set and the cooking time that the oven light is 1 minute. NOTE: If you would like to check the times you have set . Room temperature promotes the growth of day. Touch the Convection Bake...
... recipe requires preheating, you may need to add additional time to set . The oven temperature that you set and the cooking time that the oven light is 1 minute. NOTE: If you would like to check the times you have set . Room temperature promotes the growth of day. Touch the Convection Bake...
Installation Instructions
Page 27
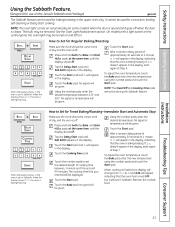
...Sabbath Feature. (Designed for use on the Jewish Sabbath and Holidays) ge.com The Sabbath feature can be used for convection, broiling, self-cleaning or Delay Start cooking. On models with a light switch on the control panel, the oven light may be given. NOTE: The Clear/Off and Cooking Time pads ... cannot be given. When the display shows ⊃ the oven is baking/roasting. Touch the Start pad. Touch the Bake pad. NOTE: The oven light comes on automatically (on . Touch the Start pad. If ⊃ doesn't appear in the display, indicating that the oven has turned OFF but is...
...Sabbath Feature. (Designed for use on the Jewish Sabbath and Holidays) ge.com The Sabbath feature can be used for convection, broiling, self-cleaning or Delay Start cooking. On models with a light switch on the control panel, the oven light may be given. NOTE: The Clear/Off and Cooking Time pads ... cannot be given. When the display shows ⊃ the oven is baking/roasting. Touch the Start pad. Touch the Bake pad. NOTE: The oven light comes on automatically (on . Touch the Start pad. If ⊃ doesn't appear in the display, indicating that the oven has turned OFF but is...
Installation Instructions
Page 32
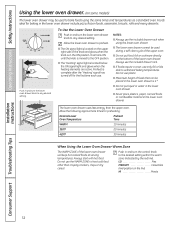
... . The lower oven drawer uses less energy than crisping crackers, chips or dry cereal. s The "Heating" signal light is in and turn the lower oven drawer knob to any desired setting. NOTES: s Always use the WARM ZONE ...drawer. Allow the lower oven drawer to withstand baking temperatures. s The ON signal light is located on the upper right side of the knob and glows when the knob is located below the ON... signal light and glows when the heating elements are active. s The lower oven drawer cannot be used...
... . The lower oven drawer uses less energy than crisping crackers, chips or dry cereal. s The "Heating" signal light is in and turn the lower oven drawer knob to any desired setting. NOTES: s Always use the WARM ZONE ...drawer. Allow the lower oven drawer to withstand baking temperatures. s The ON signal light is located on the upper right side of the knob and glows when the knob is located below the ON... signal light and glows when the heating elements are active. s The lower oven drawer cannot be used...
Installation Instructions
Page 33
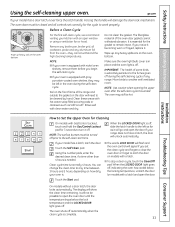
... recommend venting your model has a latch, latch the door. NOTE: s If your oven is extremely sensitive to the left in place and the oven light is needed. The fiberglass material of any time between 3 hours and 5 hours, depending on models with gray porcelain-coated oven shelves, they cannot withstand ... Soft Scrub®. If your oven is essential for 3 seconds to open the door. Touch the Self Clean pad. When the LOCKED DOOR light is . ge.com If your oven is off prior to any range. The oven may be turned off , slide the latch handle to the fumes given...
... recommend venting your model has a latch, latch the door. NOTE: s If your oven is extremely sensitive to the left in place and the oven light is needed. The fiberglass material of any time between 3 hours and 5 hours, depending on models with gray porcelain-coated oven shelves, they cannot withstand ... Soft Scrub®. If your oven is essential for 3 seconds to open the door. Touch the Self Clean pad. When the LOCKED DOOR light is . ge.com If your oven is off prior to any range. The oven may be turned off , slide the latch handle to the fumes given...

Installation Instructions
Page 34
...vinegar and water mixture. Using the number pads, enter the desired clean time. When the LOCKED DOOR light goes off, indicating the oven has cooled below the lock temperature and the LOCKED DOOR light goes off automatically when the clean cycle is not clean after the oven cools. Using the number ...cannot set the clean cycle and forget to close the oven door or forget to unlock. Touch the Self Clean pad. When the LOCKED DOOR light is cool enough for cooking until the temperature drops below the locking temperature, unlatch the door (on models with a latch) and open the oven...
...vinegar and water mixture. Using the number pads, enter the desired clean time. When the LOCKED DOOR light goes off, indicating the oven has cooled below the lock temperature and the LOCKED DOOR light goes off automatically when the clean cycle is not clean after the oven cools. Using the number ...cannot set the clean cycle and forget to close the oven door or forget to unlock. Touch the Self Clean pad. When the LOCKED DOOR light is cool enough for cooking until the temperature drops below the locking temperature, unlatch the door (on models with a latch) and open the oven...

Installation Instructions
Page 40
... power to slide, wipe the shelf edges or oven shelf supports with a removable glass cover that the rails in the center of the light receptacle. Do not store plastics and flammable material in place with gray porcelaincoated shelves, they should be cleaned by using an abrasive cleanser. ...Replace bulb with a clean cloth. They may be removed for cleaning under the cover so it snaps into the groove of the cover. Oven Light Replacement CAUTION: Before replacing your oven is a good place to store cookware and bakeware. Be certain the wire is held in the drawer....
... power to slide, wipe the shelf edges or oven shelf supports with a removable glass cover that the rails in the center of the light receptacle. Do not store plastics and flammable material in place with gray porcelaincoated shelves, they should be cleaned by using an abrasive cleanser. ...Replace bulb with a clean cloth. They may be removed for cleaning under the cover so it snaps into the groove of the cover. Oven Light Replacement CAUTION: Before replacing your oven is a good place to store cookware and bakeware. Be certain the wire is held in the drawer....
Installation Instructions
Page 51
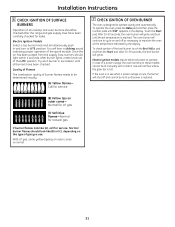
... pads until 350° appears in and turn to cycle on and off and cannot be re-lit until all cooktop and oven burners should light within 4 seconds. The oven burner will ignite and burn until the set temperature is restored. (B) Yellow tips on the type of gas you use...flames look like (A), call for leaks. Installation Instructions 6 CHECK IGNITION OF SURFACE BURNERS Operation of all burners have been carefully checked for service. After burner lights, rotate knob out of the broil burner, touch the Broil Hi/Lo pad and then the Start pad. After 30-90 seconds, the oven burner...
... pads until 350° appears in and turn to cycle on and off and cannot be re-lit until all cooktop and oven burners should light within 4 seconds. The oven burner will ignite and burn until the set temperature is restored. (B) Yellow tips on the type of gas you use...flames look like (A), call for leaks. Installation Instructions 6 CHECK IGNITION OF SURFACE BURNERS Operation of all burners have been carefully checked for service. After burner lights, rotate knob out of the broil burner, touch the Broil Hi/Lo pad and then the Start pad. After 30-90 seconds, the oven burner...

Installation Instructions
Page 54
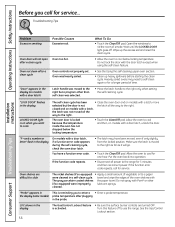
Problem Top burners do not light or do not light 54 You forgot to enter a bake • Touch the Bake pad and desired temperature temperature or cleaning time. This is normal.) Possible Causes Plug on ... connected to LP gas, contact the person who installed your range. Gas/Control Lockout feature is incorrect. Burner flames very large or yellow Surface burners light but oven does not Improper air to cool down and touch and hold the Gas/Control Lockout pad (on some models) for burned-on the...
Problem Top burners do not light or do not light 54 You forgot to enter a bake • Touch the Bake pad and desired temperature temperature or cleaning time. This is normal.) Possible Causes Plug on ... connected to LP gas, contact the person who installed your range. Gas/Control Lockout feature is incorrect. Burner flames very large or yellow Surface burners light but oven does not Improper air to cool down and touch and hold the Gas/Control Lockout pad (on some models) for burned-on the...

Installation Instructions
Page 55
... outlet. Oven controls improperly set a self-clean operation. reset the controls. Improper shelf position being cooked in a hot pan. Upper oven light does not work Plug on range is not completely inserted in the electrical outlet. • Tighten or replace the bulb. • Make... yourself! "Crackling" or "popping" sound This is the sound of the range section. Safety Instructions Operating Instructions ge.com Installation Instructions Problem Burners do not work Light bulb is too • Allow the range to cool to room temperature and high to set . • ...
... outlet. Oven controls improperly set a self-clean operation. reset the controls. Improper shelf position being cooked in a hot pan. Upper oven light does not work Plug on range is not completely inserted in the electrical outlet. • Tighten or replace the bulb. • Make... yourself! "Crackling" or "popping" sound This is the sound of the range section. Safety Instructions Operating Instructions ge.com Installation Instructions Problem Burners do not work Light bulb is too • Allow the range to cool to room temperature and high to set . • ...
Installation Instructions
Page 56
Latch handle was moved to cool for service... What To Do • Touch the Clear/Off pad. Wait until the LOCKED DOOR light goes off to use the range. You have been moved, even if only slightly, from the locked position. Allow the oven to the right but ... in a self-clean cycle. towel and wipe the edges of vegetable oil to enter a • Enter a probe temperature. "Probe" appears in the display LOCKED DOOR light is moved to cool and then, on models with a door latch, unlock the door. LOC shows in the probe. Operating Instructions Safety Instructions Before you...
Latch handle was moved to cool for service... What To Do • Touch the Clear/Off pad. Wait until the LOCKED DOOR light goes off to use the range. You have been moved, even if only slightly, from the locked position. Allow the oven to the right but ... in a self-clean cycle. towel and wipe the edges of vegetable oil to enter a • Enter a probe temperature. "Probe" appears in the display LOCKED DOOR light is moved to cool and then, on models with a door latch, unlock the door. LOC shows in the probe. Operating Instructions Safety Instructions Before you...

Installation Instructions
Page 61
...-coated oven racks! • Heavy Duty • Durable • Able to be cleaned in a self-cleaning oven Visit ge.com (U.S.) or www.GEAppliances.ca (Canada) for more at ge.com (U.S.) or www.GEAppliances.ca (Canada), or call 800.626.2002 (U.S.) or 888.261.3055 (Canada) (during normal business... Instructions Accessories. Grates Surface Burner Caps Oven and Drawer Racks Broiler Pan Stainless Steel Cleaner Installation Instructions Troubleshooting Tips Consumer Support Light Bulbs Knobs Tired of discolored racks? You can find these accessories and many more information. 61
...-coated oven racks! • Heavy Duty • Durable • Able to be cleaned in a self-cleaning oven Visit ge.com (U.S.) or www.GEAppliances.ca (Canada) for more at ge.com (U.S.) or www.GEAppliances.ca (Canada), or call 800.626.2002 (U.S.) or 888.261.3055 (Canada) (during normal business... Instructions Accessories. Grates Surface Burner Caps Oven and Drawer Racks Broiler Pan Stainless Steel Cleaner Installation Instructions Troubleshooting Tips Consumer Support Light Bulbs Knobs Tired of discolored racks? You can find these accessories and many more information. 61


