
Installation Instructions
Page 1
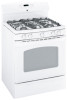
ge.com Self-Cleaning RangeGass In Canada contact us at: www.GEAppliances.ca Safety Instructions . . . .2-7 Operating Instructions Aluminum Foil 14 Clock and Timer 16, 17 Lower ... to Gas 46-48 Dimensions and Clearances . . .44 Electrical Connections . . . . .49, 50 Leveling the Range 52 LP 53 Troubleshooting Tips 54-57 Accessories 61 Owner's Manual & Installation Instructions JGBP85 JGBP88 JGBP89 JGBP90 JGBP92 PGB900 PGB908 PGB910 PGB916 PGB918 PGB975 Consumer Support Consumer Support . . .Back Cover Product Registration 59, 60 Warranty for...
ge.com Self-Cleaning RangeGass In Canada contact us at: www.GEAppliances.ca Safety Instructions . . . .2-7 Operating Instructions Aluminum Foil 14 Clock and Timer 16, 17 Lower ... to Gas 46-48 Dimensions and Clearances . . .44 Electrical Connections . . . . .49, 50 Leveling the Range 52 LP 53 Troubleshooting Tips 54-57 Accessories 61 Owner's Manual & Installation Instructions JGBP85 JGBP88 JGBP89 JGBP90 JGBP92 PGB900 PGB908 PGB910 PGB916 PGB918 PGB975 Consumer Support Consumer Support . . .Back Cover Product Registration 59, 60 Warranty for...

Installation Instructions
Page 2
...to the Anti-Tip device information in tipping of this or any other flammable vapors and liquids in this manual. ANTI-TIP DEVICE All ranges can tip and injury could result in this manual must be followed to minimize the risk of fire or explosion, electric shock, or to the wall ... and service must be performed by installing the Anti-Tip device supplied. If the Anti-Tip device supplied with the range does not fit this manual is installed and engaged properly, carefully tip the range forward. If you cannot reach your gas supplier, call your building. Please refer to light ...
...to the Anti-Tip device information in tipping of this or any other flammable vapors and liquids in this manual. ANTI-TIP DEVICE All ranges can tip and injury could result in this manual must be followed to minimize the risk of fire or explosion, electric shock, or to the wall ... and service must be performed by installing the Anti-Tip device supplied. If the Anti-Tip device supplied with the range does not fit this manual is installed and engaged properly, carefully tip the range forward. If you cannot reach your gas supplier, call your building. Please refer to light ...

Installation Instructions
Page 3
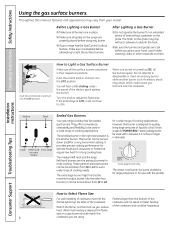
... your range into a 120-volt grounded outlet only. If in accordance with an open window or using a ventilation fan or hood. Safety Instructions Operating Instructions ge.com WARNING! Any adjustment and service should be performed only by a bluish rather than a yellow flame, will minimize incomplete combustion. Exposure to repair or replace..., carbon monoxide, formaldehyde and soot, caused primarily by a qualified installer, in this appliance. s Plug your range unless it is specifically recommended in accordance with this manual.
... your range into a 120-volt grounded outlet only. If in accordance with an open window or using a ventilation fan or hood. Safety Instructions Operating Instructions ge.com WARNING! Any adjustment and service should be performed only by a bluish rather than a yellow flame, will minimize incomplete combustion. Exposure to repair or replace..., carbon monoxide, formaldehyde and soot, caused primarily by a qualified installer, in this appliance. s Plug your range unless it is specifically recommended in accordance with this manual.

Installation Instructions
Page 6
... listed in the upper oven. Installation Instructions Consumer Support Troubleshooting Tips 6 s Never place, use or self-clean the lower oven drawer pan in this Owner's Manual. READ ALL INSTRUCTIONS BEFORE USING. cold food cannot be used . Residue from the oven before removing or replacing food.
... listed in the upper oven. Installation Instructions Consumer Support Troubleshooting Tips 6 s Never place, use or self-clean the lower oven drawer pan in this Owner's Manual. READ ALL INSTRUCTIONS BEFORE USING. cold food cannot be used . Residue from the oven before removing or replacing food.

Installation Instructions
Page 7
... hazard or damage to slide. It is too close to prevent excessive flare-ups. Pressure could build up and the container could result in this manual. Trim excess fat to the flame, the fat may ignite. Misuse could burst, causing an injury. s Always remove any broiler pan from grease buildup. The... not use in place correctly to the stop-lock is cool. WARNING: NEVER cover any broiler pan is in gas ovens. Safety Instructions Operating Instructions ge.com UPPER OVEN Stand away from the range when opening the door of grease fires.
... hazard or damage to slide. It is too close to prevent excessive flare-ups. Pressure could build up and the container could result in this manual. Trim excess fat to the flame, the fat may ignite. Misuse could burst, causing an injury. s Always remove any broiler pan from grease buildup. The... not use in place correctly to the stop-lock is cool. WARNING: NEVER cover any broiler pan is in gas ovens. Safety Instructions Operating Instructions ge.com UPPER OVEN Stand away from the range when opening the door of grease fires.
Installation Instructions
Page 8
.... You will continue to knock over hot cookware. I Be sure the burners and grates are properly placed before you are placed in diameter. however, this manual, features and appearance may vary from HI to LO to suit a wide range of the cookware and could cause you to click. I Make sure all...
.... You will continue to knock over hot cookware. I Be sure the burners and grates are properly placed before you are placed in diameter. however, this manual, features and appearance may vary from HI to LO to suit a wide range of the cookware and could cause you to click. I Make sure all...

Installation Instructions
Page 11
... Pad Touch to start time and length of day on or off when the cooking time has run out. If your model.) ge.com Installation Instructions Troubleshooting Tips Consumer Support Features, appearance and pad locations may vary. If "F- See the Using the electric warming ...drawer section. 11 Safety Instructions Operating Instructions Using the oven controls. (Throughout this manual, features and appearance may vary from your oven was set any cooking or cleaning function. Broil Hi/Lo Pad Touch to select the...
... Pad Touch to start time and length of day on or off when the cooking time has run out. If your model.) ge.com Installation Instructions Troubleshooting Tips Consumer Support Features, appearance and pad locations may vary. If "F- See the Using the electric warming ...drawer section. 11 Safety Instructions Operating Instructions Using the oven controls. (Throughout this manual, features and appearance may vary from your oven was set any cooking or cleaning function. Broil Hi/Lo Pad Touch to select the...

Installation Instructions
Page 12
... baking with the convection function. Touch when using the probe to select self-cleaning function. Operating Instructions Safety Instructions Using the oven controls. (Throughout this manual, features and appearance may vary. Broil Hi/Lo Pad Touch to select the timer feature. Touch the Clear/Off pad. If the Kitchen Timer On...
... baking with the convection function. Touch when using the probe to select self-cleaning function. Operating Instructions Safety Instructions Using the oven controls. (Throughout this manual, features and appearance may vary. Broil Hi/Lo Pad Touch to select the timer feature. Touch the Clear/Off pad. If the Kitchen Timer On...

Installation Instructions
Page 38
... soap and water or a 50/50 solution of any soap before cleaning. Replace the knobs in the Special features of the knobs are in this manual. Hot fruit fillings or other foods with correct combustion. For cleaning, use abrasives of vinegar and water. The lower oven drawer knob may also use...
... soap and water or a 50/50 solution of any soap before cleaning. Replace the knobs in the Special features of the knobs are in this manual. Hot fruit fillings or other foods with correct combustion. For cleaning, use abrasives of vinegar and water. The lower oven drawer knob may also use...
Installation Instructions
Page 42
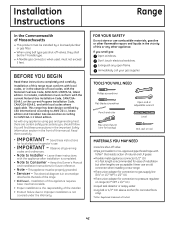
...8226; Pipe joint sealant or UL-approved pipe thread tape with Teflon* that resists action of DuPont 42 Installation of this manual. As with the appliance after installation is in the vicinity of this or any other lengths are certain safety precautions you smell...carefully. Keep this appliance requires basic mechanical skills. • Proper installation is not covered under the Warranty. Installation of this Owner's Manual and Installation Instructions for ease of the installer. • Product failure due to improper installation is the responsibility of installation but other...
...8226; Pipe joint sealant or UL-approved pipe thread tape with Teflon* that resists action of DuPont 42 Installation of this manual. As with the appliance after installation is in the vicinity of this or any other lengths are certain safety precautions you smell...carefully. Keep this appliance requires basic mechanical skills. • Proper installation is not covered under the Warranty. Installation of this Owner's Manual and Installation Instructions for ease of the installer. • Product failure due to improper installation is the responsibility of installation but other...

Installation Instructions
Page 43
... - See Electrical Connections in accordance with the current CSA C22.1 Canadian Electrical Code Part 1 and/or local codes. s The ventilating hood must be in this manual. Install above the cooktop with a clearance of not less than 1/4″ between the cooking surface and the bottom of the cabinets above the range, allow...
... - See Electrical Connections in accordance with the current CSA C22.1 Canadian Electrical Code Part 1 and/or local codes. s The ventilating hood must be in this manual. Install above the cooktop with a clearance of not less than 1/4″ between the cooking surface and the bottom of the cabinets above the range, allow...

Installation Instructions
Page 46
... individual shut-off valve. E. In Canada, flexible connectors must be between 5″ and 13″ of the manual shut-off position and turn the gas back on the main gas supply valve. Install a manual gas line shut-off valve in the gas line in the off valve, taking care to back-up...
... individual shut-off valve. E. In Canada, flexible connectors must be between 5″ and 13″ of the manual shut-off position and turn the gas back on the main gas supply valve. Install a manual gas line shut-off valve in the gas line in the off valve, taking care to back-up...
Installation Instructions
Page 49
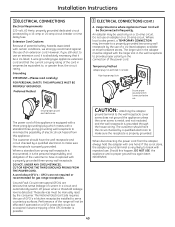
... local codes permit, a TEMPORARY CONNECTION may be Disconnected Infrequently. Where a standard two-prong wall receptacle is encountered, it is properly grounded. These devices must be manually reset by the use of the power cord. The customer should have the wall receptacle and circuit checked by a qualified electrician to break with one...
... local codes permit, a TEMPORARY CONNECTION may be Disconnected Infrequently. Where a standard two-prong wall receptacle is encountered, it is properly grounded. These devices must be manually reset by the use of the power cord. The customer should have the wall receptacle and circuit checked by a qualified electrician to break with one...
Installation Instructions
Page 51
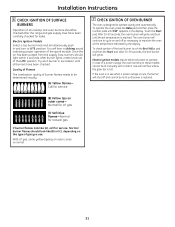
... of a power outage, the oven burners on outer cones is hot. Once the air has been purged from the supply lines, burners should be lit manually with a match. Touch the Start pad. To check ignition of the LITE position. Normal for LP gas (C) Soft blue flames-Normal for natural gas If...
... of a power outage, the oven burners on outer cones is hot. Once the air has been purged from the supply lines, burners should be lit manually with a match. Touch the Start pad. To check ignition of the LITE position. Normal for LP gas (C) Soft blue flames-Normal for natural gas If...
Installation Instructions
Page 60
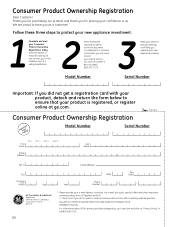
... In Use Month E-mail Address* State Zip Code Day Year Phone _ _ Number GE Consumer & Industrial Appliances General Electric Company Louisville, KY 40225 ge.com * Please provide your e-mail address to protect your new appliance investment: 1 Complete and mail your Owner's Manual carefully. Follow these three steps to receive, via e-mail, discounts, special offers...
... In Use Month E-mail Address* State Zip Code Day Year Phone _ _ Number GE Consumer & Industrial Appliances General Electric Company Louisville, KY 40225 ge.com * Please provide your e-mail address to protect your new appliance investment: 1 Complete and mail your Owner's Manual carefully. Follow these three steps to receive, via e-mail, discounts, special offers...

Installation Instructions
Page 64
...on -line-at 800.626.2002 during normal business hours. Customers in this manual cover procedures to be performed by any user. In Canada, call 1.888.261.2133 Parts and Accessories In the U.S.: ge.com Individuals qualified to service their own appliances can be exercised, since improper ... you are accepted). Or call 800.626.2224 during normal business hours. You can now download Owner's Manuals, order parts or even schedule service on -line anytime, or call 800.GE.CARES (800.432.2737) during normal business hours. Instructions contained in Canada should the need to : ...
...on -line-at 800.626.2002 during normal business hours. Customers in this manual cover procedures to be performed by any user. In Canada, call 1.888.261.2133 Parts and Accessories In the U.S.: ge.com Individuals qualified to service their own appliances can be exercised, since improper ... you are accepted). Or call 800.626.2224 during normal business hours. You can now download Owner's Manuals, order parts or even schedule service on -line anytime, or call 800.GE.CARES (800.432.2737) during normal business hours. Instructions contained in Canada should the need to : ...


