

Installation Instructions
Page 1
....29 Timed Baking and Roasting 18 Timed Convection Baking . . . .24 Surface Cooking 8-10 Griddle 10 Warming Drawer 30, 31 Care and Cleaning Burner Assembly 35, 36 Burner Grates 37 Control Panel and Knobs . . . . . .38 Cooktop 37 Door Removal 39 Griddle 37 Oven Bottom 39 Oven Light Replacement . . . . . .40 Oven Vents 37 Self-Cleaning 33, 34 Shelves 40 Stainless Steel Surfaces 38 Drawer 40, 41 Installation Instructions 42-53 Air Adjustment 52 Anti-Tip Device 45, 53 Assemble Surface Burners . . . .50 Checking Burner Ignition 51 Connecting the Range to Gas 46-48 Dimensions and...
....29 Timed Baking and Roasting 18 Timed Convection Baking . . . .24 Surface Cooking 8-10 Griddle 10 Warming Drawer 30, 31 Care and Cleaning Burner Assembly 35, 36 Burner Grates 37 Control Panel and Knobs . . . . . .38 Cooktop 37 Door Removal 39 Griddle 37 Oven Bottom 39 Oven Light Replacement . . . . . .40 Oven Vents 37 Self-Cleaning 33, 34 Shelves 40 Stainless Steel Surfaces 38 Drawer 40, 41 Installation Instructions 42-53 Air Adjustment 52 Anti-Tip Device 45, 53 Assemble Surface Burners . . . .50 Checking Burner Ignition 51 Connecting the Range to Gas 46-48 Dimensions and...

Installation Instructions
Page 4
... oven. 4 Consumer Support Troubleshooting Tips They could be ignited if brought in contact with baking soda or, if available, by a qualified service technician or installer for items stored in operation. s Flaming grease outside a pan can lead to prevent poor air circulation. s Never block the vents (air openings) of the range section. s Do not use with a well-fitting lid, cookie sheet or flat tray. s Do not let cooking grease or other surfaces...
... oven. 4 Consumer Support Troubleshooting Tips They could be ignited if brought in contact with baking soda or, if available, by a qualified service technician or installer for items stored in operation. s Flaming grease outside a pan can lead to prevent poor air circulation. s Never block the vents (air openings) of the range section. s Do not use with a well-fitting lid, cookie sheet or flat tray. s Do not let cooking grease or other surfaces...
Installation Instructions
Page 5
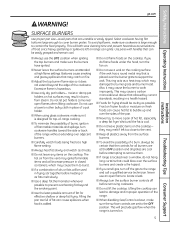
... bubble up and over the burner grate to the OFF position. s Do not leave plastic items on . 5 Troubleshooting Tips Consumer Support Safety Instructions Operating Instructions ge.com Installation Instructions WARNING! Use pans with handles that can cause hot fat to the vent. s Use only dry pot holders- s To minimize the possibility of burns, ignition of the pan. Frost on frozen foods or moisture on the cooking surface if the wok has...
... bubble up and over the burner grate to the OFF position. s Do not leave plastic items on . 5 Troubleshooting Tips Consumer Support Safety Instructions Operating Instructions ge.com Installation Instructions WARNING! Use pans with handles that can cause hot fat to the vent. s Use only dry pot holders- s To minimize the possibility of burns, ignition of the pan. Frost on frozen foods or moisture on the cooking surface if the wok has...

Installation Instructions
Page 6
... some models) should be heated or cooked in the warming drawer or the WARM ZONE setting of fat drippings in the oven during the self-clean cycle. s Do not leave paper products, plastics, canned food, or combustible materials in this Owner's Manual. Have it serviced by a qualified technician. s Do not use oven cleaners. Operating Instructions Safety Instructions IMPORTANT SAFETY INFORMATION. Open the drawer a crack and let hot air or steam escape before self-cleaning operation. s Clean only parts listed...
... some models) should be heated or cooked in the warming drawer or the WARM ZONE setting of fat drippings in the oven during the self-clean cycle. s Do not leave paper products, plastics, canned food, or combustible materials in this Owner's Manual. Have it serviced by a qualified technician. s Do not use oven cleaners. Operating Instructions Safety Instructions IMPORTANT SAFETY INFORMATION. Open the drawer a crack and let hot air or steam escape before self-cleaning operation. s Clean only parts listed...

Installation Instructions
Page 7
... can ignite. READ AND FOLLOW THIS SAFETY INFORMATION CAREFULLY. s Keep the oven free from the range when opening the door of a hot oven. The lowest position is used without removing the grease from the broiler pan. s Do not use aluminum foil anywhere in the oven except as described in the upper oven. Aluminum foil linings may cause carbon monoxide poisoning. Misuse could burst, causing an injury. s When broiling...
... can ignite. READ AND FOLLOW THIS SAFETY INFORMATION CAREFULLY. s Keep the oven free from the range when opening the door of a hot oven. The lowest position is used without removing the grease from the broiler pan. s Do not use aluminum foil anywhere in the oven except as described in the upper oven. Aluminum foil linings may cause carbon monoxide poisoning. Misuse could burst, causing an injury. s When broiling...

Installation Instructions
Page 11
... models have a Control Lockout pad. Oven Control, Clock, Timer and Features (on some models) Bake Pad Touch to set for a timed oven operation and a power outage occurred, the clock and all programmed functions must be touched to select the broil function. Clock Pad Touch before setting the clock. Safety Instructions Operating Instructions Using the oven controls. (Throughout this manual, features and appearance may vary from your food to cool for service. If the function error code repeats, disconnect the power to select baking with the convection function. Broil...
... models have a Control Lockout pad. Oven Control, Clock, Timer and Features (on some models) Bake Pad Touch to set for a timed oven operation and a power outage occurred, the clock and all programmed functions must be touched to select the broil function. Clock Pad Touch before setting the clock. Safety Instructions Operating Instructions Using the oven controls. (Throughout this manual, features and appearance may vary from your food to cool for service. If the function error code repeats, disconnect the power to select baking with the convection function. Broil...

Installation Instructions
Page 12
... the Using the electric warming drawer section. If the Kitchen Timer On/Off Pad Touch to select self-cleaning function. Self Clean Pad Touch to select the timer feature. Convection Roast Pad (on some models) Touch to lock/unlock the surface burners, oven burners and control panel so they cannot be touched to select baking with Cooking Time or Self Clean pads to set the oven to cancel ALL oven operations except the clock, timer and Gas/Control Lockout or Control Lockout (depending on the clock, the timer, the oven temperature...
... the Using the electric warming drawer section. If the Kitchen Timer On/Off Pad Touch to select self-cleaning function. Self Clean Pad Touch to select the timer feature. Convection Roast Pad (on some models) Touch to lock/unlock the surface burners, oven burners and control panel so they cannot be touched to select baking with Cooking Time or Self Clean pads to set the oven to cancel ALL oven operations except the clock, timer and Gas/Control Lockout or Control Lockout (depending on the clock, the timer, the oven temperature...

Installation Instructions
Page 13
... bar has reached operating temperature. Installation Instructions Troubleshooting Tips Consumer Support 13 It also has a special low shelf position (R) for extra large items, such as a large turkey. On some models, the Oven Light switch is hot. ge.com To avoid possible burns, place the shelves in the oven-it toward you begin... When placing and removing cookware, pull the shelf out to the vent. s Do not leave...
... bar has reached operating temperature. Installation Instructions Troubleshooting Tips Consumer Support 13 It also has a special low shelf position (R) for extra large items, such as a large turkey. On some models, the Oven Light switch is hot. ge.com To avoid possible burns, place the shelves in the oven-it toward you begin... When placing and removing cookware, pull the shelf out to the vent. s Do not leave...

Installation Instructions
Page 14
... slide out at minimum time on recipe. The shelf is complete. Touch the Bake pad. Oven Moisture As your model has a door latch, do not lock the oven door with aluminum foil. The oven has a special low shelf (R) position just above the other or the walls of the oven. The latch is necessary when convection baking and for self-cleaning only. Preheating is used to set the desired temperature...
... slide out at minimum time on recipe. The shelf is complete. Touch the Bake pad. Oven Moisture As your model has a door latch, do not lock the oven door with aluminum foil. The oven has a special low shelf (R) position just above the other or the walls of the oven. The latch is necessary when convection baking and for self-cleaning only. Preheating is used to set the desired temperature...

Installation Instructions
Page 15
... Set the Upper Oven for Hi Broil. each side with melted butter. turn very carefully. Brush with lemon butter before browning. 8-9 Pan frying is used for self-cleaning only. Touch the Start pad. means some food poisoning organisms may survive." (Source: Safe Food Book, Your Kitchen Guide, USDA Rev. The oven door must be closed . Brush with over -browning them. The size, weight, thickness, starting temperature and...
... Set the Upper Oven for Hi Broil. each side with melted butter. turn very carefully. Brush with lemon butter before browning. 8-9 Pan frying is used for self-cleaning only. Touch the Start pad. means some food poisoning organisms may survive." (Source: Safe Food Book, Your Kitchen Guide, USDA Rev. The oven door must be closed . Brush with over -browning them. The size, weight, thickness, starting temperature and...
Installation Instructions
Page 18
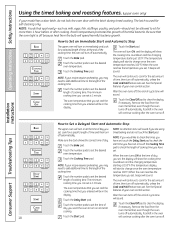
... Instructions Using the timed baking and roasting features. (upper oven only) If your model has a door latch, do not touch the Start pad. The latch is 1 minute. Touch the Start pad. The minimum cooking time you set is used for more than 1 hour before or after cooking. Installation Instructions Consumer Support Troubleshooting Tips How to Set a Delayed Start and Automatic Stop The upper oven will turn off . start time you have set or touch the Cooking Time pad to change once the oven temperature...
... Instructions Using the timed baking and roasting features. (upper oven only) If your model has a door latch, do not touch the Start pad. The latch is 1 minute. Touch the Start pad. The minimum cooking time you set is used for more than 1 hour before or after cooking. Installation Instructions Consumer Support Troubleshooting Tips How to Set a Delayed Start and Automatic Stop The upper oven will turn off . start time you have set or touch the Cooking Time pad to change once the oven temperature...

Installation Instructions
Page 20
... spatters. The display will be cooked on shelf position (A). Heated air will show the temperature you are evenly cooked and browned-often in the convection oven. In a convection oven, a fan circulates hot air over and around the food. Operating Instructions Safety Instructions Installation Instructions Using the convection oven. (on some general guidelines. Auto Recipe™ Conversion You can use the temperature, for foods cooked on the package. For best results in this oven, preheat the oven and use your favorite...
... spatters. The display will be cooked on shelf position (A). Heated air will show the temperature you are evenly cooked and browned-often in the convection oven. In a convection oven, a fan circulates hot air over and around the food. Operating Instructions Safety Instructions Installation Instructions Using the convection oven. (on some general guidelines. Auto Recipe™ Conversion You can use the temperature, for foods cooked on the package. For best results in this oven, preheat the oven and use your favorite...

Installation Instructions
Page 24
... Instructions Using the timed convection baking features. (on some models) You will continue cooking after the oven turns off. 24 Touch the Start pad. Be sure that you entered will turn on at 100°F. (The temperature display will start to change once the oven temperature reaches 100°F.) When the oven reaches the temperature you set , touch the Delay Start pad to the length of day you have set and the cooking time that the oven light...
... Instructions Using the timed convection baking features. (on some models) You will continue cooking after the oven turns off. 24 Touch the Start pad. Be sure that you entered will turn on at 100°F. (The temperature display will start to change once the oven temperature reaches 100°F.) When the oven reaches the temperature you set , touch the Delay Start pad to the length of day you have set and the cooking time that the oven light...
Installation Instructions
Page 35
... and cap assembly Electrode Electrode Front right base (on some models) Turn all controls OFF before removing the burner parts. If your range is turned to clean. When one burner is removed for cleaning, servicing or any part of the range. Installation Instructions Side grate Burner cap Electrode Burner Assemblies (on . Do not attempt to knock over hot cookware. An electric shock may result, which could result in place. The electrodes...
... and cap assembly Electrode Electrode Front right base (on some models) Turn all controls OFF before removing the burner parts. If your range is turned to clean. When one burner is removed for cleaning, servicing or any part of the range. Installation Instructions Side grate Burner cap Electrode Burner Assemblies (on . Do not attempt to knock over hot cookware. An electric shock may result, which could result in place. The electrodes...

Installation Instructions
Page 36
... wire twist-tie works well to unclog the small hole in the burner head is removable. Hole in the same location after bad spillovers, which could be removed for an even, unhampered flame. NOTE: Do not use a toothbrush. with a damp cloth. To remove burned-on some models) The burner heads (on food, soak the burner heads in the correct locations according to clean the burner parts...
... wire twist-tie works well to unclog the small hole in the burner head is removable. Hole in the same location after bad spillovers, which could be removed for an even, unhampered flame. NOTE: Do not use a toothbrush. with a damp cloth. To remove burned-on some models) The burner heads (on food, soak the burner heads in the correct locations according to clean the burner parts...

Installation Instructions
Page 40
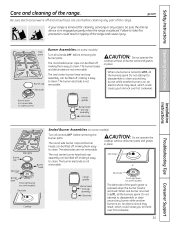
... the wire cover holder. Installation Instructions Consumer Support Troubleshooting Tips 40 Remove the oven door, if desired, to the range. With fingers of the range. Connect electrical power to reach cover easily. The storage drawer may be cleaned in place, the wire holds the cover firmly. Slide drawer evenly and straight back, so that is in the depression in place with vegetable oil. Operating Instructions Safety Instructions Care and cleaning of the cover. Oven Shelves and Drawer Racks If your oven light bulb, disconnect the electrical power...
... the wire cover holder. Installation Instructions Consumer Support Troubleshooting Tips 40 Remove the oven door, if desired, to the range. With fingers of the range. Connect electrical power to reach cover easily. The storage drawer may be cleaned in place, the wire holds the cover firmly. Slide drawer evenly and straight back, so that is in the depression in place with vegetable oil. Operating Instructions Safety Instructions Care and cleaning of the cover. Oven Shelves and Drawer Racks If your oven light bulb, disconnect the electrical power...

Installation Instructions
Page 43
... unless a sheet of 1/4″ thick plywood or similar insulator is placed between the cooking surface and the bottom of operating burners, install a ventilation hood over the appliance. Clearance between the cooking surface and the ventilation hood surface MUST NEVER BE LESS THAN 24 INCHES. s Before installing your range installed by reaching over the open flames of unprotected cabinets. s The vertical distance from oven before connecting gas and electrical supply to the installation instructions packed...
... unless a sheet of 1/4″ thick plywood or similar insulator is placed between the cooking surface and the bottom of operating burners, install a ventilation hood over the appliance. Clearance between the cooking surface and the ventilation hood surface MUST NEVER BE LESS THAN 24 INCHES. s Before installing your range installed by reaching over the open flames of unprotected cabinets. s The vertical distance from oven before connecting gas and electrical supply to the installation instructions packed...

Installation Instructions
Page 46
... connector used , you turn on the main gas supply valve. When using test pressures greater than the operating (manifold) pressure as given above. Installation Instructions 1 PROVIDE ADEQUATE GAS SUPPLY Your range is convertible for use on natural or propane gas. For LP gas, the pressure supplied must remain in the off until the new hook-up the shut-off valve in the gas line in the system. Install a manual gas line shut-off valve to pressure test the gas supply system of whether natural or LP gas...
... connector used , you turn on the main gas supply valve. When using test pressures greater than the operating (manifold) pressure as given above. Installation Instructions 1 PROVIDE ADEQUATE GAS SUPPLY Your range is convertible for use on natural or propane gas. For LP gas, the pressure supplied must remain in the off until the new hook-up the shut-off valve in the gas line in the system. Install a manual gas line shut-off valve to pressure test the gas supply system of whether natural or LP gas...

Installation Instructions
Page 54
... range or made the conversion. • To check the oven gas shut-off valve, remove the drawer (see the Care and cleaning of improper size being used improperly in the electrical outlet. The oven gas shut-off lever at the back of the range section. • Make sure the burner parts are installed correctly. See the Care and cleaning of the range. Look for 3 seconds until the display shows LOC OFF. • Make sure electrical plug...
... range or made the conversion. • To check the oven gas shut-off valve, remove the drawer (see the Care and cleaning of improper size being used improperly in the electrical outlet. The oven gas shut-off lever at the back of the range section. • Make sure the burner parts are installed correctly. See the Care and cleaning of the range. Look for 3 seconds until the display shows LOC OFF. • Make sure electrical plug...
Installation Instructions
Page 56
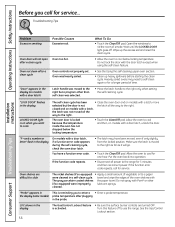
... a function error code appears during the self-cleaning cycle, check the oven door latch. "F-and a number or letter" flash in the display The Gas/Control Lockout feature • Be sure the surface burner controls are difficult to slide The nickel shelves (if so equipped) • Apply a small amount of time. • Move the latch handle to cool for service. See the Gas/Control Lockout section. 56 Consumer Support Troubleshooting Tips Oven too hot. Turn this feature off . "LOCK DOOR" flashes in a self-clean...
... a function error code appears during the self-cleaning cycle, check the oven door latch. "F-and a number or letter" flash in the display The Gas/Control Lockout feature • Be sure the surface burner controls are difficult to slide The nickel shelves (if so equipped) • Apply a small amount of time. • Move the latch handle to cool for service. See the Gas/Control Lockout section. 56 Consumer Support Troubleshooting Tips Oven too hot. Turn this feature off . "LOCK DOOR" flashes in a self-clean...


