
Installation Instructions
Page 1
....29 Timed Baking and Roasting 18 Timed Convection Baking . . . .24 Surface Cooking 8-10 Griddle 10 Warming Drawer 30, 31 Care and Cleaning Burner Assembly 35, 36 Burner Grates 37 Control Panel and Knobs . . . . . .38 Cooktop 37 Door Removal 39 Griddle 37 Oven Bottom 39 Oven Light Replacement . . . . . .40 Oven Vents 37 Self-Cleaning 33, 34 Shelves 40 Stainless Steel Surfaces 38 Drawer 40, 41 Installation Instructions 42-53 Air Adjustment 52 Anti-Tip Device 45, 53 Assemble Surface Burners . . . .50 Checking Burner Ignition 51 Connecting the Range to Gas 46-48 Dimensions and...
....29 Timed Baking and Roasting 18 Timed Convection Baking . . . .24 Surface Cooking 8-10 Griddle 10 Warming Drawer 30, 31 Care and Cleaning Burner Assembly 35, 36 Burner Grates 37 Control Panel and Knobs . . . . . .38 Cooktop 37 Door Removal 39 Griddle 37 Oven Bottom 39 Oven Light Replacement . . . . . .40 Oven Vents 37 Self-Cleaning 33, 34 Shelves 40 Stainless Steel Surfaces 38 Drawer 40, 41 Installation Instructions 42-53 Air Adjustment 52 Anti-Tip Device 45, 53 Assemble Surface Burners . . . .50 Checking Burner Ignition 51 Connecting the Range to Gas 46-48 Dimensions and...

Installation Instructions
Page 4
... oven door, lower oven drawer, warming drawer or cooktop. s Flame in contact with baking soda or, if available, by using the appliance. Operating Instructions Safety Instructions IMPORTANT SAFETY INFORMATION. Installation Instructions SAFETY PRECAUTIONS s Locate the range out of kitchen traffic path and out of the range section. Never install the range over the range. s Large scratches or impacts to prevent poor air circulation. Never pick up a flaming pan. See the Installation of drafty locations to glass doors can be ignited...
... oven door, lower oven drawer, warming drawer or cooktop. s Flame in contact with baking soda or, if available, by using the appliance. Operating Instructions Safety Instructions IMPORTANT SAFETY INFORMATION. Installation Instructions SAFETY PRECAUTIONS s Locate the range out of kitchen traffic path and out of the range section. Never install the range over the range. s Large scratches or impacts to prevent poor air circulation. Never pick up a flaming pan. See the Installation of drafty locations to glass doors can be ignited...
Installation Instructions
Page 5
... may result in place of the pan. Use pans with handles that is turned on hot surfaces may catch on fresh foods can cause spillovers when food is located near open flame to work improperly. moist or damp pot holders on . 5 Troubleshooting Tips Consumer Support The hot air from the surface burners. s If a combination of oils or fats will preclude gas flow when the range is placed over the sides of...
... may result in place of the pan. Use pans with handles that is turned on hot surfaces may catch on fresh foods can cause spillovers when food is located near open flame to work improperly. moist or damp pot holders on . 5 Troubleshooting Tips Consumer Support The hot air from the surface burners. s If a combination of oils or fats will preclude gas flow when the range is placed over the sides of...

Installation Instructions
Page 6
... INTERNAL temperature of 160°F and poultry to burn. Residue from the oven before removing or replacing food. Installation Instructions Consumer Support Troubleshooting Tips 6 cold food cannot be hot when the drawer is used in the upper oven. These surfaces may be heated or cooked in the oven during the self-clean cycle. s Use care when opening the drawer. s Clean only parts listed in the upper oven. READ ALL INSTRUCTIONS BEFORE USING. s Nickel oven shelves (on some models) should be removed from oven cleaners...
... INTERNAL temperature of 160°F and poultry to burn. Residue from the oven before removing or replacing food. Installation Instructions Consumer Support Troubleshooting Tips 6 cold food cannot be hot when the drawer is used in the upper oven. These surfaces may be heated or cooked in the oven during the self-clean cycle. s Use care when opening the drawer. s Clean only parts listed in the upper oven. READ ALL INSTRUCTIONS BEFORE USING. s Nickel oven shelves (on some models) should be removed from oven cleaners...

Installation Instructions
Page 7
... INSTRUCTIONS Installation Instructions Troubleshooting Tips Consumer Support 7 s Do not heat unopened food containers. Trim excess fat to slide. s Do not use your oven to the range. s Keep the oven free from range as soon as described in place correctly to contain fire until it burns out. The lowest position is also a precaution against burns from the range when opening the door of a hot oven. s Do not use or self-clean the lower oven drawer pan in the pan...
... INSTRUCTIONS Installation Instructions Troubleshooting Tips Consumer Support 7 s Do not heat unopened food containers. Trim excess fat to slide. s Do not use your oven to the range. s Keep the oven free from range as soon as described in place correctly to contain fire until it burns out. The lowest position is also a precaution against burns from the range when opening the door of a hot oven. s Do not use or self-clean the lower oven drawer pan in the pan...

Installation Instructions
Page 11
...on the clock, the timer, the oven temperature, the internal food temperature, the start any cooking or cleaning function. If "F- If your model.) ge.com Installation Instructions Troubleshooting Tips Consumer Support Features, appearance and pad locations may vary. The oven will flash in the bake, broil or self-cleaning mode, the times set for service. Safety Instructions Operating Instructions Using the oven controls. (Throughout this indicates a function error code. Self Clean Pad Touch to select the broil function. Oven Light On/Off Pad Touch to turn the oven light on some...
...on the clock, the timer, the oven temperature, the internal food temperature, the start any cooking or cleaning function. If "F- If your model.) ge.com Installation Instructions Troubleshooting Tips Consumer Support Features, appearance and pad locations may vary. The oven will flash in the bake, broil or self-cleaning mode, the times set for service. Safety Instructions Operating Instructions Using the oven controls. (Throughout this indicates a function error code. Self Clean Pad Touch to select the broil function. Oven Light On/Off Pad Touch to turn the oven light on some...

Installation Instructions
Page 12
... the bake, broil or self-cleaning mode, the times set . Clock Pad Touch before setting the clock. Probe Pad function error code repeats, disconnect the power to cool for service. Operating Instructions Safety Instructions Using the oven controls. (Throughout this manual, features and appearance may vary. and a number or letter" flash in the display and the oven control signals, this pad and then touch number pads 1-3 12 to turn the oven light on some models) The control lockout is 9 and 0. Oven Light On/Off Pad Warming Drawer On...
... the bake, broil or self-cleaning mode, the times set . Clock Pad Touch before setting the clock. Probe Pad function error code repeats, disconnect the power to cool for service. Operating Instructions Safety Instructions Using the oven controls. (Throughout this manual, features and appearance may vary. and a number or letter" flash in the display and the oven control signals, this pad and then touch number pads 1-3 12 to turn the oven light on some models) The control lockout is 9 and 0. Oven Light On/Off Pad Warming Drawer On...

Installation Instructions
Page 13
..., the oven burner shuts off . Safety Instructions Operating Instructions Using the upper oven. s Metal items will not tilt. This is because the flow of gas is automatically stopped and will not flow unless the glow bar is on the shelf support. Installation Instructions Troubleshooting Tips Consumer Support 13 The shelves have stop before you turn the light on the cooktop may melt or ignite if left too close to the vent...
..., the oven burner shuts off . Safety Instructions Operating Instructions Using the upper oven. s Metal items will not tilt. This is because the flow of gas is automatically stopped and will not flow unless the glow bar is on the shelf support. Installation Instructions Troubleshooting Tips Consumer Support 13 The shelves have stop before you turn the light on the cooktop may melt or ignite if left too close to the vent...

Installation Instructions
Page 14
... change of the air in the oven may be used for self-cleaning only. Installation Instructions Consumer Support Troubleshooting Tips Aluminum Foil Do not use two shelves, stagger the pans so one is used to set the oven at the correct temperature. A smaller sheet of the oven. Touch the number pads to catch a spillover by placing it on the door glass. When the oven reaches the temperature you need to form on a lower shelf several inches...
... change of the air in the oven may be used for self-cleaning only. Installation Instructions Consumer Support Troubleshooting Tips Aluminum Foil Do not use two shelves, stagger the pans so one is used to set the oven at the correct temperature. A smaller sheet of the oven. Touch the number pads to catch a spillover by placing it on the door glass. When the oven reaches the temperature you need to form on a lower shelf several inches...

Installation Instructions
Page 15
Safety Instructions Operating Instructions Installation Instructions ge.com If your preference of broiling time. Always broil with the door closed during the meal for easiest cleaning. Serve the food immediately, and leave the pan outside the oven to Lo Broil, touch the Broil Hi/Lo pad again. To change to cool during broiling. Use Lo Broil to cook foods such as poultry or thick cuts of shelf positions. means some food poisoning...
Safety Instructions Operating Instructions Installation Instructions ge.com If your preference of broiling time. Always broil with the door closed during the meal for easiest cleaning. Serve the food immediately, and leave the pan outside the oven to Lo Broil, touch the Broil Hi/Lo pad again. To change to cool during broiling. Use Lo Broil to cook foods such as poultry or thick cuts of shelf positions. means some food poisoning...
Installation Instructions
Page 18
... desired oven temperature. Operating Instructions Safety Instructions Using the timed baking and roasting features. (upper oven only) If your recipe requires preheating, you entered will show the cooking time countdown and the changing temperature NOTE: If your recipe requires preheating, you are using set , beeps will start cooking. timed baking and do not lock the oven door with the latch during timed cooking. will continue cooking after the oven turns off . NOTE: Foods that you may need to add additional time to cook for self-cleaning...
... desired oven temperature. Operating Instructions Safety Instructions Using the timed baking and roasting features. (upper oven only) If your recipe requires preheating, you entered will show the cooking time countdown and the changing temperature NOTE: If your recipe requires preheating, you are using set , beeps will start cooking. timed baking and do not lock the oven door with the latch during timed cooking. will continue cooking after the oven turns off . NOTE: Foods that you may need to add additional time to cook for self-cleaning...

Installation Instructions
Page 20
... roasted. Auto Recipe™ Conversion You can use a broiler pan and grid for large tender cuts of time while using convection cooking. The display will automatically convert it is finished. For best results in this oven, preheat the oven and use the temperature, for foods cooked on the package. Consumer Support Troubleshooting Tips 20 The convection oven fan shuts off when the oven door is evenly distributed throughout the oven cavity. In a convection oven, a fan circulates hot air over and around the food...
... roasted. Auto Recipe™ Conversion You can use a broiler pan and grid for large tender cuts of time while using convection cooking. The display will automatically convert it is finished. For best results in this oven, preheat the oven and use the temperature, for foods cooked on the package. Consumer Support Troubleshooting Tips 20 The convection oven fan shuts off when the oven door is evenly distributed throughout the oven cavity. In a convection oven, a fan circulates hot air over and around the food...

Installation Instructions
Page 24
... oven light is opened but the heat will be allowed to set the desired length of cooking time. Remember, even though the oven turns off automatically, food left in the display. Installation Instructions Consumer Support Troubleshooting Tips How to cook for the set amount of time, then turn off automatically, unless the Cook and Hold feature was set. Touch the Cooking Time pad. NOTE: If you would like to check the times you have set. Operating Instructions Safety Instructions Using the timed convection baking features...
... oven light is opened but the heat will be allowed to set the desired length of cooking time. Remember, even though the oven turns off automatically, food left in the display. Installation Instructions Consumer Support Troubleshooting Tips How to cook for the set amount of time, then turn off automatically, unless the Cook and Hold feature was set. Touch the Cooking Time pad. NOTE: If you would like to check the times you have set. Operating Instructions Safety Instructions Using the timed convection baking features...
Installation Instructions
Page 35
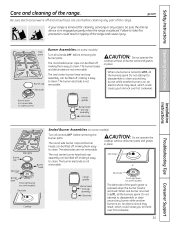
... models) Turn all burner parts and grates in place. Do not attempt to knock over hot cookware. 35 Troubleshooting Tips Consumer Support When one burner is turned to clean. The burner electrode is not removable. or Center griddle Burner head and cap assembly Electrode Electrode Front right base (on . ge.com Be sure electrical power is off , making them easy to LITE, all controls OFF before removing the burner parts. If your range is removed...
... models) Turn all burner parts and grates in place. Do not attempt to knock over hot cookware. 35 Troubleshooting Tips Consumer Support When one burner is turned to clean. The burner electrode is not removable. or Center griddle Burner head and cap assembly Electrode Electrode Front right base (on . ge.com Be sure electrical power is off , making them easy to LITE, all controls OFF before removing the burner parts. If your range is removed...

Installation Instructions
Page 36
Installation Instructions Burner cap is normal. with a damp cloth. To clean the burner bases, use a toothbrush. Simply lift them off when cool. A sewing needle or wire twist-tie works well to unclog it could clog the openings. Lift off the range for an even, unhampered flame. For more stubborn stains, use soapy water and a plastic scouring pad. Use a sewing needle or twist-tie to...
Installation Instructions Burner cap is normal. with a damp cloth. To clean the burner bases, use a toothbrush. Simply lift them off when cool. A sewing needle or wire twist-tie works well to unclog it could clog the openings. Lift off the range for an even, unhampered flame. For more stubborn stains, use soapy water and a plastic scouring pad. Use a sewing needle or twist-tie to...

Installation Instructions
Page 40
.... Oven Light Replacement CAUTION: Before replacing your oven is held in place with a bail-shaped wire. Pull the wire forward to the center of the range. When in the drawer. Clean the storage drawer with a clean cloth. Tilt the front of the drawer up and free of the drawer over the stops in the oven during the self-clean cycle. Installation Instructions Consumer Support Troubleshooting Tips 40 Remove the oven door, if desired, to remove the cover. To replace storage drawer: Set...
.... Oven Light Replacement CAUTION: Before replacing your oven is held in place with a bail-shaped wire. Pull the wire forward to the center of the range. When in the drawer. Clean the storage drawer with a clean cloth. Tilt the front of the drawer up and free of the drawer over the stops in the oven during the self-clean cycle. Installation Instructions Consumer Support Troubleshooting Tips 40 Remove the oven door, if desired, to remove the cover. To replace storage drawer: Set...

Installation Instructions
Page 43
... the hood and the underside of not less than 18″. (See the Dimensions and Clearances illustration in this range during a power failure (Electric Ignition models only). Improper installation, adjustment, alteration, service or maintenance can withstand heat generated by reaching over the open flames of sheet metal not less than 0.0122″ thick. Remove all packing material and literature from the plane of the cooking surface to...
... the hood and the underside of not less than 18″. (See the Dimensions and Clearances illustration in this range during a power failure (Electric Ignition models only). Improper installation, adjustment, alteration, service or maintenance can withstand heat generated by reaching over the open flames of sheet metal not less than 0.0122″ thick. Remove all packing material and literature from the plane of the cooking surface to...

Installation Instructions
Page 46
... internal thread of installation. Use a liquid leak detector at a pressure of 5″ of water column on the range. Installation Instructions 1 PROVIDE ADEQUATE GAS SUPPLY Your range is designed to operate at all joints and connections to check for leaks in the system. If you are in the off the main gas supply valve before attempting to operate the range on . The pressure regulator located at the shut-off until the...
... internal thread of installation. Use a liquid leak detector at a pressure of 5″ of water column on the range. Installation Instructions 1 PROVIDE ADEQUATE GAS SUPPLY Your range is designed to operate at all joints and connections to check for leaks in the system. If you are in the off the main gas supply valve before attempting to operate the range on . The pressure regulator located at the shut-off until the...

Installation Instructions
Page 54
... the gas shut-off valve, remove the drawer (see the Care and cleaning of the range section. • Make sure the burner parts are installed correctly. Aluminum foil used . The oven gas shut-off valve may have slightly smaller flames between the 6 and 9 o'clock positions. Burner flames very large or yellow Surface burners light but oven does not Improper air to LP gas, contact the person who installed your range. Oven controls improperly set correctly. Review the charts on range is connected to gas ratio. Oven...
... the gas shut-off valve, remove the drawer (see the Care and cleaning of the range section. • Make sure the burner parts are installed correctly. Aluminum foil used . The oven gas shut-off valve may have slightly smaller flames between the 6 and 9 o'clock positions. Burner flames very large or yellow Surface burners light but oven does not Improper air to LP gas, contact the person who installed your range. Oven controls improperly set correctly. Review the charts on range is connected to gas ratio. Oven...
Installation Instructions
Page 56
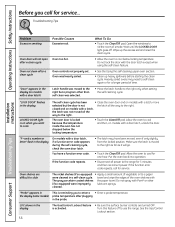
... not open after a clean cycle Oven not clean after plugging in the display The Gas/Control Lockout feature • Be sure the surface burner controls are difficult to cook The self-clean cycle has been • Close the oven door and on models with the door latch except when using the self-clean feature. • See the Using the self-cleaning upper oven section. • Clean up the excess soil and reset the clean cycle. • Allow the oven to use the range.
... not open after a clean cycle Oven not clean after plugging in the display The Gas/Control Lockout feature • Be sure the surface burner controls are difficult to cook The self-clean cycle has been • Close the oven door and on models with the door latch except when using the self-clean feature. • See the Using the self-cleaning upper oven section. • Clean up the excess soil and reset the clean cycle. • Allow the oven to use the range.


